Choosing a location and measuring the area for a wardrobe
Before proceeding with the installation of the structure, the novice craftsman is recommended, firstly, to arm himself with instructions and watch training videos on the topic: how to assemble a wardrobe at home. Secondly, choose the right place for the cabinet and draw a diagram of the future design. The thing is that the furniture is made with perfectly even corners. Floors may have unevenness. Therefore, to avoid distortion of the cabinet, arm yourself with a water level, plumb line or square and choose a suitable place.
Using a tape measure, take measurements and mark them on a piece of paper. Construction flaws in details that are not visually visible will become noticeable on paper (if any). Be sure to measure the distance between the walls at the bottom and top of the cabinet. You should end up with a rough outline.
Where to start assembling a wardrobe
First you need to check whether all the spare parts were delivered to you. There should be several boxes with chipboard (at least two), doors and packaging with hardware. The manufacturer can pack hardware and additional elements in a box with chipboard. Be careful when receiving the cabinet, as delivery workers may sometimes forget some elements or may damage some of its parts, be sure to check this.
What tools will you need to assemble the cabinet:
- Phillips screwdriver PH2;
- hex key, edge width 5 mm (L-shaped);
- roulette (ruler);
- level (optional);
The assembly process will speed up significantly if you have a screwdriver with bits (hex and Phillips), but you can do without it.
Assembling the cabinet: step-by-step instructions
The instructions for assembling a sliding wardrobe will allow even a novice craftsman to perform high-quality installation work. Before you begin, prepare the necessary accessories:
- toucan shelf holders – 12 pcs.,
- adjustable legs – 6 pcs.,
- sliding door system,
- Fi25 pipe for hangers,
- flanges-rods – 4 pcs.,
- mortise handles – 4 pcs.
For fastening the frame, shelves, doors:
- universal screws (3x16 and 3.5x30),
- plastic corners (20 pcs.),
- confirmations (6.4x50 – 100 pcs.),
- confirmation plugs (50 pcs.),
- stoppers and limiters.
To install the wardrobe yourself, you will need the following tools:
- a set of screwdrivers (phillips and straight);
- imbus key,
- cord plumb,
- level,
- pliers,
- hammer,
- screwdriver,
- roulette,
- stationery knife.
Step one: installing the base
The assembly of the wardrobe begins with the installation of the base, namely the base and legs. We take a part called the base and make drawings on it.
We fasten the base using confirmations. Since this area will not be in the field of view, the cabinet stands on legs and not on a plinth, you can use plastic corners. We fasten the legs with 3.5x30 screws.
We also fasten the 4 parts of the base together with confirmations.
Step two: housing assembly
Having assembled the base of the cabinet at home, proceed to installing the body - sides, partitions, roof.
- We secure the side walls with confirmations.
- We fasten the back wall with screws (no need to nail it).
- We install vertical walls and a roof on the confirmations.
- We attach cross ties in each section separately, at different levels. In this way, it will be possible to ensure the necessary rigidity over the entire height of the structure. We will install one continuous unifying tie in the center.
It is very important to install the stiffeners correctly. Otherwise, the cabinet may sway. The role of stiffeners will be performed by transverse ties together with the rear wall of the cabinet.
Step Three: Installing Shelves
As a rule, even for novice craftsmen, assembling shelves does not cause any difficulties. The shelves are located in separate sections. There are several ways to attach them:
- If the shelves are located axially, a corner furniture tie should be installed. It will connect the horizontal plane of the shelf with the vertical intermediate wall. In order not to break the symmetry, install corner ties on each side of the central axis of the mounting wall.
- Fastening the shelves using a “helicopter” – along the central wall of the cabinet. This method falls into the non-standard category. First you need to take one shelf and fix it in the center on the confirmation, turning it 90° along the axis. Attach the next shelf to 2 confirmata. Then return the previous shelf to its original position and reinforce it with tightening furniture corners.
If you want to have removable shelves, you do not need to secure them with confirmations. Install the “shelf supports” and insert the shelves. In this case, there is one big advantage - the absence of plugs for holes on the visible side of the cabinet.
To install shelf holders, make drawings on the inside, clearly defining the height of the shelves (make sure that the angles are even), and use a 4.5 mm drill to make blind holes. The depth of the holes should not exceed 8 mm. It is recommended to use a drilling depth limiter, if there is none - a plastic dowel for 6 or 8, which is installed on the drill. Hammer the shelf holders into the holes.
Step four is the most important
The most important step in installing a wardrobe is installing the doors. The door leaf must be leveled.
The stages of work are as follows:
- Install a door rail into the top opening of the cabinet. It needs to be secured with screws.
- Drill holes for screws in the lower profile.
- Install a stopper on each end of the guide rail. The stoppers will secure the doorway in the closed position.
- Insert the bottom profile inside the cabinet and screw it to the bottom.
- Replace the sliding wardrobe door. Carefully insert the upper door rollers into the upper profile, and the lower wheels into the recess of the lower guide profile.
- Adjust the doors to each side of the cabinet. This should be done when they are in the closed position. Adjust the wheels located on both sides of the door leaf. Adjust the left one along the left side surface of the cabinet, the right one, accordingly, along the right side.
- After making sure that the door panels are aligned correctly, open and close freely, and do not pull, strengthen the lower guide rail with screws.
To finish assembling the cabinet, apply a rubber gasket to each door to reduce the impact of opening and closing them. If you follow all the recommendations on how to assemble a wardrobe, you can easily and quickly complete all installation work without outside help.
In the hallway, living room, and bedroom you need to use comfortable and roomy furniture that does not take up much space. The best option in this case would be, especially since it is quite easy and fast. To assemble such a structure, it is best, after drawing up the drawing, to order elements for it from a specialized factory. They will be made quickly and efficiently, and this will also save time on assembly and on the materials themselves. If you start preparing parts at home, you need to ensure the availability of complex tools and a processing machine, and this is not always possible. Therefore, it is better to take your own measurements at home, draw up a drawing indicating the obtained values, and then contact the factory to order the necessary elements. To draw up a drawing, you can use special programs. An example of a drawing with dimensions is shown in the figure. IMAGE 1.
A DIY sliding wardrobe can become not only a convenient storage space, but also a decoration for the room.
Video: Instructions for assembling a sliding wardrobe with your own hands
In the hallway, living room, and bedroom you need to use comfortable and roomy furniture that does not take up much space. The best option in this case would be, especially since it is quite easy and fast. To assemble such a structure, it is best, after drawing up the drawing, to order elements for it from a specialized factory. They will be made quickly and efficiently, and this will also save time on assembly and on the materials themselves. If you start preparing parts at home, you need to ensure the availability of complex tools and a processing machine, and this is not always possible. Therefore, it is better to take your own measurements at home, draw up a drawing indicating the obtained values, and then contact the factory to order the necessary elements. To draw up a drawing, you can use special programs. An example of a drawing with dimensions is shown in the figure. IMAGE 1.
A DIY sliding wardrobe can become not only a convenient storage space, but also a decoration for the room.
Cabinet fittings
Image 1. Drawing of a sliding wardrobe.
In addition to the main elements of the cabinet in the form of shelves, walls, doors and other things, it is necessary to ensure the presence of fittings of the following type:
- screw plugs;
- screws;
- handles and runners, guides for drawers;
- end hanger;
- strips for doors.
If the cabinet will be made with lighting, then all the electrics must also be prepared in advance, think through where and how it will be installed so as not to interfere with the operation of the cabinet. The cabinet must be assembled from the side walls, bottom and top, resulting in a rectangular box. The easiest way to do this is on a flat horizontal surface, first attaching the side walls to the bottom, and then screwing the top part, i.e., the lid.
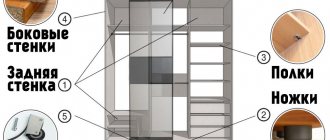
It is in this position that you will be able to avoid distortions, even if all the parts are not adjusted so precisely. After this, the frame is simply turned over and installed in the place where the cabinet itself will be located. If partitions are provided for the structure, then they must be installed before the top cover is mounted, since otherwise it will be extremely difficult to install such elements. A detailed step-by-step assembly option is shown in the figure. IMAGE 2
Return to contents
Installation of shelves and doors
Image 2. Stages of assembling a sliding wardrobe.
By assembling a wardrobe with your own hands in the form of a compartment, you will get a convenient design that contains not only ordinary internal, but also external shelves, often having a rounded shape. They are installed extremely simply, usually for a cabinet with a height of up to three meters, 4-5 shelves on the outside are enough, their internal number depends on the purpose and ease of use. To fasten the shelves, you need to take blanks, special screws, PVA glue and wooden dowels. Using a drill, holes are made in the side walls of the cabinet at the level where the shelves will be located, after which you can begin to fasten them. You need to start from the top shelf and work your way down.
They should be placed so that the front edge is in front, the raw sides can be facing the walls and back. The instructions for assembling sliding wardrobe doors are one of the most difficult, since this is a completely separate mechanism. It is best to order ready-made doors according to the required dimensions, because ease of use and the appearance of the entire structure depend on them. Guides, rollers, and fasteners are purchased for doors. Separately, there is a profile and a mirror for the facade, which also need to be ordered based on preliminary calculations. The following additional elements are used:
- guides (lower and upper) that will be screwed to the bottom and top cover. These are small rails along which the rollers will move;
- lower frame for rollers;
- side frames in the form of an H and C profile, which are used as handles for opening doors;
- top frame for rigidity;
- the middle frame is used if the door consists of 2-3 panels (depending on the size of the cabinet);
- rollers for moving doors;
- Schlegel, i.e. a strip of soft pile that protects the side walls of the cabinet;
- seal for mirror.
The door is assembled only after the main structure of the cabinet is ready and its evenness has been checked. It is recommended to assemble the door on a horizontal surface; you need to start with the facade, i.e., the mirror fastening, and then move on to the rollers and installing the door in the prepared place.
Return to contents
Installing a mirror and sliding door
The mirror for cabinet doors should be chosen on a film basis, the thickness is approximately 4 mm. The mirror itself can be ordinary, matte, or have an unusual pattern. When ordering, you must immediately indicate the required dimensions, since cutting at home is very inconvenient and you can get unpleasant “surprises” in the form of chips. For installation, a silicone-based sealant is used; it must be carefully applied to the edges along the entire length. There should be no folds or bubbles left after application. The mirror is carefully inserted into the frame (it is best to work together), after which it is given exactly the position that is needed. To do this, use a rubber hammer, with which the edges are carefully tapped.
The next step is the installation of the sliding cabinet door; special holes for threading will need to be made on the canvas in advance. The lower profile with rollers is attached first; all the screws must be adjustable so that you can, if necessary, adjust the position and height of the door using the rollers. After this, the top rails are attached; it is not necessary to use adjustable screws. The end frame is hidden using a schlegel, i.e. a soft strip of pile that protects the side walls of the cabinet from damage. This strip must be attached on both sides of each door. The guides on the bottom and top board of the cabinet are attached using self-tapping screws that have press washers. The guides must be placed strictly parallel to each other; after this, you will have to align the door using a building level.
Modern interior designs most often include the use of built-in appliances and furniture (cabinets, beds, tables, etc.). This solution helps to significantly save space even in the smallest apartment or house. Built-in wardrobes of various models, made from natural and artificial materials (plastic with a metal frame, real wood), are very popular in interior design. If you are renovating an apartment/house yourself, then you just need to know how to properly assemble a wardrobe yourself, without involving specialists. After reading the article, you will learn how to assemble a wardrobe with your own hands (video and written step-by-step instructions), the advantages of this type of furniture, as well as some of the features of placing cabinets in a room.
Rules for installing various hardware
People often ask how to assemble a wardrobe and whether it is necessary to glue the wooden dowels? Please note that if you glue them, then when moving or repairing, you will not be able to disassemble the cabinet without damaging the fasteners. The glue does not add rigidity or strength to the structure, but is used only in cases where the connection is made only with dowels without the use of screws or minifixes.
How to drive dowels correctly. They are installed only in holes on the plane and in no case are driven into the end of the chipboard, because the board may crack when connected. It is advisable to insert them by hand or using a rubber hammer. You can also use a metal hammer, but be extremely careful, as it is easy to punch through the panel with a dowel.
Minifix rods are screwed in using a Phillips screwdriver. It is not advisable to tighten them with a screwdriver, since you can easily turn it in the hole and the connection will not be securely fixed. The eccentric discs are inserted after the panels are connected and the rods are inserted into the holes. This will make assembly easier, since if the disk is not centered correctly in advance, the minifix rod will not go into the hole all the way.
I recommend: Wardrobe in the bedroom and more
The furniture screw (confirm) should be tightened with little force, as it may turn in the hole. If this happens, you can use regular matches (3 pieces) to insert and seal the hole.
Advantages of sliding wardrobes
The characteristics of such furniture, which are undoubtedly its advantages, can be depicted in a table:
| Advantage | Description |
| Compact and spacious | In such a closet you will place twice as much clothes without the expense of the enormity of the furniture itself. |
| Possibility of convenient placement of the cabinet in a room of different sizes and shapes | Some models of wardrobes can be transformed to suit the features of the room: the presence of a corridor, recesses in the wall where the wardrobe can be placed. |
| Room zoning | With the help of a wardrobe, you will visually separate different zones in the room, for example, a working area from a relaxation area. |
| Sliding door mechanism | To open the closet, you don't need to remove chairs or move other furniture |
| Convenient assembly and disassembly of the cabinet with your own hands | Assembling a wardrobe with your own hands is quite easy and anyone can do it simply by following the instructions. |
| Beautiful design | Compared to conventional furniture, built-in compartments are distinguished by a variety of shapes and a palette of colors. A huge selection of shades and color combinations, various designs and thematic images will give the room in which the compartment is located a special character and mood. |
Assembling the Maestro wardrobe
A sliding wardrobe is a universal piece of furniture that in just a few years has transformed from a symbol of well-being into an essential item. The Maestro sliding wardrobe became one of the examples of such furniture.
Buying furniture for your home is not an easy process. It should be beautiful and functional. Good quality and affordable price also play a role. The Maestro wardrobe meets these requirements.
Why do you need knowledge and skills on how to assemble a wardrobe yourself?
You can easily assemble a sliding wardrobe with your own hands if you follow the step-by-step instructions. This will not only save you money and time, but you will also learn how to assemble a sliding wardrobe yourself and disassemble it whenever necessary. Also, if you have started remodeling an apartment/house, knowing how to assemble a wardrobe yourself will help you easily and quickly resolve the issue of moving this furniture. You will be able to help your family and friends with the assembly and disassembly of sliding wardrobes, which will help them greatly. Assembling sliding wardrobes with your own hands is indicated in the instructions, and you can see a clear example of this process in the video.
Preparing to assemble the wardrobe
Assembling a wardrobe with your own hands is a labor-intensive process, so immediately find an assistant who will help you hold or supply the spare part. Before you start assembling, you need to open all the packages and sort the boards by size. After this, it will be easier to determine which elements are where.
Each panel has characteristic connection holes, which make it easy to determine its purpose.
There are 3 basic diagrams for connecting chipboards:
- using confirmed screws;
- eccentric couplers (minifixes);
- one of the above methods, but with the addition of wooden dowels (chops).
Each connection has its own characteristic holes on the plane and at the ends of the boards. There are two types of holes for confirmations:
- in one part through in a plane with a diameter of 7 mm;
- in the second part there is a blank with a diameter of 4.5 or 5 mm.
There are also 2 pairs of holes made for eccentric couplers:
- in one part there is a blind part in a plane with a diameter of 5 mm into which the minifix rod is screwed;
- in the second part there is a hole at the end of 8 mm connected to a recess in the plane with a diameter of 15 mm for the clamping cylinder.
Holes for dowels are made blind at the end and in the plane with the same diameter from 8 to 10 mm.
Before assembling the wardrobe, look at the set of hardware; their presence will make it clear what type of connections you have and in what order to assemble the elements.
Before deciding on the details, it is worth remembering that the front side (end) of all boards is glued with an edge, and the back (where the fiberboard is nailed) remains bare. This way you can position the shelves, lintels and sides correctly.
Actually assembling the wardrobe
not that difficult if you follow a certain sequence.
What tools will you need to assemble a sliding wardrobe with your own hands?
To assemble/disassemble a wardrobe with your own hands at any time, you need the following set of tools:
- level: regular or laser (to avoid problems with measurements)
- angle - for the correct placement of parts in relation to each other, strictly perpendicular
- hammers: regular (driving dowels into walls) and rubber (to align cabinet parts “standing” next to each other)
- screwdrivers with a flat and Phillips nose for screwing in self-tapping screws
- tape measure, marker and pencil for markings
- hex wrench (for working with confermates)
- sandpaper for sanding
- iron to glue melamine edges to the open surfaces of the ends of the panels
- electric drill with wide functionality
- To screw in screws, you will need different attachments for a “bit” type drill to save time and not screw in screws with screwdrivers
- 35mm
Wood Drill Bit and Counterbore - special drills for working on metal ( 2-10 mm
) - 1 cm
pobedit drill for making holes in walls - jigsaw (preferably powered by electricity, 600 kW
, for quickly filing coupe parts)
Assembling a wardrobe with your own hands: step-by-step instructions
The optimal option for assembling cabinets of different models is not just one method, since the difference in design requires different approaches to assembling and disassembling built-in furniture. How to assemble a classic type coupe is indicated in the following instructions.
Preparatory stage.
You need to familiarize yourself with all the details of the product (so as not to confuse anything during the assembly process and not have to start all over again), prepare the tools and the place where the assembly and installation will take place. Any furniture is assembled in a horizontal position.
The first stage is to assemble the podium (base and legs).
On the part that is the bottom of the cabinet, we make markings at right angles (confirmations) so as to ensure optimal emphasis over the entire area. We mount the base with dowels and minifixes, then hammer in the support nails. If there is a baseboard, it will need to be trimmed as the podium needs to fit very tightly against the back wall.
The second stage is to install the side parts of the cabinet (if this model has them).
Initially, it is necessary to trim the sides so that they fit smoothly and tightly against the back wall (it is advisable to even sand the back walls of the ends). To place the side parts perfectly vertically, use a level.
If the coupe model does not have side parts and is designed to be placed between walls, then at this stage you need to make a marking under which the shelves will be attached, also using a level. Using a hammer drill, we make holes in the walls (below the level markings), insert fasteners into them and secure the corners. We place shelves on the corners and also secure them. Next, we install the rear racks at the level of the shelves.
The third stage is the installation of drawers and rods.
We install guides on the drawers, retreating from the edge by 10-15 cm, since in most models of sliding wardrobes the drawers are made with inset facades. We attach the response mechanism to the side panels. We install facades. We fix the bar on which clothes will be hung on hangers until the installation of the drawers is completed.
The fourth stage is installing the door.
We take measurements of the cabinet from the inside and mark the levels of fastening of the guides on the floor (podium) and the top panel. Before fixing the floor guide, we also insert a stopper into the holes of the marks to secure the door when closing.
We begin installing the door by fixing the guides - the top one needs to be raised slightly and lowered onto the bottom. We adjust the rollers at the bottom through the end holes. That's it, the door is installed.
The final stage.
Attaching hooks to the outside on the side panels, if this is included in the cabinet design, as well as cleaning the furniture collection area. After this, you can safely place all the necessary clothes in the compartment without fear that something will fall off the furniture or clothing will be damaged - if you followed the instructions, such cases are not expected.
For each wardrobe model, the manufacturer provides an assembly diagram, so if you are not sure that you are performing the assembly steps correctly, check the diagram periodically. In addition, there are many demonstration lessons on how to assemble a wardrobe: videos, audio materials, etc. You can also consult an experienced specialist if you have problems with measurements and the correct choice of placement of the product.
High-quality built-in furniture always fits well into the interior, so before you start collecting, decide on the place in the apartment where it (the furniture) will stand. Take advantage of the knowledge you acquired after reading this article, additional information materials, and the services of specialist consultants and easily assemble or disassemble cabinets of any model with your own hands.
How to assemble a sliding wardrobe can be read in the “Instructions for assembling a sliding wardrobe”, which is included in the package. However, there are some details that require strict adherence. A sliding wardrobe is furniture that performs many functions; now such models have become very widespread.
Sliding wardrobe "Maestro"
Assembling the Maestro sliding wardrobe takes a little time and is not particularly difficult. Installing such a product for an adult man who has a little knowledge of the instrument is a matter of one or two hours. It is recommended to watch the video instructions first.
Parameters in millimeters:
- width 170 cm;
- height 222 cm;
- 60 cm deep.
Maestro cabinet parameters
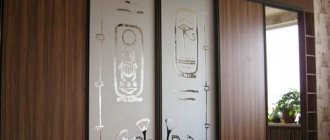
Inside, the shelves are arranged functionally and thoughtfully. There are also mezzanine shelves. Cabinets are produced covered with a pleasant soft color (wenge or ash). The front of the cabinet can be Loreto or oak. White doors create an image of imposingness and sophistication. There are large format mirrors with special bevel processing.
Inside view of the cabinet
Cabinet Features
Assembling the Maestro sliding wardrobe takes a little time and is not particularly difficult. Installing such a product for an adult man who has a little knowledge of the instrument is a matter of one or two hours. It is recommended to watch the video instructions first.
Parameters in millimeters:
- width 170 cm;
- height 222 cm;
- 60 cm deep.
Inside, the shelves are arranged functionally and thoughtfully. There are also mezzanine shelves. Cabinets are produced covered with a pleasant soft color (wenge or ash). The front of the cabinet can be Loreto or oak. White doors create an image of imposingness and sophistication. There are large format mirrors with special bevel processing.
Installation Guide
Before assembling the cabinet, prepare the necessary tools and parts
Before you start assembling the Maestro sliding wardrobe, you should read the step-by-step instructions.
- In the package you should find:
- leading fasteners;
- racks that secure the sidewalls;
- internal bulkheads.
It is necessary to find the main structural elements, so that the assembly algorithm for this product will be approximately clear.
If you mix up the main blocks, you will have to start all the work again, having first disassembled the already assembled elements.
- Assembly of the main block, frame.
When assembling the Maestro sliding wardrobe, first of all, you should mount the unit, which is located at the bottom. The massive slab is screwed to stands that are located along the elongated side. The fastening elements are self-tapping screws (confirmants), which work quite effectively. The hex key is sold with the cabinet and is always included in the packaging.
- Installation of internal partitions. The lower ends of the partitions have holes; chopiks (small cylindrical wooden elements) are inserted and secured into them. Vertical bulkheads are being installed (someone may need to help, the elements weigh a little, but they are bulky).
- Installation of shelves. The installation of shelves is very important, they give rigidity to the entire structure, in this case they perform the same role as the ship’s frames. The shelves can be “mounted” on self-tapping screws, this will be quite reliable.
- Installation of racks on the side, installation of the cover. The final step is to install the racks and the lid on top. These nodes are installed almost simultaneously. First of all, the side elements are mounted; at the bottom they are secured with self-tapping screws. Then the top cover is installed; in this case, you should carefully study the drawing so that all the joints and holes match.
- Centering of the structure. You should take a tape measure, a square and a two-meter level. Diagonals are measured and angles are set. The structure is secured with self-tapping screws.
- Installation of chipboard sheets. The sheets are nailed on the back side of the product. These elements also give the cabinet additional stability and rigidity. The sheets have different treatments and are often coated with a pleasant color scheme. They are nailed using small nails that are included in the package. As a rule, markings on where to nail such nails are present on the panels.
- The most labor-intensive and crucial moment is the installation of rails. At the bottom of the rail there are special recesses along which the wheels move; this process should take place without any effort. The holes in the guides are already there; you just need to secure them correctly using self-tapping screws.
The distance between the edge of the base and the front cream should be no more than 2.45 cm.
As you can see, the assembly diagram of the Maestro cabinet is simple. Care and precision are required; if there is an error during installation, the doors will move with difficulty or will jam.
Self-assembly of furniture helps to significantly save money. It’s good if a person has simple skills in assembling objects. It will be useful for beginners to learn how to assemble a wardrobe themselves. Step-by-step installation steps for each element of the product will allow for quick installation.
Among all types of clothing storage products, the leading place today is occupied by the wardrobe. It is multifunctional, spacious, comes in different shapes and sizes, and does not require additional space to open the doors. That is why most people, when choosing between a wardrobe and a sliding wardrobe, prefer the latter option.
Assembling a sliding wardrobe with your own hands in the video presented is not at all difficult - all you need to do is have the necessary tools in your apartment and be familiar with the design of the product. Often, when ordering a cabinet without the services of assemblers, the company sends a document that contains a drawing of the product. This also lists all the component parts, which are numbered in order. By looking at the drawing and comparing the elements of the cabinet, you can intuitively assemble the product.
To work according to the sliding wardrobe assembly diagram, you will need the following tools:
- building level - to check the levelness of the installation parallel to the floor;
- corner;
- rubber and regular hammer;
- straight and Phillips screwdriver;
- roulette;
- pencil and ruler;
- screwdriver;
- wood drill - to make holes;
- metal drill – for installing an aluminum base.
Additional tools for assembling furniture yourself include a jigsaw, drill and sandpaper. It is also necessary to prepare all the details of the cabinet, which means checking the diagram to ensure that the number of items matches. Pay attention to the fittings and mechanisms: if there are drawers in the closet, ball guides should be included.
Doors for the product are often supplied ready-made. They are pre-installed with rollers and a strip of soft material. The door must be installed in the final phase.
Tools
Assembly steps
To know where to start, it’s worth familiarizing yourself with its stages. Most sliding wardrobes are assembled according to the following algorithm:
- base;
- frame;
- installation of the rear wall;
- installation of shelves and guides;
- installation of compartment doors.
After the completed stages, the implementation of internal additional elements is carried out. These include pull-out baskets, drawers, rods, hanging hooks and pantographs. Let's consider the installation of each cabinet element separately.
Assembly steps
Base
The assembly of sliding wardrobes, the video of which is presented below, begins from the bottom part, which bears the entire load during operation. We find a part that will perform this function and place it in front of us. In order for the process to proceed correctly, we use tools such as screwdrivers or a screwdriver, a hexagon, a pencil and a tape measure for marking. Also check the package for the presence of self-tapping screws and special masking plugs.
The algorithm of actions looks like this:
- on the part for the bottom, the place for installing the base is marked;
- sometimes, instead of base strips, adjustable legs are used, the place for which also needs to be marked;
- drill holes for fasteners;
- we attach the bottom to the slats using confirmata (corners) - for this we use self-tapping screws and a screwdriver;
- We assemble the transverse supports of the plinth, designed for stability.
Some products, such as the Phoenix coupe model, require installation using adjustable legs. This is easy to do: the plastic plugs are cut off with a knife, and the legs themselves are screwed into holes prepared at the bottom with a diameter of 10 mm.
Depending on the size of the assembled wardrobe, the number of legs will be adjusted. So, for large planes more than 6 support elements will be required.
Preliminary marking of the cabinet base
The easiest way to assemble the base is on furniture metal corners
Installing the feet
Finished plinth with legs
Frame
Before disassembling and assembling sliding wardrobes from scratch, it is important to familiarize yourself with the general structure of the existing product. Study the diagram carefully, because assembling the housing must ensure safe operation of the cabinet. The stability of the internal elements will depend on how securely it is installed.
In order for the furniture assembly to be accurate, you should additionally check the floor surface for evenness. Use a building level: if there are differences on the floor, tighten the adjustable legs. Only after this assemble the product box.
To ensure quality installation of the housing, follow these steps:
- It is better to assemble the product while standing, because it is very difficult to install a perfectly fitted cabinet in a lying position. But it is important to remember that for complete assembly it is necessary to leave at least 100 mm for the installation of the roof;
- in the part that is responsible for the bottom, you must first drill several holes and insert anchors. Rack strips will be mounted on the installed fasteners;
- Installation of stand-up panels is carried out by two people: in order not to get confused, you can view the instructions for assembling the sliding wardrobe presented in the video. The left side panel is inserted first, one person holds it while the second person inserts the right side panel;
- at the next stage, the middle stand is installed, if present. After its installation, the roof is installed. If the cabinet is assembled in a standing position, then this part will be properly secured to the corners or confirmations.
It is a little more difficult to assemble a maestro model sliding wardrobe, which has many functions. Its installation is carried out slowly, preferably by several people.
Fastening occurs using euroscrews
Installing the side and interior walls of the cabinet
The base is connected to the body using confirmat corners
Rear wall installation
To assemble the coupe yourself, in particular to attach the back wall of the product, you need to wisely select consumables - fasteners. Often, assemblers use incorrectly selected consumables, which is why, over time, the fiberboard panel comes away from the furniture product. In Soviet times, hardboard was assembled onto the back wall using nails, which is undesirable to do today.
For greater reliability, attach the fiberboard wall to the cabinet using self-tapping screws. This is how the product will not be damaged during operation.
When assembling furniture for yourself, it is important to carry out high-quality assembly of the sliding wardrobe with your own hands: the video presented below clearly shows all the complex nuances. Perform the following manipulations:
- place a hardboard panel behind the cabinet;
- Holding the sheet with your hands, use short self-tapping screws and use a screwdriver or screwdriver to screw them in at a distance of 10-20 cm.
If the cabinet has several back walls at once, they must be secured end-to-end. Use special tightening fasteners, and then screw the screws into the back of the middle bar.
Rear wall mounting