how to make a paper house
Looking for fun projects to keep your kids creative? Then there is an excellent collection for you with step-by-step photos on how to make a paper house for children, which will become an absolute hit! Try making these DIY paper houses with your kids. This is an interesting activity that will put an end to over-indulgence in TV screens and gadget monitors.
An important feature of paper crafts is that the materials needed for making are easily available. Kids can have fun making their own paper houses . This will help them develop their skills and imagination. There are 15 models of paper houses presented here, look at them all, you will probably like some option.
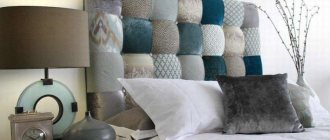
Organize your beads
The yokes will find use for the lid, covering it with burlap or velvet. Shiny jewelry looks great against such a background. And the man will attach the hooks or pins - he is always present with the yoke.
Interesting fact. According to an article in Glamor magazine, the average woman will purchase 469 pairs of shoes in her lifetime.
Required materials and tools
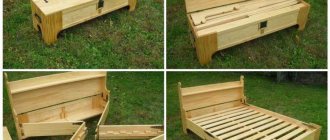
Regardless of what type of furniture is chosen for self-production, the list of materials will remain the same. This necessarily includes the main raw material - cardboard.
To make the products durable, you should give preference to three-layer cardboard. The quality of the material can be checked by cutting.
If you purchased a single-layer analogue in advance, do not be upset. This option works well for making a dollhouse and furniture for dolls. If you use it to work on real furniture, you need to glue several layers of cardboard to give it greater strength.
List of materials and tools for work:
If all the listed materials and devices are prepared, you should proceed to the manufacture of the selected furniture. Experienced cardboard craftsmen recommend that beginners choose simple work to start with, for example, shelves or a table.
Huge pencil holder
An excess of office supplies: pencils, pens, rulers, felt-tip pens, markers will take root in a spacious stand. Everything is in one place and can be easily moved around the house to the right place. Decorate the outer part as you wish, and empty tin jars of olives will go inside. Or beer.
For the environmentalists at home: Replace jars with cardboard toilet paper rolls.
How to make a cardboard house (first method)
The first way you can build a house without using electronic equipment.
Necessary materials
- Cardboard
- Cutting mat or cutting board
- Precision knife
- Scissors
- Ruler
- Markers or paint for decorating houses
Operating procedure
- First you need to think about the design of the house. The basic idea can be transferred to all sorts of project ideas.
- You can use a simple design to make things easier.
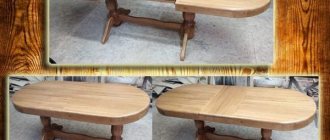
- It is necessary to cut out four sides of the house. Two sidewalls, front and back.
- The front and back parts measured 25 centimeters high and 15 centimeters wide.
- The sides were 12 centimeters high and 20 centimeters wide.
- You will need to use a ruler to cut out the corners for the roof and door.
- The next step is to cut the cardboard. The slots should be half the height of the shortest piece.
- For example, when we cut the side parts, the resulting slots should reach the middle of the cardboard.
- However, the high fronts and backs should only be cut to a length equal to the length of the cuts made on the sides.
- When these parts are put together, they form a building. If you make the cuts too short or too long, they will not be straight.
- It is also possible for the cuts to be at the same distance from the edge of the cardboard.
- This will keep everything consistent so the cardboard house won't be wobbly when it's finished.
- It is best to use a precision knife to cut the slits and use scissors to cut them out.
As always, you need to be careful with sharp objects.
Once all the pieces have been cut out, you can have the kids decorate them however they want!
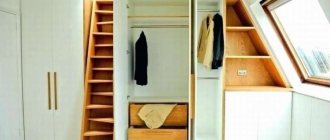
Decorative wall shelves
Do you need a way to increase your wall storage space? How about making your own decorative shelves from shoe boxes! All you need is a few shoe boxes, some spray paint, decorative paper, scissors, glue, a screwdriver and two screws and you have everything you need to make beautiful yet affordable decorative wall shelves.
Of course, small children will tear away this beauty at once. The cat will also certainly try to jump on flimsy cardboard furniture. But in general, the idea is not bad - for a quiet room where few people visit.