In the modern world, real wooden furniture made from solid wood, and not from artificially created materials, is highly valued. However, boards and beams, being a natural, “living” material, crack or deform over time under the influence of such external factors as changes in humidity and air temperature, and the influence of sunlight. And the wider the board, the more pronounced these processes are.
The array is subject to cracking and shrinkage
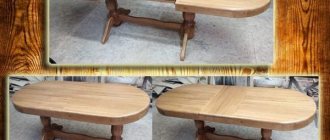
Furniture panels - wide panels glued together from wooden slats - are almost completely free from such shortcomings. They are indispensable in the production of furniture elements such as tables and cabinets, the individual parts of which have impressive dimensions. In particular, they are used to make very high-quality countertops, which, if properly processed and followed operating rules, last for decades without losing their aesthetic and consumer properties. And if necessary, they can be easily restored.
Table made of furniture board
From this article you will learn about what types of furniture panels there are and what parameters are used to choose them in order to make a desk or dining table with your own hands. You will also find examples of their manufacture in it.
Furniture panels
How to attach wood and MDF countertops
Installing a working surface of a table made of materials based on timber or other wood components, such as shavings or cardboard, has the same procedure and principle of operation.
Preparation and fitting
Depending on the wishes of the consumer, the material, thickness and degree of protection against moisture are chosen. For example, chipboard for countertops comes in different thicknesses and designs, both moisture-proof material and simple one. The thickness of wooden and other products also differs. An important element of the working surface of the kitchen table will be the coating, which should not be exposed to moisture. For this purpose, chipboard and MDF products are laminated with special decorative materials, and wooden ones are varnished.
The length of the tabletop is made greater than the size of one or several assembled cabinets by 20–40 mm. But this is only in the case when the working surface of the table does not rest against anything and has free side walls. If the kitchen table is connected to a stove, refrigerator, or is angular, then the size must correspond to the distance to the adjacent attribute and have a gap (2–4 mm) for installing an aluminum strip that will protect the end of the tabletop from moisture and dirt.
Creating a hole for a sink
Installing a countertop involves the need to insert a sink into it, and sometimes a hob. This work will require:
- marking tool;
- drills;
- jigsaw.
Inserting a sink into the work surface of a table is a very important job that requires the following steps:
- First of all, mark the installation location. To do this, turn the sink upside down, place it in the required place and trace the contours with a pencil or marker. Then another contour is drawn, 10–20 mm (depending on the shape of the side of the product), less than the outer size of the sink.
- The inner contour is the boundary along which the cut is made. First, three holes with a diameter of 3–5 mm are drilled in this line to freely place the power tool blade.
- Carefully cut out the marked part using a jigsaw. Before completing this stage of work, it is necessary to fasten the internal cavity to the tabletop in such a way as to avoid possible chips when completing the cut. Or enlist the help of a second person to support the part being cut out.
- The end of the countertop is treated with silicone sealant, the sink is inserted into the prepared place and secured with special clamps. This stage of work is carried out after installing the work surface in the standard place of the kitchen unit.
If the design of the sink does not provide for the placement of a mixer and it needs to be installed separately, then for this purpose use a core drill (crown) for wood of the required diameter.
Tabletop installation
Before installing the work surface of the table, the floor cabinets are leveled using the 2-meter rule with a water level. Adjustment is made using legs, and in their absence - spacers made of wood or plastic. Horizontalness is checked not only along the tabletop, but also across it.
After this, proceed to installing the working surface:
Aluminum plates are attached to the ends, which will join with other elements of the upper part, using screws. Holes are drilled in the top strips of the floor cabinets for connection to the countertop. In the absence of such horizontal surfaces, metal corners are installed in the internal cavity of the cabinets, the horizontal support of which will correspond to the lower plane of the desktop. The tabletop is moved to the required location, leaving a gap of several millimeters from the wall
When moving the product, take precautions, especially be careful with the cut-out area for the sink: heavy weight can cause damage to the entire product. Using self-tapping screws, secure the working surface of the table. The length of the fastening elements is selected less than the size of the parts being connected: a horizontal bar or corner together with a tabletop by 8–12 mm. After this, the sink is installed and fixed.
All that remains is to add a mixer to the workbench and install a siphon with a connection to the sewer.
Blank gluing technology
To minimize warping during drying, we select and lay next to each other boards with an optimally similar arrangement of annual rings. We mark them in any noticeable way, for example, by drawing a figure. Then, this will help you not waste time searching for the required lamella (unjointed workpiece). The ends of the workpieces must be smoothed before gluing.
Further procedure:
- Place the lamellas in a pack, coat the ends with glue (blanks placed in a plastic bag stick together more slowly).
- We tighten the glued wood with large clamps. You can use a clamp (a device assembled from scraps of blanks). The tightening moment is achieved by wedges driven between the stop and the end of the lamella. Or clamp boards between metal shelving brackets. The principle is the same - adhesion along the edges is made using wooden blocks and wedges.
- Thorough drying of the woven fabric. To make the surface even and smooth, plan the shield, sand it and remove excess glue.
Rice. 4. Slat joining
Rice. 5. Connecting wooden elements
It is permissible to use different methods of connecting lamellas. A shield made without glue can provide a powerful interface. To understand this, explore the options illustrated below.
Rice. 6. Furniture panels
Resin kitchen
A new technique for processing and creating tables has conquered the entire Internet. Epoxy resin costs a penny, but finished countertops made from it cost at least 10-20 thousand rubles. To make such an unusual surface for yourself, you just need to follow the steps.
A do-it-yourself epoxy countertop is made in several stages:
- you need to build a sealed frame;
- choose a surface - a log house or a finished tabletop purchased earlier.
The material dries in about a day. It is better to do it in a technical room. Although the resin does not have a strong odor, it is poisonous when hardened, as it emits synthetic fumes.
Tools
Tools you will need :
- jigsaw;
- drill;
- hacksaw;
- chisel;
- screwdriver;
- hammer;
- drill.
If you are planning to make a complex model of a table, also prepare:
- milling machine;
- sander;
- clamps.
As for materials , you need to stock up on:
- lumber;
- bolts, nuts, washers;
- self-tapping screws;
- furniture glue;
- dowels;
- paint and brushes;
- liquid nails;
- varnish;
- tape measure;
- pencil;
- building level.
How to make a wooden tabletop with your own hands
Before we start describing everything in detail, let's break our topic into several stages.
And so we have 4 main points that we will consider. In our article, you will not only learn how to make a wooden tabletop with your own hands, but also gain very useful experience in making wooden products from furniture panels.
Choosing material for making a wooden countertop
Choosing a material for wooden products is quite a difficult task.
The first thing we pay attention to is the tightness of the packaging of the furniture board.
Choosing a Furniture Panel for your Countertop
Furniture panel for wooden tabletops, available in two types
- Spliced furniture panel
- Solid lamella furniture panel
Spliced panels are small lamellas of wood glued together in a checkerboard pattern.
Solid lamella panels are long wooden lamellas glued along their length. Such boards have a more holistic board appearance and are more in demand among consumers.
Type of wood for making countertops
Let's not delve into exotic breeds and talk about those available in Russia. The most common wood species are Oak, Ash and Beech. These are more reliable and durable shields.
Oak countertops have a slight difference from ash wood countertops.
The main difference between oak and ash is texture. The difference is not great and many ordinary users may think that there are no differences at all. But that's not true. Ash has a pronounced, variegated pattern.
Solid oak, solid lamella furniture panel for table tops, solid ash furniture panel
As you can see in the pictures, there is one more difference. Did you guess it? This is the color. Oak has a more yellowish-greenish tint, Ash has a lighter tint.
Beech for making a tabletop with your own hands
Beech has a smoother grain and is used purely as an addition to interior design. What does a beech furniture panel for countertops look like?
The choice is yours. All three types of wood are perfect for making kitchen countertops.
Let's move on to the next stage.
Advantages
In addition to the desire to make furniture on your own, you need to have a special tool and some skills.
If you have everything, then you can start making a table for a schoolchild. The advantages of making furniture items yourself include:
- saving money;
- the ability to make furniture of any design, size and shape;
- independent selection of consumables.
Types of tables
Today we will not talk about complex models - desks with two cabinets or dressing tables, especially bureaus or secretaries. Let's talk about the simplest table, both in terms of design and manufacturing, with ordinary legs.
They differ in:
- number of legs. Most often there are products with four legs, less often - with three. You can also find tables on two supports, usually they look like a flat panel (solid or in the form of a rod structure), and even on one central support;
- tabletop shape. In addition to the traditional rectangle (or square), there are round, oval, triangular, polygonal and curvilinear shapes;
- materials - only wood, wood plus metal, substitutes for natural wood (OSB, chipboard, MDF, plywood, etc.) alone or in combination with metal, plastic, glass, etc.;
- designs - simple or transformable, with folding/pull-out/inserted and so on tabletops, variable height, the ability to turn into a cabinet, cabinet, and so on;
- design. Here, too, you can distinguish between simple tables without any decoration and products with various types of decorations - from carving and engraving to inlay and three-dimensional sculpture. The decor itself can be the shape of the product.
However, leaving aside design and engineering delights, let's consider the components of the simplest table - on four legs with a rectangular, round or oval tabletop.
So there is;
- table top (1) – made of solid wood, furniture board, or composite (from boards, timber, slats);
- tabletop supports, otherwise called drawers (2) - usually this is a beam or board in the form of a rectangular frame that supports the tabletop and distributes the load. May be absent;
- legs (3) – supports in the amount of 1…4 (rarely more) pieces, evenly absorbing the load and ensuring a stable position of the product.
The separately located legs can be positioned strictly vertically or tilted outward.
If there is only one support, it is strictly vertical - otherwise it will not be possible to maintain balance. The lower supporting plane is supplemented either by a cross or by auxiliary “wings” located under the tabletop.
The two supports are usually also vertical and have a link (a longitudinally located beam).
Solid wood products that are quite heavy and not frequently moved may not have such a connection, or it may be located directly under the countertop, hidden.
Table elements can be fastened using:
- so-called carpentry joints, that is, cutouts on parts that, when connected, form a tight and reliable fixation;
- nails or staples;
- threaded elements - bolts, studs, screws (self-tapping screws), screws and so on. Typically, the joints are reinforced with metal corners, strips, overlays and other similar parts;
- glue - often in combination with carpentry joints or threaded elements.
Where to begin
A home craftsman who decides to assemble his own furniture board should take care to have on hand:
- belt and surface grinder (you can use sandpaper screwed onto the block, but this will lengthen the process);
- clamps or homemade devices for tightening boards;
- plywood and thin slats for holding the lamellas together;
- tool for measuring length;
- thicknesser stand with clamp;
- milling machine;
- lumber;
- electric plane;
- circular saw;
- pencil;
- hammer;
- drills;
- glue.
Rice. 1. Blanks for furniture panels
Then you should decide on the dimensions of the future wooden panel. To ensure that the result does not disappoint, follow these recommendations:
- the length and thickness of the workpieces must be greater than the final parameters;
- boards made of only one type of wood are included on a separate sheet;
- You can only use workpieces that are dry and smooth, with a minimum number of knots;
- The ratio of width to thickness for lamellas (unjoined pieces) is taken as 3x1 (the internal tension of the wood with such an aspect ratio is not enough to split the slats).
Rice. 2. Furniture panel
It is necessary to take into account that during drying, wood warps in different directions. It occurs most intensely in the tangential direction (along the tree rings), and is 2 times weaker in the radial direction (along the core lines).
Rice. 3. a) the core is connected to the core; b) the sapwood (the outer layer immediately below the bark) is bonded to the sapwood; c) and d) we use blanks with curling noticeable to the naked eye (random arrangement of wood fibers), we orient them along the lines of annual rings.
Installation features
Despite the apparent simplicity and clarity of installation, the manufacture and installation of countertops have their own nuances. For example, it is rarely possible to carry out this work independently. This is possible if the owner of the house has experience in such work and knows exactly all the intricacies of the process. When an amateur gets down to business and ignores important aspects of the work, the finished result will be far from the desired one.
When you get down to work, you need to choose the right base for the future tabletop. In this regard, it is easier to make your own device from veneer, wood or chipboard. Some build it from stone. You can tile concrete, but only if you have at least basic skills in such work. To put the tabletop in its place and not be afraid that it will break the set, you need to strengthen the furniture. The heaviest countertop will be made of stone. You will have to install it with an assistant. When installing a countertop yourself, you must take into account that the edge of the surface needs to be processed, regardless of the type of material chosen.
When installing a concrete slab, you need to set the level of all cabinets. Only after this can a base made of chipboard or plywood be placed on them. Before installing the formwork, the base must be properly secured. We must not forget about fencing the area under the sink. Replacing a countertop is not limited to removing the old stove
It is also important to remove the sink, baseboard and all joints. The old countertop must be removed carefully so as not to damage the surface of the kitchen unit
The dimensions of the new slab must correspond exactly to the original parameters, otherwise installation difficulties may arise.
The new slab must be installed in the same way as the production one was installed. In addition to the fact that you will have to maintain an identical level, you need to ensure that the tabletop does not stick out against the general background, even taking into account the end elements. If the tabletop is small, it should not stand out against the general background in width. The resulting edges especially need to be sealed if the surface of the product is laminated. Corner joints when working with stone must be additionally closed using aluminum profiles. In this case, the hole for the sink is made at the final stage of manufacturing the countertop.
To learn how to make a kitchen countertop from cement with your own hands, see the following video.
Choosing a table design
Before creating a design, you need to understand which model is needed. It depends on the usage. There are 4 design options:
- Small desk. Suitable if the child spends a lot of time drawing, or practicing reading and writing.
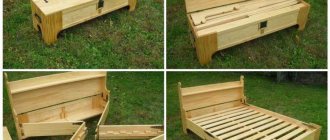
- Folding tables. They are appropriate if there is little space in the room and the table needs to be removed as it interferes with active games. Children usually have lunch at such tables. The table can be removed as soon as the child has eaten, and it will no longer be needed.
- Folding table. The same. Suitable if there is little space in the house, or as a place for lunch.
- Growing table. This design has a tabletop that can be lifted. Ideal if the child is growing quickly. The design is suitable for children of any age and will last until school.
Which tree to choose
The future tabletop must be strong and resistant to possible cracks, scratches, and abrasions during operation. The right type of wood is very important here. Cherry, cherry, walnut, oak or beech wood is suitable for long-term use.
Solid beech is widely used in the furniture industry, as products made from it are characterized by a high level of strength and durability.
The harder the rock, the more difficult it is to process, the stronger the reaction to changes in temperature and humidity, and the higher the cost. Tabletops made of wood are not only practical, but also beautiful. Shades and textures can transform any room, creating warmth and comfort. Regarding the disadvantages of suitable wood species, we can only talk about the high price.
Solid wood is considered to be a material that consists entirely of natural wood.
However, if you consider the number of years they can last, this minus quickly pays off. Pine as a starting material is the least expensive. This is due to the fact that its wood is too soft and short-lived. But if used correctly in a small family where the kitchen is not used 24/7, this option is also suitable.
Furniture made from solid pine has a light amber tint.
A few words about the dimensions of the structure
The table should not only be stable, but also be the right size for the child. After all, if the baby bends over the table or reaches for it, then vision or posture problems may occur. The dimensions are given below:
- A child with a height of 80-90 cm (1-2 years) needs furniture with a height of 35-40 cm.
- A child with a height of 90-100 cm (2-4 years) needs furniture with a height of 40-45 cm.
- A child with a height of 110-120 cm (4-6 years old) needs furniture with a height of 45-50 cm.
If the child sits straight at the table, then the height is chosen correctly. If the baby stands up, puts his leg under him or sits on a pillow, or bends over the table too much, then the size is either small or too large.
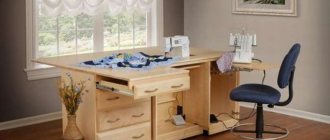
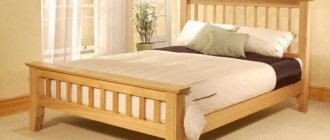
Stylish models in the photo
Recently, countertops made of light wood have become popular. This countertop has a softness to it that gives your kitchen a fresh, elegant and stylish look. Ideal for bright white kitchens, this wood choice has a unique charm. The warm yet minimalist look can make any space feel friendly and cheerful - perfect for a family kitchen!
To make a large kitchen feel even bigger, choose a subtle shade of warm wood to highlight the open space. If your kitchen is very bright, a wooden countertop will make the entire space more harmonious.
A distinctive feature of a wooden tabletop is that it can be easily combined with other materials. If your kitchen has a more contemporary style, light wood countertop models will stand out against metallic silver appliances and bare brick walls.
Related Posts
- Do-it-yourself stone tabletop: step-by-step master class with photos! preparatory work, drawing creation, materials and tools
- What sizes can the countertops have? standards for chipboard and other materials
- How to embed a sink into a kitchen countertop: the correct DIY installation process
- Do-it-yourself vibrating table: design drawing for the production of paving slabs, step-by-step assembly
- Workplace in home bedroom
- DIY table for a circular saw
- Epoxy resin table: types, instructions for making with video (50 photos)
- Bar counters for the kitchen: photos 50 examples
- Schoolchild's workplace: how to organize it for your child
- How to cut metal using a grinder
- Options for making shelves for the garage with your own hands
- Ventilation grilles for window sills
- How to paint wood with stain and varnish it
- How to make a garden swing from wood?
- How to update old tiles in the bathroom
- How to glue fiberglass correctly?
- Disadvantages of polypropylene pipes in home heating
- Children's room interior: 111 photos and 7 ideas
- Children's design (50+ photos)
- DIY garage accessories: all the most useful things
- Homemade Russian stove on the street under a canopy
- Wall cornice: how to hang, photo
- DIY LED phytolamp for seedlings
- How to check grounding
- Making a hand-held or stationary circular saw with your own hands
Read with this
- Do-it-yourself stone tabletop: step-by-step master class with photos! preparatory work, drawing creation, materials and tools
- What sizes can the countertops have? standards for chipboard and other materials
- How to embed a sink into a kitchen countertop: the correct DIY installation process
- Do-it-yourself vibrating table: design drawing for the production of paving slabs, step-by-step assembly
- Workplace in home bedroom
- DIY table for a circular saw
- Epoxy resin table: types, instructions for making with video (50 photos)
- Bar counters for the kitchen: photos 50 examples
- Schoolchild's workplace: how to organize it for your child
- How to cut metal using a grinder
Decoupage
After making and assembling a table with your own hands for a schoolchild, it needs to be decorated . You can do this using:
- coatings with paints and varnishes;
- installing countertops in contrasting shades;
- pasting self-adhesive film;
- decoupage with napkins or wallpaper.
To give your table an attractive look using decoupage you will need:
- sanding machine or coarse sandpaper;
- brushes for varnish and paint;
- PVA glue;
- acrylic lacquer;
- materials for pasting.
The workflow itself consists of the following sequence:
- Degrease the surface to be treated.
- Cover the table with primer .
- If we are decorating an old table, we cover all its surfaces with the selected tone of paint in two layers. We are waiting for it to dry completely.
- Using glue, we attach the selected pictures and ornaments.
- We cover the product with acrylic varnish . This will keep the table looking attractive for a long time.
Expert advice
When deciding on the choice of protective coating, be guided by the recommendations of professionals and your own aesthetic preferences.
For processing use:
- High-quality oils with Osmo and Saicos wax - practice has shown that material treated with this composition does not deform, does not crack, is not inferior in strength to varnish, and retains moisture for up to 30 minutes without penetrating into the pores of the wood.
- Polyurethane varnishes Akzonobel, Hesse Lignal, Sayerlack - when treated with such compositions, traces of wine, juice, and coloring products are removed by wiping with a damp cloth. They are characterized by high moisture resistance, resistance to temperature and mechanical influences.
Factors of wood damage
If the room has high humidity, poor ventilation and a comfortable temperature for the growth of bacteria (depending on the type - from 15 to 65 ° C) and moldy fungi, any wooden surface is at risk.
This is how a kitchen cutting board can turn black.
Do not forget - and this applies mainly to the kitchen - that aggressive solutions (acids and alkalis) change the chemical composition of wood and thereby worsen its appearance and strength characteristics.
Another factor of damage is direct sunlight. But here the situation is ambiguous: on the one hand, ultraviolet light has a pronounced bactericidal effect. But in addition to destroying bacteria, it almost instantly begins to destroy the unprotected surface of the tree. It becomes silver-gray in color and loses strength.
Finally, do not forget about possible (and in the case of a cutting board, inevitable) mechanical damage. They put a hot frying pan on, scratched it with a knife - they ruined the tabletop or board.
It may seem subjective, but we are for butter. Yes, the varnish coating looks beautiful, dries quickly and is inexpensive.
But the varnish coating has disadvantages, which in the case of countertops and especially cutting boards will emphasize the advantages of oil:
- The varnish is not recommended for use in rooms with high humidity.
- The varnish can hardly withstand temperature changes: and this happens often in the kitchen.
- The varnish coating is easily damaged even with slight impact - a scratch on oiled wood is much less noticeable.
- Damaged varnish cannot be restored in a separate area - you will have to completely remove the coating and apply a new one.
Any defects on the varnish become immediately visible.
Care instructions
In order for a wooden tabletop to retain its appearance longer, it is necessary to properly care for it:
- The wood is wiped with mineral oil. It adds shine and prevents the growth of harmful microbes.
- Every day, remove any remaining water and food, first with a damp sponge, then wipe dry. To clean the countertop and wash dishes, use different sponges and rags.
- Hot dishes, iron containers with sharp edges at the bottom, heavy kitchen appliances are placed on stands.
Bottom line
The table is completely ready!
In principle, a computer can be placed on such a table. For many users, it is more convenient if the monitor, keyboard and mouse are at the same level. make such furniture from pine and from beech and birch panels. True, this will slightly increase the cost of the project. You can change the location of shelves and niches, the size and number of drawers at your discretion - this is what makes production at home captivating! We guarantee that in no store in St. Petersburg you will not find such exclusive furniture that fully satisfies your and children’s needs. It was worth the effort, wasn't it?
Ways to protect your kitchen work surface
The working area of the room in which food is prepared is exposed to various liquids, so in order for it to serve for many years, it must be protected from water.
There are several ways to do this:
- Use oil to treat objects made of wood, which is absorbed into the material and prevents the fibers from swelling when wet. The following industrial products can be used for wooden surfaces: OSMO TopOil, Belinka, Adler Legno or many others. To treat the work area together with this substance or even instead of it, use a special wax. But it is necessary to remember that such a product will have to be renewed over time, that is, applied again.
- Treat it several times with a special varnish for wood surfaces. If desired, a little pigment is added to it so that the deep fibers of the wood become darker, and the cooking surface itself acquires expressiveness.
We recommend: Ventilation grilles - the most important information
Oil coating for kitchen units
Oil protects furniture from not only moisture, but also from chemical, natural and household influences. This industrial product is largely colorless and can be plant-based, mineral-based or synthetic.
These coatings differ from each other in the drying method:
- It dries completely, hardens after drying, it cannot be washed off with water and the original appearance of the treated furniture is preserved for quite a long time.
- It does not dry at all or dries only half and saturates the wood quite deeply. It is made using natural ingredients. It is removed using mechanical force.
Before applying such a product, the surface to be treated is thoroughly cleaned of all contaminants and dried. If necessary, old paint or varnish will have to be removed. And if there are defects, they must be leveled with a special putty and then sanded with sandpaper.
The oil is applied using a brush or cloth that does not leave lint, it is applied along the entire length of the fibers. The very first layer should dry for twelve hours, then a new layer is applied. Their total quantity in this composition depends on the method in which the product itself will be applied. If a brush is used, two treatments will be done. And when using a rag, you need to do three or four layers. After the composition is completely absorbed, the entire treated area should be wiped well with a soft and clean cloth.
The presented coating has a number of positive properties:
- Does not change the color of the surface for working with food, emphasizes its “pattern”.
- It leaves the original natural exchange of moisture in the surface and prevents the appearance of fungi, so the original appearance of the treated area does not change for a long time.
- If the outer part of the object for such treatment is exposed to elevated temperatures, then the product does not delaminate and does not flow.
- Furniture oil is environmentally friendly, so contact of food ingredients with a surface containing the described composition will not harm human health.
- Oil hides small scratches, worn areas and stains left by cookware.
- If there is a need to renew contaminated areas, you can remove only part of this coating, and then reapply it to the desired areas.
- The oil is well suited even for aged wood containing pores, as it is deeply absorbed, gives it elasticity and prevents it from drying out.