- October 18, 2018
- Furniture
- Lazko Natalia
Industrially made doll furniture today is, unfortunately, very expensive. Meanwhile, making such toys for your child, if desired, will not be difficult with your own hands from scrap materials. A doll's wardrobe can be made, for example, from ordinary cardboard boxes. There are many simple ways to assemble such toy furniture.
How can I do it?
If you wish, it will be easy to make a cabinet from boxes with your own hands for a doll of absolutely any size, design and design. In any case, making such a toy will not take too much time. For a large doll, of course, you need to make a fairly “oversized” wardrobe; for a small doll, smaller furniture will do. If desired, it will not be difficult to make such a toy of the simplest design with hinged doors. It is also easy to use boxes to glue together a more complex wardrobe, a craft with many shelves and drawers, etc.
At the final stage, such a toy can be decorated, for example, in such a way that it is as similar as possible to adult furniture, that is, it is painted “like wood.” This locker is very suitable for an older girl. A small child, of course, should make a brighter cabinet, decorated with flowers, patterns, cartoon drawings, etc.
The easiest way, of course, would be to make a wardrobe for the doll directly from the box itself. In this case, the main tool when assembling the craft will be ordinary scissors. You can also cut the box into several parts and make a cabinet of a more complex and original design out of cardboard. In this case, of course, you will need more glue.
Pros of DIY cardboard shelves
Of course, you can’t make a solid wardrobe out of cardboard, but in addition to serious, highly loaded furniture, there are also a lot of products that do not require sky-high strength. I’m not going to convince skeptics, but I’ll just try to analyze the obvious advantages of this option:
- Perhaps this will be a discovery for some, but professional designers and especially furniture designers first realize their ideas in cardboard. A 3D computer projection and a sketch on paper do not give a complete idea of the scale and visual effect, but a paper layout puts everything in its place.
- The cost of such a product cannot be compared even with the cheapest furniture material; packaging cardboard can be obtained for free.
- To assemble a high-quality cabinet from any traditional material, you need an expensive tool; here you can get by with a basic stationery set.
- Being a type of paper, cardboard is considered an absolutely environmentally friendly material.
The environmental friendliness of cardboard is beyond doubt.
- As practice has shown, making useful and beautiful products with your own hands is one of the most effective ways to develop imagination and practical design skills in children.
- From a practical point of view, furniture made of multi-layer cardboard is quite capable of supporting any clothes, you can store toys and all sorts of small things in drawers, and fill the shelves with figurines and books.
- Making cardboard furniture yourself can be an excellent hobby, and here you do not need a carpentry workshop, professional equipment and production space; any idea can be easily implemented in an ordinary city apartment.
Box selection
Of course, in order to make a beautiful, strong and durable toy cabinet out of boxes with your own hands for a doll, first of all you need to select a suitable material for it. Corrugated cardboard is best suited for this craft. In this case, the design of the toy will be stable and will not weigh too much. You can make a doll closet from one such box, or from several different sizes.
If desired, you can use, of course, not corrugated cardboard, but ordinary cardboard to make such a doll interior item. This could be, for example, a small shoe box or, say, some kind of gift. Sometimes, when assembling doll furniture, even just matchboxes are used.
Other door design options
A do-it-yourself wardrobe for doll clothes does not necessarily have to be closed with plywood doors. This is furniture for play, in which there should always be at least a little room for imagination. However, these methods are also suitable for real furniture:
- fabric curtain;
- curtain made of thick threads.
Option 1
It is better to make a curtain from two panels, and take the kind of fabric that does not need to be sewn, like tulle, tulle and something else like that. You need:
- 2 flaps;
- thick, hard threads like “iris”;
- 2 cloves;
- hammer.
First you need to decide where the cord will be attached. Best of all – on the outside of the sidewalls:
- Mark the points where to drive the nails.
- Drive in the nails - you can instead screw in the screws that fasten the parts of a mechanical watch.
- Cut 2 rectangles of fabric - it is better if they are wide enough to lay them in beautiful gathers.
- Sew the top edges with thick threads using a basting stitch.
- Make the assemblies.
- Tie the thread on both sides to the nails.
- Cover the carnations with decorative overlays - for example, plywood flowers or elements made of self-adhesive film.
Option 2
You can make a curtain for a doll closet with your own hands, for example, from synthetic twine:
- Cut a long thread for the warp - it should be long enough to be stretched and tied.
- Cut a lot of threads for the curtain itself - each should be twice as long as the curtain itself.
- Tie short threads to the base.
- Attach the base to nails or screws.
- Trim the edge.
- Cover the fastenings with decorative overlays.
Important! Such a curtain can also be striped if you take threads of different colors.
Required tools and materials
Actually, the answer to the question of how to make a doll cabinet out of cardboard with your own hands is simple. In addition, the materials and tools for making such a craft will need the simplest. In addition to the box itself, to assemble the toy cabinet you will need to prepare:
- sharp scissors;
- ruler;
- a simple pencil;
- high quality glue for paper.
To design such a toy at the final stage you can use:
- paints;
- colored paper;
- napkins;
- scraps of fabric or oilcloth, etc.
It is, of course, best to make such a craft on a flat surface - for example, on a table or on the floor.
How to care for such furniture
When the furniture is ready and is already in use by household members, the main question arises: “How to care for such a structure?” After all, standard wet cleaning will definitely not work here; cardboard quickly deteriorates, and in addition, it tends to become covered with mold and mildew. What not to do:
- You cannot leave it in a damp room or in the rain - the furniture is definitely not for balconies and cottages.
- You cannot jump, press, or increase the load.
Cardboard products can be useful and convenient, and add variety to everyday life.
What you can do:
- Cover with strengthening varnish.
- Wipe with a dry cloth and use a vacuum cleaner.
- Use fabric for decoration, the covers from which can be washed.
It is unlikely that such furniture will last long if it is used as standard. However, for a temporary option and decorating a studio, it is ideal.
The simplicity of the material allows you to realize any idea without much complexity and dilute the interior with unusual elements.
The simplest DIY cabinet made from boxes step by step
To assemble such a toy you will need several boxes of different sizes. The largest of them should be placed bottom down on the table and opened. Next, several more smaller ones should be inserted into this box in random order. Thus, inside the cabinet you will get compartments-shelves. Before installing small boxes into large ones, their walls need to be coated with glue. In this case, the doll's wardrobe will be more solid and durable.
There is no need to cut off the lid of a large box when making this craft. It should be cut in the middle so that you get two doors. At the final stage, the resulting cabinet simply needs to be turned over vertically, placing it on its end.
Mobile rack
The procedure for making a rack is quite simple. If there are several identical boxes, the lids are carefully cut off from them.
Using tape and plastic clips, they make a lightweight storage system from the blocks: the boxes are placed on top of each other with their sides and connected into a single whole. This shelving unit is ideal for arranging a utility room or pantry; moreover, it can be expanded, reduced or disassembled without any problems.
How to make a cabinet with legs
If desired, more substantial furniture of this type can be made for a child, but at the same time a fairly simple design. In this case, you will need boxes to assemble a doll cabinet with your own hands:
- narrow long (for example, from shoes);
- three small ones, the total width of which should be equal to the length of the large box.
You need to remove the lid from the shoe box and cut off the short sides. Also, this element should be shortened by a third. The long box itself needs to be placed on the table and two small ones glued inside it so that they touch the walls. The remaining part of the lid should be cut in half. The resulting doors need to be glued back into the box above the two compartments made at the previous stage so that 1/3 of the cabinet remains free.
Next, the finished toy should be placed vertically on the table. Then you need to insert the third small box, bottom down, into the bottom of the cabinet, without using glue. The result is a large drawer.
Guide to Making Cardboard Shelving
Since the work is creative, there are hundreds of models of shelving, shelves and drawers. At the initial stage, you need to decide on the shape and dimensions of the product, and then draw a sketch with approximate dimensions. Only after this can you begin the practical part.
You can take drawings of real furniture as a basis for your sketch and adapt the dimensions to your project.
| Illustrations | Recommendations |
| We are preparing the material . The strength of ordinary cardboard for making furniture is not enough, so you disassemble the boxes, cut the material into large sheets and glue 3 to 5 sheets together. The thickness depends on the size of the future product. | |
| Pattern of blanks. In this model, the elements are joined according to the same principle as wooden products; among professionals this method is called tongue-and-groove. You need to cut the sheet into its component elements and, at the joints, cut tenons to the thickness of the sheet and counter grooves for these tenons. | |
| Center assembly. The first to assemble is the central cage, that is, the base of the shelves and drawers. The connecting elements are lubricated with glue and assembled.
| |
| Box assembly. Next we glue the sides, then the bottom and top sheets. The glue in this volume sets within an hour and a half; if you use a hairdryer, the process can be reduced to half an hour. | |
| Reinforcement . To strengthen the joints of the structure, reinforcement with kraft paper is used. You need to cut the paper into strips 50 - 70 mm wide and bend it in half lengthwise. Next, coat the strips with glue and cover all the cabinet joints. | |
| Pattern for the box. The boxes are made from ordinary cardboard; it is not necessary to glue it in several layers. You need to take a rectangular sheet and draw it as shown in the photo on the left. Make sure that the size clearly fits into the intended niche. | |
Cutting and folding.
| |
| Pens. Stage 1 . Cardboard is also used to make handles. At the first stage, cut the cardboard in straight lines and make a small accordion. For a handle, 5 - 7 layers of accordion are enough. The outermost strips of the accordion are made 2 - 3 times wider than the rest. | |
Stage 2.
| |
| Stage 3 . We cover the handle with tracing paper, paint it and make 2 punctures with an awl. | |
| Stage 4 . Straighten the paper clip and further tighten the handle. | |
Stage 5.
| |
| Ready product . After covering the box with tracing paper and painting the assembled structure, it looks like this. |
There is a simpler design method, although it is only suitable for the simplest parallel-perpendicular shelving. You need to cut the glued sheets into separate elements according to the depth of the shelves, and then simply make counter cuts on these elements and assemble the rack.
Assembly option using counter grooves.
Legs and handles for doors
This technology can be considered a very good answer to the question of how to make a doll cabinet out of a box. However, if desired, such a design can also be improved by attaching additional parts to it.
From one of the short sides of the lid of a long box cut off at the first stage, you can, for example, roll up a tube, glue it and subsequently separate several short sections from it. These elements are subsequently glued to the bottom of the cabinet as legs. Handles for the doors of such a craft will be easy to make from pieces of wire if desired. To do this you need:
- cut two short pieces from the wire;
- make two holes in the doors at the same height;
- insert the wire into the holes so that handles are formed on the front plane and screw it on the back side of the doors.
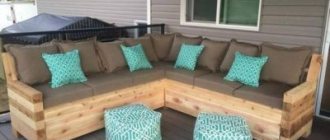
Doll life Layout model Cardboard Toy furniture + MK Paper Cardboard
Hello, residents of the Country of Masters! At your request, I will try to post the MK for creating furniture. As you can see, I embellished it a little by adding pots of flowers and books.
So, let's start with the sofa. We cut out such a base from cardboard from a box. The back here is 9 cm, but I cut it in 1 cm, so you can immediately draw 8 cm. The length of the sofa is 20.5 cm, the depth is 9.5, the handrails are 4 cm.
We glue the corners with tape.
Draw on white cardboard as shown.
And glue the box together. Glue it to the sofa.
We make two boxes from cardboard. Size 10 x 9 cm, box height - 2 cm.
We cut the foam to the size of the sofa, 2 - 2.5 cm high.
We glue padding polystyrene onto the foam.
We cut out the upholstery for the sofa from fabric. Draw a rectangle on the fabric, drawing from foam plastic, adding 4 cm on all sides.
Sew the corners this way. Can be sewn by hand.
We insert our mattress into the upholstery, straighten it in the corners and glue it underneath.
This is what he looks like now.
We cover the back and drawers with colored cardboard. I used a paper bag. I made the front panel of the drawers 5 mm longer to cover the side cuts. I covered the sides of the sofa and the front panel with white cardboard (I also made it longer, covering the cuts on the sides).
I covered all the colored drawer panels and cabinet doors this way.
We sew pillows. Cut out three rectangles measuring 8 x 14 cm, fold in half and stitch, leaving an opening to turn over. Turn it over, fill it with padding polyester and stitch it in a circle. So we sew all three pillows.
The sofa is ready. All that remains is to glue the handles to the drawers. I did this at the very end.
Let's start making the cabinet. I don't have many photos, but I will try to describe in detail. We cut out rectangles from thick cardboard: 22 x 17 cm - back wall, 22 x 4 cm (3 pieces) - side and middle, 17 x 5 cm (2 pieces) - top and bottom of the cabinet, 10 x 7 cm - front part (visible on picture), 10 x 4 cm (3 pieces) - shelves. We glue the cabinet together as in the photo.
We cover all the walls inside the cabinet with white cardboard.
We tape the outside of the cabinet. Cut strips 0.7 cm wide and cover all sections
We paste the shelves in the same way as in the photo. You must adjust all the exact dimensions to your furniture because it is difficult to cut cardboard exactly. A few millimeters make a difference. Remeasure every time. We glue in 2 large shelves, dividing the large hole into 4 parts. I made a mistake in my work, so in the coal it turned out that the shelf lay on the shelf. We glue shelves into the narrow part of the cabinet, comparing them with the neighboring ones.
Wardrobe for a doll
If you wish, you can, of course, make such toy furniture with your own hands. To assemble the wardrobe, you need to prepare a fairly large corrugated box. First, it should be cut into pieces so that you get several sheets of cardboard. They will become the material for assembling the craft.
In this case, you can make such a cabinet from a box with your own hands for a doll, for example, according to the diagram presented below. When assembling such a toy, all elements of its design are made double. That is, two pieces of cardboard are glued together at once. At the same time, the elements are additionally “reinforced” by laying wire at the junction. This material will also be used in the future to fasten individual parts of the craft’s structure.
A photo of a cabinet made from boxes, made with your own hands using this technology, can be seen below the list. Actually, the very method of assembling such a toy looks something like this:
- Shelves are cut out of cardboard (two squares per square) and glued together using wire. The latter is laid between the squares in two places closer to the edges. At the final stage, the free ends of the wire are not cut.
- Cut out parts 2 and 3 and mark the places where the shelves will be located in the future. Make two holes on each mark line.
- Attach 3 shelves to the part by threading the wire into the holes made. Glue is first applied to the ends of the shelves. The wire is tightly twisted on the back side of part 3 and glued with tape. The other side of the shelves is fixed to part 2 using the same technology.
- Cut out two more parts 2 and 3 and glue them to the outer part of the resulting structure. First, a wire is laid above and below between the elements, on which the bottom and lid of the cabinet will subsequently be attached. They also lay wire to secure the back wall.
- Glue together part 4 from two pieces and make a blind hole in this wall at the top. The same hole is pierced in part 2 from the outside. Connect both walls of the cabinet, for example, with a kebab stick 12 cm long.
- Cut out the parts of the lid and bottom of the cabinet. Make holes in the resulting elements for the wire. Thread the wire through the holes and secure it. The ends of parts 2,3 and 4 are pre-coated with glue. Glue two reinforcing plates of the lid and bottom.
- Attach the back wall of the cabinet to the wire. Cut out the second element of this part and glue it to the first.
At the final stage, a do-it-yourself cabinet made from cardboard boxes, assembled using this technology, is glued inside and out with bright colored paper. Sliding doors for the toy are also cut out of cardboard and made double. They are secured inside the cabinet by gluing a kebab stick on top of them in the front plane from below and from above. Door handles are made of wire or brackets.
Step-by-step instructions for creating an origami cabinet
In some ways, paper furniture is even a little more complicated than adult furniture: a shelf made from a sheet of paper is not always made according to the “cut and fix” principle. Especially when it comes to the art of beautifully crumpling paper.
The origami cabinet consists of two elements:
- Shelves, which are made from a square sheet of paper (recommended minimum 7.5 x 7.5 cm);
- Rectangular housings (7.5 x 15 cm).
Important! If you need a larger craft, just increase the original size of the sheets of paper. But maintaining the proportion is mandatory: a rectangle is equal to two squares.
So, the shelf. Its step-by-step production looks like this:
- The opposite corners of the square sheet are brought together one by one and the fold line is pressed with a finger only in the center - you should get a cross pointing to the center of the square.
- The right and left sides of the sheet are folded to this point. Then the workpiece is turned over and the remaining two sides are reduced to the center.
- The workpiece is bent along both diagonals.
- Take one of the corners located in the center and move it to the side so that you get a triangular pocket. Then the action is repeated with the remaining three corners.
- The resulting figure is folded in half, creating a double pocket, and opened.
The shelf is ready, it's time to start making the cabinet itself. The process is also quite simple:
- The rectangle must be divided into 8 parts along the long side. To do this, the sheet is folded in half and only the center is marked. The fold cannot be ironed! Then the right edge is brought to the center. The fold line is ironed and, focusing on it, two more adjacent folds are made. Then the action is repeated on the opposite side.
- The sheet is straightened and folded in half along the long side. Then the workpiece unfolds again and the sides are folded to the resulting fold.
- On the resulting strip on the right, the second vertical is counted and the paper is folded back along it. The action is repeated on the left side.
- The corners of the resulting rectangle are folded to the intersection point of the vertical and horizontal lines. It turns out to be a square with four triangles on the sides.
- The tails bent back are unrolled, returning the workpiece to the appearance of a ribbon. Then, in the central area, it is opened and, using the existing folds, a box is formed into which the shelf is inserted.
The last stage is the double “wrapping” of the long tails inside the cabinet, after which the toy furniture can be considered ready.
More complex hanger
Also, if desired, you can make a more substantial hanger of a modern design for a toy cabinet. To do this, you will need, among other things, a small box that will need to be painted with bright paint. Next, two double narrow strips of hard cardboard should be glued to the resulting box vertically (along the short sides). At the next stage, you need to stretch a thick wire between these posts. Next, pre-made wire hangers should be hung on it. In the future, you can put some doll clothes and shoes in the box of such a hanger.
Features of operation
Despite their apparent external density, cardboard products are flammable pieces of furniture. Cardboard, glue, and paper can easily catch fire even from a small spark.
In addition, high levels of humidity and constant temperature changes will lead to rapid deformation of the structure.
A cardboard cabinet will last the longest in a well-ventilated, dry area. In addition, the available materials and simplicity of design make its parts easily replaceable. If suddenly one of the shelves begins to sag or become loose, you can make a box according to its internal size, decorate it in an original way and simply insert it into the structure.
More photos of the results you can get:
Beautiful cabinet design: decoupage with napkins
The short master classes presented above, describing the process of making a cabinet from boxes with your own hands, allow you to make, of course, a very interesting toy for a child. To make such a craft, among other things, also beautiful, you can use, for example, a fairly simple technique of decoupage with napkins to decorate it. A cabinet decorated in this way will look no worse than a store-bought one.
This design technique looks something like this:
- the cabinet is painted in the background color;
- the top paint layer is separated from the napkins;
- cut out drawings from napkins;
- attach the drawings to the desired places in the cabinet;
- Glue the drawings with PVA glue or special decoupage glue.
As a result, the glue will saturate the design and it will be firmly attached to the walls or doors of the cabinet. At the final stage, the toy can also be varnished for fidelity.
The final stage is decoration
The simplest decor option is painting. For such purposes, it is advisable to buy interior acrylic paint. It is water-based and quickly forms a durable film on the surface.
If no glue was spared when gluing the structure with tracing paper, then after painting the cardboard cabinet will not be distinguishable from a wooden one. Such paints come in glossy and matte, I don’t recommend using gloss; all the flaws are visible on such a surface, but matte paint slightly conceals unevenness.
The best option for painting a cardboard cabinet would be acrylic interior paints.
Initially, all interior paints are white; if necessary, a special color is added and the composition acquires the specified color.
Master class: decorating a product using pages of glossy magazines
In this case, we are not talking about the banal covering of glossy magazine pages on the surface of the cabinet, although this option also has a right to life. The hit of this type of decor are straws.
The idea is that you cut pages of colored magazines into strips and roll them into tubes. When twisted, the product is slightly glued. Then there are 2 options:
- You make tubes of different thicknesses and cut them into small identical columns, after which these columns are vertically glued to the surface to be decorated. If you have imagination, you can lay out a semantic mosaic, but it is much easier to cover the surface chaotically.
A mosaic made of colored paper rings is considered the hit of the season.
- You can roll all the tubes of the same thickness and, without cutting them, cover them with a ladder, or as some call it, a “washboard.”
Covering the surface with colored paper tubes.
If desired, fringe is added along the edge of cardboard furniture; pages of glossy magazines are also used to make it. You simply roll the sheet in several layers and lightly cut it into thin strips.
It is easier to make paper fringe with special scissors.
Master class: surface decoupage
Using the decopage technique, your cardboard cabinet can be turned into a rare item from the “time of Napoleon”, and you won’t need too much effort and materials, the main thing is a creative approach.
- We start from the fact that your cardboard cabinet has already been made, covered with tracing paper or craft paper and coated at least 2 times with interior acrylic paint; the paint must dry completely.
- In addition to what we already have, we still need to buy acrylic varnish and get drawings that will be applied to the cabinet.
- For decoupage, patterns on multi-layer paper napkins are best suited; there are plenty of them on sale.
The ornament is glued to the base using PVA and carefully leveled.
- To implement the technique itself, you need to slightly dilute the PVA glue with water and, in the place where the pattern will be glued, apply the composition to the painted surface of the cabinet.
- Next, take a napkin and divide it into layers, usually the design is printed only on the first layer, which is what we need. The design itself is not cut out with scissors, but is pulled out by hand along the contour; this approach is necessary in order to hide the contours of the ornament.
To make the outline of the ornament invisible, the design should be torn out of the napkin by hand.
- Now carefully apply the napkin to the wet glue and smooth it out with a soft brush.
- When the napkin completely sticks, place a piece of polyethylene or a transparent stationery file on top and use a soft cloth to smooth out the pattern, after which the file is removed.
- The procedure ends with the application of 2 - 3 layers of acrylic varnish. In this case, high-speed drying with a hairdryer is not advisable, since the color of the ornament may change unpredictably.
- If you want to achieve an aging effect, then a special craquelure varnish is applied to the surface, but this composition is not cheap and decide for yourself whether it is worth spending on cardboard furniture.
Craquelure varnish produces a network of fine cracks.
It’s convenient to work with napkins, but the problem is that they usually have flowers or some kind of neutral designs applied to them. If you are doing decoupage for a closet in a nursery, you will have to use clippings from magazines.
To hide the transition border, you need to turn the cut over and sand it along the contour with fine sandpaper, then stick it on PVA and cover it with at least 3 layers of acrylic varnish.
The decoupage technique allows the use of beads and other auxiliary decorative elements in the ornament.
Matchbox chest of drawers
In addition to the closet, you can make such an interior item for a doll from boxes with your own hands. It will not be difficult to make a toy chest of drawers from matchboxes in just a few minutes. To assemble such furniture you will need:
- four matchboxes;
- colored thick paper;
- glue;
- match.
Four boxes for making a chest of drawers will need to be glued in series, placing them one on top of the other. Next, the structure you have learned should be covered around the perimeter with thick colored paper. You also need to cut a rectangle out of this material and secure it to the back of the chest of drawers. The front part of the structure, of course, should be left free. From here the drawers will then slide forward.
At the final stage, you also need to stick a strip of colored paper on the front side of each matchbox of the chest of drawers. If desired, drawer handles can be made, for example, from pieces of matches.
Shoe rack
To make a rack, several identical rectangles of cardboard are prepared, which are thickened with the help of snake strips. The thicker the future shelves are, the more reliable the entire structure will be.
The sides of the shelves are covered with thick paper, and round holes are cut out on four sides of each of them. Through them, using plastic pipes and glue, the entire structure is connected, turning it into a rack.
For decorative purposes, the shelves are pre-painted, varnished, glued with wallpaper, self-adhesive film, or the decoupage technique is applied to them. The pipes should also be painted in the chosen shade so that the product looks elegant and harmonious.
If desired, the shelves can be made curly, however, processing their edges will be quite difficult. Shelves and cabinets made of cardboard are an ideal solution for home and garden. Making them will not take much time or money, and the result will certainly please the most picky owner.
Advantages of origami technique
The main advantage of origami is that working in this technique involves limited use of materials. The absence or minimal use of glue and other improvised means in this technique greatly facilitates the work and also guarantees the cleanliness of the workplace. Fans of origami are also attracted by the simplicity of the forms and method of execution.