Hood installation kit
The purchased built-in hood must be equipped with the following devices (using the example of the Kamilla hood)
- Mounting kit for the hood to the hanging cabinet (4 self-tapping screws).
- Adapter flange with anti-return valve (see photo). The valve blocks the hood duct from air flowing in the opposite direction to the kitchen.
Let me remind you that modern hoods can operate in two modes:
- Recirculation (filtering vapors and returning purified air to the kitchen);
- Air exhaust into the ventilation shaft of the house.
Size specifications
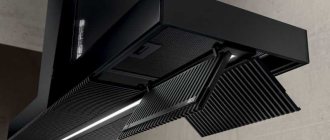
Equipment parameters are selected depending on the kitchen area. The larger it is, the larger the hood is required. This is especially true for the cap. This design element allows you to capture a larger volume of air.
To choose the right hood , you need to take the dimensions of the slab. This is important because the device must be approximately the same width. In this case, optimal operating mode will be ensured. The reference point is 60 cm with a range of hood sizes from 45 to 90 cm.
Small parameters indicate low power of the installation. Large ones, on the contrary, occupy a significant amount of space, which ensures good air purification. The most convenient option is to select a hood if there are no tiles. Then all the dimensions are put together. The main condition is the size of the hood, which should cover the cooking area.
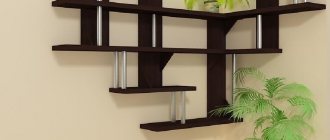
Preparing the wall shelf
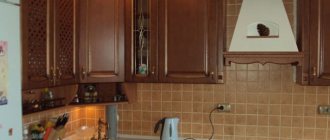
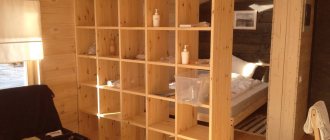
The very name of the type of hood - built-in, by definition, implies its integration into an element of kitchen furniture. Such an element is a small hanging shelf (cabinet) above the stove.
Before installing the hood, all kitchen furniture in the top row must be hung in accordance with all the rules for assembling and installing furniture. This means that it is horizontal.
dimensions of Kamilla hoods for installation
Performance, filters, management
According to sanitary standards for kitchen premises, tenfold air changes are recommended every hour. Therefore, when calculating the performance of the hood, you should focus on the volume of the kitchen, expressed in cubic meters. To do this, you need to multiply the length, width and height of the room, and increase the resulting result ten times.
For example, for a kitchen with an area of three by four meters and a ceiling height of three meters, you will need a hood with a capacity of (3 m X 4 m X 3 m X 10) 360 cubic meters per hour. And this is the minimum value.
Sellers recommend purchasing a kitchen hood with some power reserve. If the performance of the device is lower, it simply will not cope with cleaning the kitchen air from contaminants. How to calculate the power of a kitchen hood is written in detail here.
Grease filters vary in composition as follows:
- organic (based on synthetic winterizer);
- paper (based on non-woven fabric);
- synthetic (acrylic based);
- metal (aluminum or steel).
Paper filters are a disposable option and must be replaced with new ones each time they become dirty. Synthetic analogues can be washed, but this must be done very carefully, as they are easily damaged. They will also have to be replaced from time to time, although not as often as paper ones.
Metal filters are considered the most reliable; they are wear-resistant cassettes. Coal varieties, which are used only in recirculating installations, also cannot be purified. They must be replaced promptly, otherwise the performance of the hood may be significantly reduced.
When choosing a hood, you should pay attention to its type of control. Electronic control usually allows:
- automatically adjust performance levels;
- change operating modes;
- configure the device to turn on and off automatically;
- turning on the built-in lighting when there is movement near the stove;
- light indication of filter status, etc.
Among the useful functions of a hood built into a cabinet, one can note the residual mode: the fans run for some time after the hood is turned off to ensure the most complete removal of contaminants.
The additional ventilation mode allows you to automatically start the hood at low power at certain intervals to maintain optimal air exchange in the kitchen.
Checking the hood
To maintain the warranty, before installing the hood in place, it must be checked on the “table”. You need to check all operating modes of the hood.
I would like to draw your attention to the following points, they are fundamentally important:
— The built-in hood is installed so that only the lower part of the hood (panel) remains visible. The rest of the device body must be hidden in a wall cabinet;
— Whatever exhaust mode you choose, recirculation mode or connection to the ventilation shaft (mode of air exhaust into the ventilation shaft), you must connect the exhaust outlet through the adapter flange to the air duct, and pass the air duct itself through the wall cabinet, all the way through.
Related article: Proper lifting and carrying of loads at home and at work
For the air duct, you can use metallized corrugation or, better yet, buy a ready-made 90 cm PVC outlet.
Device principle
If the horizontal version of the equipment can be installed in any box, then the vertical version must be mounted in a specially prepared niche. An important design element is the cap. Splashes that fly during cooking are caught by this part.
Hoods are either flow-through or recirculating. In the first case, air is removed through ventilation ducts. For this purpose, air ducts are used, which come in round and square sections.
Depending on the material used, there are 2 types of products:
- Plastic. This is a good option, since air passes through smooth walls without resistance and dirt is less easily retained. To form a turn, a knee is required. In these places, the preconditions for turbulence are created, which is a disadvantage of this type of air duct.
- Corrugated. The presence of folds interferes with the passage of air and causes additional noise. The advantage is that there is no need for adapters. The corrugated product bends easily and can be mounted at any angle.
If there are no ventilation ducts, a hole is simply made in the wall.
The air flow is driven by fans built into the system. Recirculation systems are based on the fact that the air flow after cleaning is not removed, but returned back. The main component of such a hood is a filter for trapping fat. It is located in the retractable part. Here the air is cleaned of fatty components, then passes through a series of carbon filters and moves back.
We recommend that you read: How to avoid mistakes in organizing roof ventilation
Installation of a built-in hood
Installation of a built-in hood Scheme
Let me remind you that the installation height of any hood, including an inclined one, above an electric stove should be more than 650 mm, above a gas stove above 750 mm.
To install a built-in hood, the cabinet under the hood must be removed. Work on preparing the cabinet for installation involves cutting out a hole for the air duct and moving the bottom shelf of the cabinet, if there is one. Therefore, for the work you need to prepare the following tool.
Tool for work
- Electric jigsaw;
- Drill with a set of drills;
- Screwdriver Set;
- Roulette;
- Pencil;
- Compass (optional);
- Paper tape.
The kit with the hood usually includes a marking template for installation. The template is made on a sheet of paper with the actual dimensions of the installation.
Next, be careful! If the cabinet has a bottom shelf, it needs to be unscrewed and removed. If the cabinet does not have a bottom shelf (these are special cabinets for built-in), then the sink must be attached to the middle shelf of such a cabinet.
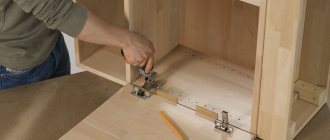
It is important to understand that the shelf to which the hood will be attached must be secured to the cabinet walls with self-tapping screws (video 1) or special furniture screws (video 2).
The marking template must be secured to the bottom shelf of the cabinet using paper tape. The cut lines and holes for attaching the hood must be transferred with a pencil from the template to the shelf.
Next, we cut out a round hole for the air duct and drill 4 holes for attaching the hood.
The hole for the air duct must also be cut in the top shelf of the cabinet.
If there is no bottom shelf in the cabinet, markings and holes for the air duct are made in the middle shelf of the cabinet.
After cutting and drilling, the shelf is ready for installation. The hood must be secured to the shelf. Fastening is carried out with four self-tapping screws, which you will find in the kit. Next, the shelf with the hood already attached is placed in the closet.
Related article: Built-in kitchen hood, how to choose
Important. The relocated bottom shelf or middle shelf to which the hood is attached must be secured to the side walls with self-tapping screws.
At the same time, do not forget to do the following:
- Route the power cable through the cabinet. For the cable, you need to prepare a niche or hole in the shelves (see video 1);
- Attach an adapter flange with a check valve to the hood. If a flexible air duct is used, it is tightened with a clamp. If you are using a rigid duct and it does not fit tightly onto the flange, it needs to be lubricated with sealant or wrapped with plumber's tape.
Installation of built-in hood. Required materials and tools
Correct installation of a kitchen hood
Let's consider the option when you decide that there is no need to make a new box, all that remains is to re-equip the existing wall cabinet. Before you begin installation, you need to decide on the material from which the ventilation duct will be made, and prepare the necessary tools so that everything is at hand.
Types of materials from which the air duct is most often formed.
- Plastic. Rectangular or round shape, different sizes and diameters. The rectangular channel takes up less space and this is its advantage. This type of air duct has smooth walls, due to which the air flow is higher and dirt particles settle less on the smooth surface. The downside is that installation will require additional elbows. The joint should be sealed with sealant.
Plastic air duct for connecting to the hood - Corrugated. Easily takes the desired angle of inclination. No additional elbows are required. To avoid excessive noise, the corrugation must be well stretched. To ensure that air flow does not decrease, the bending angle should not be more than 90 degrees. Excessive bending will result in reduced hood performance. If necessary, make a rectangular one from a round shape; this can be done simply by pressing your fingers.
Corrugated exhaust duct hidden behind the panel
Both types have a number of pros and cons. What to choose, you decide based on the parameters of the equipment, the capacity of the cabinet, and your preferences.
A structure made of flat rectangular pipes can be hidden in a suspended ceiling, almost without taking away the height of the room
The following tool will be useful for this work. For marking and measurements you need a tape measure, a square, a pencil. For cutting holes - a jigsaw, wood saws. A screwdriver, bolts, and screws will also come in handy. To glue joints, purchase adhesive sealant. To enhance the tightness, clamps are used; they need to be prepared.
Tools for installing and connecting the hood
Putting the cabinet in place
After securing the hood and assembling the cabinet, the last thing remains - the assembled cabinet with the hood needs to be hung in place. Plug the hood into a power outlet and test the hood by simply turning it on.
Note. If the hood plug is grounded, then you must use a grounded socket. If possible, and this must be done in advance, for the hood you need to plan a separate power supply group with a 6 Ampere circuit breaker.
Features of operation
During operation, the usual requirements are observed. The device should not overheat and water should not come into contact with it. Pay attention to wires that should not touch the hot surface. In addition, the following maintenance is carried out:
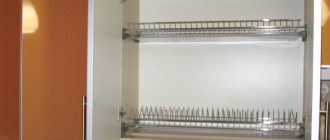
- The grease filter is cleaned regularly. To do this, it is removed and washed using detergent. Then it is put in place.
- A critical element of a recirculation hood is the carbon filter. It needs to be replaced every six months, since during this period it loses its properties.
- Attention is drawn to the retractable panel. The resulting layer of fat is removed so that the element moves without difficulty.
- The touch panel is being wiped. There are always fingerprints on this part of the device. If a thick layer of fat appears, the equipment will be harder to turn on.
- It is necessary to ensure the cleanliness of the front panel even when turning on the button. Fat gets into the cracks and the buttons stick.
We recommend that you read: Ventilation system in an apartment building
How to install a hood in a cabinet with your own hands
The number of kitchen electrical appliances is growing every year. Some save time by taking on part of our responsibilities, others make life more comfortable - they purify the air, remove steam, unpleasant odors, fumes and grease. Such devices include kitchen hoods.
In order for the hood to perform its functions adequately, it must be installed correctly.
This equipment is necessary for those who are tired of constantly ventilating the room, washing kitchen facades and walls from grease settling on them. If you are one of such people, then you cannot do without a hood. Numerous household appliance stores will help you, where you can easily choose a model that is suitable in size, power and price.
These are not all the criteria that you need to rely on when making your choice. Features of use, types, their shape, practicality and performance, as well as external design play an important role.
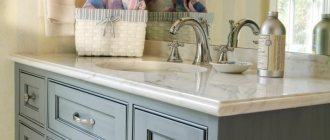
Many devices have a stylish design or are hidden in hanging furniture
Types of hoods and their design features
A variety of devices for the kitchen that filter air
Before purchasing equipment, you should decide on the place where the stove will be located, since the hood is installed above it. The design features of the model depend on the installation location of the slab. Depending on the type of location of the kitchen area, hoods are divided into several types.
- Flat. It is small in size and does not require installation of an air duct. It has built-in filters through which polluted air passes. The disadvantage is that they need to be changed periodically. The service life of the filter directly depends on the intensity of use of the stove and hood.
Flat hood - an inexpensive option with built-in filters that takes up little space - Dome. The equipment of this group is connected to ventilation and has high performance. The more impressive size of the case makes it possible to install larger fans than in flat ones. Therefore, they are used in spacious rooms where there is a need to filter a large air flow from the kitchen. Remove odors from far corners of the room.
A dome or fireplace hood has good aerodynamics, operates almost silently, but is more expensive - Built-in. The most widely used type. The main advantage is that it hides in kitchen furniture or countertops and does not spoil the overall style of the interior. Another plus is that installing a built-in hood in a cabinet is easy to do independently and there is no need to call a paid technician.
A built-in hood is the most optimal solution for small spaces
Which type of hood to use depends on the size of your kitchen. If the kitchen is small, then the power of a flat hood will be quite enough. Built-in models are good in typical Khrushchev buildings. They save space, since the air duct and the frame itself fit neatly into the closet. In the kitchen, where space allows, there is a free-standing island; a fireplace or dome hood would fit perfectly there.
Scheme of operation of kitchen hoods
Built-in hood dimensions
Diagram of a hood with a retractable unit with detailed dimensions
In order to correctly install a built-in hood, measurements are taken of the slab and the existing cabinet into which the equipment will be built. If you do not pay attention to this, it may turn out that the size of the device will exceed the dimensions of the cabinet.
Parameters for installing the hood height
Then you will need to carry out additional manipulations with it - changing the walls of neighboring cabinets or making a new box to fit the size of the hood. Having chosen the right model for a kitchen that fits inside, you can complete the installation yourself, without the help of specialists.
The most common option is a hood built into a 60 cm cabinet
The body of most built-in hoods has a rectangular shape, which greatly facilitates installation. The width of the devices varies. There are compact options, from 45 to 50 cm, which fit into standard kitchen units.
Another important point to consider: the distance from the stove to the hood. It should be such that parts of the appliance are at a safe distance from the heat of the stove. It is not advisable to place it high from the hob; performance will be significantly reduced. Steam with the smell of cooked food is poorly drawn in by the device, and the required efficiency will not be achieved.
In the instructions for the device you will always find recommended centimeters; the average values for all devices are as follows:
- for an electric stove - from 65 cm to 70 cm will be optimal;
- for gas - from 70 cm to 80 cm, since there is an open fire.
Distance from the gas stove and electric stove to the hood.
The size of the stove also matters. The width of the equipment should ideally match or be 1-2 cm wider than the hob. This will ensure that the unit is as efficient as possible and if it is smaller than the slab, some of the air will not be entrained and this will reduce performance.
Recommended distance from the stove to various types of hoods
Installation of built-in hood. Required materials and tools
Correct installation of a kitchen hood
Let's consider the option when you decide that there is no need to make a new box, all that remains is to re-equip the existing wall cabinet. Before you begin installation, you need to decide on the material from which the ventilation duct will be made, and prepare the necessary tools so that everything is at hand.
Types of materials from which the air duct is most often formed.
- Plastic. Rectangular or round shape, different sizes and diameters. The rectangular channel takes up less space and this is its advantage. This type of air duct has smooth walls, due to which the air flow is higher and dirt particles settle less on the smooth surface. The downside is that installation will require additional elbows. The joint should be sealed with sealant.
Plastic air duct for connecting to the hood - Corrugated. Easily takes the desired angle of inclination. No additional elbows are required. To avoid excessive noise, the corrugation must be well stretched. To ensure that air flow does not decrease, the bending angle should not be more than 90 degrees. Excessive bending will result in reduced hood performance. If necessary, make a rectangular one from a round shape; this can be done simply by pressing your fingers.
Corrugated exhaust duct hidden behind the panel
Both types have a number of pros and cons. What to choose, you decide based on the parameters of the equipment, the capacity of the cabinet, and your preferences.
A structure made of flat rectangular pipes can be hidden in a suspended ceiling, almost without taking away the height of the room
The following tool will be useful for this work. For marking and measurements you need a tape measure, a square, a pencil. For cutting holes - a jigsaw, wood saws. A screwdriver, bolts, and screws will also come in handy. To glue joints, purchase adhesive sealant. To enhance the tightness, clamps are used; they need to be prepared.
Tools for installing and connecting the hood
Working with the bottom shelf of the cabinet
Preparing a kitchen cabinet for installation of a built-in hood
When installing a built-in hood in a cabinet, you can go in several ways.
- Order a kitchen cabinet without a bottom. To bring out the air duct, you will need to make appropriate holes for it in the middle shelf and the top.
- Make a cabinet for the hood with your own hands, based on the dimensions.
- Remodel an existing piece of furniture, first remove the bottom or cut a hole according to the existing dimensions.
There is no need to disassemble the cabinet. You need to remove it from the wall and disconnect the doors. It will be more convenient to perform your actions on the floor. “Unstitch” the back wall, unscrew the side fastenings, then the bottom shelf will easily come off on its own.
When you cut out a place for a hood, you need to do it so that the body of the device fits tightly to the front wall, and not vice versa. Mark the place where you will cut with a marker, drill holes in the corners of the mark, and then cut.
Transforming the middle part of the cabinet
You will have to cut holes in the cabinet shelves to allow the air duct to pass through.
Most often, the hood is attached to the middle shelf. Therefore, you also need to make a cutout for the air duct. We mark the cut location with a pencil; if it is round, we drill a hole with a diameter of 10 mm for the saw to enter and cut along the mark.
Then you need to mark the places where the device is attached to the middle part. Attach the shelf to the body of the device, make a notch with a sharp object in the location of the future location of the screws.
Example of mounting a hood to a wall
To secure the shelf to the sides, use plastic corners. First, we attach the four corners to the shelf, adjust its position by placing the box on the floor.
Exiting the power cord above the hood, as well as organizing a hole for a corrugated pipe
We build the hood into the cabinet and install the air duct
Ceiling version of ventilation installation
The penultimate stage of work will be the connection of all parts. The cabinet with the middle part and the hood attached to it is hung in place. We must not forget that the retractable part of the equipment must move freely back and forth. This part contains a filter that catches grease. It starts working when the moving part is located above the stove.
Installing Ductwork on the Top of the Cabinet
The last stage is the installation of the air duct. It is inserted through the top of the cabinet, into a hole cut in advance, and connected to the device. The joints must be coated with glue and secured with clamps. It is also important to maintain the ability to detach parts to clean the system from dirt.
Then the air duct is connected to the ventilation. Special grilles are used for fastening. A hood is an electrical appliance; there should be a grounded socket nearby.
Connecting the air duct to the ventilation duct
The work is not at all difficult if you take into account the points described above. A built-in hood is a good option for those who want to save space and maintain a beautiful interior.
An example of mounting a hood in a cabinet above the hob