Wood furniture has always been valued. But factory options are not available to every family. And if you have the desire and a little construction skills, you can create your own original work.
The easiest way would be to make a cabinet out of wood. However, its design depends on what you will store in it: clothes, wine, books, kitchen utensils. It is also worth considering where the closet will be located.
Create a drawing
Initially, draw a plan for a built-in wardrobe with your own hands. To do this, you need to decide on the design and size of the furniture. They depend on the location and dimensions of the niche.
Features of built-in corner cabinets, examples of filling and placement
Without experience in designing and installing complex furniture, you should not assemble complex shapes, for example, semicircular structures. The decor of the facade should also be laconic. Before making a cabinet diagram, you need to measure the niche. It often happens that it has an irregular shape. Because of this, you should measure the dimensions of the future installation location of the cabinet as follows:
- First of all, the top, middle and bottom of the back wall are measured;
- the dimensions of the front part of the recess are determined in the same way;
- The height of the notch is determined by its front, center and far sides.
Measurements must be made as accurately as possible. Otherwise, a box made without taking into account errors will not fit into the niche or large gaps will appear between them. Next, you can start planning the facades and filling the furniture. Drawings are made by hand (on paper) or in a specialized computer program, then printed. An excellent choice would be the “Basis-Cabinet” designer. With one click of a button, it displays the number and dimensions of the required structural elements.
When the niche is spacious, the dimensions of the structure are chosen according to the law of the golden ratio. According to it, the ratio of height to length is 1.62. When the ceiling is located at a level of 280 cm, the optimal dimensions of the furniture are 173 cm (280: 1.62 = 172.82).
When drawing up a drawing and description of the cabinet, you need to take into account the thickness of the material and edges. In this case, the cuts will close completely. It is worth leaving a margin of 10 cm for the sliding system of sashes.
The standard depth of shelves and drawers is 0.6 m. They should not be designed longer. Otherwise, it will be difficult to remove things that are located far away.
Recommendations for carrying out work
As you can see, assembling a cabinet is a fairly simple process that any householder can do. The main thing here is accuracy when taking dimensions and the presence of several tools usually available at home: a saw, a screwdriver, a sanding machine (it can be replaced with regular sandpaper), a protractor, a level and a tape measure with a pencil.
Table. Accessories and devices that may be needed in the manufacture of the product.
| Name | Image |
| Self-tapping screws | |
| Confirmations | |
| Hooks | |
| Furniture dowels | |
| Corners | |
| Drawer guides | |
| Clothes rail with fastening | |
| Sash guide system | |
| Hinges (if a swing structure is installed) | |
| Decorative plugs for mounting points | |
| Handles for drawers and doors |
In addition to the presented devices, modern types of fittings can also be used: smooth and silent closing systems, devices that allow you to open drawers with a light touch of your hand (in this case, there is no need to install handles on the drawers), etc.
- To make the edges of chipboard, most often used for the production of cabinets, attractive, several types of furniture edges are available: paper (impregnated with melamine), acrylic, PVC, ABS plastic or veneer. The easiest way to apply a melamine edge. All you need for this is an iron. But it also serves less than its analogues.
Furniture edges
- The most important element in sliding wardrobes is the sliding system. You shouldn't skimp on it. Low quality products can quickly become unusable. Today, there are many models on the market that differ in the type of guides. Whatever device is chosen, it is recommended to pay attention to the material from which it is made. It is best to purchase aluminum systems. They are durable and can easily cope with loads.
- You can cut the material yourself, but if you don’t have many furniture making skills, it’s better to entrust this work to professionals.
- When drilling holes, it is important to maintain clear geometry, otherwise visible asymmetry, even masked by plugs, can ruin the appearance of the cabinet.
Original do-it-yourself bookcase
With a responsible approach to the matter, the labor costs and time spent will be translated into a reliable and functional design, which will take into account all the individual wishes of the owner.
Choosing the appropriate type
Taking into account the purpose and the room in which it will be installed, the following types of cabinets are distinguished:
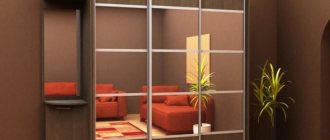
- Coupe. Great for bedroom, living room or hallway. The sliding door system saves space. Designed for storing things. Dimensions are often adjusted to the size of the room.
- Wine. This is a set of interconnected wooden cells mounted on a slope. Bottles are placed in it for long-term storage. Since it should be located in a cool place, it is worth taking moisture-resistant wood (oak) as a basis.
- Book. Open type cabinet. Consists of shelves for books. Placed in the living room, home library, hall.
- Clothes. A classic product designed for storing clothes. The door system is hinged. It is easier than other types to do it yourself. Shelves and a pipe holder for hangers are installed in the wardrobe.
- Angular or triangular. Used in rooms with a small area to save space. Equipped with one door. It can be installed both in the kitchen for dishes and on the balcony for storing various things. Convenient for a small house on a summer cottage.
In addition, there are built-in, kitchen with drawers, display cabinets and others.
Photo: wooden furniture in the interior of a country house
The choice of a specific model is influenced by the area of the room, purpose, and required capacity. The appearance of the cabinet should harmoniously fit into the interior style of the room.
Visitors are also looking for:
- Furniture from scrap materials
- DIY hanging hammock chair
More about doors
Installation of guides
Install the top trim flush with the end of the roof. Fasten one side first, align the strip with the end surface, and then secure the other side with screws. Then install the remaining screws between them. This sequence will prevent the wool from becoming completely deformed.
Attention: the bottom bar is not mounted flush, but with a recess of 15 mm from the end into the body. This dent ensures that the doors will stand strictly vertically, without tilting.
Door installation
Now you can install the doors, for which you will need to decide on the exact model, if available. First install the gate onto the rear tracks by carefully inserting the top into the top rear track, pulling out the bottom spring wheels and wrapping them around the bottom rear tracks. If you have more than two doors, install the second door on the rear tracks in the same way. The outer door was installed last.
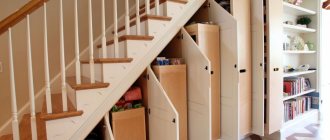
Filling the built-in wardrobe
Before you get to work, think about how your closet will look from the inside - you may need to adjust the overall dimensions. The height of the section with the bar should be such that even dresses or outerwear can fit there. It is convenient to leave wide sections at the bottom for shoes and bedding, and at the top there is an impromptu mezzanine for seasonal items.
Consider whether you need a department for a vacuum cleaner or ironing board, separate sections for hats and accessories, small drawers or large pull-out units. It may be better to leave large sections and separate them with liner organizers.
Painting the wardrobe
If you plan to paint doors and shelves, it is better to do this before final assembly. This way, all the parts will dry, there will be no marks left on the surface, and you won’t inadvertently stain the wall. Be sure to choose washable paints and varnishes - they are much easier to maintain. Don’t forget to varnish the inside of the closet too, so it doesn’t stain your clothes.
Finishing and lighting
The installation of a built-in wardrobe is completed by decorating it. All defects on internal and external surfaces must be eliminated. The heads of self-tapping screws are recessed, otherwise they will spoil things. The grooves from them are covered with wood putty.
Natural wood, plywood or chipboard without laminate, fiberboard is primed and then painted. Its color should be in harmony with the design of the room. Natural material will look good if stain is applied to it and then varnished.
The sashes are tinted before the structure is finally assembled. When they dry, they are inserted into the guides of the sliding system. After this, moldings, friezes and other carved decorations can be stuffed around the perimeter of the canvases. Door facades can also be decorated with a mirror.
If you need to build a cabinet in a dark room or it is very large, it is equipped with lighting. LED spotlights are best suited for this. They are compact, economical, and do not heat up. Their power is enough to find any necessary item in the closet.
Building a wardrobe into a niche yourself is the best option for people who can work with their hands. Before this, you need to decide on the structure and design of the furniture, draw its plan, and cut the materials. If everything is done correctly, assembling the structure will not be difficult.
Prime surfaces
Cover with paint
Install doors
Make a backlight