In recent years, a built-in wardrobe can be found in almost every home due to its spaciousness and ease of use. You can customize such a cabinet to suit your needs and not have to worry about trying to choose several cabinets of the same style and size to store various items.
If there are niches, sliding wardrobes become an even more profitable option due to the fact that they do not eat up space. Despite the fact that such structures are assembled mainly by professionals, there is also the option of self-assembly. Today we’ll talk about how to assemble a built-in wardrobe with your own hands.
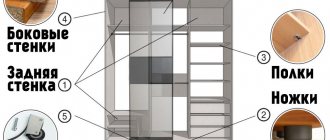
DIY built-in wardrobe
Where to start assembling
The most important thing is to study the instructions. To make it easier to understand the fittings, they should be sorted into separate groups. For small components, an organizer or several plastic containers are suitable. It is better to count all the small parts in advance and check their quantities with those indicated in the manual. Structural elements need to be checked for chips and uniform color.
With a competent approach to assembling the cabinet, it will last at least 10 years.
It is difficult to assemble a wardrobe alone, so it is better to call 1-2 partners.
If everything is in order, there are no missing parts or damage, you can begin assembly.
Instructions for assembling the wardrobe must be included with the purchased piece of furniture.
Where to begin? Development of a future cabinet project
Any work must begin with a project. It is necessary to think through all the stages, but first of all, develop a design that will meet all your requirements.
The closet should be beautiful, comfortable and functional, and it should fit into the overall design concept of the room. You need to decide whether a built-in or free-standing cabinet will be more convenient for you.
The shape of the future cabinet is largely determined by the features of the room. If the room where the cabinet will be located is small in size, then assembling a corner cabinet is more preferable - it will not only be spacious, but also fit perfectly into the interior of the room, rationally uses the space, and also allows you to create the required comfort and coziness.
Consider whether the structure will be open or closed. How many modules will it consist of, how will they be placed relative to each other and in the volume of the room.
Multi-modular cabinets allow more flexible use of room space, however, during assembly they are more labor-intensive; each element must be combined with the others, and when assembling the entire structure, they must fit perfectly together.
Think in advance about the drawers, what doors the cabinet will have, locking devices and other fittings.
The most general advice in designing a future cabinet would be to follow the rule of the “golden ratio”: the ratio of the height and width of the structure should be equal to 1.62 - this value is most optimally perceived by a person.
If it is a wardrobe, it can be adjusted to the height of the room and occupy the entire width of the wall.
Having decided on the type and shape of the future cabinet, you need to think about the materials. In this case, take into account your financial capabilities and preferences.
The most expensive option is to use natural wood. The disadvantage, in addition to the high cost, is the requirement for maintenance and the rather large weight of the finished structure.
A cheaper alternative to natural wood is the use of chipboard and MDF boards. Their main advantages: low maintenance, ease of installation, a wide range of color shades, but for all that, they are less durable.
The completion of the design stage should be a finished drawing: maximally informative, well thought out, containing all linear dimensions, predetermining the relative arrangement of elements, and having a complete list of all fittings.
Remember, how carefully you think through and draw up a drawing will largely determine the final result of the entire work.
Preparing all materials for assembly
You need to prepare in advance the tools that may be needed. Usually the minimum required is: keys, screwdriver or screwdriver, hammer (rubber and regular), pencil, ruler, tape measure. It is also advisable to use a building level to check how level the cabinet is assembled relative to the floor.
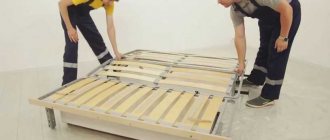
You need to assemble the cabinet on the floor. It is optimal to do this in such a position that lifting a heavy body after assembly requires a minimum of effort and energy.
Advice. Parts should not be immediately removed from their packaging. After inspection, it is better to put them in boxes so as not to accidentally damage them.
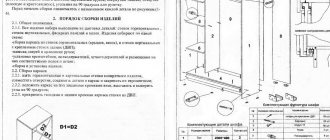
Wardrobe assembly procedure
The first step is to install the base. Usually the stove is attached to stands that are located along the long side. It is mounted using Euro screws - fastenings with a recess in the head for a hex key.
It is important to know that a number of cabinet filling elements will also require preliminary marking and installation of fasteners, since this work will then be complicated.
The next step in the order of assembling the wardrobe is mounting the body. These are load-bearing parts.
Next, the back wall is attached. Shelves, hanging rods, that is, all the internal contents, are installed in the finished housing.
Assembling a sliding wardrobe with your own hands requires the master to have a clear understanding of the functions of all structural parts and fittings. Some shelves can be put back in place only after the furniture has been installed in a vertical position.
Lastly, the doors are mounted to the cabinet.
Advice. If the model has mirrors, it is attached to a fully assembled cabinet.
Before installing the side outer wall, we recommend pre-fixing the corner shelves that will be on the outside.
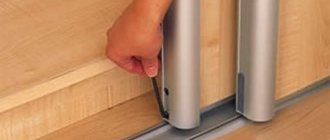
How to apply buffer tape
Buffer tape is glued to protect the interior of the cabinet from dust. In addition, it softens the impact of the door on the sides during their closing. If you no longer need access to the adjustment screws, then it's time to apply buffer tape. This is due to the fact that it covers the holes on the vertical end of the door.
There are 2 types of tape:
- With short pile - up to 6 mm.
- With long pile - up to 12 mm.
Although short-pile tape is more popular, its long-pile counterpart provides more comfortable use of the cabinet. The color of the buffer tape depends on the color of the system attached to the ends of the wardrobe doors. To apply the tape, you need to remove the protective film and glue it to the vertical end of the door.
Purpose of materials and panels
During operation, the main load falls on the base or stand. Therefore, it is important to check the strength of the part and install it on the most flat surface possible.
If the perimeter of the built-in structure will be walls, floor and ceiling, it is important that they are as smooth as possible. A level is useful for measuring the angle of inclination and leveling surfaces before installing shelves, walls and doors.
Body parts are necessary to protect things from the external environment, and they also serve as load-bearing elements to which all shelves are attached.
To correctly measure the locations for drilling holes, you need to fold all the shelves.
The back plate is usually made of thin sheet material; the part does not bear body load.
Important! So that smooth movement mechanisms are installed on the drawers.
It is recommended to immediately screw the base of the telescopic guides.
When assembling the plinth, it is necessary to mark the location for attaching the slats or adjustable legs. Long cabinets will require at least 6 supports. The cross strips are attached to the bottom of the cabinet with corners and self-tapping screws.
As for the through holes for confirmation, which are made from the outside, difficulties may arise with this, since the markings are made inside.
Before installing the housing, it is advisable to check the evenness of the floor with a level. If it is uneven, it is better to choose a model with adjustable legs that can be adjusted in height.
Sometimes it happens that in order to eliminate defects of poor quality assembly, you have to disassemble the wardrobe and then reinstall it.
Important! After assembling the main parts of the structure, it is necessary to level it. First, measure one diagonal with a tape measure, then the other. This method is used to check how even the corners are. By calculating the difference in values, you can determine in which direction the top of the furniture needs to be moved.
The distance between opposite corners should be the same. Otherwise, the cabinet will stand crookedly and the doors will not close tightly.
It is necessary to align the geometry of the cabinet so that there are no problems with installing the doors.
What and how to store
For each type of thing in a closet, it is important to find its place, so before you start arranging its internal space, you need to decide what exactly will be stored in it - the nature of the filling of the “storage” will directly depend on this:
Distribution of things in the closet
- Wrinkle-resistant clothes - multi-format drawers and wide shelves.
- Wrinkly clothes - sections for hangers: for short items - compartments with rods and hooks, located one after another; for long items - compartments with pantographs.
- Outerwear – vertical sections with bars.
- Underwear – roll-out drawers up to 30 cm deep.
- Trousers – fixed and retractable trouser holders in two standard versions: for storing trousers folded in half and completely unfolded.
- Shoes – one- or two-story shelves for low shoes and vertical side mounts for high ones.
- Bags - a horizontal row of hooks or stationary shelves.
- Large accessories - hanging organizers or vertical drawers.
- Decorations – roll-out trays 10-15 cm high with divided cells.
- Bed linen - sections under the mezzanine with a width of 40 cm to 70 cm.
Advice. Don't forget about such an important element of the wardrobe as a mirror. It can be presented in two variations: mirrored doors or retractable mirrors hidden under shelves.
Installation of hardware
Responsible furniture manufacturers prepare all holes for hardware during production.
On the bottom bar, you need to pre-drill several holes and insert anchors on which the rack bars will be attached.
The specific set depends on the model and manufacturer, but for most cabinets you need to have hex keys and a set of screwdrivers, including ones for Eurobolts.
The first step is to install the side planks; if there is a middle post, it is installed after.
The top bar is fastened with corners and self-tapping screws or confirmations.
Advice. It is better to assemble the cabinet in a standing position, since fitting the parts while lying down is problematic. To install the roof, a minimum of 10 cm must be left.
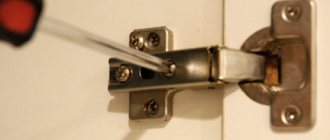
Each hardware has its own technical parameters and requires special fixation technology.
Tool
Naturally, any DIY assembly will require that you have the necessary set of tools at your disposal and the ability to use them. A minimum list of what may be required would be as follows:
- Screwdriver Set;
- Screwdriver;
- Electric drill or hand crank;
- Forstner drill with a diameter of 35 mm;
- Set of drills for wood;
- Jigsaw or hand saw;
- Bench hammer;
- Mallet or rubber mallet;
- Ruler, caliper, tape measure.
In this case, please note that the list of tools presented above is intended for assembly only.
When you have developed a finished cabinet project and determined what wood panels will be needed, what size and shape they are, it is more preferable to order them to be cut in special workshops.
In addition, it is also better to have the side edges glued by specialists: this is a very labor-intensive and complex process, and it is almost impossible to do it yourself without sufficient skills. You can carry out all the assembly work and install the fittings yourself.
Nailing the back wall
If you choose suitable fastenings for a panel made of fiberboard (the back wall is most often made from this material), then over time it will move away from the structure. It is best to screw it on with self-tapping screws.
The elements should fit into the holes prepared by the manufacturer easily, but at the same time not wobble.
The panel is placed behind the cabinet and then screwed, holding the bulk of the wall. Self-tapping screws are inserted in increments of 10-20 cm.
As soon as the actual loads exceed the maximum values, the thin part of the chipboard is destroyed. The holes will have to be redone, which means additional costs and loss of time.
Advice. If there are several back slats, they are first fastened end-to-end with ties.
Installation of additional materials
Usually shelves are fastened with corners and self-tapping screws. Manufacturers pre-drill holes for hardware on these parts. All that remains is to measure and determine the optimal distance between the shelves and screw them to the side and central strips.
During assembly, never tighten fasteners until all parts are in the correct position.
The hanger bar is mounted on the flanges that come with it. If necessary, the pipe can be shortened using a hacksaw.
Work very carefully and hold the elements constantly.
To install drawers, you first need to attach the mechanisms to the rack strips. It is very important to install them parallel to each other at the same height. Then there will be no problems with retractable mechanisms.
The fiberboard boards are fixed with wood screws. Screw them in carefully; the screws should land exactly in the middle of the furniture boards.
Door installation
Before installing the doors, it is necessary to install the guides, strictly observing a straight line. First of all, screw on the upper rails, and then the lower ones.
When installing sliding doors, you should always install the inner one first, and then the outer one.
The upper guides are attached flush with the side edge, and the lower ones with an indentation of 8-15 mm. Holes for mounting are drilled in a staggered pattern on both lines.
Once the doors are adjusted, the stoppers should be adjusted correctly. They are needed to ensure that the doors remain stationary in the closed position.
2 doors
Before installing the doors, you need to check and clear the bottom track of any debris. If foreign particles get into the roller mechanism, the door will jam.
The door that will run on the far rail is installed first. The door is first inserted into the top track, and then the end rollers are placed in the bottom channel.
If there is more than one door, the outer latches are adjusted first, and the rest are centered on them.
3 doors
To install 3 doors on a wardrobe, first install two doors that will run on the rear rail. They are also mounted: first in the upper guide, then in the lower. After installing the doors, stoppers are installed to prevent the doors from colliding.
Please note that a mirror door is expensive and will be unpleasant if it falls out due to improper installation.
Lastly, the door is mounted, which will run on the front rail. A mirror is usually attached to it. It is very important that the doors are installed level, otherwise they may fly out of the grooves, which is not safe to use.