A sliding wardrobe is a practical piece of furniture that has undeniable advantages over its hinged counterparts. It makes it possible to save free space, is easy to use, has many variations in finishing, however, the cost of the products can hardly be called low. This is due to the high cost of sliding mechanisms, a significant amount of time and effort for assembly, as well as further installation. Costs await the owner even if any element breaks down - disassembling furniture is much more difficult than assembling it. How to remove a closet door so that they remain undamaged? It is quite possible to do all the work yourself, especially if in this case you are ashamed to use the services of a master or you want to save a little money. Removing sliding doors from a closet with your own hands is not a problem.
Sliding system design
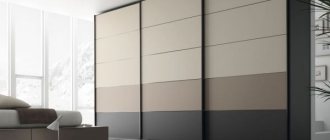
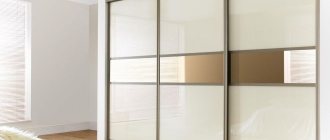
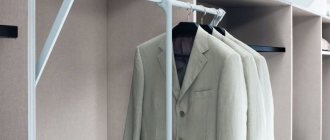
Its main advantage is the absence of a hinged door. In this embodiment, the door leaf moves along the guide, covering the adjacent leaf. Unlike an interior sliding system, the movement of the canvas in a wardrobe is limited by its volume. There can be several doors, but, as a rule, more than four are not installed, otherwise the guides - both upper and lower - will occupy too much of the wardrobe area. The photo shows a wardrobe with mirrored doors.
A more common design is in which movement is carried out along the lower rail, while the upper guide serves to support the blade in a vertical position. This method provides greater reliability, strength and quiet movement. If the weight of the canvas is too large, then another installation option is not allowed.
There are models in which the sash moves along an upper guide. This method is used for small wardrobe sizes and relatively light panel material, for example MDF or chipboard.
How to remove a sliding wardrobe door yourself: instructions from a master
What, for the better, distinguishes sliding wardrobes from their counterparts with hinged doors is their dimensions. It is the sliding system that allows, instead of a short wardrobe, to install a structure that is ceiling-high and 30% larger, due to the fact that there is no need to find space for a swing door.
Learning to remove a closet door
But when the question arises of dismantling such spacious furniture, certain concerns arise.
Cabinet door mechanism
To understand how to remove doors from a wardrobe, you must first become familiar with the principle of their operation. There is a guide part in the upper area. It has a frame fixed on it, along which wheels move along with the door itself. The lower area is arranged in a similar way.
The cabinet doors move in such a way that when one part opens, the other closes and vice versa. It is worth noting that movement is provided only in one plane – horizontal. Therefore, when removing, you need to be very prudent and careful so as not to damage the elements.
How to quickly disassemble and correctly reassemble a cabinet in another place?
Moving always involves transporting furniture. To avoid the inconvenience of moving and transporting cabinets, it is easier to disassemble them and then reassemble them in a new location. This procedure is also necessary when renovating a room. A modern wardrobe is easy to disassemble - the fasteners can be removed quickly. But furniture made during the Soviet era has outdated fittings and will require some skill.
Let's talk about the features of disassembling cabinet and built-in cabinets with your own hands. We will tell you how to pack disassembled furniture parts, as well as how to properly throw away an old wall with the least expense and in accordance with the law.
Advantages
The doors have a complex design just to create maximum comfort for the owner in the house. There are several advantages of using such an interior element:
- Compactness. Due to the fact that the doors do not swing outward, you can open them without taking up space in the room. This advantage is especially important for small spaces.
- Large capacity. In such a closet you can install both shelves and hangers, which can accommodate a lot of things.
- Versatility. This piece of furniture will fit into almost any room interior. Due to the fact that there are many shapes and colors of cabinets, you can choose exactly the one that will harmonize with other furniture.
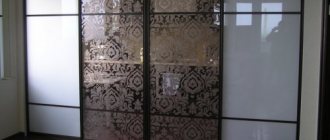
- Mirror doors. In addition to the fact that you can show off in them all day, a mirror also creates additional visual space in the room.
Main design elements
The wardrobe consists of several parts:
- housings;
- storage systems (shelves, rods with hangers, drawers or baskets);
- sliding mechanisms;
- components, fittings.
The outer box of the wardrobe has a regular geometric shape in the form of a square, rectangle, polygon or triangle. It is available with or without legs and is installed on floors. The case must be strong, assembled as rigidly as possible, otherwise it will move, the fasteners will weaken, and deformations will occur . The strongest cabinets are made from natural wood; products made from MDF and chipboard are not so durable.
The doors are equipped with guide rails made of metal profiles. They are screwed to the canvas with screws, screws, bolts. Wheels are attached to the top and bottom of the sashes. Most of the mechanical loads fall on the lower rollers and the frame fixed in the structure box. They most often fail and need repair.
Frame
Storage systems
Sliding mechanism
Components
Equipment
A sliding wardrobe door consists of a door leaf and a movement system.
- The canvas is assembled from profiles and filling. The profiles differ in height, since moving rollers are installed in the bottom rail, and they are much larger in size. The side profiles are very thick due to the fact that they are shaped like a handle. The grooves in them are designed to hold a sheet of material 10 mm thick. If the filling is thin - glass, mirror, a seal is used.
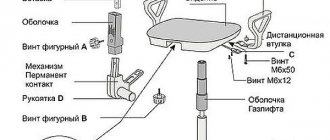
- System mechanisms - the kit includes rollers - upper and lower, self-tapping screws, and adjusting screws, thanks to which the position of the canvas is leveled. In addition, during installation, a closer or stoppers are installed to ensure smooth sliding of the wardrobe door and keep it closed. The photo shows the mechanism of the sliding system.
Instructions for dismantling the wardrobe door
The disassembly sequence is quite simple, but includes some features. As a rule, they are associated with the distinctive features of a particular design. If the instructions have been preserved after installing the wardrobe, then most likely the features of the system or model of this category are indicated there. If not, you will have to find out empirically.
- Closer – used in premium products, it ensures smooth operation and protects the sash from excessively sudden movements. Before dismantling, the closer should be unscrewed. It is recommended to remove it from the canvas, but leave it on the box in order to facilitate the assembly process in a new place.
- Stoppers or locks – ensure a tight fit of the door to the wardrobe wall. Usually, when closing, if stoppers are installed, some force is felt. If elements are present, they should be removed before disassembling. To do this, use a screwdriver to unscrew the bolts securing them. Stoppers are installed near the walls, and, regardless of the number of sashes, there are always two elements.
- In some models, the guides are installed on the frame, that is, when closing, the sash does not rest against the side wall, but is stopped by a side stop. In this case, removing the door is quite simple. To do this, you should dismantle the limiters, and simply roll out the canvas itself from the guide rail, as shown in the video presented.
- The lower rollers can be equipped with plastic latches that block attempts to remove the canvas. In this case, at the moment the sash is lifted, the lower rail rises along with it. In order for the door to come out of the rail, you need to turn the flag on the lower roller 90 degrees. The blockage will be removed, and the blade will easily come out of the grooves.
Related article: Wallpaper for the living room
When dismantling, it is recommended to carry out all actions according to the instructions and remember their sequence. The more thoroughly you disassemble the wardrobe, the easier it will be to reassemble it.
- All detected restrictions should be removed: stoppers, closers and any other fasteners.
- The sash closes, lifts on one side, and using a screwdriver lifts the lower roller and removes it from the groove.
- The canvas in a raised state is removed from the lower rail. If the operation is difficult, you should once again make sure that all restrictions are removed and try again. You should proceed with caution, especially if the filler is a mirror or glass.
- The door lowers down until it clears the top track. It is recommended to unscrew the rollers, both upper and lower, in order to ensure their safety during transportation.
- The sashes are removed one by one.
In the video, the process of dismantling the wardrobe door is presented in more detail.
Reasons for removing doors
The reasons may be different:
- The door mechanism is broken, causing the door to open spontaneously or move freely.
- Replacing the pattern with a new one that matches the wallpaper. It often happens that the owner purchases a cabinet and only during installation discovers that the design of the doors does not match the interior of the room. You need to pay attention to this when purchasing, or look at photos of wardrobe doors with inserts or drawings.
- Broken glass. As already mentioned, wardrobe doors consist of a mirror, so you need to be extremely careful with them.
- Moving the cabinet. The most common reason is a change in the location of the furniture. And this requires complete disassembly into its component parts.
Removal process
To understand how to remove doors from a wardrobe, you first need to inspect the structure from above and below in order to roughly understand what is where and what will have to be unscrewed.
Removing one door is quite simple: you need to grab the wheel from below and gently lift it. They are designed in such a way that if you need to remove the door, they lift up easily. Then, keeping the first wheel raised, you need to do a similar procedure with the second. The door must be pulled towards you by the lower part to move the wheels away from the frame. Then you just need to detach the door from the top mounting.
It is recommended to carry out this work with an assistant, since it is not very convenient to hold the lower part with both hands and remove the door completely. There is also a risk of product damage or personal injury. Also, in no case should you use force during the disassembly process, since the doors are quite fragile and can easily be damaged.
There are also wardrobes with beveled doors. The same principle applies here: you need to lift the bottom part and then remove the top.
Removing hinged doors
How to remove doors from a wardrobe without wheels? This design differs from the usual one only in that instead of wheels, rails are used for movement. This mechanism is somewhat inconvenient to use, since the doors are unstable and often wobble.
The withdrawal process is similar. First you need to unscrew the bolts on the door itself, which secure the structure to the rails. Then you need to lift the door, pull it towards you and disconnect it from the upper part by pulling it down. It is also recommended to have a partner to make the process easier.
How to dismantle from a wardrobe with your own hands?
Any door consists of:
- from canvases (profile and filling);
- fastening mechanisms (upper and lower rollers, screws, closers, clamps, adjusting screws).
The removal process itself looks like this:
- First, the limiters (closers, clamps, fasteners) are removed.
- The sash is installed in its original closed position and lifted up on one side.
- Now, using a pre-prepared screwdriver, you only need to remove the lower roller from the groove.
- The canvas in a raised state is removed from the lower roller.
How does the mechanism work?
Doors are installed in several ways:
- The most reliable door fastening is considered to be when the design mechanism moves along the lower rail, which takes on all the loads. The upper guide here performs a guiding function. Such doors are most often installed on expensive cabinet models; they are easy to use.
- Mounted ones are more affordable at their price. In terms of quality, they are significantly inferior to the first ones. This type of installation is only used for small furniture pieces as they are only attached using the top rail.
Required Tools
When assembling or dismantling any furniture items, you must prepare all the tools in advance. This makes the job much easier. To remove the doors, just arm yourself with a screwdriver (its type depends on the method of fastening the door). It is advisable to invite a friend to help you: when removing large doors you will need outside help. You need to prepare a container for self-tapping screws and other small parts.
How to remove rollers?
Since the rollers on the door leaves are equipped with plastic latches, they block attempts to remove the door leaf. Therefore, before dismantling the canvas, it is necessary to remove the rollers. If they are equipped with locks, then in order for the door to come off the rails, the flag on the lower roller is rotated 90 degrees.
Mounted and sliding
Hinged doors are installed in small models. This fastening is only suitable for door leaves with low weight. And under heavy loads, the hinged structure will not work correctly and will quickly fail.
Useful tips and nuances
Worth considering:
- If the doors have a mechanism designed to close them smoothly, then it is advisable to remove it to facilitate the removal procedure.
- Locks that ensure the door is tightly connected to the wall when closing should also be removed.
- To insert the door back, you must first align the upper wheels with the upper frame, and then, pressing them down, insert the lower ones. Only in this sequence can assembly be carried out correctly.
- Some types of cabinets may have locking wheels that prevent them from being detached from the frame. In this case, you should find the flag that is responsible for the lock and turn it 90 degrees to remove the wheel.
- How to remove doors from a wardrobe if there is a frame consisting of frames? In this case, the side doors limit the door. They just need to be unscrewed from the wall and removed. Now the door rolls out the side and is completely removed from the cabinet.
- If you need to completely disassemble the cabinet and move it to another place, you first need to remove the doors, then unscrew those elements that may interfere with disassembly (closers, locks, sashes, etc.). Now you need to disassemble the frame itself. When assembling, you should perform the steps in the reverse order: assemble the base, install additional elements and insert the doors. Only after all these procedures can you install shelves and other elements that are not related to the main structure of the cabinet.
How to properly throw out a closet?
If the furniture is so decrepit that you decide to throw away the cabinet, then there are two options:
- Take out the entire wardrobe.
- Disassemble the cabinet for disposal.
Take out the entire wardrobe
You can move the cabinet without disassembling it by renting two lifting belts and inviting an assistant. That's what movers do. Carrying bulky furniture using belts is not particularly difficult. The technology can be mastered in a short time. If your home has a freight elevator, this will make the task much easier.
You can’t just put old furniture near the entrance or trash can. There is a specially designated place for bulky waste in each locality. Usually this is a solid waste landfill or simply a landfill. Residents of private houses were luckier. Burning waste in your own fenced area is not prohibited.
Disassemble the cabinet for disposal
In this case, arm yourself with a pry bar and a hammer. You can tear the doors out of their hinges by pressing them away from the body with a mounting spatula. Insert a pry bar into the cracks and separate the panels. Using a hammer and spatula, remove the filling elements. Collect everything disassembled into bags and take it to the garbage container site. Make sure this is not prohibited by your building code. Otherwise, use a waste removal service.
The management company is responsible for the removal of large-sized rubbish.
Major breakdowns of the sliding system
Regardless of the structure and design, any sliding wardrobe consists of two main elements: the frame and the mechanical part.
The sliding system is responsible for the smooth movement of the sashes and their adherence to the vertical planes of the structure. If the cabinet doors open with force, and when closed there are gaps between the doors and the frame, this may indicate a failure of some component of the sliding device.
The main system failures are associated with:
- contamination of the guide groove;
- poor fixation of the track on the frame;
- incorrect location of the locking mechanism;
- failure of the lower or upper roller.
If the guide track is dirty, the cabinet door will move with great difficulty and jerking. The problem is solved by removing dust and debris from the groove with a sharp object and a vacuum cleaner.
During operation of the cabinet, gaps may appear between the doors and the body. This may indicate either problems with the frame or a broken fastener.
If a gap has appeared between the sash and the middle part of the body, this indicates that the cabinet is overloaded (experts call this a “barrel”).
In other cases, the culprit is usually a stopper that has fallen out of the bottom track groove. It just needs to be installed in the groove in its regular place and (if possible) secured with a fastener or polymer glue.
If the guide has “moved away” from the body, then you should dismantle the door and re-fix the track on the frame, screwing it with self-tapping screws through new holes drilled in the guide. Place the sash in its original place.
Options for breakdowns and solutions
If the door is out of order, do not rush to contact highly paid craftsmen. In a large number of cases, you can identify the cause of the breakdown and eliminate it yourself.
Most often, wardrobe repairs at home are required because this piece of furniture:
- frame elements break;
- mechanical components fail: guides, rollers are broken, hinges are torn from the facade or side wall. Very often it is necessary to repair a sliding wardrobe by replacing rollers;
- glass or mirror is damaged. In the manufacture of premium sliding wardrobes, mirrored facades are often used. It is quite possible to damage them if used carelessly.
Frame elements
If one of the elements of its frame breaks during use, for example, a scratch appears on a shelf, it can be restored. To do this, you will need to dismantle the old hinges, remove the shelf, sand it and cover it with paint and varnish in the area of the immediate defect. If an internal accessory, such as a hanger, fittings or a leg, has become unusable, then the broken part will need to be replaced. It is often necessary to replace mirrors in wardrobes.
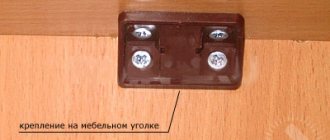
Frame elements
A simple metal corner will help strengthen the cabinet frame
Frame defects
During long-term use, the furniture body warps and becomes deformed. It begins to wobble and squeak when the doors move. Sliding door leaves and drawers open with difficulty or become completely jammed. The problem is a broken or loose fastener. Here you need to inspect the wardrobe box and find problematic screws, screws, bolts. Then replace or tighten them with a screwdriver or screwdriver. Additionally, it is recommended to securely fasten the frame iron corners fixed at the joints of the rear wall of the cabinet and both side walls.
The most common cases of failure of wardrobe filling :
- Deflection, breakage of shelves, formation of large cracks on them. The cause of these defects is excessive mechanical stress. It occurs if the base of the storage system is too wide and not reinforced with racks. Panels that are sagging or broken in half cannot be repaired; only their replacement is possible. The new shelf needs to be divided into two compartments and placed in the middle with timber supports to reduce the load.
- Chips and small cracks on shelves and drawer fronts. These small damages are restored. All defects are covered with wood putty, sanded with fine emery cloth and covered with paint to match the furniture.
- Deflection, separation from the walls of clothes rails. This happens due to strong mechanical loads. First you need to strengthen the pipe in the middle, this is done using a pass-through holder. It is fixed to the inside of the cabinet lid with screws. Then a rod is threaded through the fittings ring and secured with two flanges on the sides of the furniture.
When using the product, the filling elements break: hangers, hangers, hooks. The fittings also fail: handles, latches, awnings. One of the furniture legs may give way. When repairing wardrobes, these elements are completely replaced.
To prevent the shelves from sagging, you can install timber supports in the middle, which will reduce the load
Chips and small defects on the surface of the shelf can be covered with wood putty, treated with fine sandpaper and coated with paint to match the furniture
If the clothes rail breaks, reinforce the pipe in the middle using a pass-through holder
Mechanical components
Repairing a wardrobe with your own hands is quite possible if you clearly identify the cause of the problem. Let us describe the main mechanical components, damage to which leads to malfunctions in the operation of the model.
Contamination of grooves in guides
Often repairs are required due to clogged grooves in the guides. This problem entails difficulties when moving the cabinet doors to the side. The problem can be resolved by cleaning the bottom guide groove with a medium-hard cloth. If necessary, it can be moistened in a soap solution.
Preventive measures (timely removal of dust and dirt) will allow you to use the sliding system for as long as possible without any problems.
Over time, dirt may accumulate in the guides, which can be easily removed with a soft cloth.
Incorrect installation of guides
If the guides are installed incorrectly, even premium sliding wardrobes may need repairs. Over time, the doors will have to be moved to the side less smoothly. They may also fall out of the guides, as the roller will slip out. You will have to remove the doors and then the tracks to install them correctly.
Correct installation of guides
Replacing the guide
If the wardrobe door jams in one of the positions, then the problem may be a damaged guide that needs to be replaced.
Rail profiles differ in design depending on the sliding mechanism used.
Important! You should not try to level this element of the sliding wardrobe system. It is almost impossible to do this at home, without changing the geometry, groove thickness and track shape. Defects in the guide can negatively affect the performance of the entire sliding mechanism.
We dismantle the doors of the wardrobe. After removing all the sashes, you can proceed to directly replacing the guides.
For this:
- Use a screwdriver to remove damaged guides;
- Measure the new workpiece to size. Please note: the size of the opening gives the required length of the lower and upper guide profiles
- After cutting the workpieces to the required length, install new elements in place of the damaged ones.
Tip: for better fixation of the track to the frame, it is recommended to attach the rail to new fastening points. Old holes can be filled with a mixture of fine sawdust and PVA.
Doors not closing tightly
If some time after assembly the doors no longer close tightly, you will need to determine the cause of this problem. Perhaps the structure is overcrowded with things and some item of clothing simply prevents the door from closing. Check the contents of the cabinet. If these fears are not confirmed, a thorough repair of the sliding doors will be required.
The doors may not fit tightly against the side wall due to a broken latch. If the stopper falls out or moves, you should return it to its place. For the best result, it is worth placing it on durable glue, strengthening the adhesion using a press.
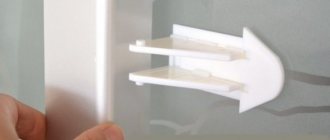
Stopper
Installing the stopper
Misadjustment of rollers
When using premium sliding wardrobes with three doors, it is important to monitor the quality of the rollers. Without timely adjustments, they can quickly become unusable. If a gap appears, peel off the buffer tape in the corner of the facade, and then turn the screw clockwise. This will eliminate the gap at the bottom. If the gap is at the top, then the screw is turned counterclockwise.
Creak when door moves
Creaks and other noises when the door moves indicate a bent roller that will need to be replaced. You can do this yourself, the main thing is to select a replacement part with similar operational parameters.
But before replacing the roller, you should try to solve the problem with a few drops of machine oil. Perhaps by dropping them into the mechanism you will solve the problem and will not have to purchase new expensive parts.
Roller failure
If a roller is damaged during use of furniture, you need to replace it, since this unit cannot be repaired. Remove the door, and the type of sliding system will determine the specifics of this operation.
| Work sequence | Type of sliding system | |
| Aluminum | Steel | |
| Removing the door leaf from the guides | Lift the door and remove the lower wheels from the guide. Next, slide the lower part towards you and pull the blade out of the upper profile. | Sliding systems of this type almost always have special locks on a mechanism with a wheel on the back side of the facade. In some models, it is enough to turn the lever, in others - move it to the side. After this, the facade can be removed from the guides. |
| Inspection of the wheel and dismantling the roller | Turn the screw at the bottom of the facade from the end side using a hexagon. | When unscrewing the mounting screws, do not forget to hold the door frame, as it may move apart. |
| Installing a new roller | The same hexagon will help to secure the new roller in place of the old one. | The new roller mechanism is tightened with a hexagon, holding the door frames. |
It is better to dismantle the door leaf with a partner, because when it is lifted, the spring mechanism in the lower rollers pushes the wheel outward. You will need to hold it carefully.
Roller system elements
Replacing the mirror part
Often, during operation, mirrors in a 3-door wardrobe are damaged. If the mirror insert of the facade is damaged, you will need to disassemble its frame. It is made either of aluminum and fixed with four screws located at the end of the doors under the dust brush, or made of steel and fixed with four roller mechanisms located on the back of the doors.
To repair a wardrobe and replace a mirror, you will need a screwdriver or screwdriver. The first thing to do is to remove the door, which will require disconnecting the stopper. Only after the door has been removed and placed in a horizontal position can you begin to replace the mirror.
The work should be done slowly, since replacing a mirror in a closet is a painstaking process. Door assembly after repairs, which involve replacing the mirror, should be carried out in the reverse order.
Removing a regular door
How to dismantle a regular door:
- The door leaf rises slightly, in this position its lower rollers are pryed off with a screwdriver.
- The door pulls towards itself so that its lower part extends beyond the lower guide. In this case, the main thing is not to put a lot of effort so as not to damage the upper guide.
- The door is carefully guided downward at a slight angle so that it can be easily removed from the top rail.
All other door panels are removed in a similar way. Their manufacturers install from 2 to 4 depending on the dimensions of the furniture item.
Advice
It is much easier to dismantle the door leaf if you have an assistant.
How to remove a mirror?
To remove the glued mirror, you will need metal wire and bars. The wire is necessary to cut off a layer of liquid nails or other adhesive composition with movements left and right. This is convenient; if done correctly, the mirror should not burst or crack. The main thing is not to overdo it with the speed of movement in this case.
It is best to remove the mirror element from an unscrewed door that is in a horizontal position.
How to disassemble a wardrobe for moving
If in order to move the dismantling of the wardrobe consisted precisely in lightening the frame, then in order to move it is necessary to disassemble the body itself. It is very difficult to take it out of the apartment, lower it and load it due to its large size.
Where to start with a complete dismantling of a wardrobe
Preparing for the complete dismantling of any furniture begins with a supply of sufficient packaging material. You should also prepare a box of a suitable size to put all small hardware and accessories in it. In case of loss, you will have to worry about purchasing new ones, and this is not always possible if specific and paired fastener kits were used in the assembly.
We also recommend stocking up on cushioning material. They can also serve as cardboard folded in several layers.
Spacers are needed to level out the thickness of guides, rod holders, etc., screwed to the side partitions. To make assembly easier, it is better not to remove them at all, just pack them more carefully. As you know, chipboard “does not like” multiple assemblies and it is better to minimize unscrewing and then screwing into the fastening location.
Complete dismantling of the wardrobe body for further assembly on site
The beginning of the process of disassembling the cabinet completely coincides with the step-by-step instructions described above.
After the cabinet body is freed from removable shelves, drawers, storage systems and pulled out from the wall, begin its complete dismantling. To do this, you will need ordinary hand tools in the form of screwdrivers, a screwdriver with Phillips and hex bits, and a nail puller. Power tools save a lot of time.
- Back wall. It can be nailed onto small nails or screwed overlapping, or inserted into a groove. In the first case, it is carefully disconnected using a nail puller or a Phillips screwdriver. In the second, they are pulled out of the groove while disassembling the case.
- Internal filling . Remove the remaining hanger bars, pull-out baskets and shelves. Then the shelves and stiffeners of the wardrobe are unscrewed.
- Frame. After dismantling the shelves and stiffeners, the rear wall, the cabinet structure becomes shaky. And ideally, if free space allows, it is better to disassemble it while lying down. If there is no free space, then assistants are needed who will hold the internal partitions, the roof, and the bottom of the wardrobe when unscrewing the fasteners from the outer walls.
- Top and bottom rails of the compartment, side supports. If possible, it is better to leave it in place (roof, bottom and side walls of the case) and carefully pack it.
Memo on fasteners
To assemble sliding wardrobes, the same fittings, fasteners and hardware are used as for any other cabinet furniture.
- Eccentric coupler . Often, internal shelves with rigid mounting are secured using eccentrics (minifixes). You need to carefully turn the mechanism on the eccentric clockwise to release the holding rod and the shelf can be easily removed.
- Dowels. Hidden fasteners for furniture dowels are rarely used in wardrobes. But if there is one, then such shelves are removed last, when disassembling the case.
- Confirmations . Can be with Phillips or Hex head. To avoid stripping the thread, it is better to use a screwdriver to unscrew it. The confirmation mats are too tight for manual disassembly (alternatively, you can always buy more).
- Self-tapping screws 4x30 or intersectional screed. For built-in wardrobe designs, a modular design principle is often used. The modules themselves are pulled together, similar to kitchen modules. Sometimes with the help of intersectional ties (which is easier for dismantling), but more often they are tightened with long self-tapping screws.
- Self-tapping screws 3.5x16, 3x16, 4x16. This type of fastener is used to install absolutely all the fittings for the internal contents of the wardrobe, including guides. In order to disassemble the wardrobe and remove them, you will need a Phillips screwdriver.
- Small nails . For use on cabinet backs and bottoms only. Most often they are replaced with 3.5x16 screws.
If you do not have experience in assembling cabinet furniture, we advise you to contact private specialists who provide services for the dismantling and subsequent assembly of sliding wardrobes.
How to pack a disassembled wardrobe for moving?
For high-quality packaging you will need sheets of cardboard, film for painting, tape, foam rubber or polystyrene foam. You can pick up empty used boxes from any store for free. So let's get started:
- Cover all panels and shelves with corrugated cardboard to prevent abrasions on the laminated surface of furniture parts during transportation.
- Fold long slabs first, then smaller panels.
- Cover glass or mirror sheets with bubble polyethylene film or foam strips.
- Wrap all stacks with two layers of covering polymer film for painting work. Pre-wrap the ends with foam rubber or corrugated cardboard.
- Secure the plastic cover with tape along both the length and width of the panels.
- Wrap drawers and cabinet bodies with film with foam or foam padding at the corners.
- Place bags of accessories in one box.
- Do the same with packing the back walls.
- Now, all this can be taken out and put into transport.
Foamed polyethylene and corrugated cardboard
Five cabinet door decor ideas
After carrying out repair work, you can improve the appearance of the furniture. There are many options for decorating products. The cabinet doors are painted, covered with fabric, and finished with wallpaper or film. The design can be visually enlarged using a mirror or by creating a volumetric texture.
The most common option is painting furniture. Both simple coloring (1-2 colors) and creating a picture are used. In the absence of artistic skills, a stencil is used to apply drawings. When creating patterns with regular geometric shapes and lines, you need to use masking tape. The surface is coated with paint after plastering and priming.
Furniture with large dimensions is covered with fabric. The best solution is a leather substitute. Glue or a stapler is used to secure the fabric.
Due to the wide range of products, the technology of finishing cabinets with wallpaper is also in demand. Any surface can be created. Matte and embossed wallpapers look especially stylish.
The use of photo wallpaper will visually increase the room space. If desired, not only the outer side of the door is finished with wallpaper, but also the back wall of the furniture with shelves.
An original solution is to cover the cabinet with self-adhesive film. There are a large number of films on sale: from single-color to imitating any material. Before gluing the film, the surface is degreased and primed.
To visually increase the space, you should create a volumetric texture. This is done using colored sawdust:
- glue is applied to the door;
- sawdust is placed on the surface;
- sawdust is varnished.
To visually expand the space, you can use a mirror. One or more small mirrors are attached to the cabinet doors.
In order for furniture to last for a long time, it is necessary to follow a number of rules. The door should be opened smoothly (without sudden movements or jerks). Do not hang heavy objects on the handle.