Sliding wardrobes are very popular due to their design and impressive appearance. Installation is quite labor-intensive and requires certain skills. There are many special cases that do not fall under the standards, so I will talk about how to assemble a classic wardrobe with a combined sliding door system. If you have an unusual model, follow the manufacturer's recommendations.
Parts that make up a wardrobe
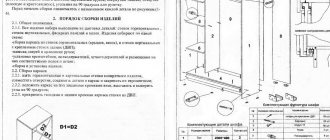
The cabinet wardrobe is assembled in the following order:
- Unpack and sort the parts.
- We install the base.
- We assemble the frame on top of it.
- At the same time we install internal partitions.
- We attach non-removable shelves to them.
- Fix the back wall.
- We install removable shelves.
- Installing door guides.
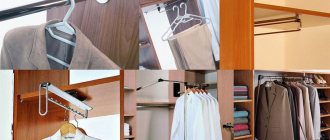
- We install rods and accessories (pantographs, baskets, trouser holders, tie holders, etc.);
- We install and adjust sliding doors.
To avoid confusion and unnecessary labor costs, I recommend performing installation in the specified sequence. But before starting assembly, read the manufacturer's manual.
Standard assembly order
What to do if there are no instructions?
Serial products that are purchased, for example, through a retail chain of stores, must contain assembly instructions. If the cabinet is made to order, then paper documentation is usually not included, and you will have to make do on your own, or resort to the services of professional furniture assemblers.
Expert opinion
Alexander Didenko
Furniture assembler at Mabaks
It is quite difficult for one person to assemble a bulky structure - invite an assistant. It will be needed when installing the frame and internal partitions, especially if you bought a wide model with four doors.
To assemble a regular wardrobe, you need the following tools:
- screwdriver, cordless or simple Phillips screwdriver PH2;
- hammer (used to drive nails into the back wall);
- 5 mm hexagon for confirmation or similar attachment for a screwdriver;
- angular ruler (so that the parts are perpendicular);
- tape measure for checking diagonals;
- building level.
The production model comes with a set of appropriate fittings, and the parts are already drilled in the right places - all that remains is to assemble them. Custom cabinets, especially those made by garage workers, often arrive without drilling, which makes the process much more complicated. In this case, before starting assembly, you need to mark and drill the parts, having previously prepared the fasteners that will be used.
Assembly steps
To know where to start, it’s worth familiarizing yourself with its stages. Most sliding wardrobes are assembled according to the following algorithm:
- base;
- frame;
- installation of the rear wall;
- installation of shelves and guides;
- installation of compartment doors.
After the completed stages, the implementation of internal additional elements is carried out. These include pull-out baskets, drawers, rods, hanging hooks and pantographs. Let's consider the installation of each cabinet element separately.
Assembly steps
Base
The assembly of sliding wardrobes, the video of which is presented below, begins from the bottom part, which bears the entire load during operation. We find a part that will perform this function and place it in front of us. In order for the process to proceed correctly, we use tools such as screwdrivers or a screwdriver, a hexagon, a pencil and a tape measure for marking. Also check the package for the presence of self-tapping screws and special masking plugs.
The algorithm of actions looks like this:
- on the part for the bottom, the place for installing the base is marked;
- sometimes, instead of base strips, adjustable legs are used, the place for which also needs to be marked;
- drill holes for fasteners;
- we attach the bottom to the slats using confirmata (corners) - for this we use self-tapping screws and a screwdriver;
- We assemble the transverse supports of the plinth, designed for stability.
Some products, such as the Phoenix coupe model, require installation using adjustable legs. This is easy to do: the plastic plugs are cut off with a knife, and the legs themselves are screwed into holes prepared at the bottom with a diameter of 10 mm.
Depending on the size of the assembled wardrobe, the number of legs will be adjusted. So, for large planes more than 6 support elements will be required.
Preliminary marking of the cabinet base
The easiest way to assemble the base is on furniture metal corners
Installing the feet
Finished plinth with legs
Frame
Before disassembling and assembling sliding wardrobes from scratch, it is important to familiarize yourself with the general structure of the existing product. Study the diagram carefully, because assembling the housing must ensure safe operation of the cabinet. The stability of the internal elements will depend on how securely it is installed.
In order for the furniture assembly to be accurate, you should additionally check the floor surface for evenness. Use a building level: if there are differences on the floor, tighten the adjustable legs. Only after this assemble the product box.
To ensure quality installation of the housing, follow these steps:
- It is better to assemble the product while standing, because it is very difficult to install a perfectly fitted cabinet in a lying position. But it is important to remember that for complete assembly it is necessary to leave at least 100 mm for the installation of the roof;
- in the part that is responsible for the bottom, you must first drill several holes and insert anchors. Rack strips will be mounted on the installed fasteners;
- Installation of stand-up panels is carried out by two people: in order not to get confused, you can view the instructions for assembling the sliding wardrobe presented in the video. The left side panel is inserted first, one person holds it while the second person inserts the right side panel;
- at the next stage, the middle stand is installed, if present. After its installation, the roof is installed. If the cabinet is assembled in a standing position, then this part will be properly secured to the corners or confirmations.
It is a little more difficult to assemble a maestro model sliding wardrobe, which has many functions. Its installation is carried out slowly, preferably by several people.
Fastening occurs using euroscrews
Installing the side and interior walls of the cabinet
The base is connected to the body using confirmat corners
Rear wall installation
To assemble the coupe yourself, in particular to attach the back wall of the product, you need to wisely select consumables - fasteners. Often, assemblers use incorrectly selected consumables, which is why, over time, the fiberboard panel comes away from the furniture product. In Soviet times, hardboard was assembled onto the back wall using nails, which is undesirable to do today.
For greater reliability, attach the fiberboard wall to the cabinet using self-tapping screws. This is how the product will not be damaged during operation.
When assembling furniture for yourself, it is important to carry out high-quality assembly of the sliding wardrobe with your own hands: the video presented below clearly shows all the complex nuances. Perform the following manipulations:
- place a hardboard panel behind the cabinet;
- Holding the sheet with your hands, use short self-tapping screws and use a screwdriver or screwdriver to screw them in at a distance of 10-20 cm.
If the cabinet has several back walls at once, they must be secured end-to-end. Use special tightening fasteners, and then screw the screws into the back of the middle bar.
Rear wall mounting
Sorting parts
In order to streamline the assembly process, at the initial stage it is advisable to sort the parts in accordance with the instructions. Separately lay out the components of the cabinet frame: bottom, roof and side walls. Place the interior partitions in the second stack and leave the shelves aside.
Sometimes, to facilitate the assembly process, especially if the cabinet is too tall or long, designers break it into several separate modules, for example, a body and a mezzanine, or several sections, which are subsequently twisted together. In this case, sort the parts modularly, again in accordance with the instructions.
Base assembly
Start the installation process from the bottom of the cabinet. In the vast majority of cases, sliding wardrobes are installed on adjustable supports so that, if necessary, it is possible to correct uneven floors. As a rule, plastic legs are used, which are then covered with a base.
Example of a base with plastic legs
If there are no drill holes on the parts (in particular, marks for supports), then make markings on the outside of the bottom of the cabinet for installing the legs and base. Screw the supports to the bottom surface using 3.5*15 screws. Then secure the base - either using the plastic clips that come with the supports, or screw it to the bottom with mounting angles. In the first case, the plinth is removable, in the second - rigidly fixed.
How to mount
The easiest way to deal with all the complexities of installing a Basya wardrobe is to entrust this process to professionals. But, if you don’t want to spend extra money, or are simply used to doing everything yourself, then you can try to assemble your furniture yourself.
This process begins with the installation of the frame. All design details are marked with a special number, which is also indicated on the drawing. Assembling the wardrobe body begins from the bottom corner. To do this, one of the side walls is attached to the bottom. A parallel wall is installed nearby. The installation is completed by fastening the roof.
When the frame is ready, you can nail the back wall to the base. Chipboard sheets are attached using self-tapping screws. They begin to be fixed from above and fall down. The back wall must be secured both from the outside and from the inside. After completing this process, it is advisable to check whether all parts are securely fastened - an installation error can significantly reduce the life of the cabinet.
Having secured the main parts, you can fix individual shelves inside the cabinet. To secure the five shelves, you will need self-tapping screws, wooden dowels, glue and a drill. The main tip to remember when installing shelves is to start at the top and work your way down. When installing shelves, pay attention to the fact that their front edge is in front, and not rough, raw edges.
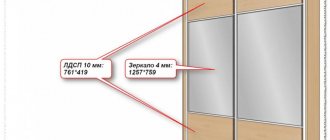
The most difficult step is installing the door. The sliding wardrobe door mechanism must be installed so that the door opens and closes well. How convenient it will be for you to use the wardrobe depends on how correctly the mechanism is installed. All rollers and fixing elements are included with the main parts. Additionally, there is also a mirror for the facade on a film basis. Finally, after all these procedures, close all visible holes with the decorative plugs included in the kit and check the quality of the assembly.
Self-assembly of furniture helps to significantly save money. It’s good if a person has simple skills in assembling objects. It will be useful for beginners to learn how to assemble a wardrobe themselves. Step-by-step installation steps for each element of the product will allow for quick installation.
Frame assembly
Before you begin assembling the frame, adjust the bottom of the cabinet using a spirit level. If the height of the ceilings subsequently allows you to raise the cabinet, assemble the cabinet on the floor, lying down. If there is a small gap between the cabinet and the ceiling, you will have to do this in a vertical position, which is less convenient.
You can roughly focus on the following indicator - if the height of the ceilings is greater than the diagonal of the side of the cabinet, then the cabinet can be assembled on the floor. In this case, the height of the supports should also be taken into account.
We begin assembling the cabinet from the right wall. Then we move to the left.
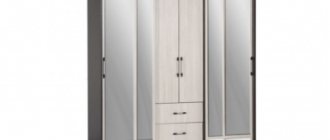
Schemes of cabinets and filling
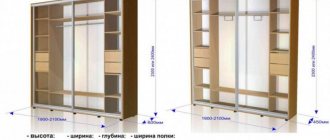
Today you can find a variety of designs of sliding wardrobes:
- With two, three, four or more sections;
- with drawers and lower shelves for storing shoes;
- two-door, three-door and so on.
Before proceeding with installation, we suggest that you familiarize yourself with the diagrams.
We will show you an example of how to assemble a wardrobe with your own hands in the second option. The diagram shows a cabinet with three sections 2400 mm wide and 2600 mm high. It has two doors and a corner exterior panel with rounded shelves.
The filling of the closet includes shelves, drawers, and clothes rails. It is these features that most often prevent a person from making a choice. Among the variety of furniture designs, it is sometimes difficult to choose what is right for you.
When choosing a wardrobe, consider the following details:
- The room where it will be installed;
- own requirements for design capacity;
- features of storage items (linen, clothes, shoes, etc.);
- budget.
The space inside it should be used rationally. You can store your trousers separately on the bottom section, and have a separate rack for your shirts.
Modern content is the key to assembling a practical cabinet. Behind the sliding doors today there are baskets for storing small items, hangers for ties, trousers, belts, retractable shelves and rods, and wardrobe elevators.
Having decided on the content and design, you can proceed to assembly.
Installation of internal partitions
After assembling the outer casing, proceed to installing the internal partitions. Place them in pre-designated locations and secure them using confirmats, eccentrics, mounting angles or wooden dowels (caps). Then tightly tighten the fasteners of the outer case, after which, in principle, the partially assembled cabinet can already be placed in a vertical position.
In some models, the partitions and frame are assembled simultaneously.
Fastening the shelves
There are two types of shelves - removable and rigidly fixed. In the first case, the shelf is installed on shelf holders, and its width should be a couple of millimeters less than the internal dimensions of the section. In the second option, the width corresponds to the size of the section, and the shelf itself is rigidly fixed using confirms, eccentrics or corners.
In our model of a double-leaf cabinet, the shelves are attached to corners on one side and to screws on the other.
It is advisable to provide at least one fixed shelf in each section of the cabinet to give the structure additional rigidity. They must be installed simultaneously with the internal partitions or immediately after them.
How to assemble a wardrobe yourself
One day I received a question via live chat: “Tell me where on your website I can read an article on how to assemble a wardrobe yourself. I’m from Volgograd and I want to assemble the frame myself.”
We didn’t have a clear article of similar content, so I decided to write it.
I want to say right away that the fastening methods and assembly procedure differ from different manufacturers. The design of the cabinet may also differ.
You will need metal or plastic corners to assemble furniture.
Self-tapping screws from 16 to 51 mm long. If you are interested in how to assemble a wardrobe, then you have an idea of the necessary tools and there is no need to explain what a screwdriver and a measuring angle are.
Let's consider assembly on a real order. Sliding wardrobe with the following dimensions: 2480x600x2297.
We nail the bottom of the boxes. I recommend screwing in one 30mm long screw. on each side of the side of the box so that the bottom does not fall out due to use.
When the drawers are assembled, you need to install the guides on which they will slide out. We use full extension slides on bearings. We do not accept roller guides.
Three screws 16mm long are enough. on each side.
Before screwing the guide, make sure that the counter part that will be attached to the sides of the cabinet does not rest against the front of the drawer. Otherwise the box will not close.
So, you've collected the boxes. All that remains is to install them and secure the facades with handles.
Remove the counter parts of the guides.
In the section of the cabinet where the drawers should go, we add about 5-10mm of thickness under the guides. We love using construction pencils.
Screw the counter parts of the guides with sixteenth self-tapping screws with a small head. Three pieces are enough, you can screw in more.
Now you need to calculate at what height to mount the next guides.
Take the front of the drawer, place it on the bottom shelf and draw 10mm on top. This will be the bottom of the next drawer.
It should turn out like this.
Now you need to secure the facades.
I advise you to immediately install the handles on the front panel, it is more convenient to handle during installation.
Apply the lower façade. Place something 3mm high. We use drills for this. The facade is glued to the box with double-sided tape. There should be enough adhesive tape so that you can pull the drawer towards you while holding the front handle, but at the same time, if you glued the panel crookedly, you can tear it off and re-glue it.
The next facade is attached in a similar way, also providing a gap between the facades.
Secure the facades with 25mm long self-tapping screws from the inside of the drawer into the laminated chipboard body. I recommend 4 or 5 pieces for strength.
It should look like in the photo.
All that remains is to install the compartment doors.
Attach the top rail to the cabinet roof with 16mm self-tapping screws. Do the same with the bottom guide, do not forget to immediately install the positioners for the door wheels.
Next, insert the compartment doors. You start from the top. Adjust the height and tilt of the doors using a hexagon. Glue the schlegel on.
That's all. The cabinet is ready.
Of course, for a person who is taking up a screwdriver for the first time, this article will be of little help, but for someone who has an idea about furniture, they will be able to assemble a wardrobe. There is nothing complicated here. The only thing is that there are nuances that I missed, otherwise the article would be simply huge.
Just don’t expect to be able to assemble a wardrobe with just a screwdriver. You need a variety of tools, from a screwdriver to a grinder. Because sometimes it is necessary to adjust the upper and lower guides to the size, or to shorten the shelf. All sorts of situations happen.
And of course, the basis is a competent drawing and exact dimensions of the parts. If something is different, it will be extremely difficult to assemble what you intended.
I wish you success and assure you that it is possible to assemble a wardrobe yourself, just as it is possible to change the spark plugs in your car or the oil yourself. The only question is: do you need it?
Source
Rear mount
The back wall of cabinets is usually made of HDF with a thickness of 3-4 mm. It is fastened using furniture nails, special branded fixtures or 4*16 screws and backing corners or washers of the appropriate diameter. The second and third options are preferable because they firmly fix the back wall, unlike furniture nails. The pitch length between fastenings is 150-180 mm.
Not all cabinet models have a back wall. In our case, it is missing and we simply place the cabinet close to the wall
Screw the HDF along the entire perimeter of the outer cabinet body, to the internal partitions and rigidly fixed shelves. You can secure the back wall at an earlier stage, immediately after installing the internal partitions, while the body is still lying on the floor. The front decorative side should face inward.
Preparation before assembly
First you need to prepare the room. The final outcome of the case depends on this, how much time you spend on work. The important point is that nothing interferes. Make sure all materials and necessary tools are at hand.
As a depth limiter, you can use a 6 or 8 plastic dowel mounted on a drill.
With the help of a wardrobe, you will visually separate different zones in the room, for example, a working area from a relaxation area.
Assembling furniture at first glance seems simple. Many people make mistakes, resulting in defects: the doors and sashes do not fit together well, the doors can creak when opening, misalignment of the holes causes misalignment of parts, furniture does not stand securely on the floor. To avoid this, you must adhere to certain rules and instructions.
Built-in wardrobes of various models, made from natural and artificial materials, are very popular in interior design.
Some models of wardrobes can be transformed to suit the features of the room: the presence of a corridor, recesses in the wall where the wardrobe can be placed.
Installation of guides
The size of the runners (or rails) must correspond to the internal width of the cabinet. They are fixed with 3.5*15 screws with a countersunk head. Step length 300mm.
The top rail is installed flush with the roof. Pre-drill holes are made in it for screws, if they were not drilled at the factory.
Installation of the bottom guide is somewhat more difficult, since it is not installed flush, but at a distance of approximately 20 mm from the edge of the bottom. To determine the exact position of the bottom track, take one of the doors and slide it into the top track. Then lift the wheels and slide the door into the bottom track. After this, use a level to align the door strictly vertically, moving the lower guide in one direction or another if necessary.
Before this stage, the cabinet should already be level.
Before screwing the bottom rail, install the clamps (stoppers).
Suspension systems use a rubber stopper
Wardrobe assembly instructions
Our procedure for assembling the wardrobe will be as follows.
You need to start assembling from the bottom of the cabinet, namely by assembling the base and installing the legs.
We take a part called the bottom and mark its lower side for installing the base and legs as shown in the diagram below:
The plinth can be secured to the bottom using mini fixes (eccentrics, rasteks - whoever calls them), confirmats or ordinary plastic corners.
Since this will still be an invisible area, and the cabinet will not stand on a plinth, but on legs, I decided to secure the plinth using plastic corners. The legs were secured with 3.5*30 screws.
Just when you screw the legs, don’t overdo it (you can over-tighten it, and the sharp part of the screw will come out from the back side).
We attach the four parts of the base to each other using confirmations. For convenience, take yourself a corner clamp. You can use it.
Do not twist the front plinth with corners, as To adjust the legs you will have to remove it.
We will attach the sides to the bottom and roof with minifixes. They are great for fastening perpendicular parts, and they also manage to completely hide the fastener.
If space allows, it is convenient to assemble the sliding wardrobe lying on the front part and fasten it using confirmations. But since I didn’t have any free space in my room, I had to assemble it standing up and use eccentrics (rastexes, minifixes) as fasteners.
On the bottom and roof of the cabinet (from the inside) we mark holes for installing the minifix rod.
Before installing the sides, using a level, the bottom of the wardrobe must be leveled as evenly as possible. Simply lean the level and adjust the legs to the maximum horizontal position.
Now you need to mark the sidewalls, the holes should exactly coincide with the installed rods on the bottom and roof. In the sidewalls you will need to do two different drillings in two different planes.
The first hole is made for a metal eccentric, which will tighten the rod, it is made in the inner side of the sidewall, with a special 15mm cutter, at a distance from the edge of the end to the center of 34mm (this is if the rod has a total length of 44mm, like mine).
In general, when fitting a part onto a rod, its head should protrude 6 mm. If this is your first time installing minifixes, practice better on rough parts, so you will feel more confident when assembling.
The second hole is made at the end of the part, with a 6-6.5 mm drill, strictly in the center (8 mm from the edge).
For a more detailed understanding of this assembly step, you can use our materials on.
- When you have made all the necessary holes, do not rush to install the sides and roof right away.
- To give the structure initial rigidity, immediately assemble the central partition with the upper shelf (we fasten it with confirmations).
- At the next stage, we need to place the sidewalls, the rear wall of the console and the assembled T-shaped partition on the lower rods, tighten them with eccentrics, and secure the upper shelf to the sidewalls (with confirms). Use an angle clamp for support.
- Next, we attach the roof and check the verticality using a level.
- If everything is fine, to provide additional rigidity, we install additional shelves using confirmats.
- Now, using 3.5*16 screws, we fasten the back wall of the fiberboard. We start from the two upper corners, and after perfect alignment, we begin to screw in screws throughout the box, in increments of 15-20mm. The fiberboard should also be secured to the central partition and the top shelf.
The hardest part of the job is finished. We put the cabinet in its place, once again check the position of the cabinet by level and proceed to installing shelves, hangers and drawers.
Shelves can be made either rigid (secured with confirmations) or removable (on shelf holders).
To have fewer plugs for holes on the visible side of the wardrobe, I decided to install the shelves on shelf holders.
Everything is simple here. We mark the required height on the sidewall, use a 4.5-5 mm drill to make a non-through hole, up to 8 mm deep, and hammer the shelf holder into it.
Self-assembly of furniture helps to significantly save money. It’s good if a person has simple skills in assembling objects. It will be useful for beginners to learn how to assemble a wardrobe themselves. Step-by-step installation steps for each element of the product will allow for quick installation.
Among all types of clothing storage products, the leading place today is occupied by the wardrobe. It is multifunctional, spacious, comes in different shapes and sizes, and does not require additional space to open the doors. That is why most people, when choosing between a wardrobe and a sliding wardrobe, prefer the latter option.
Assembling a sliding wardrobe with your own hands in the video presented is not at all difficult - all you need to do is have the necessary tools in your apartment and be familiar with the design of the product. Often, when ordering a cabinet without the services of assemblers, the company sends a document that contains a drawing of the product. This also lists all the component parts, which are numbered in order. By looking at the drawing and comparing the elements of the cabinet, you can intuitively assemble the product.
To work according to the sliding wardrobe assembly diagram, you will need the following tools:
- building level - to check the levelness of the installation parallel to the floor;
- corner;
- rubber and regular hammer;
- straight and Phillips screwdriver;
- roulette;
- pencil and ruler;
- screwdriver;
- wood drill - to make holes;
- metal drill – for installing an aluminum base.
Additional tools for assembling furniture yourself include a jigsaw, drill and sandpaper. It is also necessary to prepare all the details of the cabinet, which means checking the diagram to ensure that the number of items matches. Pay attention to the fittings and mechanisms: if there are drawers in the closet, ball guides should be included.
Doors for the product are often supplied ready-made. They are pre-installed with rollers and a strip of soft material. The door must be installed in the final phase.
Tools
Installation of rods and fittings
At the penultimate stage, the assembled cabinet body is equipped with additional fittings and accessories. Depending on the design, these may be:
- rods;
- pantographs;
- trombones;
- baskets;
- trousers;
- tie makers, etc.
The rods on which clothes will be hung are usually placed in the center of the side walls or internal partitions, at a distance of 120-150mm from the bottom plane of the cabinet roof or top shelf. The mounts into which the rod is inserted are screwed with 3.5*15mm screws. In this case, its size should be several millimeters smaller than the internal dimensions of the section (depending on the thickness of the fastening itself).
Other fittings and accessories are installed in accordance with the instructions supplied with them.
General rules for assembling cabinet furniture
To assemble purchased furniture, you must follow the cabinet assembly instructions provided by the manufacturer. There are certain rules. By following them, you will assemble any item with high quality and in a short time.
- You shouldn’t take everything out of the packages at once, much less mix parts from different packs. Maintain the order.
- Read the instructions carefully so that later there are no overlaps and you don’t have to redo it again.
- Make sure the fittings and components are in place. Otherwise, you will not be able to completely assemble the furniture. The handles must match the color scheme. It is necessary that the drawer guides have a soft movement.
- Assemble one section at a time in order. You need to start from the bottom, gradually moving to the sides.
- Open the package, lay out the parts, prepare the tools.
- Mirrors and glass are installed at the final stage. This way you will avoid damage.
For assembly you need a screwdriver, a screwdriver, a hex key, and a tape measure.
If you do the manufacturing yourself, it will be much easier to assemble.
It is very important to follow the assembly sequence, otherwise you will be forced to disassemble and reassemble the cabinet in the correct sequence.
Installation and adjustment of doors
Install the inner door first. To do this, insert the upper edge of the door into the rear groove of the upper rail, squeeze out the wheels and insert the lower edge of the door into the rear groove of the lower rail. Install the outer door in the same way, but in the front grooves of both guides. Do the same for all other doors if the cabinet is large.
To ensure complete contact with the side walls, the lower wheels are equipped with an adjusting screw.
If you need to lower the corner of the door, turn the adjusting screw of the corresponding wheel counterclockwise; if you want to raise it, turn it clockwise. For this purpose, use a 4 mm hexagon.
After completing the procedure, when access to the adjusting screws is no longer required, apply buffer tape to the vertical end. It absorbs the impact of the door on the side of the cabinet and serves as additional protection against dust.
Lastly, remove the protective film from the door profile. At this point, the assembly process is completed and the wardrobe is ready for use.
Installation of wardrobe doors
Now that the cabinet is almost assembled, all that remains is to install the doors. It is advisable to first adjust the level of the cabinet. Otherwise, the doors will not close tightly.
To install the top guide, you need to drill at least 5 holes for self-tapping screws, two on each side and one in the middle. The guide should be level with the edge of the cabinet lid.
To install the lower guide, you also need to drill three holes with a diameter of 4 mm, and chamfer it with a drill of a larger diameter so that the screw head is flush with the guide. Sliding wardrobe guides from different manufacturers require different cabinet edge offsets. To simplify installation, you can simply place the guide on the installation site, and fix it when the doors are installed.
Installing the door into the guides. First, the upper rollers are inserted into the upper guide and raised all the way, then the lower rollers are inserted.
First, the two side doors are inserted into the second track, then the middle door into the first track.
The doors are adjusted with a hex wrench (sometimes with a cross screwdriver). When the level is set correctly, the door should fit snugly against both walls of the cabinet.
Now you can glue the sealing brushes. First, the protective film is removed. Attention, after removing the protective film, it is not recommended to touch the place where the brush will be glued with your hands. Greasy fingerprints will make the brushes less durable.
Lately, sliding wardrobes have become increasingly popular. They are compact and convenient for storing all your daily necessities. The sliding door hides not only clothes, but also shoes, accessories and even necessary household appliances. This allows you to save a lot of space in your room by rationally using every centimeter of your room.
A sliding wardrobe can be installed not only in the bedroom, but also in the living room or hallway. It does not take up much space, so it will fit even in a small apartment. All these characteristics are relevant for a simple and inexpensive Basya wardrobe, which will be discussed in this article.