Pros and cons of hanging hammock swings
The hammock is designed to create the most comfortable rest. It has many advantages:
- hammocks are compact and lightweight, taking up minimal space;
- they can be placed where there is a suitable base for mounting: in a room, on a veranda, on a tree, in a gazebo;
- the design of the swing-hammock can be anything you want, handmade products are unique;
- This is a great way to keep children busy in the garden.
Hammock swings also have disadvantages:
- The product can only be mounted on a solid base; suspended and suspended ceilings are not included;
- a swing does not replace a classic hammock, as it does not allow you to enjoy your relaxation while lying down.
At the dacha, they often install both a swing and a hammock, and use them as desired.
Additional Tips
Using brightly colored fabric, you can make a unique and interesting hammock that will stand out from the crowd. It is better to hang bright hammocks in the shade so that the fabric does not fade from sunlight.
Sticks for fastening ropes are best treated with a grinding machine or fine sandpaper. Also, to avoid chafing of the ropes, it is necessary to coat them with varnish.
From leftover fabric you can sew a bag for small items, which will be attached to the side with clothespins; it is convenient to put water, books or just a phone in it.
Pillows in a hammock can be secured with ropes so that they do not fall off from the wind.
If you take the fabric shorter, the hammock will sag less and vice versa.
If desired, you can sew a larger hammock using more fabric and sticks of a larger diameter and length.
If it is not possible to secure a hammock to trees, you can make your own base from timber. Additionally, you can make a canopy to relax in the shade on hot days.
Chicken feederCapers - what are they? How to choose, cook and tips on which dishes to use (110 photos and videos)
- Do-it-yourself country table: the best projects and ideas that are not difficult to build (120 photos)
Of course, wicker hammocks can look more interesting and impressive, especially if you use ropes of different colors. Weaving a hammock is a very complex procedure; skill is required. If difficulties do not frighten you, you will need to find a weaving pattern and master classes with detailed explanations on the Internet.
When using a hammock in the country, you should think in advance about the most convenient fastenings. For the winter, the hammock must be removed so that it does not deteriorate due to weather conditions. Also, then it remains possible to conveniently install a hammock in different places when traveling outdoors.
Peculiarities
The features of the hammock chair include:
safety and environmental friendliness (due to the use of natural and non-toxic materials);- original design;
- simplicity and ease of use;
- Possibility of use at any time of the year;
- ease of care;
- long service life.
A hammock chair is a soft version of a hanging structure . On soft pillows that sway from side to side, it is pleasant to spend summer evenings in the fresh air.
Advantages
The advantages of a hammock chair include::
- Wide selection of models. Such products differ in shapes, designs, colors, and materials of manufacture. Some chairs are something like a cocoon, others are a product with a soft fabric seat.
- Possibility of self-production. To do this, you will need to use minimal sewing skills and prepare supplies.
- A hammock chair can be framed or frameless. Both models do not have sharp corners or parts, which makes them popular among small users.
- The textile can be easily detached from the product and washed in an automatic machine.
Device
A hammock chair, as a rule, has a fairly simple design . It consists of:
Fabric seat. For these purposes, a tight cut is most often used.- Crossbars, which serve as a strapping element and distribute the load. The seat is tied to the crossbar.
- Sling. To do this, use a strong rope or braided cord.
- Suspension. For these purposes, chains for ceiling mounting or rings with a spring are used.
Little subtleties
- For older people or children, classic options with headboards and sides will be more suitable models. To make these, you will first need to make drawings.
- Suspended structures can be attached to the wall on one side: this way they will not sway with every movement.
- Hanging models require special design. It’s good if it is possible to make original lighting: under the bed, along its perimeter, or to illuminate the cords on which the structure hangs.
- The floor under the hanging structure must be of excellent quality. To draw attention to an unusual sleeping area, you can zone the floors using colored tiles or laminate.
Related article: Do-it-yourself primer for walls for painting, advantages of using the material
A hanging bed is a wonderful solution that can decorate any interior space.
Types of swings in the form of a hammock
The design of the hammock and swing are slightly different. A hammock is a device for resting in a lying position. Because of this, it is mounted on vertical supports, making it uncomfortable to sit on, although you can swing. The swing is fixed to a horizontal crossbar. Depending on their size, you can swing here either sitting or lying down.
Important! There is nothing stopping you from using a hammock - a soft cloth with ropes to create a swing. However, it will be fixed specifically to the horizontal crossbar.
There are several design options:
Hanging swing hammock for children is a classic option. A small hammock is attached to the edges of a horizontal crossbar of the required size and the structure is suspended on any type of support - horizontal or vertical.
Hammock with seat – complemented by pillows and backrest. For convenience, the seat is attached to the fabric to achieve stability.
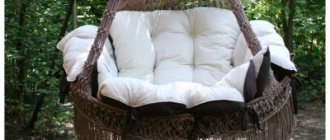
The chair is a structure with a rigid or semi-rigid frame. In this case, the perimeter and shape of the seat are specified by a plastic or metal frame, and the entire structure is often suspended from a hook. This model can be large in size and accommodate a company of 5–6 people. The design can be complemented by a canopy.
The drop cloth is attached to very narrow horizontal bars so that the edges of the fabric rise much higher than the seated person’s head. This model is intended for small children, as it prevents the baby from falling out of the seat. The hammock swing for the cottage in the photo belongs to this category.
To make swings with your own hands, different materials are used. Based on this feature, there are 3 categories of products:
Mesh is a traditional option, not the most popular today. The mesh stretches and sag over time; in addition, it digs unpleasantly into the skin.
Fabric - cotton with some synthetic fiber, burlap, canvas, nylon, and even parachute silk are suitable for hammocks. The latter option is exceptionally wear-resistant and never loses its appearance.
Wicker ones are the strongest and most durable. To make it yourself, they use vine - the best option for a do-it-yourself model, Brazil nut and rattan. Both natural and artificial materials are used, the latter being noticeably cheaper.
When choosing a material, take into account the load on the intended swing. A product made of parachute silk can withstand up to 200 kg, and a product made of mesh – no more than 80 kg.
Materials and manufacturing techniques required
You can create a hammock swing with your own hands from simple available materials. To make a seat the following can be used:
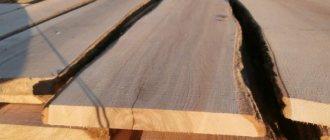
- Thick fabric . It is worth choosing a material that holds its shape well and will not stretch during use. On average, a fabric hammock can withstand a load of up to 150 kg. For reliability, it is better to make a double layer of fabric.
- Tarpaulin. This type of material is excellent for making chairs that are intended to be used outdoors. It is highly durable and easy to maintain. Capable of withstanding loads up to 300 kg. The color palette is limited.
- Cotton and polyester cord . Suitable for weaving hanging models using the macrame technique. In recent years, this material has been gaining popularity, and the range is constantly expanding. You can find cords of any thickness and color.
- Vine . A hanging chair made from this material looks very beautiful and stylish. It has a small weight and at the same time can withstand a large load.
Mounting options for home
The type of fastening of a self-made product can be:
Ceiling. To do this, use a hook attached to the ceiling. A chain is attached to it, which will hold the product. With such a model it will be pleasant and comfortable to swing from side to side.- Axial.
This option is also attached to the ceiling. But additional slings are installed on the sides of the seat, attached to the walls or ceiling. It will not be possible to swing on such a product like on a swing; the seat will only rotate around its own axis . - Shtangov. For this purpose, a special curved stand with a ring stop at the bottom is used. A suspension consisting of a ring and a spring with a chain is mounted at the top of the rod. This option is durable, reliable and stable.
- In the form of a platform with a double suspension. It is a strong and stable base equipped with sidewalls. This type of fastening is suitable for installing a spacious double chair.
- With a crossbar, at the ends of which rings with cords and a suspension are put on.
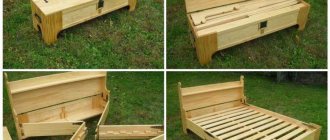
Types of hanging beds
Creative pendants are becoming more and more popular in our latitudes. So far, most often parents try to make a hanging bed in the children's room. Boys like a rocking bed in the shape of a ship, girls prefer a bed in the shape of a fairy flower. Resourceful parents with many children build bunk hanging beds for their children. One side of such structures is usually attached to the wall, the other is suspended on steel cables or strong ropes.
Round hanging beds combined with a light cape look good on the terrace.
On the terrace or in the girl's bedroom, round hanging beds are quite appropriate. Decorated with canopies and properly selected lighting, they become the center of the interior, demonstrating either the creativity of the owner or the sophistication of the hostess.
Rectangular hanging models can be light and airy. Even beginners can do this. More complex designs with a back and sides require some carpentry skills, but with hard work and patience you can make even such models yourself.
Today it is considered fashionable to decorate the interior of a country house with hammocks. A hammock in Mexican, Brazilian or Mediterranean style is both a fashionable interior solution and a comfortable bed.
Related article: Natural stone tiles: varieties of rock for interior and exterior decoration
Return to contents
Hammock swing yourself: step-by-step instructions
Assembly and installation of a simple swing hammock occurs in several stages:
- Cut the fabric to the required dimensions and make a frame for it. To do this, you need to sew a rope along the long edges and bring its ends parallel. That is, the product will have 4 pieces of rope, which must subsequently be used for fastening.
- Drill several holes in the beams along the entire length in increments of 7-12 cm.
- Pull the cord through the holes, then secure them with knots.
- Cut strips of rope measuring 50 centimeters according to the number of holes on the beams.
- Fix the strips of rope with one end to the beam and the other to the steel ring.
- Tightly wrap the remaining rope around the supports and make loops along the edges; they will be needed to secure the structure.
- Secure the rings and loops with a carabiner on both sides. The swing-hammock is ready.
A wicker or fabric swing hammock is an excellent option that can replace bulky and rather expensive garden furniture, and due to its mobility, this structure can be installed anywhere in the garden.
Home hammock
You can also make a hammock in the apartment, at least for children. You can sew a hammock according to the previous master class, slightly changing the fastenings and size.
In an apartment there are two main questions: “Where should I install it?” and “how to fasten?”. You can hang the hammock on installed mounts in the ceiling or walls; if you don’t want to spoil the recently made repairs, you can fix the hammock on the children’s wall.
If there is no space in the house, but the children really want to hang a hammock. You can take a long fabric and tie it across the tabletop from the table. It turns out to be a very successful homemade product that does not require additional effort or expense. After playing, it can be easily removed and stored in a closet.
Preparation and process of making a dream chair
You don’t need to be a special specialist to assemble a suspended structure yourself. It is enough to prepare the essentials and then diligently follow all the recommendations. To build the frame you need to prepare:
- work suit and gloves;
- measuring and cutting tools;
- thick fabric;
- blanks for rigid structures - rods or hoops made of metal, wood, PVC or acrylic;
- rigid cushioning material, grosgrain ribbons;
- nylon threads;
- filler (sintepon, foam rubber, balls);
- chain, cable, rope or sling.
These materials are available in a sufficient assortment in hardware or construction stores.
Hanging swings for children made of wood step by step
Above I gave drawings and dimensions of a wooden swing. You can use them or independently calculate the dimensions and how your design will look. By the way, you can attach it not only to tree branches, but also build a support for them yourself.
Work on the design in stages:
- Cut out all the pieces from wood to the required sizes. Treat the wood: sand and apply 1-3 layers of paint/varnish.
- Make a strong support from which the swing will be suspended. And install the support.
- Connect all the parts of the swing. Hang it on a support.
And the last stage can be painting.
Watch the video for details:
I really liked the project for 3 children. The author made a playground for his big children (8-12 years old). And it took him 6 hours, can you imagine?!
He bought ready-made poles of the required size, which is very simple these days. In any construction hypermarket they will cut the posts to the required sizes. Even seat boards can be cut straight away. The author recommends concreting the legs.
Source oldsaltfarm.com/how-to-build-a-wooden-swing-set/
The top is a 4" x 6" post that is 3.6m long and is perfect for three swings. The legs are 4 x 4 inches, 3 m high. In addition, ready-made brackets were needed. They are convenient to use; you hammer the beams into them, secure them with bolts, and you’re done.
Spacers are installed closer to the bottom. The swing is an ordinary hanging one, attached to chains on brackets with bearings.
Scheme and drawing
Before you start making your own hammock chair, you will need to make a drawing of it. To do this you can:
- Use options found on the Internet. Among their variety, each person will choose the option that suits them, which can be modified according to their own preferences.
- Draw a diagram of the future product with a pencil on paper. For this option, you must be able to independently determine the dimensions and calculate every detail .
Advantages and disadvantages of handmade hammocks
Making hammocks yourself has its advantages:
- Low manufacturing cost.
- Possibility to choose the most suitable model.
- Taking into account individual tastes during production and installation.
- It is not accessible to rats or other animals.
However, you need to remember the disadvantages:
- You'll have to spend a lot of work.
- The workmanship will be lower than that of purchased structures.
- To do this job you need to have certain skills.
To make your life more comfortable, you need to take into account your tastes and capabilities when choosing the best option.
How to make a hammock swing with your own hands
Building a swing on your own is not difficult. Most of the work is done on a sewing machine, and installation most often requires only a strong tree branch.
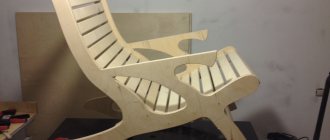
Hammock swing made of wood
The model received its name for the appearance of solid wooden elements in the structure. This DIY hammock swing is the most successful homemade product for a summer residence. It looks more like a chair than a hammock, so it relaxes your back when sitting. Thanks to the wooden slats, the swing retains its configuration, so it is easy to reinstall. The presence of “improvements” does not make it at all difficult to build with your own hands.
The tools you will need are a drill, a hammer and a screwdriver, and the materials will be 2 thin wooden blocks 90 cm long and 3 thick slats 80 cm long.
Manufacturing does not take much time.
- Holes with a diameter equal to the smaller of the slats are made in two thick bars. The distance from the edge is 9 cm. After another 5 cm, smaller diameter holes are made on both sides for ropes. Planks are inserted into them and secured with nails or screws. This creates a frame for a swing.
- The panel is cut out based on the fact that its width should fit between the holes for the ropes, and the length should be sufficient for the finished seat to sag slightly. It must be remembered that the fabric should be folded. A narrow piece of fabric is wrapped around the strip with your own hands and sewn up with thread.
- Cut the ropes to the required length - 2 shorter for the upper part of the hammock, 2 longer for the lower. The rope is threaded through the hole made in the bar and secured with a knot. In 3 thick timber, 2 holes are drilled for the rope. This is a horizontal bar. All 4 ropes of the swing are tied to it. A 3 thick rope is threaded through the crossbar itself, by which the structure is suspended or fixed.
Important! Instead of fabric, you can use woven panels made using the macrame technique. This product is, of course, more impressive.
Hammock swing for children on rings
An additional element is the rings to which the ropes are attached. They rotate freely on a wooden crossbar, simulating a real swing. Models with rings are most suitable for children.
For a swing you need appropriate fabric - preferably made from artificial fibers, as it is easier to wash, eyelets for fastening with a diameter of 12 mm, nylon thread 8 mm and a pair of stronger ropes. You will also need rings, carabiners and a wooden strip with a diameter of 25 mm, depending on the design.
The manufacturing technology is as follows:
- For the base of the hammock, it is recommended to fold the fabric in half and stitch it to ensure sufficient strength. Places for holes for eyelets are marked on two opposite sides - with a deviation from the edge of 5 mm and a distance between holes of 87 mm. Then cuts are made in the marked places.
- 8 mm twine is cut into fragments of different sizes: from 400 to 1000 in increments of 100 mm - 2 pieces each, 7 pieces 1075 mm long. When secured, ropes of varying lengths create and hold the chair configuration. Thicker twine is cut into 2 fragments 750 mm long. Eyelets are inserted into the holes of the fabric. Then ropes are threaded through them and secured with knots. The shortest strings are attached to the upper part of the backrest, the longest ones - to the seat. Then tie all the twine tightly into a ring with your own hands.
- A beam 1000 mm long is sanded and treated with an antiseptic, and then 3 holes are made in it. The main thick rope is threaded through them, so that the twine fits into the hole and is tied with a double knot on each side of the block. On the other side, the slats repeat the same operation. Both ropes are tied to the 3rd ring.
The swing can be fixed directly to the ceiling on the veranda. You can also place them in the garden. To do this, straps are tied to the upper ring, and then a tree branch or beam is tied.
Round swing hammock
This option is very convenient because it has some semblance of a frame. Moreover, to build the latter, you do not need to waste effort, since an ordinary hoop, but only a metal one, is used as a base.
In addition, for the swing you will need 4 tie straps, fabric, padding poly and stationery pins. The procedure is as follows:
- Cut several strips of padding polyester 20 cm thick. They wrap the hoop with them and secure it with threads.
- Cut the selected fabric into strips of the same thickness or greater. The material is wrapped around the hoop so as to hide the padding polyester. The result is a strong, but not hard base, comfortable for the baby. Place the hoop on the fabric and cut out a circle of the appropriate diameter. For hanging the hammock, 4 symmetrical notches are left. The fabric is sewn to the hoop, slightly stretching it. The seam must be very strong, since it bears the main load. In the recesses left, the hoop remains visible. Here it is wrapped with a belt so that the latter forms a loop and sewn. Do the same with the remaining 3 belts.
The finished structure is attached to any suitable element with your own hands: the straps are tied to a hook, to a branch, to any horizontal crossbar anywhere.
Round hanging bed
It looks great on a garden veranda or in a children's room. The main thing is to hang it away from the walls. When swinging, it should not touch the walls.
Diagram of a round hanging bed.
Very strong boards are selected for the base. If the bed is constructed from fiberboard, then 2 sheets should be fastened together: this will be more reliable. The required diameter of the future bed is calculated, a circle is cut out from the assembled wooden panel or fiberboard. Holes are drilled at a distance of approximately 20-25 cm from the edge. They must be located at the same distance, and their diameter must correspond to the ropes, ropes or chains on which the structure will be suspended. Chains are passed through the holes, which are securely fastened from below. These are the most reliable, but not the most aesthetic mounts. Nylon cords look more aesthetically pleasing, but they are less reliable. When choosing what the structure will be suspended on, you should take into account the weight of vacationers and the load that will fall on the base and fastenings. If children will jump on the bed, you should choose the most durable materials. Chains or ropes are passed through the holes and collected into a bundle, which is fixed to the ceiling. It turns out to be a beautiful cone. It is very important to correctly calculate the length of the cords: the base should hang evenly. For fastening you will need the most powerful anchor bolts.
Return to contents