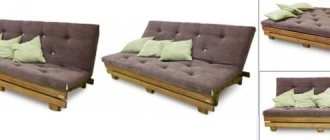
Even a person with no experience in carpentry can make a bed from laminated chipboard with his own hands. The tools needed to make this kind of furniture are available in almost every home. Specialized stores have a wide range of laminated chipboards, as well as hardware and other consumables necessary for assembling the bed.
What is the advantage of laminated chipboard for making a bed with your own hands?
In order to make a bed with your own hands, you can choose plywood, solid wood, and MDF. But for making at home, laminated chipboard is the best option. And that's why.
- Laminated chipboard has excellent performance characteristics
. Thanks to the manufacturing method (the slabs are produced by hot pressing of raw materials using thermosetting resins), the finished material can withstand temperature changes. Laminated chipboard has a homogeneous structure, which makes it easy to process and durable to use. - Laminated chipboard is the most budget option
. While no one can argue with the quality of beds made from solid wood, not everyone can afford such an expensive pleasure. Especially if you want to save money on it. The material is cheaper not only than solid wood, but also, for example, its closest competitor - MDF. Even if you compare ready-made options from the store, the difference is obvious: the cost of double beds made of chipboard on average starts from 100 rubles, and from solid wood - from 300 rubles. - Laminated chipboard may have additional properties
. The material can be purchased with special impregnations that will provide it, for example, with increased moisture resistance or resistance to fire, if these qualities of the material are fundamentally important to you.
The only thing you should pay attention to when choosing is the formaldehyde emission class. The fact is that the resins that are used in the production of chipboards can be harmful to health in certain quantities. Their content in slabs is regulated by standards, which are reflected in formaldehyde emission classes - they are E1 and E2. Class E1 is safe for the manufacture of any furniture, and this is what you should choose.
Selection of furniture fittings
In addition to fastening elements, there are other furniture fittings, without which the product will lose its decorative and functional qualities.
Table 4. Types of furniture fittings
| Name | Description |
Pen | A necessary element that provides convenience when opening doors and drawers. Fixed with screws. Selected in accordance with the color scheme and style of the furniture facade. |
Legs | For the stability of the structure, especially when the floor surface is not too flat, choose products with height adjustment. The material must be practical and durable, moisture-resistant and resistant to mechanical stress. The appearance is also selected according to the design style. |
| Silicone damper | An inconspicuous but important detail that ensures silent closing of the doors. Fixed from below and from above on the door or end of the cabinet. |
Loops | An important element that ensures the opening of the sash. Equipped with a mechanism for adjusting the height and depth of the door. |
Wheels | Used for comfortable operation of roll-out drawers and cabinets. |
Stubs | Masking fasteners. Matched to match the body. |
Shelf supports | Used for fixing additional shelves in wardrobes and racks. |
Hooks | They are used inside wardrobes and on panels in hallways. |
Crossbars and bars | They may have different cross-sections and radii. Used in wardrobes. |
Lock | Used for doors and drawers in cabinets and office shelving. |
How to choose chipboard for a bed
When choosing a material for making a bed, you need to take into account two main points - embossing and thickness.
Depending on the type of embossing
slabs are designated by several letters of the Latin alphabet, for example:
- TM - the material has a matte structure;
- WML - material with the designation of natural lines of wood;
- BS - shagreen texture of the material;
- PR - laminated chipboard with indication of wood pores, etc.
For the manufacture of furniture items such as wardrobes, beds and tables, the BS and PR types are most commonly used.
Regarding the thickness
Chipboard, then it can vary from 80 to 380 mm. For the manufacture of furniture, a material with a thickness in the range from 160 to 220 mm is best suited. Here you need to take into account that the greater the thickness, the more significant the load your bed can withstand, so you should focus on the weight of the person or several people who will sleep on it.
What is chipboard?
The abbreviation chipboard stands for “chipboard”. Its main components are waste from the wood processing industry. These are shavings, sawdust, slats and slabs of inexpensive tree species (for example, pine).
The waste is crushed using chippers. Then a binding material, resin, is added to them. The latter evenly glues small chips and hardens. To obtain wood board, the mass is placed under a hot press.
The binder resin contains a toxic substance - formaldehyde. It is because of this that furniture made from chipboard is considered harmful to health.
The effect of formaldehyde on the body
Formaldehyde is a colorless gas. It has a pungent resinous-alcohol odor, slightly reminiscent of acetone. In Russia, formaldehyde was included in the list of “possibly carcinogenic substances for humans” back in 1998.
In apartments with a large number of interior items made from chipboard, the concentration of formaldehyde exceeds the norm by 1.5-25 times. The stronger the odor, the greater the health hazard.
Harmful properties of formaldehyde that appear immediately:
- can provoke allergies (symptoms - skin rash, nausea, dizziness, difficulty breathing);
- often causes headaches, especially in hypotensive patients;
- irritates the mucous membranes of internal organs: eyes, mouth, larynx, stomach and intestines.
The substance becomes even more dangerous with prolonged exposure to the body. Cases of severe symptoms have been reported:
- significant weight loss;
- the occurrence of bronchial asthma;
- neuropsychiatric disorders (insomnia, thalamic syndrome);
- reproductive dysfunction in women.
But the most dangerous consequence of using furniture made of chipboard is an increased risk of cancer, especially cancer of the nasopharynx and blood (leukemia).
Why is furniture still made from chipboard?
A reasonable question arises: if formaldehyde is so dangerous to health, why does the production of chipboard furniture actively continue?
The main reason is economic. Essentially, chipboard is a secondary product of the woodworking industry. The material is cheap to produce. Therefore, an ordinary buyer with a modest budget can afford to regularly update the interior.
In European countries, in the production of boards, the substance methylene diphenyl diisocyanate is used as a binding component. If the technology is followed, it is safe for health. The use of methylene diphenyl diisocyanate costs enterprises 3–4 times more than resins with formaldehyde. Since the standard of living in Europe is higher than in Russia and other CIS countries, relatively expensive but environmentally friendly furniture is in demand among the population.
In addition, standards and norms for the formaldehyde content in the material are established at the legislative level. However, they do not guarantee 100% security.
Making drawings
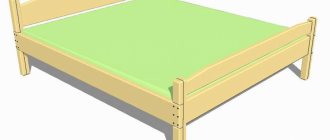
First, let's determine the parameters of the bed itself, using standard values for each type.
Single
a bed usually measures 0.8-1.2 m by 1.9-2.2 m,
a one-and-a-half bed
is 1.2-1.6 m by 1.9-2.2 m, a
double bed
is 1.6-2 m .3 m by 2-2.2 m.
Next we move on to creating a drawing of the bed.
This is necessary so that the plan of the finished product is always before your eyes during the manufacturing process, and also in order to calculate the amount of materials needed as accurately as possible. If you don't pay enough attention to this step, this mistake can cost you dearly, and you will have to spend additional time (or even money) to make a new drawing or buy new material. To create a drawing, you need to schematically depict the bed you want to make, preferably from different angles (top and side). On the drawing you need to put down all the dimensions that you have chosen. If you are new to this business, we recommend finding several ready-made solutions on the Internet and adapting them to your size. This will make your drawing more accurate.
Next you need to do the detailing. If the drawing was a more general diagram, then here each detail is designated by a number and signed. This is necessary in order to calculate the amount of material and not forget even the smallest details.
Legs
Separated legs can also be corrected by replacing nuts and screws or strengthening them with additional fasteners, for example, the same fastening corners only of a small size. If the nuts are simply loose, then they need to be tightened until they stop.
It is more difficult to get out of a situation when your legs are broken. You'll have to buy new ones or make an analogue yourself (and the latter option is possible if you have carpentry skills). But the simplest option, which does not require any financial expenses, is to abandon the legs altogether. No legs - no squeaking or other problems!
Sawing
After purchasing laminated chipboard to make a bed, it is cut. There are two solutions here - you do it yourself or turn to professionals who do it for you.
It is worth doing this yourself, unless you already have such experience, since the cost of error here is very high. You can ruin the material (more than once), and then buy a new one and try again. But if you are confident in your abilities, then for home cutting you can use a jigsaw, jigsaw or circular saw. Mark the material with a pencil and carefully saw the parts. But you need to take into account that when cutting yourself, there is a very high probability of getting chips that will ruin the entire appearance of the product.
The only guaranteed way to avoid chipping is to turn to professionals who use sawing machines to cut furniture. In addition, this method ensures the production of parts according to your drawing with millimeter accuracy, and they can be used immediately without any additional processing.
It's up to you to decide, but remember that cutting it yourself most often costs much more than turning to professionals due to the fact that you have to redo the work and spend money on buying material.
In addition, the fact that for further use the bed parts need to be treated with a plastic edge also plays in favor of turning to professionals. But you can’t do this kind of processing at home, because it requires a professional pasting line, like that of specialists from specialized companies.
Necessary tool
- Screwdriver
- Confirmation bat
- Awl, screwdriver
- Tape measure, ruler, pencil
- Hammer
By and large, you won’t need any other tool to assemble this bed, of course, unless you want to save some money and glue the edges onto the chipboard yourself.
But for this bed, we took all the parts immediately with edging, in the same place, at the furniture production, when ordering the cut. Therefore, if you glue the edge yourself, you will also need an old iron, sandpaper and a knife cutter. This process is described in more detail here.
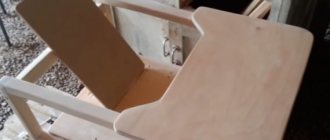
Assembly of the finished product
When you have ready-made parts and accessories on hand, you can proceed directly to assembly, having previously prepared all the necessary tools.
- First, we assemble the bed frame, that is, we connect the side walls with the headboard and footboard using a screwdriver. For added strength, you can use metal corners. As a result, we should get a rectangular box.
- Next, we secure the transverse and longitudinal crossbars, checking the geometry of the product using a level.
- We attach the base for the flooring to the side walls.
- We attach the mattress base to the decking base. It can be either lattice, or plywood, or chipboard.
- We remove any debris remaining after assembly and place the mattress on the finished bed.
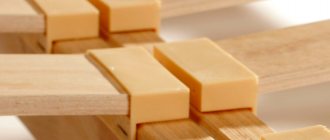
Attaching supports for slatted bottom
The supports for laying the slats are attached according to the same principle as the frame.
Technology for fastening supports for slatted bottom:
- in the support boards it is necessary to drill holes for the thickness of the screws, in increments of 25 cm;
- to fasten the boards, it is better to place the frame on its side and, having drawn a line at a distance of 5 cm from its bottom, you can proceed to the installation steps;
To attach the boards, I placed the frame on its side
- Before attaching the support boards, they must be lubricated with wood glue;
- fastening is carried out along the frame along its edges, using 50 mm self-tapping screws;
- For stability while the glue dries, the support block must be pressed; for this you can use clamps. An example can be seen in the photo;
The frame with the block was fixed until completely dry.
- the middle support board is attached parallel to the previous two, at the same height, by drilling holes in its ends;
- the remaining holes from the fasteners must be sealed with putty and cleaned with sandpaper after it dries.
Decorative elements
Decorative elements play a big role in finishing the product; thanks to them, the bedroom will sparkle with new colors. One of the options for finishing elements is wooden slats, 5 by 2.5 cm thick, which should also be included in the drawing.
Manufacturing process:
- it is necessary to make the required size of slats from the prepared materials;
- the prepared slats must be sanded and painted with stain, the color of which is chosen based on personal preferences and the design of the room;
- after drying, they are coated with water-based varnish;
- After opening the first layer of varnish, you need to sand the slats to prevent the appearance of all kinds of bubbles. Next, apply two more layers of varnish;
- The painting procedure must also be carried out with the legs.
Fastening:
- decorative trim is attached with glue;
- it is necessary to apply glue to the surface of the frame and finishing slats;
- using clamps, press them for a while, preferably until the glue dries completely;
- all excess glue must be wiped off with a damp cloth;
- The slats can be fastened using either nails or self-tapping screws.
Fastening the lifting mechanism requires additional skills, since its installation must be of high quality and safe. There are three types of mechanisms, each of which is installed differently. Therefore, having chosen a certain type, you need to carefully study its installation diagram or seek the help of specialists.