How to design a balcony closet?
The idea itself is not so difficult to generate, but bringing it to mind, making the cabinet not just a piece of furniture, but fitting it into the overall compositional space is much more difficult. We will give some simple tips that will help you not forget anything when designing a balcony cabinet.
It is important to think through the future project down to the smallest detail. Special online programs for creating collages will help you determine the shape and design of the cabinet (you can easily find suitable photographs of balcony cabinets on the Internet), and it is better to draw the drawing on paper.
Be especially careful when choosing doors and internal division into sections: the most convenient doors are roller doors and accordion doors, but when focusing on aesthetics, it is preferable to use folding panels.
Most often, the cabinet space is divided into two halves, but it is better to leave very narrow spaces hollow, providing only two small shelves: near the floor and near the ceiling.
Determine the functions that the cabinet should perform in the interior: storing tools, clothes, canned food, books or trinkets, winter or flight equipment.
Choose suitable materials. Thus, it is not recommended to use heavy metal structures, since the slabs may simply not withstand, and the wood must be treated against dampness and rotting.
Choose a design according to the interior requirements of your balcony and the room adjacent to it as a whole. You may even need to have a custom cabinet made to fit the style of your apartment.
Plans, drawings
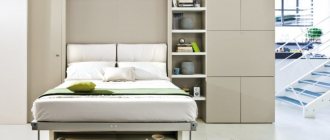
The design of a built-in wardrobe should be carried out taking into account the type of balcony on which it is planned to be installed. For example, on a loggia with a small niche on one side, you can either install a full-size wardrobe, or divide this niche into separate sections and fill only one of them from top to bottom, and in the other place a cabinet at the level of the window sill.
List of fasteners and special accessories
Depending on the chosen method, the following fasteners may be needed to install the elements:
- Confirmats (Euroscrews) measuring 70x5 mm and plugs for them for mounting walls and shelves.
- Nails or self-tapping screws for attaching fittings and the back wall, if provided for by the project. Fastening is possible using a construction stapler.
- Dowels and PVA glue.
- Adjustable or non-adjustable legs.
- Metal furniture corners if fastening with their help is provided for by the project.
- Roller guides for drawers, if any in the project.
- Bars for hangers and holders for these bars.
- Guides and rollers for fastening sliding doors.
- Sliding door and drawer handles.
It is advisable to use special accessories:
- Instead of assembling the drawers yourself, you can purchase them assembled, along with the guides, from a specialized store.
- Pull-out nets and baskets, in which it is very convenient to store a wide variety of things.
- Holders for ties, belts, trouser holders for convenient storage of trousers.
- Retractable hangers can be used instead of rods, especially in projects where the sections are small in width.
- Pantograph (clothes lift) - very convenient for storing clothes at the top of the closet.
- Special shoe racks for storing shoes.
After all the parts of the future cabinet have been purchased, you can begin the assembly process, which consists of several stages.
Placement rules taking into account the size and shape of the balcony
The most optimal type of installation of a built-in wardrobe is considered to be its location near the balcony door. It is there that there is some distance intended for storage. If there is no such place, we advise you to consider the basic rules for proper placement of the product:
- near the window - if the corner where the room window comes into contact with the wall of the loggia is free, then it is recommended to install the cabinet there. Then its design may be slightly different: under the window itself it is necessary to make a small table, which is a continuation of the built-in wardrobe;
- in the corner - arranging a corner model will allow you to properly use the space if it is not suitable for other furniture. This option is also suitable for balconies with sloping corners, a photo of which can be found in this material.
You can purchase a built-in wardrobe ready-made, or you can make it yourself. The best option is a built-in niche made of plasterboard and shelves made of chipboard. Timely care of the product and the choice of moisture-repellent materials will significantly extend the life of the cabinet.
Homemade niches
While the owners of apartments in panel buildings are racking their brains on how to hide the “ugliness,” the owners of spacious areas are specially creating niches. It is not entirely clear to them what they will store in the resulting voids. Designers offer the following solutions:
- If a niche is made on the wall where the sink and gas stove are located, use the tips given above.
- A niche is made under the window sill, using it for the kitchen countertop, protruding it into the room. A trash can, a folding children's table, and an additional heating device are placed in the resulting void.
- If there is a desire to make niches on the free side, use drywall and the formed design of the room - it is important to understand the functionality of the resulting voids.
Convenient built-in shelf above the stove
The last option is well-known, since this is done with sufficient space in the kitchen, which is impossible to do in panel houses. The erected plasterboard wall takes away useful space, which must be compensated for by the useful use of niches.
Here designers advise paying attention to the chosen style:
- avant-garde style, content-porary allows for the arrangement of paintings in appropriate themes, vases and other details, but not in large quantities;
- Empire, Baroque, Art Nouveau, Provence - only porcelain figurines, festive tableware is allowed;
- art deco – lighting is required for each niche and no more than 2 figurines;
- classicism - dishes with minimal decor but expensive framing are placed in niches;
- minimalism - 2 small niches on the entire wall in which vases, napkin holders and other useful paraphernalia are placed;
- eco-style - pots with fresh flowers.
A good place for candles to create a cozy atmosphere
High-tech, Scandinavian, loft, country styles do not support the above idea. You should not pile up the presented style if the basics of design do not allow it.
Non-standard ideas for arranging a balcony-boot
Many people are baffled by the boot-shaped balcony. There are a huge number of original ideas on how to turn a completely unnecessary, at first glance, “appendix” into a pantry or a full-fledged built-in wardrobe with a lot of shelves.
The boot-shaped space on the loggia can be used for a pantry or a closet with shelves
To do this, it is enough to install the frame for the shelves, the shelves themselves and sew up the facade. As a door, you can use roller shutters or a swing door made of a material that matches the interior. Instead of a double-glazed window, you can install a sandwich package (plastic-insulation-plastic).
The cabinet helps to give the balcony the correct rectangular shape
Built-in materials
Selecting them is the first stage of preparatory work. The range of potential materials for assembling such cabinets is no different from those that are usually used to make any furniture.
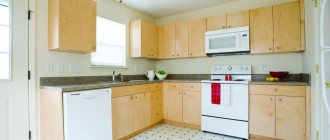
- Wood is a traditional material: environmentally friendly, prestigious, beautiful, easy to process. However, do-it-yourself built-in wardrobes are rarely made from it. The reason for its unpopularity is humidity, which is always higher in niches. It is its fluctuations when opening the cabinet that are the main threat to wood used for cabinet furniture. If the owners have chosen wood, then the material must be found to be impeccable: it should not have any defects - curls, knots or cracks. Impregnation with a water-polymer emulsion or hot drying oil is required.
- Chipboard is the most common raw material. These boards are made from pressed chips using formaldehyde resins as a binder. Laminated chipboard is a more suitable material; it is a constant favorite of the best companies producing this type of furniture. The disadvantage for self-production is that the fine processing is quite heavy, so chipboard or laminated chipboard are only suitable for creating simple structures.
- Fiberboard is another pressed board representative made from steamed wood fibers. Its use depends on the type of material: semi-solid fiberboard is used to make drawers and back walls of cabinet structures, hard and super-hard varieties are already used to create furniture. For built-in cabinets, low-density material is not the best material, even for the bottom of the drawers. The reason is the same - humidity.
- MDF (fine fraction) is the best candidate, as these boards are more environmentally friendly, moisture resistant and dense, because they are made from wood dust, which is compressed at the highest possible temperature. The result of such heating, which ensures excellent quality and complete safety of MDF, is the release of natural resin - lignin, which reliably binds particles.
There are other materials too. The first contender is plywood, which is more often used to create built-in cabinets intended for storage rooms, or sent “in exile” to the country. For the same Cinderella structures, furniture panels are often chosen. Drywall is the black sheep on this list because, due to its low strength and fragility, the material cannot be used as a load-bearing structure. It needs a serious metal frame.
Photo of the cabinet on the balcony
DIY wardrobe on the balcony - examples in the interior
Most often, the following types of cabinets are used in the interior: hinged, sliding wardrobe, and accordion.
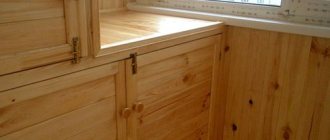
- The accordion cabinet has smaller doors than a design with hinged doors, this saves space on the balcony. They also don't hit the windowsill. The price of such products is not very high, which is also undoubtedly a plus. The model shown in the photo looks simple and natural. The design fits perfectly into the overall style of the interior; the cabinet is made of wood, as is the lining of the balcony itself.
- The wardrobe is very spacious. Its doors are sliding, and when opened they do not take up extra space. But the price category is higher than that of the “accordion”. In the photo you can see two options for sliding wardrobes: with regular doors and with mirrored ones. The advantage of mirrored doors is the fact that they visually increase the space.
- For fairly spacious balconies, built-in wardrobes with hinged doors are suitable. They are also roomy, but with the doors open they take up more space than previous options. The photo shows a wonderful, roomy option. It fits harmoniously into the interior, the white color gives the model elegance and does not clutter up the balcony space.
- The model of cabinets with open shelves, shown in the photo, perfectly complements the design of the balcony; thanks to such a cabinet, the balcony loses its everyday functional purpose and turns into a resting place for its owner.
Sources
- https://mebeldec.ru/shkaf-na-balkon/
- https://mblx.ru/shifoner/vnutri/302-vstroennyiy-shkaf-na-balkone.html
- https://stroy-podskazka.ru/balkony/vstroennyj-shkaf/
- https://okna-dom.net/shkaf-na-balkon-svoimi-rukami/
- https://kachestvolife.club/stroitelstvo/balkon/kak-sdelat-shkaf-na-balkone-svoimi-rukami-iz-dostupnyh-materialov
- https://grand-haus.ru/mebel/kak-sdelat-shkaf-na-balkone.html
859