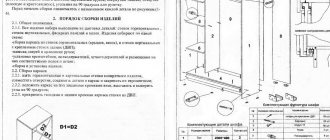
Why do you need to adjust the hinges on cabinet doors?
The work is not difficult, it will take no more than 20 minutes and does not require additional skills
A common cause of warping and sagging cabinet doors is improperly adjusted hinges or operation for a long time. Therefore, door leaves need to be adjusted to the optimal position from time to time. The design of the most common hinge options allows you to adjust the façade in three planes.
Before adjusting the hinges, it is advisable to work with a building level. It is applied to three planes: to two sidewalls and to the front. This way you can determine in which direction the door deviations relative to the body occurred.
To adjust, you will need a shaped screwdriver.
How to Adjust Cabinet Doors
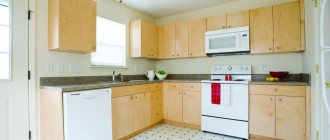
Everyone always has a closet in their home. And a fairly common problem is the curvature of the facade. In this case, the question arises of how to adjust the wardrobe doors. The problem itself does not depend on the manufacturer, but for the most part on the assembly of the structure, and, of course, with long-term use, over time, the doors become bent.
In any case, both old structures and new ones can be adjusted. And if all the work is done correctly and not in a hurry, then the process will seem like a mere trifle to you. But let's take a closer look at the entire door adjustment process.
Vertical adjustment
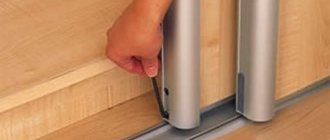
When adjusted vertically, the sash moves back and forth. This allows you to align the vertical and diagonal sagging of the canvas, and align its edges with the side wall of the furniture body. A fastening screw located on the counterplate is responsible for this process.
A fixing screw located on the strike plate is responsible for vertical adjustment.
Algorithm:
- first, set the screws on all hinges to the same position, slightly loosening them;
- press the facade to the body;
- tighten the fastening screws, ensuring that there are no gaps between the door and the facade.
After this, close the door and check for unevenness. Then they act according to the situation. For example, when the upper part of the facade is tilted, the fastening bolt on the upper hinge is tightly tightened. At the bottom, loosen slightly.
By adjusting the bolts, the door is optimally positioned at the same level as the cabinet body. Next, we begin to adjust the doors according to their height.
How to care for fittings
In order for the furniture to last a long time and not cause discomfort during use, you need to regularly care for the hinges.
4 simple rules will help with this:
- The first adjustment of the hinges is carried out immediately after installing the door on the cabinet.
- The interval between the following adjustments depends on the correctness and intensity of use of the cabinet door. If you use the cabinet daily, you need to adjust it 4-6 times, and if you use it irregularly, 2-3 times a year.
- The cabinet facade is regularly inspected for distortions, sagging and door deviations. If deviations appear, adjustments must be made.
- In order for the hinges to last longer, not make sounds, and open doors easily and smoothly, they need to be lubricated. For this purpose, motor and diesel oils and lubricants are used: “Ciatim”, “WD-40”. The hinges are lubricated 1-2 times a year.
Horizontal clearance
By tightening the two screws located on the ears of the strike plate, you can move the doors up and down. This eliminates sagging or upward displacement of the doors relative to the body.
By tightening the two screws located on the ears of the strike plate, you can move the doors up and down
Algorithm:
- loosen the screws on all hinges;
- raise or lower the canvas (as appropriate);
- tighten the screws almost to the limit.
Tightening the screws too tightly may cause the threads to strip.
The best option is to select self-tapping screws with fine threads; they are tightly fixed in the door leaf and help to most accurately adjust the height of the facade.
How to adjust cabinet doors: instructions
First of all, it should be noted that adjusting the cabinet door system is quite simple, but at the same time, you can notice that not everyone is able to cope with it, or rather, they think that they cannot, and first of all turn to specialists for help. Note that this step should only be taken as a last resort, and it is also important to note that in reality, the success of self-regulation depends directly on the perseverance of each person.
Speaking about the work, it is necessary to pay attention to the following factors:
- Before you begin, you need to close the cabinet and carefully examine the position of the doors to determine where changes need to be made.
- Then we open the doors in order to provide maximum access to all the necessary hinges.
- Next, you should check the position of the bottom of the cabinet, and then compare it with the position of the walls of the furniture, which is done using a level.
- Note that the bottom must be completely horizontal, and the walls must be strictly vertical. If this is not the case, then any repair actions will not lead to the desired result.
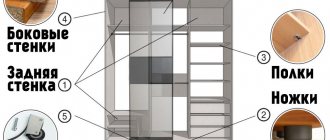
Considering the cabinet door designs in general, you can see that they have a fairly large assortment; by type, they are usually divided into internal and overhead, in addition, the types of hinges can be quite diverse. But you can reassure yourself that the logarithm itself, as well as the direct method of regulation, is identical for everyone. Please note that to complete the work you only need one tool - a Phillips screwdriver.
Let's consider an action plan if the following problems arise:
- The location of the doors is one higher than the other;
- Formation of an uneven gap;
- Poor fit of doors to cabinet.
Vertical adjustment
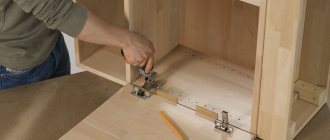
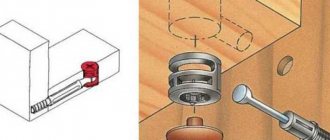
Using an example, let's look at the situation of vertical door adjustment. In this situation, to accomplish this, two screws on hinges will be used, thanks to which the hinge itself is directly secured to the cabinet wall. Let us also note that there are only two of them on each of the loops; in this case it is impossible to confuse them.
The screws themselves are screwed into oval-shaped holes, which, when loosened, allow the sash to be moved a few millimeters up or down, which is usually enough.
The next thing to do is to loosen these screws and move the sash in the required direction. Note that in this case all the hinges should be loosened at once, so this work must be carried out with extreme caution to avoid the door falling, and it is better to do the work together. Make sure that the sashes are at the same level, then tighten the hinges back.
Horizontal adjustment
In the case where a change in the gap is visible, or a discrepancy between the ends of the cabinet and the door, you will need to do horizontal alignment. In this case, it is necessary to use the screw that is located closest to the edge of the door. It is this that allows the façade to be shifted in different directions. In addition, it is always necessary to monitor the coincidence of this gap with the gaps of other types of furniture.
Speaking about the sash protrusion, it should be noted that you will have to use the second screw on the hinge (located a little further from the sash). With it, the procedure is carried out in the same way: you loosen or tighten the screw, through which the sash moves in space.
He will tell you in more detail about how to adjust cabinet doors: the video below:
By plane
The adjusting screw is responsible for changing the position of the facade along the plane; by turning it, you can move the sashes to the right or left. This eliminates distortions of the door relative to the body and the adjacent door.
To eliminate distortions to the right or left, you need to tighten or loosen the adjusting screw. Carry out opposite manipulations with hinges located at different heights until the door is perfectly aligned.
To eliminate distortions to the right or left, you need to tighten or loosen the adjusting screw
Care and prevention
To avoid having to constantly adjust cabinet doors, it is recommended to carry out preventive measures that will help protect the product from rapid wear and distortion.
Care instructions:
- the first adjustment is made immediately after installation and assembly of the furniture (cabinet);
- if the furniture is used infrequently, then adjustments and tightening of bolts are carried out 2-3 times a year, with frequent use - once a month;
- It is recommended to inspect the appearance of the door panels for distortions, deviations, and other defects;
- for better operation and prolongation of the functions of the adjusting mechanism, it must be lubricated with motor or other suitable oil;
- To prevent impacts, you can install a special oil closer; it promotes smooth closing and prevents the canopies from coming loose.
After lubricating the mechanism, it is recommended to open and close the door several times to better penetrate the oil into the device.
The process of correcting distortions in the design of door panels takes little time, and inspection and preventive actions take even less.
What is important to consider when setting up loops
There are 4 conditional laws for adjusting loops, which are important to consider during operation:
- Before work, check the evenness of the cabinet on the plane; it must be leveled.
- First of all, align the door vertically.
- In some cases, optimal results may not be achieved when adjusting the height. The reason is that the door width is too wide. Therefore, tighten the screw that adjusts the width of the gap. It should be no more than 5 mm.
- When working with modular furniture stacked on top of each other, work begins with the upper cabinets. In this case, the weight is distributed correctly, and the adjustment will be most accurate.
To prevent the screws from quickly unscrewing, anaerobic thread lockers are applied under their heads.
If an anaerobic fixative is not available, enamel or paint can be applied.
To prevent the screws from quickly unscrewing, anaerobic thread lockers are applied under their heads.
Key Features
These hinges are used in furniture production and are equipped with a special closer. There is a shock absorber inside the structure that allows the doors to open and close smoothly. Moreover, the products differ in their configuration, size, type, and can be used in the manufacture of various furniture elements.
[adv1]
The key difference between this hardware and its analogues is considered to be silent and smooth operation. This follows from the operating principle and design of the mechanism. There is an additional device inside it. It is also a shock absorber or a special closer. Due to this design, the doors on the furniture façade close neatly and there is no characteristic bang or impact.
There is a spring inside the housing. And this spring has the appropriate filling. Depending on it, the mechanism can be gas, oil or viscous silicone medium.
Based on the peculiarities of the application of this fittings, such hinges are structurally:
[adv2]
- invoices;
- semi-overhead;
- loose-leaf;
- internal type of execution.
They are successfully used for standard and corner cabinets. The same 45-degree corner hinges are great for organizing kitchen furniture and are used for corner cabinets.
The fittings are capable of opening doors at different angles, including 180 degrees and a full 270 degrees. Here a lot depends on the design of the furniture itself and the need to open the cabinets wide.
The operating principle itself is based on the following. The spring is covered with a special liquid, which, when closed, gradually flows into the sleeve located in the capsule of the closer itself. Due to narrowing or expansion (opening and closing), the outflow of fluid provokes the movement of the piston. The valve adjustment determines how quickly the door closes completely.
Advantages
When planning to use such hinges for a false panel or for a kitchen, you are making the right decision. It's easy to explain. By purchasing products from brands like JET or GTV, you get a number of objective advantages. Namely:
- smooth and silent closing of doors;
- long service life;
- ability to withstand loads;
- high-quality fastening on the facade;
- work even with heavy doors;
- possibility of regulation;
- a wide range of;
- availability of excellent manufacturers on the market;
- protection against leakage of oils and working fluids.
By adjusting the operation of the closer valve, you can speed up or slow down the process of opening and closing furniture doors. By applying a slight force, the sash will close itself using its own weight.
Construction and materials
In the manufacture of this type of fittings, materials based mainly on cold-rolled steel are used. Some hinges with a closer function additionally have a lock. To accomplish this, alloys of copper, zinc and aluminum are used.
It is also important to create an anti-corrosion coating so that the fittings do not rust under the influence of moisture and other aggressive environments. The most relevant solution is brass plating.
There is also a decorative coating, for which different enamels and imitation of bronze, chrome, nickel or gold are used.
See also
What is loft style in the interior: what materials are used
Structurally, refined hinges include:
- installation site;
- strike plate;
- cup;
- spring mechanisms;
- overlays;
- movable types of hinges;
- built-in dampers;
- shock absorber
Based on their purpose, hinges are made from different materials and with different designs or structures. For example, if special hinges with finishing are used for glass doors, there is no bowl.
Corner dish dryer: what are they, and are they convenient?
If, when purchasing fittings with a door closer, you do not see who exactly made it, I recommend abandoning such hinges. Go to the same Leroy Merlin. Good selection and always available hinges from leading manufacturers.
Also look at the number of cycles that the manufacturer guarantees. It’s good if this parameter is in the range from 60 to 200 thousand.
How to adjust furniture hinges
To properly set up the operation of the canopy, you first need to check the position of the cabinet itself. Doors on the facade will help sag under their own weight or due to skew of the body. To do this, we check the position of the box with a level and level it either by altering the suspension on the wall, or by trying to adjust the height of the legs.
Any mortise hinge has at least three position adjustment screws. In general, the system allows you to adjust the position of the door, its displacement by 2-4 mm vertically, horizontally and in depth. Since there are usually two loops, the angular deviation can also be corrected. A more detailed description of the screws for adjusting furniture hinges is given in the video:
But you can also use the diagram below.
How to adjust furniture hinges vertically
In all training manuals and manuals, it is usually recommended to begin adjusting the door position by eliminating the most obvious problems with the hinges. If the screws are not screwed deep enough or are loosened at both fastening points, then one half of the facade will simply drop a few millimeters lower relative to the other.
Advice! First of all, you need to check the condition of the screws themselves. If the cabinet is assembled from chipboard of low quality, then it happens that the fasteners are pulled out of the particle board.
In this case, you will need to unscrew the screws, place a piece of a match or toothpick in the hole and tighten the fasteners.
If the fastening is in order, you can adjust the height of the sash by unscrewing the screw 1-2 turns. Next, we will raise the cabinet door level with the other half, fix it and at the same time raise the “butterfly” hinge to the same height. All that remains is to tighten the fasteners with a screwdriver, use a ruler and a level to check the accuracy of the installation.
How to adjust furniture hinges horizontally
Since when opening a cabinet a person usually grabs the corner of the door with his hand, the main part of the load falls on the nearest hinge. As a result, the door may warp, the upper parts of the two doors will collide head-on, and a huge wedge-shaped gap will form between the doors below.
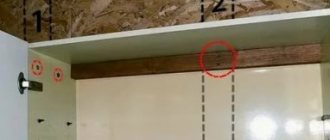
In this case, you have to adjust the horizontal displacement along the front on one of the hinges, usually the top one. To level the position, you will need to unscrew the adjusting screw, which is located first from the end, as in the diagram.
Before adjusting, you need to loosen the screw, align the door and only then tighten the fastening point
If a cabinet with a skewed door has been in use for a long period of time, then you will probably have to adjust the lower canopy. Using a school wooden ruler, it is convenient to control the size of the gap between the edges of the sashes, so as not to adjust, as they say, “by eye.”
You can configure cabinet doors with four hinges in the same way. Initially, you need to adjust the gap on the top and bottom hinges, then use the screws to level the gap in the middle of the sash. One of the options for adjusting the horizontal reach is shown in the video:
How to properly adjust furniture hinges in depth
Front or depth adjustment makes it possible to adjust the size of the gap between the ends of the side walls of the cabinet and the ends of the door in the open position.
Frontal adjustment is the most important; the durability of the hinge depends on the accuracy of the gap setting.
If the doors do not open completely to an angle of 90°, then most likely there is no working gap at all. To fix the problem, you need to adjust the specified distance at 0.6-3.4 mm. Again, it is very convenient to use a ruler as a gauge.
Adjusting the gap is easy:
- We turn out the screw farthest from the facade;
- Place a ruler on the end of the wall and fix it with your hand;
- Next, you need to adjust the protrusion of the screw with a screwdriver so that the cabinet door leaf opens fully.
It is also not recommended to make the gap too large; in this case, you will have to additionally adjust the position of the horizontal movement with a nearby screw.
Leading manufacturers
If you have experience purchasing and installing hinges with special closers from different manufacturers, including those mentioned in this article, be sure to leave feedback. It will be interesting to find out whether these brands are really that good, or whether they also have their drawbacks.
To choose hinges with a closer function, you need to decide the purpose of their use. After all, there are different overlaps, sizes and corresponding configurations. The standard is the popular overhead type hinge with 4 hinges, the mounting holes of which fit a 35 mm bowl. Such hinges are universal and are actively used in the production of all kinds of furniture.
As for filling, gas will be the cheapest option, and silicone and oil fillers are the leaders in terms of reliability.
The following companies are currently considered leading brands:
- Boyard. She's just Boyard. Domestic accessories of high quality with a huge range and reasonable prices. A simple secret to success;
- GTV. Very durable, move smoothly and blend perfectly with different furniture. Adjustment and installation are extremely simple;