How to install a furniture hinge
Correct placement of doors on furniture ensures long service life and ease of use. From time to time it may happen that the doors are sloping or do not open well. At such moments, the mood deteriorates sharply. That is why it is worth paying much closer attention to the correct installation and design of furniture hinges. Installation must take place in accordance with the rules, because all subsequent use depends on the quality of the installation. Real estate aggregator - Real estate notice board in Kropyvnytskyi
In modern conditions, there are a great many varieties of furniture hinges, each of which is popular with customers in its own way. For example, more modern cabinets use a four-hinged type of hinge. In Europe, such loops are called “hidden”.
What are the stages of installing a furniture hinge?
Many home craftsmen are interested in the question of how to properly install furniture hinges. When installing hinges, it is recommended to proceed in the described order:
- The most basic thing is how to mark the location of furniture hinges. The loop itself, as you know, consists of a couple of main parts. This is a cup and a bar. They, in fact, are initially mounted on the door and directly on the frame of the cabinet or cabinet. So markings must be done on both parts of the furniture. In order to measure the distance for furniture hinges and calculate the location of the slats, you can use a special template;
- Next, you need to drill a recess for the furniture hinge. To do this, it would be better to use a drill with suitable drill bits of the required diameter;
- Afterwards, a cup is inserted into this recess and the counter plate is secured. All that remains is to adjust the loop in three directions. And everything is ready.
Figuring out how to hang furniture hinges is not at all difficult.
Marking for loop
An important part of the correct installation of any furniture hinges is, of course, the most accurate markings. If it is done poorly, it will certainly affect the functionality of the door. The correct markings for furniture hinges will help you find the right center to make the recesses.
You need to “move away” 7-12 centimeters from the edge. The number of hinges is standard two, but it can vary depending on the type of furniture. It is necessary to maintain a specific distance between the loops. It is equal to fifty centimeters. The door parameters depend specifically on the number of canopies.
When you have finally decided on the quantity and all the necessary dimensions of furniture hinges have been installed, you can mark the central holes in relation to the width of the door. The distance from the side should be approximately two centimeters. It is also impossible not to take into account that the fastening should not be placed where the shelves in the closet or cabinet should be.
After taking all the necessary measurements, make notes. Remembering to respect the width spacing, mark the placement point. At the intersection of these marks, you need to make a “hole” with a nail or a self-tapping screw. If the facade is higher than a meter, make notes every half meter.
For more accurate markings, you can use a special template called a jig for furniture hinges.
Types of hinges for furniture
The following types of hinges are used for cabinet doors:
- Hinge fasteners consist of two parts and are connected to each other by an axis. This is one of the most popular types of hinges, which were used in furniture made in the USSR.
- Four-hinged hinges are an improved version of the previous type. They are versatile and suitable for various types of cabinets.
Types of hinges: hinged (left) and four-hinged (right)
Furniture hinges are divided into several subtypes, depending on the method of application and, accordingly, the area of application. Let's look at them in more detail:
- Overlay and semi-overlay fasteners are used for exterior furniture doors.
- Inset hinges are designed for internal partitions.
- Corner fasteners are suitable for assembling corner cabinets, regardless of their configuration.
- Inverse hinges are installed if it is necessary for the furniture door to open at an angle of up to 180 degrees.
Types of furniture hinges depending on the method of application
Drilling holes
Installation is carried out with all the rules:
- The depth of the hole for the furniture hinge should be about thirteen millimeters. If possible, the insertion of furniture hinges should not be deeper, otherwise the front side of the canvas may crack;
- The diameter of the hole depends strictly on the cup of the loop. Tools must be completely aligned with their axis to prevent damage to the surface;
- A sharpened cutter will help protect the blade from damage and chips;
- Do not rush while drilling, otherwise there is a risk of doing it sloppily;
- It is worth paying attention to the dimensions of the cups and their dimensions when installing furniture hinges;
Having drilled one hole, proceed to the next and so on until all the holes for laying the hinges are prepared.
What tools should I use for this?
The bowl must be secured to the facade, and the bar to the body of the bedside table. The furniture hinge must be inserted into the hole, which must be made in advance. The shoulder of the loop becomes a kind of bridge, now connecting both parts. To make holes for such loops, you need to prepare the following tools:
- screwdriver or drill;
- special drill-mill;
The diameter of the cutter for the hole for a furniture hinge is 35 millimeters or 25-26mm. It is selected depending on the size of the loop cups. To create holes for such hinges, you can also use a simple drill.
A multifunctional drill, with attachments that are easy to replace, is quite suitable for such work.
The middle spike must be installed in the center of the circle, outlined using a specially prepared caliber. Automatic calibration is used on the corresponding machines, but at home the master cannot do without a specialized electric tool.
During installation, hinges require a high level of care and precision. The chance to complete exactly the required niche is the most important advantage of the so-called Forstner drill. It can provide a stop that will prevent you from penetrating further than required. And the teeth of the drill do not allow it to deviate from the intended “course”. The end result is an almost perfect hole. And due to this, the cup fits into the recess quite tightly.
Preparation for installation
A process such as installing hinges on a cabinet involves several stages of work. First you need to determine what tools you will need. For installation you will need to prepare:
- pencil;
- level;
- roulette;
- screwdriver (screwdriver);
- drill;
- hammer;
- fasteners;
- self-tapping screws measuring 4x16 mm.
Installing furniture hinges: what you need
Installing a hinge on the door
Loops must be placed in the recesses made. Then adjust their location in relation to the facade. All canopies must fit snugly to the facade. And if their position is not corrected, the door will very quickly begin to warp. After aligning the hinges, you need to use a pen or regular pencil to mark the points for securing the screws.
Next, you need to attach the door with screws or a Euroscrew to the piece of furniture itself. In particular, a cabinet or bedside table. The algorithm of actions in this case is as follows:
- Mark the points for installing loop pads;
- Attach platforms for mounting the installed hinges;
- Attach the door to the side of the cabinet;
- Connect the loop;
- Adjust the doors using a regular screwdriver.
It is better to hang doors on a smooth surface. The side of the cabinet where the hinge strip is attached must lie horizontally. This will make fitting and connecting the door more comfortable. The door can be adjusted in a vertical position.
Adjustment
Adjustment (or adjustment) is the final stage of installation of furniture hinges. It must be performed in several planes at once - vertically, horizontally, and in relation to depth:
- Adjusting the depth will help press the door closer to the body, or ease the pressure. You need to tighten the oval hole.
- On the vertical side - it will help to move the facade. This is done by twisting oval-shaped holes.
- On the horizontal side - ensures free movement of the door back and forth and back. The purpose of this adjustment is to avoid gaps between the cabinet and the door. The method is great for rooms with uneven floors or walls.
Now you know how to secure furniture hinges. As you can see, this is not so difficult to do. You don't need to have any special skills or abilities. Doing this kind of work with your own hands will be another reason for a little pride.
Leveling and Adjustment
Furniture fastenings need adjustment. To do this, during the installation process, their fixation in depth and distance is checked. This can be done with horizontal or vertical position of the cabinet parts. After assembling the furniture, all preliminary calculations will turn into results, so it is important to spend more time on marking and connection parameters in advance.
When choosing, you must first of all pay attention to the strength of the product; it should serve throughout the entire life of the furniture.
After installing the fasteners on the cabinet doors, you must carefully try the doors against the sides so that they match exactly. Mark the joints with a pencil. Fix the door and do fastening work on both sides. It is important that the accuracy of all cabinet parts is one hundred percent. Finish assembly and check operation.
When opening and closing for the first time, the doors may move somewhat stiffly if the hinges are not yet lubricated and developed.
After attaching the hinges to the cabinet is completed, it is recommended to drop a little machine oil inside the mechanism. Then you need to wipe the surface with an absorbent cloth.
Check that all elements are working properly.
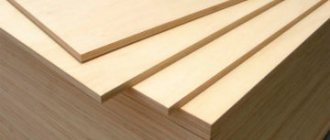
For a cabinet made of chipboard, it is better to take wide hinges, since the base material can crumble.
The better quality all the elements of the assembled furniture are, the more reliable their operation will be.
When installing hinges on cabinet doors, do not forget that after a while the doors may sag under their own weight, especially if they are often left open. Therefore, it is necessary to periodically strengthen the hinges by tightening the screws. In modern fasteners this is easy to do - there is an additional recess in the oval part.
Try to adjust the parts carefully so as not to loosen the grooves.
It is also necessary to lubricate the cabinet hinges from time to time to prevent them from rusting or squeaking. When adjusting the fasteners, it is necessary to fix not only the screws connecting the cup or bar, but also the parts of the closer. The mechanical part may wear out from use. Therefore, it is important to have 2-3 spare elements to replace a broken part. “Drawdown” is indicated by distortion and loose cover. Work is carried out more often in rooms with uneven floors and high humidity.
If adjustment does not help, you should replace the old parts with new ones.
When changing fasteners on used furniture, you need to look at how suitable they are for it. It may be necessary to change the location of the new hinges due to loosening of the grooves.
In this case, it is recommended to disassemble the furniture and perform all installation operations again.
After adjustment, check for gaps, tight fit of the doors when closing, overall mobility and evenness of the sash along the axis.
When installing several fasteners, you should make sure that their location does not get on the internal elements of the furniture.
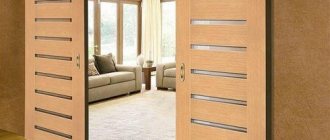
Installation and adjustment of kitchen doors
The article is a practical guide to self-installation and adjustment of furniture hinges. The chief technologist of furniture production will talk about hinges, their internal design, fastening methods and adjustment options.
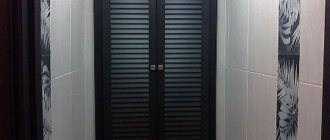
The first thing the eye stops at, even when briefly examining the furniture, is the façade.
A significant portion of the cost of the finished product also depends on the material and complexity of manufacturing the facade.
Crooked doors can spoil the impression of even the most expensive and high-quality furniture.
And although I recommend not skimping on assemblers and always order professional installation of a new headset, the skills of independent fastening and adjustment will also not hurt.
If only because any fittings wear out over time and require tightening or complete replacement.
Required materials and tools
Initially, you should prepare the materials and tools that will be needed during the installation process. Their number and features may vary depending on the type of fastening mechanism. The most commonly used are four-hinged hinges, which are attached at the top and bottom. At high heights and significant weight, the number of mechanisms increases.
In this matter, the main thing is accuracy and precision, since even a millimeter mistake will ruin the entire impression of the new furniture.
You will need the following tools:
- Self-tapping screws measuring 4 millimeters by 16;
- Roulette or meter tape;
- Hammer;
- Drill;
- Screwdriver;
- Screwdriver;
- Pencil or marker;
- Level and triangle.
The mechanism for fastening the door itself acts as the material. They differ in construction, material, design and function. When choosing hinges, you should base your choice on the size and type of furniture.
Note! When choosing materials, you need to be based on its quality - the service life directly depends on this.
It is best to take fastening devices that have personal quality certificates. This will save you from possible problems, and the furniture will last much longer.
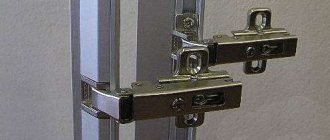
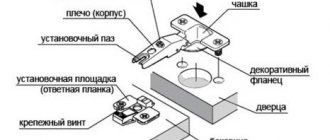
Furniture hinges and methods of fixing them
First, I propose to define the terminology. We will hang our door on a standard furniture four-hinged hinge with structural elements:
Determining where the cup is on the loop is easy. This element has the shape of a recess with “ears” for fastening.
The cup is located in a blind hole with a diameter of 35 mm on the door . The hole is made at the factory, and I do not recommend trying to drill it with improvised means without special equipment and a cutter of the required diameter.
This requires a certain precision, which cannot be achieved in artisanal conditions.
The hinge arm is a lever permanently connected to the cup through hinges. Attached from the inside to the side wall of the cabinet using a striker plate.
The strike plate is directly fixed on the surface of the stand. Has two screws for subsequent adjustment of the facade after installation.
Furniture hinge in open state
Furniture hinge closed
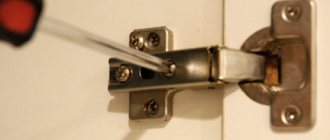
Before hanging the door, you need to attach the cup with the shoulder to the door and the strike plate to the stand.
Installation of fasteners
The cabinet doors are first fitted to the sides to make precise markings. The initial stage of installing the hinges is drilling holes for attaching the cups.
Making hinges in a vertical position of the door is not always convenient. This will potentially reduce the accuracy of the connection.
Place the sash on a flat surface, securing it. Drill holes for the cup using a drill and cutter. It is important not to make too large recesses, 1.2 cm is enough. Insert the cups into the holes and screw the screws into the door part of the mount.
It is necessary that they fit into the grooves evenly, without distortion, otherwise the door will not be secured correctly.
To install the connecting parts, place the drill vertically - any tilt will make the work poor quality, and chips may appear, due to which the fastening will not hold securely. The strike plate on the side of the product can also be installed in a vertical position of the panel, having previously marked the joints.
When drilling, the drill must also be held very level.
If overhead parts are used, they are made “blind” so that they do not fall apart during connection and assembly. Such fastenings should not have gaps or distortions. Use help when connecting the sash and side frame.
Together, the work process will be more convenient, better and more accurate.
Installing connecting parts on glass doors requires special care and attention. For such sashes, special fasteners are purchased. On the side of the side you will need holes that are drilled using a drill.
The glass sheet is fixed with clamps.
What are the features of each type of fastening?
I think we shouldn’t stop at self-tapping screws, so let’s move straight to the footings.
- The fittings are bushings pressed into the facade material, with an internal thread for a mounting screw. Thus, the hole in wood, MDF or chipboard is not broken due to repeated replacement of hinges.
- A Euroscrew is more reliable than a self-tapping screw, but it can only be screwed into a pre-prepared hole.
- Installing clip-on hinges requires not only drilling holes, but also maintaining the exact dimensions, otherwise they will not be able to be secured.
Adjusting the hinges
Adjusting the facades consists of aligning them in relation to each other and to the walls of the furniture.
Especially for this purpose, a gap of 3–4 mm .
Please note that alignment is only possible when the cabinet is level and both of its diagonals are equal to each other. Let me remind you that the facade must also be smooth.
Hinge adjustment steps:
1 Adjust the height of the facade
Vertical grooves on the canopy strike plate allow you to adjust the door height. Loosen the mounting screws and sweep the door in the desired direction. Tighten the screws.
2 Adjust the depth of the door
You need to adjust the depth in three cases:
- when the door does not open or close, resting against the door;
- when it is visually noticeable that the closed door protrudes too much at the place where the hinges are attached;
- if when opening the door there is a significant gap near the awnings.
The depth can be set by a screw on the strike plate, located further from the cup.
Loosen the screw on one or all hinges (as necessary) and slide the door in the desired direction. Retighten the screw.
3 Shift the façade to the sides
This adjustment option is necessary for uneven gaps between adjacent facades.
The door is moved to the right or left by rotating the screw closest to the cup on the canopy striker plate. It does not need fixation.
There are many types of hinges, so I suggest you determine the desired direction of rotation of the adjusting screw experimentally. Further setup will not be difficult.
Once you have completed adjusting the hinges, make sure that the doors do not slam loudly when closing.
Use an inexpensive option - an adhesive-based silicone shock absorber.
I hope my tips will be useful both for adjusting doors on old furniture hinges and when installing fronts on a new kitchen set.
Always yours, Timur Denisov
Share the link on social networks!
Help your friends find answers to their questions!
Selecting hinges for installation on cabinet doors
Most consumers, when choosing certain interior items, pay attention to the quality of the fittings with which they are equipped. This approach is due to the fact that it is this element that can affect how long the products will last before the first repair. It is worth noting that this statement applies to all elements, including loops.
The hinges are made in the form of mechanical devices that are installed on the front part of the body of cabinets or other pieces of furniture, thanks to which the door can be opened at a certain angle. Today, these accessories are offered in a large number of options , which differ from each other in design, purpose, installation method and other characteristics. Due to such a wide variety of these elements, the average consumer is faced with difficulty when choosing fittings, and how difficult it is to understand which option is suitable for specific furniture.
What to consider?
If suddenly, for some reason, a person needs to choose and buy hinges on his own, then this issue must be approached wisely. And you need to purchase only high-quality awnings, despite the fact that they all look the same on the display case. It is better to take those that are more expensive, but from a trusted manufacturer, than suspiciously cheap ones. Poor quality hinges can:
- quickly become loose and require constant adjustment;
- start creaking or closing poorly;
- break;
- start to rust.
How to choose furniture hinges
Important! It is worth refusing to buy Chinese hinges. These structures are very unreliable, as a rule, they collapse very quickly and cease to function. Low-quality alloys are used for their production. And China supplies defective hinges to our markets in very large quantities.
By installing cheap hinges, you can save money only in extremely rare cases. Typically, such structures require early replacement, which means additional costs and a waste of time for dismantling the old loop and installing a new one. The miser pays twice - a saying that is very true when it comes to furniture hinges.
How to choose furniture hinges
Primary requirements
Although many consumers pay attention to the appearance of the fittings and the method of fastening, when choosing, they must proceed from parameters such as strength and endurance. If you neglect this recommendation, the purchased fittings will not be able to cope with the load and will break before the time stated by the manufacturer.
For this reason, companies specializing in the production of furniture hinges and other products, which strive to maintain a good reputation, strive to make them of high quality in the process of manufacturing their products.
It is noteworthy that it does not matter what design the consumer decides to buy hinges, since any similar product will be of high quality.
How to attach hinges to a cabinet
Installation of the mechanism includes two stages: fastening to the frame and directly to the door. Let's take a closer look at how to properly screw the hinges onto the cabinet.
Marking and drilling
The first step is marking. This is necessary for proper fastening of the mechanism. You cannot make mistakes, otherwise it will affect the appearance and functionality.
An important stage in the installation of furniture hinges is the preparatory process, which consists of taking measurements and preparing blanks.
In order to mark, you need to use a pencil or marker to mark the areas for fastening. Make an indent of about two centimeters from the edge of the frame. The distance between adjacent devices must be at least half a meter.
Accuracy in marking can be achieved using special templates.
Note! The fastening should not be too close to the shelf in the frame, otherwise the door will not close completely.
Now you can start drilling directly. To do this, you will need a drill and a cutter (if you don’t have a drill, you can use a screwdriver). You need to drill as carefully as possible so as not to make the hole too deep. Its depth should be approximately one centimeter. Make sure that the cutter is strictly at a right angle in relation to the board, otherwise cracks may appear and the hole will quickly begin to loosen.
After all measurements have been made, you need to drill holes.
Installation
The second stage of installing the mechanism is to hang the hinge on the cabinet board. The work must be carried out in exactly this order: first on the frame, and then on the door itself. Sequence of work:
- Place the design on the markings and confirm it again with a pencil;
- Using a screwdriver, screw the screws into the hinge grooves;
- Screw in the fasteners.
When installing fasteners, it is very important to determine their location and how to hang them correctly, since the service life of the furniture set largely depends on this.
Ready. Make sure that when screwing, the mechanism fits snugly to the wood.
It is recommended to place the fasteners at the same level so that the hinges are loaded equally.
Fastenings for wooden furniture
The vast majority of cabinets and other types of wooden furniture are usually equipped with four-hinge hinges.
Thanks to the special design of these fasteners, it is possible to open cabinet doors by 92-180 degrees. They also allow adjustment in three planes. The following elements can be distinguished at the basis of four-hinged fittings:
- hinge installed on the door;
- mounting strip, which is placed on the side wall of the cabinet.
The four-hinged canopies offered today can be classified into several groups:
- Overhead fittings. It is advisable to use this type of hinge for furniture in which the door covers the side parts of the niche where it is installed.
- Semi-overhead awnings. You should opt for such fittings when one side panel is covered with two doors at once.
- Internal loops. Their main purpose is to secure doors from the inside.
- Fittings that allow the door to be mounted at an angle of 45 degrees. It is best to use this type for corner cabinets and cabinets.
- Inverse mechanisms. Thanks to the presence of hinges of this type, it becomes possible to open the sash 180 degrees.
- Piano awnings. Due to the low reliability of such fittings, manufacturers rarely equip furniture with them. The most common option where they are used is sliding facades of antique interior items. They are also often present in the design of cabinets made in retro style.
- Card loops. Fittings of this type are made in two versions: collapsible or non-dismountable. At the same time, you can find card canopies on sale, which are distinguished by their original design, having the appearance of certain figures. The detailed solution gives them a very impressive look.
- Mezzanine fittings. The main element in such hinges is a spring.
Other types of furniture hinges
Card, piano, and hinge hinges are rarely used for installing cabinet doors. They do not have three-level adjustment and do not lock the door in the open and closed position. An additional fastener is needed. Today they are more often used as an additional decorative element. For example, antique.
Mezzanine
For installation of horizontal overhead panels that open upwards.
Mezzanine
Canopies on glass sashes
In the design of fittings intended for glass cabinet doors, the following elements can be distinguished:
- mounting strip, which is attached to the side of the cabinet;
- fastening mechanism;
- a sealing ring necessary for fastening the fittings to the glass sash;
- a plug used to make fasteners invisible from the outside.
The standard version of the hinges that are equipped with glass cabinet doors is the use of two types of plugs and sealing rings. Most often, the former are designed in the form of a circle , and the latter – in a full circle. The final decision on choosing one type of hinge or another for a cabinet door must be made by the consumer himself. One of the possible solutions for installation on glass sashes can also be magnets.
How to install swing and sliding doors in a closet with your own hands
In a spacious or small apartment there are always wardrobes, cupboards, and bedside tables that provide places for organizing and securely storing clothes, dishes, books, and other necessary things behind a closed facade.
This is why cabinet doors perform one of the most important structural functions. Today it is proposed to use various methods of fastening traditional swing doors, as well as sliding ones, which are installed mainly in sliding wardrobes. You can install any doors into a closet with your own hands if you familiarize yourself with the mechanisms of their operation and follow detailed instructions.
Installation and adjustment of fasteners
Sometimes situations occur when the owner, through careless actions, damages the loop, causing it to leave its place or move. In this case, he must correct everything and adjust the fastening.
The most common type of malfunction is associated with a phenomenon in which the hinges “pull” the door. It is worth saying that this can happen with piano hinges. Here it is important to install the hinge very accurately , doing everything without haste.
To install the fittings, you should prepare a number of tools:
- accessories that need to be installed;
- drill bit with end tip;
- mounting plate;
- fasteners.
Adjustment for horizontal divergence of furniture doors
The main task here is to install the door in such a way that there is a gap on the fastening side, and when closing the door, the reverse side extends beyond the boundaries of the cabinet walls. If the furniture has two doors, they should cling to each other.
The adjustment process itself comes down to manipulating a special adjustment screw, which is found on furniture hinges. Finding it is quite simple: its usual location is the hinge arm, located closest to the door, in contrast to the mounting screws and the additional adjustment screw. If this screw is screwed even tighter, this will lead to an increase in the gap between the end of the door and the cabinet wall. By doing the opposite, that is, by loosening the screw, we reduce the distance between the designated elements.
Adjusting the depth of the cabinet door
While using a cabinet or other furniture, the owner may notice that its door, when closed, goes beyond the boundaries or, conversely, is too recessed into the cabinet. In this case, the adjustment procedure will be similar to that used in the previous case. To do this, you need to again find the adjusting screw on the hinge arm, remembering that it should be closest to the cabinet wall.
The purpose of this screw is not only to adjust, but also to secure the door. Thus, if you unscrew it slightly, it will be possible to move the door back and forth in relation to the walls. To make the adjustment, you need to determine the appropriate position of the door, move it to it, and then tighten the adjusting screw until it stops.
Remember that it is not only important what design of fittings you buy for your furniture. It is also important that its installation is carried out by a qualified installer. In this matter, every little detail is important , which can affect the service life of the entire product.
This type of fittings, such as hinges, plays an important role in influencing the service life of furniture. Therefore, you should approach its choice just as responsibly as choosing a cabinet or cabinet. The design features should , because if there is a discrepancy between the fittings and the product itself into which it will be installed, then this part will not last long.
Also, at the selection stage, you should inquire about the maintenance features of a specific type of furniture hinge. This is important due to the fact that in the absence of knowledge about how to properly adjust the fittings, the owner will not be able to use the furniture with all convenience. And in this case, he risks bringing closer the moment when he will need to look for new loops to replace those that will soon fail.