By “hinge addition” it is customary to understand the sequence of operations for attaching a hinge to the facade (door) of furniture. As a rule, we are talking about the so-called. four-hinged hinges, which are the most common in the production of cabinet furniture. To attach a four-hinged hinge to the facade, it is necessary to make a special seat on the back side of the facade - a blind hole of a certain diameter and depth. This article will discuss how to properly attach a furniture hinge using a minimum set of hand tools.
Required tool:
- Construction corner (square).
- Pencil.
- Kerner (optional).
- Metal drill with a diameter of 2 mm (optional).
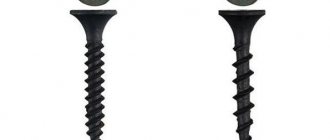
- Faustner drill with a diameter of 35 mm (or 26 mm for reduced hinges).
- Electric drill.
A Fostner drill (mill) is a very common piece of equipment used to make blind (not through) holes in soft materials. When purchasing a Fostner drill for adding furniture hinges, you need to pay attention to several points. First, the needle (the central sharp tip) of the drill should be well centered (without noticeable runout). Secondly, the drill must have carbide (often called Pobedit) cutters, otherwise it will become dull very quickly. The length of the centering needle is a very important parameter. If the length of the needle is too long, there is a risk of drilling through the facade. If the length of the needle turns out to be insufficient, then the drill (when drilling with a hand drill by hand) will move to the side. As a rule, the length of the needle of a new drill has to be reduced (ground down) by about 0.5 mm. Professional (machine) Fostner drills have a reduced needle length or do not have one at all, since they are intended for special filler machines or machining centers, where accuracy is ensured by other means. It is strongly recommended that before drilling into a façade, you do a test drill in a similar material of the same thickness.
Preparation.
The surface of the workbench on which the additive will be performed must be smooth, clean, and non-slip. Under the facade you can put, for example, a sheet of thin rubber, a piece of foamed polyethylene (a type of insulation) or several layers of stretch packaging film. It would not be superfluous to secure the façade with clamps. Do not forget about personal safety; use safety glasses when drilling.
Marking holes.
Marking is a responsible operation. The accuracy of the loop installation and the correctness of its operation depend on its accuracy. The figure below shows the dimensions for marking. Particular attention should be paid to a distance of 21-22 mm from the working (along which the hinges are attached) side of the facade. The other indentation (in the picture on the right/left) is not so important in terms of accuracy. The main thing is that the first and last hinges of the facade are located at distances from 70 to 150 mm from the sides of the facade adjacent to the working side. The total number of hinges on the facade can be two or more, depending on the size and weight of the facade.
Indents for marking.
Indentation 21 mm.
Indentation 100 mm.
Core drilling center.
After marking, everything is ready for drilling.
Drilling a hole for the hinge.
Before drilling, it is recommended to punch the center of the drill. Drilling must be done at a rotation speed of about 1500 rpm; too high speeds will lead to burning of the facade material, and the cutter will quickly become dull due to overheating. When drilling with a hand drill, it is recommended to perform light circular movements (describing a cone with the apex on the drill needle) of small amplitude, this will increase the efficiency of material sampling. Since the drilling depth is, by and large, controlled by eye, from time to time it is necessary to stop drilling and measure the depth (the easiest way to do this is using an existing loop). As a rule, a depth of 12 mm is sufficient.
Drill with Fostner drill 35 mm in diameter.
Drilling is complete.
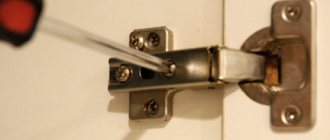
Attaching hinges to the facade.
This is the simplest operation. To do this, you need to insert the loop into the drilled hole, level the area of the loop bowl using a square, mark the fastening points with a pencil and, after preliminary core drilling and/or drilling (with a drill about 2 mm in diameter), screw the loop with two 3.5 × 16 mm self-tapping screws (the length of the screws depends on the thickness of the facade). Small installation inaccuracies (up to 1 mm) do not need to be corrected. With some experience, the hinge can be screwed on without marking, punching or drilling, but simply using the attached square.
Align with a square and mark the hinge mounting holes with a pencil.
Punching holes. No drilling was performed.
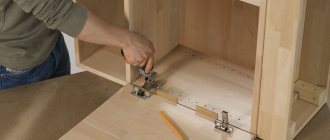
We looked at the principle of manually adding a loop, which can be done even at home. However, it is recommended that the addition of loops be carried out using specialized equipment (even homemade), the most affordable option is the usual vertical type in the entry price category. This will significantly increase labor productivity and reduce the risk of damage to facades.
The master class shows a simple technology for inserting cup-type furniture hinges using a manual router. Using an inexpensive mortise bit and a homemade template, you can quickly make professional-quality blind holes in your home workshop.
Recesses for cup hinges are often made with a Forstner drill, but the holes rarely come out neat and precise. And the centering spike of the drill easily pops out from the back of the furniture board. The use of a manual milling machine allows you to make holes no worse than factory ones.
Tools used:
- Drill.
- Ballerina drill.
- Thin drill.
- Fraser.
- Copy sleeve.
- Straight groove cutter 8-14 mm.
- Emery cloth.
- Hacksaw.
- Clamp.
- Calipers.
- Square.
- Screwdriver.
- Awl.
The procedure for making a template
1. Determine the thickness of the plywood for the template: it should be slightly larger than the protruding part of the copy sleeve. You shouldn’t take material that is too thick - the cutter’s reach may not be enough.
2. Measure the outer diameter of the copy sleeve.
3. Calculate the size of the cut hole (D) using the formula:
D = D1 + D2 – D3, where:
- D1 - required diameter of the recess for the hinge (26, 35 or 40 mm);
- D2 - diameter of the copying sleeve;
- D3 - cutter caliber.
For example, for a furniture hinge with a 35 mm cup with a 14 mm cutter and a 30 mm sleeve, you will need a template hole with a diameter of 51 mm.
4. Cut a blank from plywood and mark the center of the hole to be drilled according to the drawing.
5. Having placed an unnecessary board, secure the plywood with a clamp and use an awl to mark the drilling point.
6. Having set the desired size on the “ballerina”, drill a hole.
Advice. The accuracy of the operation affects the quality of the manufactured template. It’s better to try the sliding drill on an unnecessary board and adjust the size.
7. Use sandpaper to clean the edges of the hole.
8. Cut a strip of plywood 3 cm wide and 14 cm long.
9. Draw a line parallel to the axis of the hole at a distance of 22 mm, marking the location of the edge of the furniture door.
10. According to the markings, secure the thrust strip with glue and nails.
11. Move the center line to the other side of the workpiece to make it easier to determine the location of the loop.
12. The template is ready.
Features of eccentric furniture screeds, installation rules
In the production of furniture, various types of fasteners are used, which ensure the reliability and durability of the structure. The eccentric furniture tie has become the most common in recent years. It is also known as “minifix” or “rastex”. An eccentric tie allows you to fasten elements at different angles, assemble and disassemble products several times. Furniture assembled using such an element is incredibly durable.
Scope of application
Furniture fasteners are used for L-shaped and T-shaped connections. Minifixes are in demand when assembling cabinets, tables, and chests of drawers. They connect the lids and bottoms of cabinets, as well as the tops of computer and dining tables, bedside tables and chests of drawers. In addition, eccentric furniture ties are used to fasten parts where it is not possible to drill holes. For horizontal elements, such as shelves, it is more convenient to use plastic ties. Bulky structures are assembled using reinforced eccentrics. Such fasteners are placed in the housing and contain an additional fitting.
The furniture is connected in such a way that the minifixes remain almost invisible. They can only be seen from the inside of the product. This point can be considered an advantage of this type of fasteners, since they do not spoil the appearance of the furniture. The eccentric tie makes assembly of products simple, quick, and also adds additional rigidity to the entire structure.
Materials and equipment
The eccentric coupler consists of 3 elements: a stand, an eccentric and a fitting that acts as a nut. There are several types of fasteners, which can be divided into groups depending on the material of their manufacture, the length of the stand, diameter, size, type of fastening of the self-tapping screw and fitting.
If you often disassemble and reassemble furniture, this type of fastener will be the best option. It is ideal for products made from chipboard and chipboard.
Eccentric furniture couplers can be metal or plastic. The material depends on the scope of application of the interior items. For example, when assembling kitchen sets, metal fasteners are used, while plastic fasteners are suitable for small items. The racks can be short up to 38 mm and long up to 58 mm. There are minifixes with a diameter of 12, 15 and 25 mm. Parts with a diameter of 15 mm are the most common. For the latter, the largest ones, special plugs made of polymer material are provided. The sizes of the ties are as follows: 5x50, 7x50, 7x70 mm. This allows them to be used when assembling almost any type of furniture.
Unlike self-tapping screws, eccentrics allow you to fasten elements at different angles. Most often, ties are used to connect parts at 90, 135, 180 degrees. Depending on the type of connection, the types of fastening are as follows: self-tapping screw and screw. Manufacturers produce fasteners of different configurations. May include:
- Eccentric;
- Futorka;
- Stock;
- Bushing, dowel;
- Stub.
Loop insertion order
1. Mark the furniture door based on the recommended distances between the hinges.
2. Using the stopper against the end, place the template on the door and secure it with a clamp.
3. Place the router in the work area, lower the tool body until the cutter touches the surface of the workpiece and clamp the locking lever.
4. Lower the depth gauge to the position support.
5. Count 11.5 mm on the scale and set the stopper position.
6. Tighten the routing depth adjuster lock.
7. Adjust the parameter using a micrometer screw.
8. Release the locking lever.
9. Rotate the positioning support to set the depth of the first pass.
10. Start the router, press the body and fix the position. Smoothly moving the tool along the surface to be processed, cut out the material, starting from the circle and moving to the center.
11. Once you have completed the passage, release the latch. Rotate the support to the next position and repeat the process until the recess is completely exhausted.
Advice. If there is no sawdust removal system, it is recommended to clean the work area with a vacuum cleaner after each pass to avoid milling defects.
12. A neat seat is ready.
13. Insert a loop into the recess, align and mark the location of the screws.
14. Drill for screws, limiting the drilling depth.
15. Screw the hinges with countersunk screws.
After inserting the hinges, proceed to the door hanger, for which mark the location of the mating parts. In our example, the markings for the screws are 37 mm from the end of the chipboard. For other modifications of the fittings, determine the size locally: having assembled the hinge and positioning the front adjustment screw in the middle, lean the door against the side with a gap of 2 mm and place marks through the oblong holes. Complete the work with adjustment operations.
Adjustment screws: 1 - height; 2 - in depth; 3 - in width.
Inserting furniture hinges is not as complicated an operation as it might seem to an inexperienced person at first glance, but to do the job well, it is recommended to have some skills and tools.
With the right and responsible approach, and following the instructions below, installing furniture hinges will not take much time, and construction enthusiasts will also have a fun time. So, let's look at what you need to know about furniture hinges, and, in particular, about their correct installation.
Fastening - loop
| Drum rope fastening systems. |
Fastening with a loop (Fig. 8, a) is carried out by bending shaft 1 or hub 5 of drum 2 twice with rope 4, followed by tightening the branches of the rope with clamps 3, and the number of clamps must be at least two.
| Drum rope fastening systems. |
Fastening with a loop (Fig. 8, a) is carried out by bending shaft 1 or hub 5 of drum 2 twice with rope 4, followed by tightening the branches of the rope with clamps 3, and the number of clamps must be at least two.
It is proposed to replace the fastening of the hinge to the corresponding parts with rivets by welding, in which case drilling, riveting and chamfering operations are eliminated. In addition, there is no need for rivets.
| Fastening wires to pin insulators of intermediate supports using wire knitting. |
To fasten the loop (loop) 8 of the wire at the top of the support, install a stand hook 9 with a pin insulator on the side / The wire is secured to the hanging insulators with tension clamps 6, as on an overhead line with hanging insulators.
If the rope loop is fastened with clamps, check the compliance of the design, diameter and safety factor of the rope with the passport data.
When attaching a loop of a fixed branch of a pulley rope with horn clamps, the handle of the latter should be located on the side of the end of the rope loop.
Loose rivets securing the trunk lid hinge are tightened using crimping and tightening. When tightening the rivets securing the hinge to the bracket, it is necessary to ensure free rotation of the hinge lever.
Open the hood, unscrew the bolts securing the hood hinge to the body and, disconnecting the spring stop, remove the hood.
Ropes with lifting mechanisms or their units, as indicated, are connected using a loop fastening method. All cargo slings and many load-handling devices are also equipped with loops.
| Reaction forces in the fastening points of the cross-shaped connection and at the level of the main. zero moments of a portal-type wooden support with a cross brace.| Diagram of the distribution of vertical weight forces along the legs of the A-truss of a portal-type wooden anchor support.| Portal Type Wooden Anchor Support.| Distribution of vertical ( a and horizontal ( b) forces between the A-shaped trusses of a portal-type wooden anchor support when wires break. |
To ensure the required distances without increasing the width of the support and the lengths of the logs, shift the traverse relative to the A-trusses of the support or fasten the loop with an additional garland of insulators, or both measures together. To facilitate the working conditions of the cantilever end of the traverse, an increase in the distance between the A-trusses is used, compared with the distances between the legs.
To connect aluminum and steel-aluminum wires in the loops of overhead line anchor supports and make taps, PA type die clamps are used in accordance with Fig. 1.41 and table. 1.131. Clamps of the PA-1-1 brand are also used for fastening loops of wires when anchored to pin insulators. In connecting die clamps, the wire is secured by tightening the dies with bolts. After tightening the bolts, there should be a slight gap between the edges of the grooves of the dies and the body. The presence of a gap confirms that the clamp is selected correctly. After a few days, it is necessary to further tighten the bolts, since due to the deformation of the wires, the pressure in the contact weakens somewhat. When the bolts are fully tightened, the wire is firmly secured with dies.
Types of loops
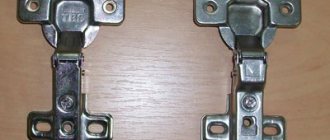
Installation of furniture hinges directly depends on their type. In practice, you can most often find the following types of loops, which have their own characteristics and advantages:
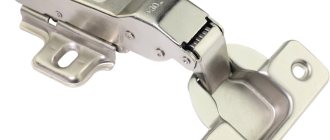
- Invoices. They are highly widespread, especially in the design of hinged bedside tables, cabinets, drawers and other pieces of furniture. When opening, the movable part of the overhead hinge rotates 90 degrees. They have wide adjustment possibilities due to the presence of many adjusting bolts.
- Semi-overhead. The fastening of such a hinge is provided on the inside of the furniture body; it is often used for cabinets and bedside tables with three or more fronts.
- Internal. Somewhat similar in design to the semi-overlay, but differs in a characteristic hump that sticks out when open.
Of course, you can find other types of furniture hinges, for example, gallery or piano hinges, which are used in certain pieces of furniture. Their installation will also differ from cases with standard hinges, the features of which are listed above. You can choose any hinges depending on the model of your furniture and personal preferences.
Preparing for furniture assembly: marking and adding chipboard with your own hands
After the furniture parts have been cut to size and all visible ends have been glued with edges, you can proceed to the stage of preparing the furniture assembly.
It consists of two parts - marking the holes and adding laminated chipboard with your own hands. This is a rather important stage, the accuracy of which determines the appearance of the furniture and the quality of the assembly. Strictly speaking, many craftsmen neglect marking and adding chipboard, preferring to use clamps and drill straight away. But this requires having several corner clamps in your arsenal and skill in handling them. Constantly pulling parts together at right angles in order to accurately drill and tighten them onto confirms, and then unscrewing them is quite labor-intensive and time-consuming. It is much more efficient to first mark the parts for fasteners, drill holes, and then assemble the furniture.
Installation process
Correct marking is the key to success
Marking for furniture hinges is one of the main installation steps, which determines the ease of use of furniture and the service life of the entire structure. For this reason, it is important to correctly apply the markings along which the hinges will subsequently be installed. To do this, follow these steps:
- Determine the exact number of furniture hinges per door, taking the dimensions and weight of the door as the main indicators. So, for small doors, two hinges are enough, while massive and large doors must be equipped with at least three hinges.
- Place the hinges at a distance of 60 to 120 mm from the top and bottom edges of the sash. If there are more than two loops, place the remaining ones evenly between the two outermost ones.
- At the center of each loop, make a notch using a pencil.
After marking, be sure to carefully check its correctness again, make sure that the distance between the hinges and the edges of the door is exactly the same.
Drilling holes for hinges
You've probably noticed more than once that furniture hinges are installed not on the surface of the door, but in special recesses. You will also have to make a hole for the furniture hinges in order to install them correctly. For this, a drill with a cutter is used. The procedure is as follows:
- Prepare a sharp bit, place it on the drill and place it in the marked place.
- Drill a hole to fit the hinge dimensions approximately 12-14 mm deep.
- Repeat this step for all other places on the sash marked for hinges.
Do not overdo it with the depth of drilling holes - too much depth can negatively affect the appearance of the outside of the door, and also subsequently lead to deformation of the structure and loosening of furniture hinges.
Putting the hinges in place
After preparing the holes, you can begin directly installing furniture hinges with your own hands. To do this correctly, follow the instructions below:
- Insert the hinge into the recess, making sure that it lies on the same axis with the end of the door.
- Using a drill and a drill, make holes for attaching the hinge with screws.
- Secure the door hinge with screws, checking that it is in the correct position.
- Repeat these steps for all other furniture hinges.
In order to fix the hinges on the door as evenly as possible, you can use special templates that help to correctly mark the places for drilling holes. If you trust your eye, you can do without the help of such templates.
Hinge installation
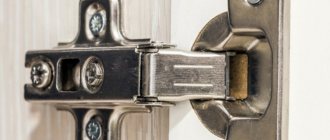
Installation of a 26mm hinge begins with assembly. There are quite a lot of types of accessories. The most popular are overhead fasteners. They are attached directly to the body.
The hinge structure consists of a cup, a mounting plate and an arm. The cup is attached to the door, and the bar is attached to the cabinet. The shoulder acts as a connecting element between the bar and the cup.
Required materials and tools for installation:
- Screwdriver or electric drill;
- Level to adjust the correct position;
- Roulette;
- Marker, screwdriver, screws;
- Milling cutter.
Marking
In order for the fittings to last a long time, it is important that marking and installation are carried out with maximum precision. If mistakes are made at the marking stage, the doors will have serious flaws, distortions, cracks and other defects
Mark the holes for the hinges. You need to make an indent of 7-12 cm from the edge of the facade. The number of hinges per door may vary. But between the fasteners it is necessary to maintain a distance of 50 cm. The number of hinges depends on the size of the doors.
You need to make an indent of 2.1-2.2 cm from the side part. The fittings should not be located where the shelves are installed. Taking into account all the features, it marks the optimal location for attaching the hinges. It is marked with a small notch using a self-tapping screw.
Cup cutout
Compliance with the installation sequence is the key to durable and reliable fastening. After marking, you should make holes for a furniture hinge with a cup diameter of 26 mm. A drill is used for this. Some people find it more convenient to use a screwdriver. Doors must be placed on a hard and level surface. Drilling is carried out in accordance with the previously made markings.
Fastening to the facade
Then install furniture hinges into the holes made. Using a level, their correct location is corrected, otherwise the door may skew. The fastening must fit tightly to the facade. After adjustments, make marks for the screws and screw the hinges to the facade. Then comes the most difficult stage - hanging the door.
Door installation sequence:
- Marking for loops;
- Installation of a platform for fixing fittings;
- Hanging the door;
- Connection of two parts);
- Adjusting the correct position.
An extremely flat surface is required for hanging. The side of the cabinet where the strip is installed should be placed horizontally. It’s much more convenient to work this way. Adjustments can be made with the cabinet in a vertical position.
Proper care of hinges
The installation scheme for furniture hinges requires proper and regular care of them. It is recommended to regularly inspect the hinges on furniture for squeaking, looseness, or, conversely, heavy closing. If problems are detected, it is also necessary to carry out the following:
- The vertical position is adjusted by tightening the bolt on the hinge located closer to the edge. In the standard position, both bolts should be tightened equally, after which, if necessary, they are tightened until the door leaf reaches the correct position in space.
- To adjust the angle of the sash, it is necessary to manipulate the degree of tightening of the bolts on the upper and lower hinges. If the top of the door is tilted to the right, you need to tighten the bolt on the top hinge, loosening the one on the bottom, and vice versa.
You can also watch a video on how to attach furniture hinges to visualize the information received. You can watch the video below.
When buying new furniture or replacing the facade in your kitchen, the need arises. There is nothing complicated in this procedure, so anyone can handle it. The main thing is to know some of the nuances that will help you get the job done efficiently and quickly.
Furniture hinge design
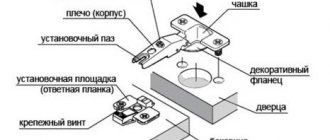
To understand how to properly install furniture hinges, you need to understand their design. Today, the most common type of fastening for home furniture is the four-hinge furniture hinge. The main feature of this product is that it allows you to adjust the door in space after installation. After hanging the doors, they may be slightly skewed and placed below or above the body dimensions. This is especially noticeable when the furniture is equipped with several doors. Therefore, for high-quality furniture assembly, the ability to adjust is very important.
The main elements of hanging overhead doors on four-hinged hinges are:
- door;
- side wall;
- hole for the head of the fastener;
- hinge block;
- mounting head;
- adjusting screw;
- mounting screws;
- barbell;
- screw securing the rod to the block;
- damper
The base of the hinge is attached to the mounting plate. To make it possible to adjust the door level, the fastening mechanism includes an adjusting screw. The hinge cup is mounted in a special hole, the diameter of which depends on the size of the door. Most often, cup holes with a diameter of 35 mm and a depth of about 12 mm are used for fastening. If the doors are made of lightweight materials (glass, wood), then the cup can be chosen with a smaller diameter. There are also hinges available that are intended for fastening large doors. In this case, the diameter of the cup should be 40 mm.
When choosing a door fastener, you also need to pay attention to the following parameters:
- Distance to cup. This is the measurement from the edge of the hole in the door for the cup to the edge of the door. In most cases it is 4-5 mm.
- Mounting method. The mounting holes are located at the same distance from the edge of the door. With their help, the cup is fixed to the door when installing furniture hinges. In this case, the cup can be attached in different ways: using self-tapping screws 12-17 mm long, by pressing or using a special coupling.
- Hole pattern. Before purchasing fastening elements, you should take into account that the cup fastening points, even for identical hinges, can be located at different distances from each other. Therefore, you need to choose the mounting option that would best suit your case.
Return to contents
How the marking is done
It is better to take this stage as seriously as possible. The success of the entire installation depends on the accuracy of the markings. Before you decide where to put the hinges, you need to know how many of them you will need. It depends on the height of the door. On a front up to 100 cm, 2 hinges are installed, but with the addition of 50 cm to the door height, another hinge is added. Thus, if the door is 150 cm, you need 3 hinges, etc.
This is a very important point, because if you incorrectly calculate the number of hinges on the facade, then very quickly the furniture will need repair.
Before installing the hinge, you need to make markings.
It is also important to remember that there should be 70-120 mm from the top or bottom of the door to the center of the hinge. And the distance from the side edge of the door to the center of the hinge should be 21-22 mm. It is also worth considering at what height the shelves will be so that the loop does not get on them.
So, first measure 70-120 mm from above and below, and make a mark. Then along this line from the edge of the side where the loops will be, you need to measure 21-22 mm and also mark it with small lines. The intersections of the first and second marks will be the centers for the hole for the hinge cup. For convenient work, you should use a nail or screw to make a recess in such places. If the facade is longer than 100 cm, then markings are also made for every additional 50 cm. Now you can proceed to the installation steps.
Fastening elements
Any installation work begins with markings.
In this case, it is necessary to pay special attention to ensure that the installation location of the fasteners does not intersect with the installation locations of the shelves.
In most cases, 2 hinges are used to secure the door, but if the door is large and heavy, then it is better to play it safe and install 3 or more fasteners.
A distance of 70-120 mm is measured from the top and bottom edges of the door. If there are more than two loops, then the distance between the extreme elements is divided into as many equal parts as the number of fasteners you plan to use. In order to know how many fasteners it is better to use, you can use the table given. After this, the center of the future fastening location is measured from the long edge of the part. For hinges with a cup with a diameter of 35 mm, this distance should be 21-22 mm.
Once the markings are made, you can start drilling holes. For ease of drilling, small holes can be made in the centers of future holes with a sharp awl. This will prevent the drill from slipping. A drill with a diameter of 35 mm is put on the drill and a hole is made according to the markings. Its depth should be about 12 mm, which is enough to securely fasten the head. To avoid chips and unevenness, the drill must be held strictly perpendicular to the facade while drilling.
If this is your first time drilling holes for furniture hinges, it is recommended that you practice before starting work. To do this, you can take a piece of chipboard and drill several holes of the required depth, since in most cases, inexperienced furniture assemblers drill a hole until the drill comes out on the back side.
For drilling, it is best to use a drilling machine, since in this case the workpiece will be securely fixed, and the drill will always be perpendicular to it. Using the machine, you can also set the required hole depth, protecting yourself from through drilling.
After all the holes are ready, hinges are inserted into them, having first removed the mounting strips. Here there may be a slight difficulty with the parallelism of the fasteners, because it will be difficult to install the hinges straight by eye. To do this, you can use a long strip, which should be attached to the rear edges of the hinges. In this case, the placement of the loops is adjusted so that they all stick to the rail. After setting the position, use a screwdriver to tighten 2 screws for each fastener element.
After installing all the hinges, you can proceed to attaching the slats to the furniture riser. To do this, the hinges are opened, the strips are attached to them and inserted into the body. This procedure will be easier to do if you turn the furniture over to the side to which the hinges are attached. The mounting strips are secured using a 4x17 mm screw with a 2.5 mm pre-drilled hole. In this case, it will be much easier to fasten the screws with a screwdriver.
After the mounting strips are secured, the doors are hung on the facade and their position is adjusted using an adjusting bolt.
When installing furniture connecting elements, it is convenient to use a drill, which uses a special drill, with which you can evenly select the waste material and make a hole to the required depth.
Furniture hinges, attached after processing the base with such a tool, “sit” evenly and securely.
Equipping a drill with a drill suitable for the selected hinges is the main task when working with cabinet furniture doors.
Furniture hinges, attached after processing the base with such a tool, “sit” evenly and securely. It is important to choose the correct drill diameter depending on the parameters of the hinge bowls.
A drill for furniture hinges is a special milling attachment that allows you to work with wooden and plastic bases of sufficient width.
You should select milling elements in specialized stores.
A drill for furniture hinges is a special milling attachment that allows you to work with wooden and plastic bases of sufficient width.
With its help, you can make the desired hole in a solid panel, MDF, chipboard or laminated chipboard.
You can find both standard and non-standard drills with a quality certificate and a guarantee from well-known manufacturers.
The middle spike is installed in the center of the future circle, which is outlined using a prepared gauge, and the rest make a round hole of the required diameter. Typically the depth of the final cut is about 9mm.
The nozzle is a base with a bridge and three teeth.
Elements that are too cheap are an indicator of a low-quality product, so it’s worth considering options with prices below the market average.
Furniture hinges for which a drill is used are mainly four-hinged. The hole for each is made almost instantly. When working, the drill is held slightly inclined, and not straight, so that the waste material is selected to the desired depth and evenly.
Typically the depth of the final cut is about 9mm.
This cutter is reliable and will last a long time.
Drilling a hole
The next step in installing furniture hinges is preparing holes for screwing in screws. The holes are made using an electric drill and a small thin drill according to the markings made. In addition, to install the hinge cup, you will need to use a special cutter - with its help, you will need to make a round hole in the door leaf with a depth equal to the depth of the hinge cup. You need to choose a cutter designed for woodworking - otherwise, traces of deformation may appear on the outside of the facade, and chips of the material may appear on the inside plane.
To drill a hole, the cutter must be sharpened - only in this case can you be sure that it will not damage the door material. To work, you will need to fix the cutter in the chuck of an electric drill. The tool is brought to the markings on the door leaf, placed in a strictly perpendicular position, then the drilling process is performed at low speed speeds of the power tool. The depth of the hole is made no more than 12-13 mm. It is necessary to constantly monitor the operation of the tool without increasing the speed of rotation.
If you do not adhere to this rule, then chips may form on the canvas, and the cutter may go right through the furniture door.
Using a cutter requires some experience, so if this is your first time working with such a tool, you should first try your hand at a piece of rough wood. Only after understanding the specifics of the process can you proceed to drilling the furniture facade.
In order to make mounting holes for furniture screws correctly, you must follow the recommendations of specialists:
- when drilling holes for attaching furniture hinges, you must remember that any of them cannot exceed a depth of 13 mm;
- the diameter of the holes must correspond to the size of the hinge fasteners;
- work on drilling holes must be performed carefully and only at low speeds of the electric drill, constantly monitoring the process;
- Having completed the first hole, you need to proceed to the second, and then to the next one - continue this until all of them are completed.
The drilling speed also depends on the density of the material.
For example, if furniture doors are made of pine or birch, then the drilling process is easy and quick, while ash, oak or walnut are quite difficult to drill due to the high density of their wood. During operation, you must ensure that the drill is always at a right angle to the working surface - if you are drilling dense wood, the tool can easily deviate from the drilling path given to it.
Kinds
When installing hinges on cabinet furniture, two types of drills are used, differing in size:
- 35 mm;
- 26 mm.
The hole for each is made almost instantly.
It is important to choose the correct drill diameter depending on the parameters of the hinge bowls.
The diameter is selected in accordance with standard hinges or with a reduced bowl. Each type of fastening has its own drill.
With its help, you can make the desired hole in a solid panel, MDF, chipboard or laminated chipboard.
The nozzle is a base with a bridge and three teeth.
When working, the drill is held slightly inclined, and not straight, so that the waste material is selected to the desired depth and evenly.
The middle spike is installed in the center of the future circle, which is outlined using a prepared gauge.
Milling machines use automatic calibration and attachments, but at home you cannot do without a special hand-held power tool.
The diameter is selected in accordance with standard hinges or with a reduced bowl.
Each type of fastening has its own drill.
Installing hinges
For work we will need:
- Pencil, ruler or tape measure for marking;
- A screwdriver or screwdriver for screwing in self-tapping screws;
- Drill with a Forstner drill of the appropriate diameter;
- Rake or building level;
- Vacuum cleaner.
A recess with a diameter of 26 mm is cut using a 25 mm nozzle; when drilling, it is enough to slightly play with the drill to obtain the required size. Before installing furniture hinges on the facades, you will need to carefully and slowly mark the surface.
Marking
The lower and upper canopies are installed 8-10 cm from the edge of the facade element, the interval between the hinges on the door is uniform, but taking into account the internal shelves and drawers of the cabinet. When they are located at the intended location of the loop, the latter moves higher or lower.
To get a recess for furniture hinges at the required distance, mark the center of the future circle:
- for standard 35 – 22mm from the edge;
- for 26 mm – 18 mm;
- for 40 – 25-26mm.
If the design features of the box require separate markings, then the location of the fixing strip is marked at a distance of 37 mm deep into the box and 16 mm to the sides - the location of the fixing screws. If the hinge is internal, add the thickness of the facade to 37 millimeters.
Strategically important marks are supplemented with guide recesses using an awl or thin drill - this will make further work easier.
Inset
The required recess depth for inserting furniture hinges is 11-12 mm. Before cutting in a hinge, take a few minutes and practice on suitable scraps of material so as not to overdo it with pressure and spoil the furniture façade with a through hole. After that you can start.
Furniture hinges are inserted at a distance of 5 mm from the edge of the facade. With proper marking, the result will be exactly like this.
The bell of the turned on vacuum cleaner in the immediate vicinity of the drilling will help keep the room clean and reduce the time for subsequent cleaning.
Fastening to the facade
Canopies must be positioned strictly horizontally. You can give them the proper position using a simple technique - using a level, or a suitable level bar. To do this, the hinge cups are placed in the prepared recesses, aligned using a guide tool, and then fixed with self-tapping screws.
It is easier to install the fixing bar on the box in a horizontal position. If this is not possible, then you should attach the facade to the body in an open form, mark the location of the fixation points and screw in the guide bolts.
The fixing strips are placed under the guide bolts and then screwed to the box.
The final stage is debugging. The design of the hinges allows you to adjust the vertical and horizontal position of the door, as well as its depth. It is recommended to carry out these actions directly at the installation site in order to correct possible unevenness of the floor covering.
Advantages and disadvantages
Furniture hinges require precision during installation, so the ability to make exactly the recess that is needed is the main advantage of a Forstner drill. This provides a special stop that prevents penetration into the hole beyond a fixed length. The drill is limited by teeth that do not allow it to deviate from the specified location. The hole turns out perfectly clean, thanks to which the loop cup fits very tightly.
A universal drill with interchangeable attachments is suitable for installing furniture hinges.
At home, you can’t do without a special hand-held power tool.
The only drawback of a Forstner drill when working with solid wood can be its low quality, which is typical for non-factory production. Therefore, it is necessary to choose a product from an official supplier and obtain a guarantee.
Furniture hinges require precision during installation, so it is possible to make exactly such a recess.
Depending on the type of panel, the cutter can become very hot, burning the edges and the material removed from the recess. Therefore, when working with such a base, it is recommended to take breaks to cool the drill, doing 3-4 approaches. This usually happens with MDF panels. When working with laminated chipboard and chipboard, hard alloy elements allow you to make holes for hinges quickly and without much effort.
The drill is limited by teeth that do not allow it to deviate from the specified location.
Types of additives and their characteristics
The main difference between one drill and another is the type and complexity of the work performed. So, if the client is ready to independently provide his own plan for the placement of all points, this will be an individual addition, and if the holes are made according to a standard pattern, then such drilling will be considered standard.
- When the customer specifies the locations and diameter of the holes that he needs, this work is called individual and involves clarifying several nuances, namely: the type of holes, depth and size.
- In the production of ready-made cabinet furniture from chipboard and laminated chipboard sheets, standard drilling is more typical, when it is necessary to receive only a general drawing of the product from the client. The cost of such work is less, but the first option has its undeniable advantage: an individual additive allows you to implement much more daring design solutions in your work.
How to choose?
Equipping a drill with a drill suitable for the selected hinges is the main task when working with cabinet furniture doors. In order for the hole to be precisely adjusted in radius and depth, you need to take a cutter of the required diameter.
The hole turns out perfectly clean, thanks to which the loop cup fits very tightly.
The product must be from an official supplier and obtain a guarantee.
You should select milling elements in specialized stores. There you can find both standard and non-standard drills with a quality certificate and a guarantee from well-known manufacturers. Elements that are too cheap are an indicator of a low-quality product, so it’s worth considering options with prices below the market average. This cutter is reliable and will last a long time.
Depending on the type of panel, the cutter can become very hot, burning the edges and the material removed from the recess.
Required materials and tools
Installing a door hinge will require disassembling the mechanism, so you will need tools to perform delicate, neat procedures. In addition, other manipulators will be required for general work with the door. A complete list of all tools for installing an overhead hinge model is as follows:
- Screwdriver with a Phillips bit.
- Set of screws.
- Building level.
- Ruler or tape measure.
- Screwdriver.
- Drill.
- Pencil or erasable marker.
- Cutter with a diameter of 35 mm.