Even those with a spacious living space are often faced with the need to put away things that are rarely used somewhere. And in standard apartments that do not have spacious storage rooms, the problem of storing belongings becomes extremely acute. Many people use a balcony as additional storage. And for this you need to install a closet on the balcony - compact, but roomy.
The beautiful and cozy interior of the balcony can be seen in the magazine. But in fact, for many, this room is filled with various necessary and not very belongings, which have no place inside the apartment. Meanwhile, every home craftsman can make his balcony cozy. To do this, you need to sort out the rubble, throw away the trash, and to store the necessary things, purchase or assemble yourself a closet for the balcony.
What materials will be needed?
You can make a cabinet using plywood, wood, chipboard, plasterboard or plastic. If desired, you can combine several materials with each other. In the process of finishing work, it is important to use PVC or lining. Using natural wood when making a balcony cabinet with your own hands is important when the room is not glazed. If you pre-coat the wood with waterproof paint or varnish, you will be able to prevent damage to the material under adverse weather conditions.
Before deciding on the building material from which the cabinet will be made, you need to take into account the design of the balcony, whether the room is insulated or not, and what the load will be on the shelves. A universal option for any type of balcony is natural wood. Materials such as plastic and MDF are also resistant to moisture.
Required Tools
List of tools required for carpentry work on arranging wooden cabinets
When deciding how to make a cabinet on the balcony with your own hands, the selection of tools is not the least important. To do the job well, you will need the following set:
- hammer drill and drills (for wood and concrete);
- hacksaw;
- electric jigsaw;
- screwdriver;
- screwdrivers;
- self-tapping screws with dowels;
- hammer;
- tape measure, building level.
In addition, you will need paper and a pencil to make a drawing, as well as a marker for making notes on the parts.
Which option for a ready-made cabinet for a balcony and loggia is better to choose?
The space of a balcony and loggia is of a rather non-standard shape, and the area and overall dimensions largely depend on the chosen method of arrangement, insulation and finishing. Ideally, balcony furniture should be designed individually, taking into account the wishes of the owners and the specific geometry of the room. But you can always study the range of offers from online stores and choose something from ready-made options.
Shelving and open shelves
Cabinets for balconies and loggias can be lightweight shelving structures with open top shelves. You can choose suitable size cabinets from ready-made inexpensive modular office series, equipped with shelves and drawers.
If the width of the loggia allows, you can create a closet of the required size from two pencil cases. Or complement a closed pencil case with open shelves made by yourself.
Utility cabinets and mobile racks
Taking into account the specifics of the room, cabinets for balconies and loggias can be made mobile, on wheels in the form of movable racks.
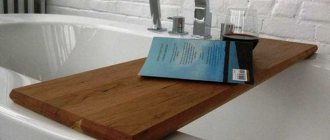
Or equip it with high legs, under which it is more convenient to wash.
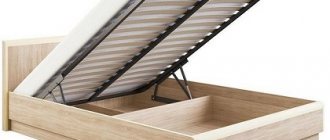
Often, on the storage area of a loggia or balcony, a food storage system is organized - various home preserves and vegetables. Here it would be optimal to install reinforced shelves that can withstand the weight of filled cans and various cabinets with drawers.
You can make a balcony cabinet for storing vegetables with your own hands, complementing the shelving structures with wooden boxes and plastic baskets.
Cabinets and wall cabinets
Typically, cabinets on balconies and loggias are located on the end sides. But with a protruding window sill, another layout may be better, with the longitudinal placement of shallow and low cabinets.
If the width of the loggia allows, the cabinets under the window sill of the wide window are complemented by end cabinets made in the same style.
You can consider ready-made cabinets for balconies and loggias among products on Aliexpress in the form of frame, prefabricated structures. Ikea has also compiled a selection of models for arranging a balcony from other furniture series.
Based on the recommendations of the article, you can select and buy cabinets, pencil cases, shelving of the required dimensions from office series, as well as modular series of children's and living rooms. Also consider the series of modular furniture for kitchen floor and wall cabinets - it is quite possible that there will be models of the required functionality and size.
But it’s better to make cabinets for balconies and loggias with your own hands - this way you can save a lot and make something that suits you both in terms of external design and internal content.
Wardrobe with wooden frame
Before starting installation work, you should make sure that the balcony is fully glazed and insulated. In addition, it is worth checking the foundation using a building level. If the height of the frame changes under the load of contents, it will simply warp.
It is also worth taking care of balcony curtains, since the influence of direct sunlight has a negative impact on any furniture.
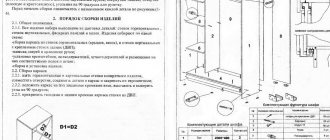
If all the conditions are met, then you can safely begin building balcony furniture, relying on simple and understandable instructions.
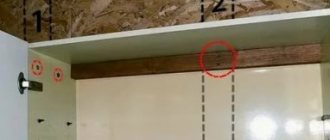
The first step is marking. To do this, guide lines are drawn in those places where the frame bars will be attached. We recommend using a marker and level for this purpose.
Next comes the manufacture of the frame of the future cabinet. Wooden fastenings are mounted on the walls of the balcony using a drill, self-tapping screws and a screwdriver
The next step is to attach the walls. The frame is sheathed with walls made of the selected material. All parts are attached using self-tapping screws, as well as furniture corners and ties.
Next you need to install the shelves. The material you can choose from is either wood or chipboard. If heavy things will be stored inside, then it is better not to use drywall.
The final stage is the installation of doors. First, special hinges are attached, after which the doors themselves are installed. Opening handles are installed last
As additional protection from moisture, the finished structure should be covered with an insulating coating. In addition, upon completion of the work, you can install an electric lamp in the cabinet, which will make the process of operating the product more comfortable.
Balcony cabinet options
Before you start designing a cabinet, you should understand the variety of configurations and choose the most functional option for yourself.
Loggias and balconies have different dimensions, so all dimensions in the diagrams are approximate. In each individual case, the drawing should be compared with the actual dimensions.
Built-in and cabinet structures
A built-in wardrobe is the most convenient and economical option. It occupies every centimeter of the area intended for it, even the space under the windowsill. The side and back walls do not need to be covered, which significantly saves material. The disadvantage of such a cabinet is the impossibility of moving it to another place. But usually there is no need for this. The built-in wardrobe is made from floor to ceiling so that it can accommodate as many shelves as possible for the necessary things.
Scheme of built-in wardrobes of varying depths on two sides of the balcony
You can install ready-made cabinet furniture on the balcony or use an old bookcase with many shelves as a shelving unit. But the option is not ideal, since it is difficult to choose furniture of the required size.
Cabinet furniture is designed to fit standard sizes
Corner balcony furniture
Corner cabinets are quite large, but can accommodate significantly more things. The advantage of such structures is the ability not to sacrifice part of the window opening and maintain access of light to the room.
This model can be either built-in or portable
In this version, the wide part of the cabinet occupies the side wall of the loggia, and the narrow part is adjacent to the front wall. In such cabinets you can only install sliding doors, which makes it possible to save useful loggia space.
There is another version of the corner cabinet - more massive and voluminous.
This cabinet looks good on the loggia if the dimensions are perfectly chosen.
Everyone determines the number of shelves and their location based on their needs. The doors are hinged, but roller shutters can also be used.
Compact containers for storing small items
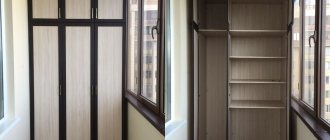
Tall cabinets are well suited for loggias with blank side walls, as they allow rational use of usable space. But such furniture is not suitable for balconies that have full glazing around the perimeter of the outer walls. In this case, the best option would be a low cabinet under the window, which can be placed under one or both end walls or along the entire length of the balcony under the window sill.
Placing low cabinets around the perimeter of a fully glazed balcony
The choice of model depends on the size of the balcony and the purposes for which the cabinet will be used.
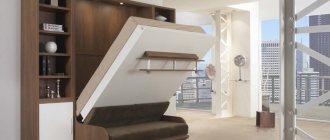
The cabinet is ideal for maintaining a panoramic view from the balcony
Non-standard ideas for arranging a balcony-boot
Many people are baffled by the boot-shaped balcony. There are a huge number of original ideas on how to turn a completely unnecessary, at first glance, “appendix” into a pantry or a full-fledged built-in wardrobe with a lot of shelves.
What types of cabinets can be used for balconies and loggias?
Cabinets can be of two types:
- A cabinet cabinet, which is an independent structure and is not attached to the walls of the balcony in any way. Such a cabinet takes up quite a lot of space, but can be moved or removed at any time.
- A built-in wardrobe, which, as a rule, is created according to an individual project, therefore fits perfectly into all the “inconvenient” places of the loggia or balcony. But in such a cabinet, the walls of the house are used as load-bearing structural elements, to which the side racks and shelves are attached, so it is impossible to move or remove it without completely dismantling it.
The following types of doors are used in cabinets:
- compartment doors;
- accordion door;
- roller shutters;
- swing doors
The final choice of the appropriate option depends on specific conditions. For example, you can install a built-in wardrobe in a loggia. In this case, the walls will simultaneously serve as its back wall. But on the open balcony it is better to place a regular cabinet.
A properly placed closet will organize the space on the balcony or loggia.
Particular attention should be paid to the choice of doors. If there is little space on the balcony, it is more practical to install roller shutters, sliding doors or an accordion. Hinged doors will be more convenient in a large loggia, where there is no need to save space and you can access all shelves simultaneously by opening the cabinet. Doors can be installed to the full height of the cabinet, but sometimes it is more convenient to divide the structure into 2-3 functional zones, each of which will have its own doors.
Materials for balcony cabinet
Even on an insulated balcony, the main threat to furniture remains moisture. Therefore, the material for its creation is selected with this factor in mind. The following options are possible:
- Wood is the best material for any furniture, as it is aesthetically pleasing, easy to process, and has excellent performance characteristics if the material is properly processed and properly cared for. Contraindication: cold balconies with high humidity. Often, wooden lining is used for this purpose.
- Chipboard (chipboard). The Achilles heel of this material is not very good resistance to moisture and temperature changes, so such furniture will only feel good on glazed balconies and loggias. Laminated chipboard is suitable for heated rooms.
- MDF. This high-quality material is closer in properties to natural wood, but compares favorably with it in price. These panels are not afraid of either humidity or temperature changes. Not the last plus is their environmental friendliness.
- Plastic - PVC panels. The most unpretentious candidate on this list, since it is not at all afraid of moisture, is practical, cheap, and very easy to care for. The disadvantages of plastic are fragility, gradual color change when exposed to sunlight for a long time.
- GKL. Another contender is moisture-resistant drywall, but this material is not the best of the “applicants.” The reason for this is its fragility. Other disadvantages are the large consumption of the profile for the manufacture of a more or less reliable structure, doors, which in any case will have to be made of a different material.
- Metal-plastic. This material is known for its practicality. He is not afraid of either heat or cold. High humidity and mechanical stress are also not too much of a threat. The biggest enemy of the union of metal and plastic is the bright sun, which sooner or later causes it to yellow. Individual elements for the cabinet (doors, shelves) are purchased at hardware stores.
To make a wardrobe on the balcony with your own hands, you can choose not one, but several materials. Combinations of them make it possible to create unusual, original furniture.
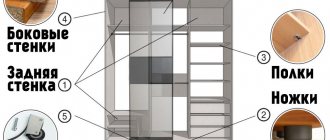
Frame
Timber is often chosen for this role; its dimensions are 40x40 or 50x50 mm. This option is traditional, but if the balcony is not heated, wood is not the best choice; its dimensions will change “thanks” to changes in humidity and temperature. Regular treatment with protective impregnations will also be necessary.
The optimal choice for balcony conditions is a metal profile with a galvanized coating. It is not afraid of moisture or temperature changes, and it is quite easy to attach any finishing material to metal. An alternative is guides with holes for brackets; shelves are mounted on them. Plus - easy change of distances between them.
Shelves
These elements are easiest to make from sheet material. It is possible to use thick plywood, chipboard or laminated chipboard, OSB, but shelves for heavy things require the “help” of wood. These elements are often made from scraps of boards left on the farm. Impregnations and paints and varnishes for processing are purchased from those intended for outdoor use. It will protect the elements from ultraviolet radiation. A water-based varnish can protect your apartment from “wonderful aromas.”
The shelves are simply laid on timber or fixed to the frame with self-tapping screws. Another mounting option is to use corners on the balcony wall, but this work will become more complicated and take longer if the walls require the entire set of shelves to be mounted on dowels. The way out of this difficult situation is to assemble the frame and fix the elements to it or guides with brackets.
Doors
There are 3 door options that are usually used when making cabinets for balconies or loggias. This:
- ordinary - swing;
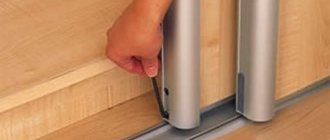
- sliding - coupe type;
- roller shutters
The first ones are the easiest to install yourself; you only need doors, furniture hinges and a screwdriver. Sliding structures allow you to save space if you plan to install a bar counter or any furniture nearby, but they require a set consisting of guides and a roller system for the door leaf. New-fashioned roller shutters are an expensive pleasure, but in this case the cost usually includes the installation of these devices.
All doors can be the same height as the cabinet itself, but it is much more practical to divide the balcony furniture (especially tall ones) into several sections (2-3), and make its own doors for each of them.
If we talk about materials that are convenient for making canvases yourself, then the first place is able to separate wooden boards and lining. These elements are assembled on a wooden frame. Doors made of laminated chipboard are a good enough reason to order the sheet from a workshop, since only a circular saw can cut the sheet without chipping. High-quality lamination of ends at home is a mission that is almost impossible.
Minuses
It is also worth talking about the disadvantages of choice:
- difficult location. You need to calculate the dimensions, height, width in advance to be able to fit the cabinet on the balcony;
- you need to consider the material’s ability to withstand high or low temperatures, the presence of high moisture and resistance to heavy loads.
Choosing furniture for a loggia or balcony
Out of habit, many of us continue to use the balconies and loggias of our apartments as storage rooms or warehouses for unnecessary rubbish. However, recently there has been a strong trend towards converting balconies and loggias into lounges, private offices and even bedrooms.
In itself, such an idea is quite attractive, but it requires clear and thoughtful implementation. The main stumbling block most often becomes the question of the correct selection of furniture. Obviously, in addition to convenience, in our not too large areas, this furniture should also be compact and cozy.
Since a balcony or loggia is a specific place that has its own characteristics, when choosing among a wide variety of furniture, you need to consider three main aspects:
- The load that the closet will carry - that is, how many things you plan to hide in it.
- Furniture on the balcony must meet several basic requirements - compactness, spaciousness and lightness.
- Design - usually a glazed balcony looks quite laconic and a simple wardrobe without unnecessary decorative elements will fit into it more organically.
Having decided on these three indicators, you can already decide what material to choose from for the loggia cabinet. The most common and convenient are wooden and plasterboard.
The advantages of wooden furniture are the possibility of greater load on the structure and the strength of its fastening to the wall. It also has a more aesthetic appearance and Eco-design, which is popular today. However, wooden cabinets are more difficult to assemble and unpleasant consequences in the form of deformation are possible if the frame beams were not dry enough (the possibility of purchasing low-quality material).
Plasterboard cabinets are easier to install and assemble, they can be painted in any favorite color if you install the cabinet on the balcony with your own hands. However, they also have disadvantages - such cabinets can carry much less payload and have low impact resistance. They can be bypassed if you reinforce a similar cabinet with wooden shelves and cover the corners with plaster mesh or reinforcing paper.
Durability of the cabinet design
It is better to mount the cabinet on one of the sides of the loggia
To ensure that a do-it-yourself cabinet installed on a balcony fits harmoniously into the interior, it is better to mount it on one of the sides of the loggia. This action will not only improve the overall appearance of the room, but also simplify the process of installing the furniture structure. But before installing the frame, you should do some preparatory work.
The first step is to glaze the balcony room if it is open. This is necessary for the long life of the furniture. And it is not advisable to install the cabinet frame in an open room, because it will be negatively affected by the environmental climate. Excessive penetration of moisture accompanied by ultraviolet rays will lead to rapid destruction of the structure.
Secondly, it is necessary to carry out preparatory work that does not
touch the ceiling and floor indirectly. To improve the indoor microclimate, it is best to pre-insulate it.
After completing the preparatory steps, you can make your own drawing, according to which further production will be carried out. The best material for cladding is eurolining.
How to choose
The main conditions when choosing a cabinet for a balcony are compliance with the size and performance characteristics. Only such structures can be installed on the mezzanine, with the expectation of a long service life. However, all further selection parameters will depend solely on the preferences and budget of the home owners.
Depending on the type of cabinet, you can install either a sliding compartment model or a hinged version with small accordion-type doors on the balcony. The color should be chosen according to the general style of the mezzanine.
From idea to assembly
The instructions for making a cabinet directly depend on what idea you want to implement. Here you need to move step by step, creating a step-by-step guide, starting from an idea and its gradual implementation.
The whole process can be divided into several stages:
- door construction and design;
- choice of material;
- color palette;
- filling;
- cabinet design;
- assembly.
No one argues that you can simply take ready-made furniture from Leroy Merlin, put it on the balcony and do without all these steps.