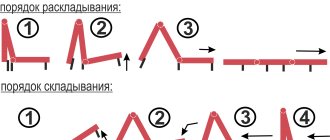
Manufacturing stages
First you need to cut out all the parts that are listed in the table
It is important to respect the dimensions. Immediately after this, all parts must be milled, you also need to mark the underside of the table, observing the distances
It is necessary to mark the fastening of part No. 5. They can be placed on glue for a while, and later replace the glue with two self-tapping screws flush with the beam.
Next, mark the location for attaching the 50 by 50 mm hinges. To mark, you need to lay beam No. 2, and then mark the places for the loops on the beam and table top. Their fixation should be opposite beams No. 5.
Beams No. 3 are connected to beam No. 4 with loops 100 by 32 mm.
It is necessary to determine the location of attachment of parts No. 4. They need to be leveled. They are fixed with self-tapping screws to the wall.
On top of part No. 4, part No. 2 is applied with the tabletop together. She needs to be propped up. Beal No. 2 is screwed to the wall with dowels, 4 of them are needed.
Now do the test. If everything is correct, then there should be no distortion or shaking.
Step-by-step master class on self-production
Wanting to save money, many people make a table with their own hands. This is not difficult, but requires compliance with certain requirements.
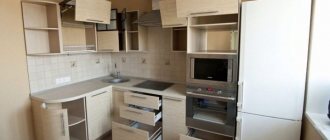
Wall mounted kitchen wall mounted
To make a folding table with your own hands, you will need to prepare plywood sheets; you can also use chipboard or MDF as a basis. Additionally, you will need screws, hinges, confirmations and anchors.
Manufacturing algorithm:
- Prepare a drawing of the model and parts separately. Moreover, it is necessary to draw a diagram according to the exact dimensions of the future product.
- To make a tabletop, use an electric jigsaw to cut the selected material, giving it the desired shape.
- Using a sanding machine, sand the edges of the product and cover them with special tape.
- Prepare supports. This can be a triangle or a support element in the shape of the letter P. For a small wall-mounted tabletop, a triangular-shaped support is most suitable. It is secured with a bracket on the wall and hinges to the tabletop. Using two strips on both sides, the structure can be strengthened.
- Attach the triangular support to the back.
- Mount the structure to the tabletop using hinges.
- Attach the wall table itself.
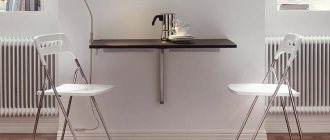
A suitable place to install a wall-mounted folding table is the wall next to the window sill.
Cut the material into the desired shape, process the edges of the product and cover it with special tape.
Prepare supports
Paint the parts, attach the triangular support to the back, mount the structure to the tabletop
Attach a wall table
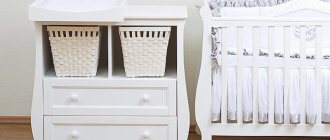
Desk folding with cabinet
You need to prepare:
- sheet material for assembling the cabinet box, the thickness of which is at least 16 mm;
- a block for fixing the structure to the wall;
- chipboard or MDF sheets for countertops;
- strip for mounting the product on the wall;
- wooden beams for making supports.
In addition, you will need screws, furniture corners, and a bracket. The manufacturing process itself differs little from assembling a regular wall table, because the cabinet is a box without a back wall:
- The parts are fastened with self-tapping screws and reinforced with metal furniture corners. If desired, shelves and partitions can be secured inside the cabinet using corners.
- The tabletop is cut to the size of the previously made box. The edges are processed and secured to the bottom crossbar of the cabinet using brackets.
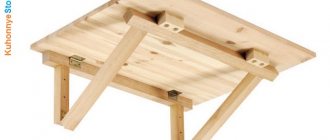
- Assemble a U-shaped support from the beams and fix it with loops to the tabletop.
- They make fasteners that will hold the tabletop in the assembled state. The table is ready.
Installing such a model does not require a lot of time and effort; the main thing is to choose the right place so that nothing interferes with the product’s unfolding and folding.
Fasten the parts with self-tapping screws and reinforce with metal furniture corners
Cut the tabletop to the size of the box, trim the edges and secure it to the cabinet crossbar
Assemble the support and attach it to the tabletop
Make fasteners and install the structure on the wall
If desired, attach shelves inside the cabinet
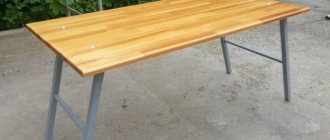
Master class No. 2: for the kitchen
You can make a folding table for the kitchen with your own hands. If necessary, it folds easily. Functional furniture is suitable for both the kitchen and any other room.
Take the following materials and tools:
- board 2.5 cm thick;
- two strips 2 meters long and 3.5 cm in diameter;
- two large and small loops;
- nuts;
- drilling machines;
- jigsaw;
- white varnish.
The master class includes the following steps:
First the legs are cut out. It is important to choose the right height, for example, 60 cm. Planks are cut according to the size of the slab. As a result, the design should look like a photo frame.
All parts are connected using special fasteners.
The frame is attached with hinges to the tabletop.
The structure is fixed to the wall using long hinges.
This is what the finished mount for folding tables looks like. The furniture can then be coated in any color that will match the surrounding interior.
In the photo you can see a drawing and diagram of a similar design.
If the table is painted black, it can be used to decorate the living room. Stylish furniture will be an excellent addition to a modern interior.
You can paint only the tabletop white, leaving the support in a natural shade. The legs can be varnished.
Table-mirror
Tables and beds that are not used all the time are bulky furniture. Because of them, even the most spacious apartment can feel cramped. Therefore, one of the most original solutions in the design of a small room will be a hand-made mirror folding table, which is very easy to make. It brings several benefits at once. When folded, it does not take up space and expands the room - mirrors are often used to visually increase the area of rooms. When unfolded, it can become a cosmetic table in the bedroom, a convenient workplace or a breakfast table in the kitchen.
In addition, you need to choose a mirror that will be suitable in size for the designed table. You also need to think about acrylic paint or varnish - the color scheme is selected depending on the existing interior of a particular room.
The table consists of two parts: a tabletop and a frame for the mirror, which also acts as legs. Before starting work, it is advisable to make drawings or even make a paper layout. Then two completely identical rectangles are cut out of plywood, then from the edges of one rectangle they measure 10 cm inward along the perimeter and carefully cut out the frame. The standard table height is 0.75-0.8 m. This means that one of the sides of each rectangle should be this size. The size of the second side corresponds to the width of the future table. It can be completely different; the minimum comfortable size is 0.45 m.
The structure is painted or varnished. Next, you need to place the mirror in the middle of the back of the tabletop and mark its position with adhesive tape.
The handmade mirror table is ready!
Small folding tables
A folding table for a balcony can be small and angular. This model is most often designed for one person and is simply ideal for a very small area. Here you can work with your laptop or just drink coffee.
For a small balcony, a narrow, elongated model is better suited
The safest option would be a semicircular table.
The corner table on the loggia can be used to place flowers in pots. Quite a convenient thing for placing kitchen utensils in the presence of a large dining table.
A triangular-shaped table has the smallest usable surface area, so it is more suitable for decorative purposes.
You can make a balcony or loggia stylish and comfortable for any budget. If funds allow, then you should give preference to ready-made furniture, but you can also assemble exclusive models with your own hands, using available materials.
Peculiarities
Outdoor furniture
There are the best types of materials for outdoor furniture that can last a long time and not lose their beautiful appearance from rain or hot summer.
Below is information about the most common materials.
Tree
Wood is the most popular material
Tree
In most cases, craftsmen prefer to make tables intended for open spaces from wood. This material is easy to process, environmentally friendly and durable. It also has a pleasant texture and a special aroma.
The disadvantages of the material include:
- high cost
- instability to moisture, temperature changes (the legs of a wooden table begin to rot when immersed in the ground)
- the need for regular treatment with antiseptics and paints and varnishes
Options made from planks are more durable and reliable. They are well ventilated and withstand bad weather.
Wood species that are most suitable for making outdoor furniture:
- pine
- ash
- beech
- oak
- larch
- Linden
- alder
Linden and alder also have a high tolerance to physical stress.
Vine
Beauty and lightness
Vine
Only very patient people can make a table from wicker. But patience will be rewarded. Such furniture is distinguished by its beauty, lightness, environmental friendliness, and ease of use. It does not require special care. Wiping the furniture with a damp cloth will prevent it from cracking. With proper weaving, the table will be strong and durable.
Disadvantages of the material:
- intolerance to high humidity (in rainy weather, it is better to put wicker furniture in a shelter)
- susceptible to drying out, which will be facilitated by prolonged exposure to sunlight
Types of vines that are most suitable for weaving:
- broom
- willow
- raspberries
- hazel
- bird cherry
- rattan
- vine
According to the advice of experts, bird cherry twigs are better suited for novice craftsmen. They are as flexible as possible.
Metal
Strength and Durability
Metal
The strongest and most durable material is metal (these qualities do not apply to recycled materials). Metal products have sophistication and grace.
Of course, it will not be possible to make forged furniture yourself without having the appropriate experience. But a simpler design, which uses standard sheets and a metal profile, is quite feasible for a non-specialist. The product will also be durable and sustainable. It will not be afraid of cold, heat, or wind. Metal furniture can be used in open spaces all year round.
Disadvantages of metal:
- susceptibility to corrosion (special treatment required to prevent)
- In hot weather it gets very hot, in cold weather it cools down
- high price
- heavy weight
Aluminum is the lightest material, but it is not as strong as steel or cast iron.
Stone
Marble is beautiful, but not resistant to chemicals
Stone
Another material from which outdoor furniture is made is stone. It could be:
- granite
- marble
- sandstone
- onyx
- composite stone
Advantages of the material:
- long service time
- pleasant appearance
- easy to care for
- environmental friendliness
The main disadvantage of such furniture is the considerable cost of the material. Also, the stone is very heavy and is not always resistant to chemicals. For example, marble can be damaged by wine spilled on it.
Concrete is a cheap and durable material
Homemade wine from jam: 7 simple recipes for everyone
How to make it yourself
As a rule, a simple folding table for a balcony does not have very complex elements in its design, so even a novice craftsman can make it. Since most of the balconies in our apartments are not at all impressive in size, it is necessary to make good use of all the free space.
First, you need to choose a model, determine its dimensions and the material from which it will be made, think over the fasteners and select the color of the future product. Any work begins with competent calculations, so it is necessary to make a drawing of the future product and calculate the required amount of consumables.
The future table should not be too heavy, so it is better to use high-quality plywood or chipboard to make it. To work you will need:
- selected wood material;
- hacksaw or jigsaw;
- electric drill;
- screwdriver or screwdriver;
- self-tapping screws and utility hinges;
- sandpaper;
- antifungal composition;
- mounting angles;
- protective varnish or paint for wood.
The folding table consists of a main tabletop and an additional folding part, sides, legs, main support and ties. To place it on the wall, first markings are made and a horizontal corner of a size slightly smaller than the prepared tabletop is fixed with self-tapping screws.
Next, we will analyze point by point all the stages of assembling a simple folding table made of plywood:
We draw a tabletop on a sheet of plywood (it’s better if it has rounded edges) of the required dimensions and carefully cut it out with a jigsaw or hacksaw. We draw a rectangle with a length equal to the length of our table top and a width of 10 - 12 centimeters and also carefully cut it out. All parts must be thoroughly sanded until smooth and all remaining wood dust must be thoroughly removed. Particular attention must be paid to the edges of the tabletop. All finished parts of the future table must be treated with an antifungal compound and covered with several layers of wood varnish. We install a metal corner where the table is attached to the wall of the house
It is very important to securely fix the fasteners in several places. We fasten the sawn tabletop to the corner with medium-sized utility hinges; After this, we need to secure our table unfolded. To do this, we use a support foot, which can be made from an ordinary metal pipe. It is necessary to cut a small recess inside the tabletop to better fix the table when unfolded.
The most difficult thing is to fix the table strictly horizontally in a suspended form. This can be achieved using auxiliary supports made of thin metal rods or tubes.
As you can see, the process of making a comfortable piece of furniture for the balcony is not a very difficult task. You can watch the stages of its construction in more detail in the following video:
Choosing the size of the folding table
The size and shape of the folding table depend on the size and design style of the loggia or balcony. When choosing a model for a small area, you should remember that the table can take up no more than 1/3 and there should still be a free passage.
Standard dimensions of a folding table for a balcony
Small balconies will be decorated with folding models made of plastic, wood or artificial rattan. Owners of spacious recreation areas can afford rattan furniture with forged elements. Modern trends will allow you to show small folding tables on the loggia from the wall. Similar directions offer a choice of polycarbonate furniture with chrome elements.
The dimensions of the balcony table must be selected based on the free space
For rectangular balconies, narrow and long tables are selected, and for large square rooms, square and round models are more appropriate.
A table top with a wall finish will fit harmoniously into the interior, and when assembled it will not stand out among the decor
A cozy corner can be created by placing a small table near a corner bench, decorated in the same style.
Role in the interior of the balcony
The layout of modern apartments implies the presence of one or more balconies. It is no longer fashionable to set up a warehouse and store seasonal household items in it. Now apartment owners are trying to improve the loggia and use it as a place to relax or work. In any case, a table is necessary, and the size and design depend on the dimensions of the loggia, the overall design and the capabilities of the owners. In this article I will tell you how to make a space comfortable with the help of a small table.
In the modern world, the balcony has long become a functional part of the apartment.
The balcony can be designed as a continuation of the room to which it is adjacent: bedroom, living room or kitchen. This space will successfully accommodate a schoolchild’s corner, an additional workplace for a freelancer or an artist. Depending on the chosen design, the table can be a central resting place for a friendly company or a place of solitude with a book. To use space wisely, use folding furniture, which helps save useful meters.
The countertop on the balcony is an indispensable design element. It can be either stationary or folding.
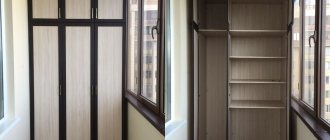
A stationary tabletop unites the perimeter of the room, can be a continuation of the window sill or occupy part of the space. This type is used in spacious rooms, and the tabletop itself is made of solid wood or chipboard with a surface that imitates noble types of wood. Depending on the room to which the loggia is adjacent, the tabletop plays a different role:
a kitchen where the countertop doubles as a bar counter, where it’s convenient to drink coffee or host a friendly party;
Balcony as an extension of the kitchen
bedroom, space as an additional corner of privacy. The tabletop is combined with the window sill of the room, and you get a place for doing embroidery or reading books;
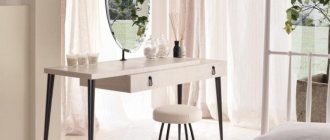
The dressing table can be placed on the balcony
The combination with the living room serves to create a relaxation area. If there is not enough space, the tabletop is used as a workstation with a laptop;
Work area on the loggia
the children's room receives the advantage of a separate school corner area, where the child will be happy to do his homework, and sounds from the room will not interfere;
A creative space for a child can be placed on an insulated loggia
A folding tabletop is furniture that is classified as transformable. It is very convenient to use it on small balconies, installing only when necessary.
A great addition would be folding chairs or armchairs woven from rattan, as well as textile accessories - a blanket, pillows, tablecloth to match the curtains or blinds.
Pros and cons of a folding table in the interior of a balcony or loggia
A table on the balcony becomes a necessity when it is frequently used for relaxation or work. Folding models are very diverse in design, construction and purpose. They can be used as a dining table or workplace, computer area.
When folded, the folding table takes up minimal space
Such designs are very convenient and save space when folded. Fastening to the wall surface is carried out using canopies and clamps that hold a stable position, ensuring reliability, safety and ease of operation.
The folding model is brought into working condition in just a few seconds
Disadvantages of folding models:
- small capacity;
- cannot be overloaded;
- attached to the main wall.
Choosing a balcony table: what to look for
Material
The choice of a table, like any other piece of furniture, primarily depends on the microclimatic conditions of the room. If the balcony is glazed and insulated, then you can install a table on it from absolutely any materials, focusing on the quality of construction and appearance. If we are talking about landscaping an open loggia or balcony, then you should give preference to the most durable and wear-resistant products.
It is believed that materials such as plastic and metal behave best in outdoor conditions; accordingly, the balcony table should be made from them. Of course, these materials are good because they are practically not afraid of moisture, and this significantly increases their service life. However, one should not exclude the possibility of decorating the balcony with furniture made from lighter materials.
If the interior of the room gravitates, for example, to tables made of wood, rattan or bamboo, please note that serious manufacturers always treat products with moisture-resistant and antifungal mixtures, which significantly increases their wear resistance
Folding table and chair for the balcony
Glass table hanging for the balcony
Plastic table with chairs on the balcony
Design
The balcony area, as a rule, is not spacious, so standard tables are unlikely to add convenience to this room. But a small table on the balcony can give your family unforgettable moments of relaxation in the fresh air. Which table should you prefer? First of all, this piece of furniture should fit compactly into the room, without taking up extra centimeters. If the balcony is too narrow and long, then it is more rational to install a corner rectangular table on it, which will not take up too much space, and at the same time visually make the room more proportional. For glazed balconies this can be a window sill table.
Window sill-table on the balcony photo
Convenient and compact table for the balcony with your own hands photo
If the balcony has a normal width, it is quite possible to install a small table of a standard design on it. For example, round tables on one leg or light structures with rectangular tabletops look very beautiful on open or closed loggias.
Furniture for the balcony – round table and chairs
Balcony table models
Balcony round table
Often, owners of small balconies refuse to improve them, believing that the furniture will create a feeling of clutter. This is true, but only if the size of the table does not correspond to the size of the balcony. Now in the assortment of many furniture manufacturers you can find incredibly compact and comfortable folding tables that are perfect even for miniature balconies. Sometimes the design of such tables is very different from standard products. For example, a folding table for a balcony can be made in the form of a high stool, which when folded takes up virtually no space.
Cute folding table for the balcony
Blue folding table for balcony
Wooden balcony table photo
In addition, there is another interesting and convenient option for a balcony table, which, in fact, is a hanging tabletop. Hanging tables for balconies are most often attached to the railings, but there are also models whose fasteners allow them to be mounted to a wall or window sill. The main advantage of tables of this design is their mobility and compactness. Such a table can be removed or moved to another place at any time.
Folding glass table for the balcony
Folding table for balcony photo
If the space on your balcony does not allow you to place even such a miniature product, please note that hanging tables can be folding. If you are not currently using the table, you can lower it down and it will practically merge with the wall, taking up 2-3cm at most
DIY folding table for the balcony
Hanging balcony table photo
Hanging balcony table photo
Design
The choice of table design depends entirely on the interior of your balcony. Metal products with carved legs or elegant wicker rattan furniture look great on open terraces. For closed balconies, you can choose a table that matches the decoration or other pieces of furniture, thanks to which the design style will acquire integrity and harmony.
Wooden table with carved legs for the balcony
Ergonomic mini table hanging for balconies
Design of a folding table for a balcony
Options for factory folding tables
When purchasing furniture, you are more inclined to choose a model that is manufactured by a factory or furniture company, which confirms the guarantee and durability of the product. Reliable quality is, first of all, the material from which the table is made.
Before purchasing and mounting a table, you need to pay attention to how well the balcony is glazed and insulated, and whether the furniture will be exposed to atmospheric and temperature influences, especially in winter. If the balcony is warm, the table can be made of any type of wood.
On balconies that are not glazed and exposed to the environment, folding tables should be chosen from metal, aluminum or plastic. If you prefer wooden furniture, you should know that its use outdoors is short-lived.
It is important to pay attention! The table should be made of moisture-resistant wood treated with an antifungal compound. It must be mounted in a place where it will least likely be exposed to rain or snow.
Sometimes experts recommend removing the table in winter and hiding it in a closet or room. But constant dismantling of the table can weaken its fastenings, and year-round contact with open air will adversely affect the appearance and quality of the wood.
Since the folding table is intended for constant use, when purchasing it you should pay attention to the fasteners. High-quality fastenings are the key to durability in use. They should be designed to secure the table in a suspended and strictly horizontal state, and in the event of a breakdown, the fasteners could be replaced without much difficulty.
Wall-mounted folding desk + chalk (slate) board
If your child needs a workspace for crafts, art and drawing, create a wall-mounted desk with a chalkboard. The basic design is a single board held in place by hinges and chain. There is also a shelf where you can store chalk in a vertical position, and when the structure is in table mode, it adds stability. First, prepare the materials. Here it is better to take your time to fill the gaps, holes and slits with putty and sand smoothly. Then apply three coats of coating.
For added design, glue the edges to create a pretty border around the board. Then simply paint with chalkboard paint.
Table assembly. Place a small board along the inside edge of the larger board and secure with L-shaped brackets. This will make it possible to drill holes evenly and twist the boards. Also drill holes through the piece that will be the front end of the table (opposite the shelf). Use a bolt to attach the chain to the end of the table. It is best to use a washer to close the chain. Screw the hinges to match the studs in the wall. Finally, glue some cork board to the underside of the shelf.
Wall mounting. This is where it helps to have a friend or someone nearby to help attach the board to the wall. Alternatively, you can hold it up using several books, depending on the height you need. Before lifting the board up to the wall, mark and drill holes for the hinges. Then install eye bolts into the stud on both sides of the board. Align the height in the upper position. Attach the chain to the wall.
Now the hard part is how to get the board to stand on the wall in the chalkboard position. You can use a bolt with a slide lock. The problem with the latch is that it is too wide to attach to the top of the board. It’s hard to describe how to solve this, probably step-by-step photos will make more sense.
Photo source: www.instructables.com/id/Wall-mounted-work-deskchalkboard/
Folding desk
If there is absolutely not enough space in the children's room, a folding wall-mounted table will be the ideal solution.
The folding wall-mounted table has three positions - when closed, it is a slate board where you can draw with chalk; when open, it is either a drawing table or a writing wall-mounted desk.
This design is a large rectangle 86 x 61 cm, which rotates on a 28 mm dowel rod, attached along one edge to a rod in a frame that is attached to the wall. A wooden side pin secures the table in the closed position. The legs fold on piano hinges and the outer leg is a large rectangle underneath the table. Two other rectangles on the sides allow you to remove the legs. Special recesses in the frame allow you to install the tabletop in different positions. For the table surface here, MDO plywood (a type of plywood for external use) was used. MDO provides a flat surface on both the table and chalkboard surface. The table is supported in two positions by two folding legs. There are four holes made in the lower part into which pegs are inserted to block the legs. There is also a magnetic latch that holds the legs when the table is closed. There is also a book stand that can be used when the folding table is lowered. Holes are drilled into the top edge of the panel to form the front of the pencil rack. At the edge of the frame there is a bracket for attaching a table clamp lamp.
Photo source: www.instructables.com/id/Wall-Desk/
Folding chair for balcony
A reclining chair for a balcony is just as necessary as a table. If you constantly take out your home furniture for tea drinking or work, it will most likely quickly become unusable due to temperature differences, as well as humidity and street dust.
The principle of making a folding chair is the same as that of a table. If the table is made with your own hands, then making chairs on both sides of the table will not be difficult. You can use the same pattern as for the table, slightly reducing the dimensions. In this case, you will get an original set of furniture for the balcony.
A folding chair on the balcony will be an excellent addition to the table
For convenience, you can make soft fabric pads stuffed with foam rubber, attaching a regular underwear elastic sewn crosswise to one side.
This design makes it easy to attach a soft seat to the wooden base of a chair.
The only inconvenience of such furniture is its annual removal for the winter. If you leave a table and chairs on the balcony in frosty weather, their service life will be only one or two years. And the cost of furniture made by yourself will be an unnecessary waste of time, energy and money.
Folding tables for the balcony: varieties, tips on selection and installation
join the discussion
Folding tables are quite popular accessories for balconies. Such furniture is presented on the modern market in a fairly large assortment, which is why many have difficulty choosing products. Also, many people do not know what types of such tables exist, what materials they are made from, and where exactly is the best place to install a table of this type. An analysis of all these and other nuances will be presented in detail in our article.
Advantages and disadvantages
Like any piece of furniture, a folding table on the balcony has its advantages and disadvantages. The advantages of the products include the following.
- The wall structure can be either unfolded or folded. If necessary, having unfolded such a unit, it can be immediately removed after use by placing the surface of the tabletop along the wall. Due to this mechanism, when folded, such a table takes up a minimum of space and allows you to use the maximum of the balcony area for various other purposes.
- A table located by the window is always well lit, and placement near the window will allow you to enjoy the view while using the product and create a special atmosphere.
- These tables can be used by 2 or even 3 people at the same time, which makes it quite suitable for a small family or couple.
- With this piece of furniture you can zone the space of the balcony. It can become either part of a relaxation area or a full-fledged work space. If positioned correctly, the table will help in dividing the balcony into functional areas.
- This product can be used for various purposes, including as a place to store various things.
- Since the models of such furniture are very diverse, with their help you can successfully complement the interior concept in which the balcony is decorated.
- The folding unit can be installed in almost any part of the balcony room. It can be on the largest wall, on the wall near the window, at the end of the balcony, or even in the arched opening, if there is one.
- For many, an additional advantage of such furniture is the ability to make it yourself.
Of the disadvantages characteristic of finding such a product on the balcony, the following nuances can be mentioned.
- It is advisable to install these tables only on insulated balconies. Otherwise, the temperature in cold seasons may be too low, and in warm seasons the furniture will be uncomfortable to use due to the heat.
- Also, more dust accumulates on the balcony, so such tables require more frequent cleaning.
Types of tables for the balcony
Any table for a balcony consists of three main elements: a tabletop, a stand and a fastening and swinging mechanism that allows you to connect all the parts of the balcony accessory and ensure their mobility within the necessary limits.
The balcony table is made using a certain technology, which provides for a method of fastening, disassembling and assembling it. Most are folding and are fixed on the walls and balcony railings.
The exception is the folding table on the balcony. Flowers in beautiful pots are often placed on it. This table can be located anywhere. Stored in a closet or other suitable place.
The most common modifications of a folding table on a balcony according to design features:
- With hanging mount on balcony railing
- With vertical support on the floor
- Supported by a metal or wooden bracket, mounted on the back of the tabletop and supported in working position on the wall.
This type also includes a small folding table for women's cosmetics. As a rule, it is made the most elegant. The device easily unfolds and, when no longer needed, returns to its original position.
Shapes and sizes
An oval table is considered comfortable and practical; thanks to the absence of corners and blurred lines, the design looks very elegant. In fact, it combines the best features of round and rectangular variations and allows you to create a comfortable and welcoming environment. While saving space in the room, there is enough space on the surface of the countertop for almost any purpose.
The semicircular shape is appropriate in a variety of styles; due to decoration and design, it can be used both in lush baroque and in discreet high-tech. You will not be limited in the choice of materials. They are traditional and the most modern:
- A small square table is good precisely because of its classical expressiveness; it is often equipped with a transforming mechanism.
- A small folding table is appropriate for dachas (country houses) that are visited only in certain seasons; if necessary, bringing them up and taking them back is not difficult.
- However, if you want, you can immediately make a large table to seat the whole family and guests in addition.
Please note that the furniture should not seem overly bulky or get lost in the middle of the room. Typically, each seated person is allocated 60 cm in width and 40 cm in depth, additionally reserving part of the tabletop for a salad bowl and shared dishes
It will be very inconvenient for four adults if the diameter of the circle is less than one meter; for six people a minimum of 1.3 m will be required, and for 8 - at least 1.5 m.
Table for the balcony - ready-made or homemade?
Wall-mounted folding table (workbench)
Folding tables are very popular because they can be purchased ready-made. Or do it yourself. The choice of one option or another depends, first of all, on your skills and financial capabilities.
If you want to quickly and without any problems acquire a folding table on the balcony, then it is better to buy a ready-made structure. This can be done at most furniture stores or, alternatively, you can contact a professional furniture maker. The latter will complete an individual order in accordance with the required shape, dimensions and color. And the cost of a finished table starts from 2 thousand rubles - not such a big price for comfort on the balcony.
You can buy a table or make it yourself
Comfortable table for reading and drinking tea
If you want and know how to make it yourself (or want to test yourself for the first time), then making such a table will take no more than a few hours. Let’s make a reservation right away: the work is not difficult, and in some ways even enjoyable. Both “store-bought” and home-made tables can be decorated, say, with decoupage, so that the product is truly unique.
Lightweight table design for the balcony
Particular attention should be paid to the location of the table. Many people believe that it should be placed at the end, next to one of the short walls
In fact, it will be better if you place the table directly under the window - this way the influx of light will be greater. In addition, this table can accommodate several people at once.
Ergonomics of a folding table for a balcony
Folding furniture is a very convenient option for a balcony or loggia of any size, especially small ones. It is quite easy to use and, if necessary, can be quickly and easily unfolded or assembled. You can install not only a folding table, but also folding chairs. This set is ideal for a balcony.
The compactness of folding models allows them to be used even on the narrowest balconies
Folding elements, as a rule, are installed in the area of the window opening, since this is where the best illumination is. Also, when unfolded, the furniture allows you to move even on a narrow balcony. If necessary, transformers are easy to assemble and practically merge with the wall. At the same time, the balcony area remains completely free, which is convenient if you need to place some other things for a while.
When choosing a table, it is important to consider the design style of the balcony or loggia.
It is also important to take into account the function that the table will perform when assembled.
Types of transformation mechanisms
Each model of the furniture discussed is equipped with a transforming mechanism. There are several types of such devices. All of them have their own disadvantages and advantages, based on which you should choose the most acceptable option for yourself. The following transformation mechanisms are distinguished:
- One of the most improved and modernized is the “acrobat”. The design involves a metal frame with a spring axis, the main table top is attached to the top. The plugs that hold the pull-out part are located on the sides of the furniture. Furniture with an “acrobat” mechanism looks like a small coffee table; it is not difficult to assemble it with your own hands. Transformation into a standard dining model occurs in a few seconds.
- The sliding mechanism of the transforming table increases the tabletop thanks to hidden sections secured under the product. It is enough to pull the main parts to the side, and a free space will appear, along the edges of which grooves are installed; an additional part is placed in them. Experts advise giving preference to metal mechanisms, since plastic parts significantly reduce the service life of the table.
- The lifting mechanism (“book”) is the very first transforming device. During the USSR period, furniture equipped with such a design was found in almost every home. The book-table unfolds by lifting the side tabletops and placing a support under them. Previously, such pieces of furniture were equipped with a metal frame, which increased the size and weight of the structure. Now such products are made from laminated chipboard. Regardless of the lightness and compactness of such tables, such models are considered obsolete options.
Mechanism Acrobat
Sliding mechanism
Table-book
Camping table-suitcase
This design combines not only a surface for eating, but also a container for storing certain things that are useful in nature. Building such a table is relatively simple and can be done in several stages:
Initially, you need to select bars for the frame. The capacity of the suitcase will depend on their thickness. The best option would be a rectangular beam, about 4-5 cm thick. At this stage, the sides of the suitcase are constructed. To do this, rectangles of a certain size are knocked down from bars.
Here it is important to carefully adjust all the ends in order to obtain smooth and not skewed parts. Then a sheet of plywood is nailed to one of the sides of the frame, which will act as a tabletop.
The result should be two small boxes with a closed bottom.
- To turn these elements into a suitcase, you need to fasten them with two hinges so that they can be closed. It is advisable to embed the fittings into the wood to prevent the appearance of large gaps.
- The process ends with the manufacture of legs. They are also cut from bars of a certain thickness. After this, fastening systems are formed at each corner of the future table. The easiest way is to use special bolted connections for which you need to drill holes in the wood.