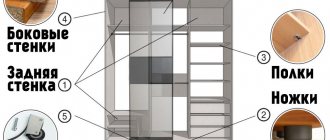
Why is the wardrobe crooked?
If you can see with the naked eye that the door looks like a curved propeller, this is a factory defect. It needs to be changed. If the defect has arisen over time, then you should know that when the doors are opened frequently, backlash often occurs, which is why one of the doors sags. For this reason, the door leaf warps. To fix the problem, you need to adjust the rollers. There are long screws at the bottom on both sides of the doors, usually hidden under adhesive soft tape. It is moved aside and the screws are tightened so that the door is horizontal to the floor.
Why does the wardrobe open on its own?
Typically, this cause of wardrobe malfunction is due to deformation of the floor covering. Perhaps the floor sank near the closet. Under the bottom bar of most models there are adjustable feet. You can twist them to equalize the height. Also, the doors may begin to open due to the loosening of the guide fastenings. By tightening them, you will solve the problem with opening the doors independently.
If you decide to buy a wardrobe in Minsk, pay attention to the quality of the fittings. It is better to abandon the model with plastic guides, as they quickly fail. Steel or aluminum elements will last much longer; with them, you will not face wardrobe malfunctions for a long time.
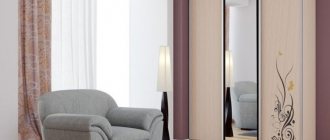
To buy a wardrobe, go to TAM.BY: catalog companies will offer you both a ready-made solution and will create an individual wardrobe design for you.
Door misalignment
The most common problem caused by sagging of one of the sides of the door is the skew of the door leaf. It is determined by the gap formed at the top or bottom between the end of the closed sash and the side rack of the cabinet. The cause of the problem is the loosening and unscrewing of the adjusting screw, which is responsible for the verticality of the side edge of the doors. A similar defect occurs due to vibration of the movable sashes during their movement.
It is easy to adjust the position of the canvas and eliminate its distortion, following the following instructions.
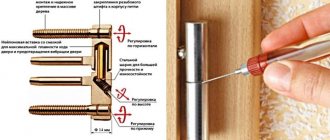
- First you need to find a bracket with two screws at the bottom of the side end of the door. If it is located under the pasted buffer tape, it must be carefully lifted and moved aside.
- A key of the appropriate shape and size is inserted into the lower adjustment screw of the installed bracket, the slot of which is usually a recessed hexagon.
- By rotating the key clockwise or counterclockwise, the door is adjusted, as a result of which its side can be lowered or raised. One full revolution usually corresponds to a vertical displacement of the blade by approximately 1 mm.
In this way, the distortion and resulting gap are eliminated. For a closed door, select a position in which its end and the side pillar of the sliding wardrobe will be parallel.
Don’t forget about the gap between the bottom edge of the door leaf and the guide, which ideally should be no more than 6 mm.
How to fix doors that aren't closing tightly enough
Sooner or later, you will notice that when closing the cabinet, the door no longer fits tightly against the side wall and rolls back slightly. This defect is most likely caused by a slight slope of the floor surface, which is not visually detectable. In order for each sliding wardrobe panel to take its place, you will need to adjust the locking stopper. To do this you need:
- install each door so that it fits tightly to the side surface of the cabinet;
- on the lower guide, make marks with a pencil in the place where the center of the roller falls - either left or right, depending on the location and orientation of the adjustable blade;
- move the door to the side, and then use a knitting needle or screwdriver to move the stopper so that its center coincides with the previously made mark.
If the stopper is installed correctly, the door roller that runs over it will be locked in the desired position. In this case, the door will fit tightly to the side of the cabinet.
Some models of sliding wardrobes have several door panels in their design, which during operation displace the initially installed stoppers. You
You can set the correct stop for each leaf relative to the width of the cabinet in the same way as described above.
What to do if the door is not closed tightly?
If they begin to close tightly, they need to be adjusted. Depending on the type of loops, they will be adjusted. Cabinets are usually equipped with hinge, piano, card or combination hinges.
For ordinary furniture
In a regular cabinet, standard hinges are screwed on, which can be overhead, semi-overlay or inset. They must be adjusted in three planes. They contain fixing screws necessary for adjusting the reach, adjusters for the side position and height of the door. These screws adjust the position and reach of the blade. Using self-tapping screws in the mounting plate, the height or inclination of these elements is changed.
Adjusting doors when there is extraneous noise
The comfortable use of a sliding wardrobe is determined, first of all, by the absence of noise when the door leaves move and the smoothness of their movement. The appearance of extraneous sounds or grinding noises when sliding along the upper guide indicates loosening of the fastening and misalignment of the upper door rollers. This happens due to vibration of the moving web during operation.
You should not try to expand the upper guide - this may lead to breakdown of the entire structure mechanism.
Adjusting the upper roller mechanism will help get rid of unpleasant noise and ensure smooth sliding of the sash. To do this, you will need to remove the sash from the guides and tighten the fastening. It is also necessary to pay attention to the roller overhangs on both sides of the web. They should be the same.
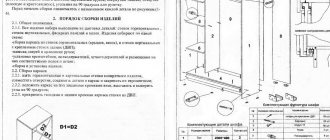
Installation instructions for furniture canopies
How to install a hinge on a cabinet door with your own hands? The following instructions will help you with this work:
The initial stage of work on installing the hinge mechanism is marking. You need to mark both the mounting location and the landing location on the facade and on the body
But the planting depth of the canopy should not be too significant, because a facade made of chipboard usually has a slight thickness. By setting the hinge too deep, you risk damaging the furniture. If the size of the facade requires the installation of several hinges, repeat the above steps as many times as necessary. Next you will need to drill out the grooves. When drilling, make sure that the position of the drill is strictly perpendicular to the surface of the case, otherwise you will damage the cabinet
Advice: pay attention to sharpening the tool before performing work; using a non-sharp drill can lead to the formation of cracks and chips on the surface of the facade; Insert the fittings into the seating area and secure its holders with self-tapping screws; The next step is to install the canopy mount on the cabinet body. Make the markings and, according to them, install the mounting plate and secure it
After completing the above work, proceed to hanging the doors. Attach the façade and first fasten the upper canopies, then the lower hinges and then the fasteners located in the center. All you have to do is adjust the fittings so that the facade fits as tightly as possible to the body. For this purpose, you need to tighten the adjusting screw in the loop. There is no need to screw the element tightly, otherwise the facades will close with a strong and loud bang.
Installing fasteners on cabinet doors and sides is a challenging process. The balance of the sashes and their trouble-free operation for a long time depend on the correct installation of the hinges. You can learn how to install hinges on a cabinet with your own hands from this material.
Fasteners installed on large-sized furniture are semi-mechanical elements that are responsible for opening the doors
The hinges must withstand regulatory loads.
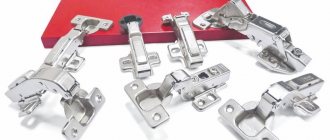
For installation, overhead devices with four hinges, the so-called frogs, are most often used. Such fastenings are convenient for any design that involves hinged doors - a wardrobe or kitchen cabinet, or other types of furniture.
Metal parts are made of durable alloys that are resistant to corrosion and mechanical deformation.
Furniture hinges are divided into several types, depending on how they are attached:
- Invoices;
- Half overhead;
- In storerooms;
- And inverse;
- Ryalnye;
- Feeding;
- Ш tolnye, etc.
Types of furniture hinges.
For cabinets, overhead structures with cup bases are often used, which are connected to the panel using self-tapping screws. Mechanical inserts with a “shoulder” are inserted into these bases and fixed to the door and side panel.
Such fasteners are quite reliable and durable, since they have a reinforced connection to the planes.
Depending on the type of cabinet and its dimensions, as well as the material, select the appropriate type of connecting parts. Some elements are used exclusively for classic furniture, where all details must match the style. For ordinary wardrobes, standard overhead and semi-overlay fastenings are chosen.
Partial loss of door leaves
Considerable annoyance is caused by the canvas jumping off the bottom guide at the most inopportune moment. Before you start adjusting again, it’s worth taking a closer look at exactly how the doors fall out. Often there are cases of clogging of the guide, in which the lower roller, encountering an obstacle, runs into compressed dirt, as a result of which the door rises and moves to the side.
Thorough cleaning of debris and accumulated dust eliminates the cause, and regular maintenance helps to avoid the fabric coming out during further use of the wardrobe.
It is also necessary to monitor the cleanliness of the rollers themselves. Hair or scraps of wool wound around them are often the culprits of breakdowns that completely disable the mechanisms. To replace a wheel that has become unusable, you need to remove the door, install another element on it and adjust it correctly. The work process itself is not particularly complicated, but the problem here lies elsewhere. Quite often it is extremely difficult to find suitable spare parts.
Overfilling the wardrobe sections or carelessly placing things on the shelves can lead to arching of the door frame, causing the panels to jump off the guides and fall out. To adjust the normal operation of the door, you will need to remove the leaf, carefully straighten it and insert it into place.
There is another reason why the door may simply slide off the rail. It consists in the absence of a stopper, the installation of which will solve the problem.
Many people have encountered situations where wardrobe doors no longer close tightly and look warped. To avoid deformation of the door closing system, you will need to eliminate all problems. Many people are looking for information and want to know how to adjust wardrobe doors; to do this, you can contact a specialist or fix the defect yourself at home.
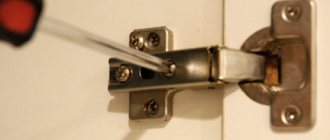
Types of hinge adjustment
Before you start adjusting furniture hinges, you need to determine the cause of the misalignment. This can be done as follows:
- Check that the cabinet is assembled and installed correctly. If there is misalignment, adjusting the awnings may not be useful. First you need to determine what caused the displacement - different heights of the floor or legs, incorrect assembly, etc. It is better to level the furniture structure using a special construction or plumb line.
- Inspect the hinges themselves. This way you can determine the type and condition of the awnings. Without this, it is impossible to choose a solution, since repairing each type of mechanism requires certain types of work. If the problem is that the hinges are loose, just tighten them with a screwdriver.
- Determine the type of adjustment required. It is important to detect the location of the gaps, their size, radius of curvature, and the area where the blade catches. Knowing the “scale” of the problem, you can choose a way to adjust the canopies: height, depth or width.
Before setting up hinges on the cabinet door leaves, you need to decide on what principle the work will be performed. There are several types of regulation:
- by height - performed if one door is located higher or lower than the other;
- in width - if there is an uneven gap between the doors;
- in depth.
Sometimes distortions occur because the furniture was assembled incorrectly or on an uneven surface. Therefore, it is first recommended to check the geometry of the cabinet using a plumb line, and if it is skewed, set it level. Often no further adjustment of the hinges will be necessary.
Vertical correction
Adjustment of a furniture hinge begins with adjusting the vertical position.
This method eliminates the uneven position of the door leaves relative to each other or their separation from the overall design of the cabinet.
Loops are found on the adjusting mechanism. If there are plugs, they are removed. Then they find oblong recesses in which two screws are located - in the upper and lower parts of the fittings. Using a screwdriver, the bolts are loosened slightly, and the cabinet doors are raised or lowered to the required level. To fix the position of the doors, the screws are tightened, holding the doors in the desired position.
After aligning the door leaves vertically, begin adjusting the remaining levels. If you start correction horizontally or in depth, you will have to constantly return to the beginning. This adjustment will resemble “pulling a blanket.”
Horizontal adjustment
To align the doors in height and prevent constant friction of the door leaves against the horizontal slats, it is necessary to adjust the special mechanisms that secure the doors. Inside the structure there are small oblong ears where the screws are located. Using a screwdriver, loosen the screws by carefully unscrewing them. In this case, it is necessary to ensure that the doors do not warp.
If necessary, during adjustment the façade panels are lifted and then the screws are tightened, but not too tightly so as not to break the threads.
Depth adjustment
This type of adjustment is required when the doors or one of the curtains constantly move in the opposite direction or do not fit tightly against the wall of the wardrobe.
To eliminate the distortion, find a second adjusting bolt. Take a screwdriver and tighten the screw in your direction by 2-3 mm. During the process, it is important to constantly ensure that no cracks or gaps form between the door panels and the facade.
If the twisted 2 mm is not enough, then you need to continue the process until complete alignment.
It is recommended to tighten this adjusting bolt much more tightly than the others; it holds most of the entire structure. A Phillips screwdriver is required for alignment.
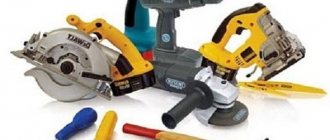
Required Tools
To adjust wardrobe doors, you may need the following tools:
- stopper;
- instant adhesive;
- hex key for furniture;
- screwdrivers of different sizes.
The cabinet doesn't close
Open the door you want to adjust to give you clear access to the hinges. To adjust the hinges on hinged cabinet doors, you will need a Phillips screwdriver. Each direction is corrected in its own way.
All doors may need to be adjusted up and down at the same time. Loosen the top and bottom bolts, support the door to the desired level and tighten them firmly again. Make sure that all doors are level, and support the door while loosening the bolts, otherwise it may fall.
To make the door end coincide with the end of the cabinet, unscrew the screw located in the hinge closer to the door. This method allows you to adjust it left and right. As a result, the gap between the doors should be uniform and necessarily coincide with the gaps on other facades, if any. If the cabinet has a lock between the doors, it should also function.
How to adjust cabinet doors in a back and forth plane, i.e. inward or outward, special instructions will tell you. This is usually required if the door is equipped with magnets. Get ready to work with the second screw in the hinge from the sash. Loosen it up. At each stage and after each tightening, close the doors and check the result.
Here are a few tips that will allow you to quickly and as well as the most experienced professional adjust the hinges on cabinet doors. Adjust different directions separately: first do and check one, then the next. This advice is especially relevant for initial setup. When finished, make sure that the screws in the slot (up-down and front-back directions) are tightened securely. They are what hold the closet door in place. Adjust the hinges gradually: first a little, then check and repeat your actions again. With these skills, you won’t be afraid of any move or repair, you can save time and money and win the respect of the whole family as a person “with golden hands.”
Types of problems and their elimination
The sliding wardrobe is considered an integral part of any interior. They are characterized by smooth running and silent operation. The main advantages are practical use, compact storage of any things. The doors in the closet should not make any extraneous sound.
During regular use, backlash often occurs, smoothness of movement is lost, the door leaf warps or jumps off the guide rails.
It is necessary to carry out regular inspection of the mechanism, which will help to avoid serious damage and deformation of the mechanism. To learn how to adjust doors, you need to familiarize yourself with the most common causes of malfunctions. Below are instructions that will help you cope with this task. You can also watch video lessons from experts.
Door misalignment
This is a common problem that occurs due to sagging of one of the door leaves. A gap is formed at the top or bottom of the structure near the side wall of the cabinet. This deformation occurs when the adjusting screw is partially or completely out. It fixes the side edge in a vertical position. When the door moves, a slight vibration is created, which leads to this defect.
To adjust the correct position of the doors, you must follow the following instructions:
- At the bottom of the side walls there is a bracket with two identical screws. If they are hidden under a special tape, then it must be peeled off without damaging its integrity;
- The slot (recess in the head of the fastener) of the lower screw is unscrewed with a hex key. It is designed to adjust the structure;
- turn the key in different directions and look at the result. The side of the structure will be lowered or raised. With one full revolution, the blade moves vertically by one millimeter.