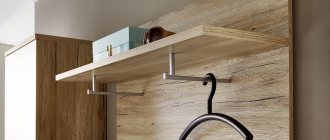
Baking cakes is not only interesting, but also responsible. The quality of decoration determines the aesthetic appeal of the confectionery product and the ability to arouse appetite among consumers. Therefore, you cannot do without a special rotating round table designed for decorating sweets.
The stand consists of several parts. Using step-by-step instructions, you can make a cake turntable yourself.
Why do you need a turntable?
A rotating cake table is a great find for those who are interested in baking complex confectionery products.
The device has the following advantages:
- significantly facilitates the final processing of the cake, rotating around its axis;
- the pastry chef can decorate the product without moving, which greatly speeds up the cooking process;
- Often there are special markings on the table surface that allow you to create smooth and neat elements.
The rotating stand will help professional confectioners and ordinary housewives create culinary masterpieces.
Features of the rotating table
If you want the cake to be accessible to you from all sides at the same time, and at the same time you do not have to run around it, be sure to consider having a rotating stand.
What is a rotary design for cakes? This is a product consisting of:
- round work surface;
- legs-bases;
- rollers, rubber bands.
Thanks to its design, the table easily rotates around its axis and provides convenient access to the confectionery product . With such a supply, you can create elegant and original decors in the most convenient way and create decorations of any complexity. At the same time, you don’t have to worry at all that your masterpiece will move, get damaged, or fall to the floor.
You can either purchase a turntable for cakes ready-made or make it yourself. A homemade design has many advantages. Firstly, you will be able to make a product that will fully meet your requirements and preferences .
Secondly, you yourself will be able to create a thoughtful drawing of the product, select materials for its manufacture and think over the most optimal dimensions. In addition, a homemade design will be much cheaper than a purchased one.
Tools
Having decided to make a rotating cake table with your own hands, prepare the following tools and materials :
two bearings (they can be purchased at any auto store);
Important: bearings are double and pressed. The second option is preferable when assembling a rotating cake stand, as they are more convenient to install.
Why do you need a rotating cake stand?
Everyone, even a novice pastry chef, should have a rotating cake stand in their arsenal. It is a smooth round or square tray on one or more legs, at the base of which lies a twisting element.
A turntable will help keep the cream decoration level. And the decorating process itself turns into a mesmerizingly beautiful event.
Please note a number of advantages of the stand:
- Easy to use. There is no need to invent anything, it is easy to rotate and wash.
- Convenience. Makes it easy to cut the cake into equal parts and place it on plates.
- Aesthetics. Beautiful presentation, decorative part of the interior.
- Speed. With such a stand, decorating the cake will go much faster.
- Versatility - suitable for holidays and as a kitchen tool.
- Material. Almost all coasters are made from durable, high-quality raw materials.
- Sustainability. When decorating, your cake will not float or fall off the plate.
The design is designed so that the tray (stand) rotates freely around its axis.
In addition, the dish helps:
- make a perfectly smooth creamy coating;
- turn the baked goods in different directions;
- pour confectionery products with an even layer of glaze;
- adds stability to large desserts;
- draw patterns and designs without stopping or bending over the plate;
- Cover the cakes with mastic quickly and effortlessly.
Some options are manufactured with a tilt, so it is possible that the device can be bent at different angles.
How can I replace a cake turntable?
What is the solution for those who do not have a turntable? A very simple and affordable solution can also be found in almost any home. You can use a rotating plate from the microwave. Almost all models are designed in such a way that they have a glass plate and a round stand at the bottom. You need to remove the plate and the circle underneath it from the microwave. If the table surface is too smooth, you can place paper (a paper towel) underneath to reduce slipping. This way you can decorate the cake by smoothly rotating it around its axis. Also, a glass plate will not spoil the view when serving the finished decorated product.
Materials
A rotating table can be made from any available materials :
- Fiberboard;
- MDF;
- plywood;
- tree.
Each individual option has its own advantages. Wood is environmentally friendly, safe, and has a texture that is pleasant to the touch . MDF and plywood are easy to process. In addition, this material has a low cost.
But chipboard is inexpensive, looks attractive, and is a pleasure to work with.
Tip : in order to save consumables, you can use a door from an old kitchen set to make a countertop.
Features of choice
In order not to make a mistake when choosing a good table, it should be assessed according to several criteria.
Rotation mechanism
The most important part of the model, without which the table simply will not spin, is the rotation mechanism. It is a metal bearing located under the table top, ensuring it rotates evenly around its axis.
It is recommended to choose a reliable turning mechanism to ensure uniform and non-stop rotation while cooking the cake.
Diameter
The most common tabletop diameter is from 26 to 30 centimeters. A standard size cake of up to four kilograms has these parameters.
But for convenience, it is better to choose a larger diameter so that you can rest your hand with the palette on the tabletop while working. This will help achieve a more accurate result.
Silicone feet
A necessary part designed to fix the structure in one place. This prevents the confectionery product from sliding on the surface of the countertop, thereby eliminating possible defects and damage to the cake during processing.
Such legs are quite inexpensive, around a few hundred rubles, but thanks to them the product will turn out perfectly smooth and without damage.
Marking
On the round surface of the tabletop there are special divisions that divide it into equal segments. This is markings that help create decorative parts that are completely even and identical in size. Plus, the pieces of the cake will be positioned at the right angles, which is sure to ensure a quality end result.
If there are no markings, you can apply them yourself using a ruler and compass.
Manufacturing stages based on the model
Make your own wooden tray using a drawn drawing. The master prepares fasteners and other joining elements. The simplest models, which are a flat board with sides and handles, are made according to a simplified scheme. To make them, it is enough:
- Cut out a rectangular base of the required size.
- Prepare a frame that matches the dimensions of the base.
- Attach the handles to the frame.
- Decorate the bottom.
- Connect the base to the frame.
Complex portable mini-tables are made in the same way. The difference is that the attachment points for the legs are additionally fixed to the base. Holders and decorative handles are purchased at furniture stores. Decorate the product upon completion of work. The decoration method is chosen at the request of the master, based on the overall interior of the room and the material from which the tray will be made. At the end of the work, the surface should be varnished or painted. A water-repellent coating will protect your portable device from liquids.
For breakfast in bed
It is quite difficult to make a model of a tray with legs for breakfast in bed; the master must at least be able to use the tools correctly. A portable mini-table can be created from a suitable rectangular piece of plywood or board. The list of materials depends on the model and design of the structure. To make a breakfast tray, you need to prepare:
- 40x70 cm board or thick plywood (any wood will do except pine and spruce);
- 4 metal tubes 1 meter long;
- corners with a diameter of 15 mm - 8 pieces;
- tees - 4 pieces;
- gaskets with a diameter of 15 mm - 4 pieces;
- varnish or stain.
The mini-table is convenient because it does not need to be placed on your knees; it is easily fixed on the surface of the bed. The detailed steps will tell you how to make a useful thing yourself:
- Metal tubes are cut into several pieces with a pipe cutter or grinder, the edges should remain smooth and without dents. In total you should get: 4 pieces of 25 cm each;
- 2 pieces of 58 cm;
- 4 pieces of 19 cm each;
- 4 tubes 6 cm each.
- using tees, connect 2 pipes of 58 cm each (located horizontally under the tray) and 4 racks of 19 cm each (legs);
If these parts are not secured with glue, they will easily detach from the main fabric of the accessory. A tray with folding legs is made according to the same principle as that of clamshells. The elements themselves are attached to the base using rotating mechanisms, and are secured with hooks or loops.
Cut copper tubes
Install handles
Drill the board
Treat the wood surface
Apply silicone gaskets
Build a stand
Pin it to the board
From an old painting
It is very easy to make a wooden tray from an old painting. All that is needed for this is the picture itself in a frame and suitable tools. This tray does not require additional decor. To make kitchen utensils you will need:
- two decorative door handles;
- a piece of plywood;
- self-tapping screws;
- screwdriver
Door handles are screwed to the sides of the frame. The picture itself is taken out, and the base is cut out of plywood according to its size. The canvas with the image is glued to the surface of the prepared plywood. The decorated sheet of plywood is varnished on the front side, allowed to dry, then screwed to the frame with self-tapping screws. The tray is ready.
From a photo frame
Any novice craftsman can make a tray from a photo frame. In the store they choose a frame of a suitable size with a plywood base; if this is not available, you will have to remake a regular one with a cardboard bottom. The work is carried out like this:
- The cardboard base and glass are separated from the frame.
- Holes are drilled in the frame on both sides, and then furniture handles are attached to it with self-tapping screws.
- A plywood base is cut to the size of the cardboard.
- The cardboard is decorated in any available way, then glued to the plywood using PVA wood glue.
- The base and glass are attached to the frame with a furniture stapler.
The sides and bottom of the converted product are painted or decorated with decorative elements. In a furniture store you can find a large number of interesting details intended for decorating kitchen furniture. They decorate the resulting portable plate.
We take out the cardboard and leave only the glass
Finishing cardboard with fabric
Place the cardboard on the glass and secure it
We fasten furniture handles
With a slate board
A tray with a slate board can be used to write romantic messages to your loved one. Making such kitchen utensils is very simple. All you have to do is buy slate paint at the store and paint the bottom of the tray with it.
For this purpose, a purchased (glass, ceramic, metal) or home-made product is suitable. The main thing is that the bottom surface is suitable for painting.
Instead of slate paint, it is advisable to use chalk wallpaper. Both manufacturing methods result in the same effect.
With mosaic
Creating a pattern on a tray using mosaic requires patience. However, wooden utensils decorated with similar patterns look extraordinarily beautiful. Classic mosaic is made from ceramic elements or glass pieces. In everyday life they use the most unexpected materials at hand.
A sketch is first drawn, on the basis of which a sketch is developed. The image, taking into account the size of the finished product, is also created in color. The mosaic is made from any suitable material:
- small colored shells;
- flat pieces of broken glass;
- colored pebbles;
- painted eggshells;
- tiles broken into small fragments;
- cut colored paper.
Each individual piece is glued to the wooden surface of the bottom of the tray. Transparent “Moment” is used as an adhesive. You can also use melted plastic. After the mosaic is ready, it is filled with transparent furniture varnish.
By choosing different materials and being creative, you can get very different tables.
It is very convenient for confectioners who make cakes to use various types of devices that facilitate the process of decorating the finished product. Fortunately, today stores offer a wide range of such equipment. One such device is a turntable. True, the cost of such a table is quite considerable, and it is often easier and more profitable to try to make a turntable for a cake with your own hands.
How to make it yourself
The modern market offers many devices to make baking easier. However, by making a cake turntable yourself, you can save a lot of money. In addition, a homemade design can be created from your own materials, adapting it to specific requirements.
Required tools and materials
To create a model, you can use various materials. The most common options are wood, plywood, chipboard.
For work you will need the following tools and materials:
- pressed bearings, 2 pcs.;
- lumber;
- thin plastic;
- metal circle;
- tubes made of plastic or metal;
- nails;
- self-tapping screws
Further instructions will be devoted to how to make a rotating cake stand with your own hands from plywood, as this is the most convenient and inexpensive option.
Manufacturing
Before starting work, you should make a drawing, indicating on it the parts that will make up the model and their dimensions.
Creation instructions:
According to the drawing, two circles of the required diameter are cut out of plywood - 20 centimeters.
A bearing is inserted into one of these circles. The hole for it is cut out in advance.
The two parts are twisted and fastened using self-tapping screws, and the bearing is inserted into the center.
The upper and lower parts of the table are connected using plastic tubes; if desired, metal ones can be used.
They must fit very accurately into the bearing. The most optimal length of the tube is 15 centimeters. The upper part of the model is made of metal. Its size plays a very important role, so it is best to make the diameter 30–40 centimeters.
Then the parts are connected to each other using a welding machine. You can also use hot glue for fastening, which hardens when cooled. Next, the rotating circle is placed on the pipe and fastened with self-tapping screws.
The finished table is decorated in different ways. For example, the surface is decorated with crepe paper or thin plastic.
It is recommended to serve the cake on a special stand, which consists of cardboard circles decorated with colored film.
Work process
Making a turntable with your own hands is quite simple. First of all, you will need to draw a high-quality drawing. After this, we begin to work according to the following scheme. If you have two bearings, and not one pressed one, then we hammer the element of the smaller diameter into the larger one using nails. It is necessary to cut two circles with a diameter of 20 cm in a wooden slab. A hole is cut in the middle of one of the circles into which the bearing is driven. In this case, the two parts are twisted and secured with self-tapping screws. A bearing is placed in the center.
The DIY table is equipped with plastic tubes. The tube should connect the upper and lower parts. Keep this point in mind when making a drawing for the turntable. In this case, the tube must fit exactly into the bearing. The ideal length is 15 cm. Such a tube will not be too short or long, so you will not have to bend over while decorating the product.
The top is made of metal. In order for it to spin, pay special attention to its diameter. On average, the diameter of a metal circle should range from 30 to 40 cm. If you have the opportunity to weld the elements, that will be great. For those who are deprived of this opportunity, cold welding was invented, which looks like plasticine. The cake turntable also requires circles cut from plywood. The rotating part is installed on the pipe, and the elements are fastened with self-tapping screws.
The table can be made of wood:
OK it's all over Now. The cake turntable is ready. In order to give it an aesthetic appearance, you can cover the product with thin plastic. Another option is to purchase self-adhesive film. It is sold in wallpaper or supplies stores. This film is easy to apply and washes well.
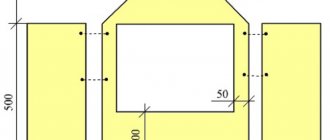
Step-by-step instructions for assembling a rotating table with your own hands
I outline all my actions in points in the following order.
- I determine the size of the rotating plane to be 600 mm. Since the diameter of the main table is 1300 mm, the table will not interfere with the plates around it.
- I fasten a sheet of whatman paper to the board with push pins.
- Using drawing tools, I draw a 600 mm circle on paper. I carefully cut out the table layout with scissors.
- Having attached whatman paper to a sheet of fiberboard, I trace it with a pencil. I use a jigsaw to cut out the lining for the tabletop.
- I perform the same actions with a piece of chipboard.
- Using pliers and a screwdriver, I remove the plastic roller from the metal hinge.
Rotational support for chair with fasteners
- In the middle of the block I make side cutouts for a tight installation of the support.
- Having installed the hinge strictly in the center of the beam, I drill a hole from the side through the openings in the metal.
Installing the hinge on the beam
- I apply the hinge area to the center of the fiberboard and mark the attachment points with a pencil. The hinged support will allow the table to rotate and turn in the desired direction at any time.
- In the fiberboard, following the markings, I drill 4 6 mm holes with a drill.
- I thread the screws through the holes in the sheet and support. I put washers on the side of the platform and tighten the nuts.
Attaching the support to the fiberboard circle
- I coat the screw heads with machine oil.
- I apply a circle of chipboard so that the outer boundaries of the two circles coincide.
- Using the marks obtained, I use a drill to make small indentations in the chipboard. They will allow the screw heads to not interfere with the tight fit of the two parts of the rotating tabletop.
- I apply a layer of liquid nails to the surface of the chipboard and connect both parts of the table. Having separated them, I wait 3 minutes. Then I finally connect the parts, loading the top with heavy objects at hand.
- I sand the side edges of the circles with sandpaper.
- I place the support beam in the center of the round table. I make marks at a distance of 30 mm from the edges of the plank.
- I drill through the marks through the timber and the tabletop.
- I thread two bolts. At the bottom of the tabletop I secure the bolts with nuts and washers.
- I put a hinge with the table top on the fixed support beam. I thread a bolt through a pre-drilled horizontal hole and tighten it with a nut and washer.
- I glue the tape along the end of the circle using an iron. I cut off the protruding part of the edge with a knife. The table is ready.
This instruction makes it possible to understand how to make a table with a rotating center with your own hands without much hassle and at minimal cost.
Interesting ways to decorate
Craftsmen with basic drawing skills can paint the product to their own taste. The sides and bottom of the tray are covered with ornaments. Decorative drawing is performed in any style and direction. Oil and acrylic painting is covered with a layer of varnish at the end of the work.
It is much easier and faster to decorate a tray using a photo from a magazine or a poster of a suitable size. The wooden bottom is pasted over with a picture, and then filled with several layers of varnish. The product is left to dry and only then used in everyday life.
A tray decorated with a photograph and rose petals looks interesting. A life-size photo of a flower is glued to the bottom. Then several petals are laid out on it so that they do not rise too much above the plane. The volumetric part can rise at the edges within 2-3 mm. Transparent and colored beads are poured around the flower and on its petals. The entire composition is filled with transparent varnish.
The most unexpected material can be chosen for decoration. The main thing is a little imagination and adherence to technology. The bottom of the tray is usually decorated with:
- mosaic of multi-colored flat buttons and woolen threads;
- applique of patches or golden coins;
- a collage of pieces of postcards;
- dry leaves, flowers;
- straw ornament;
- mat.
Handles for the tray can also be made unusual. For example, instead of ready-made store fittings, weave them from newspaper tubes, build them from glued wine corks or a piece of wide leather belt. As an option, wrap the simplest plastic handles with thick twine. For decorative legs of a tray with your own hands, use a piece of PVC pipe painted in any desired color or a wooden dowel. With wood carving skills, this piece can be made into any shape.
It doesn’t matter which of the proposed options is chosen, a hand-made tray will in any case become a vivid embodiment of an individual artistic design. An experienced craftsman can create a complex multifunctional design, and novice home creators will at least be able to remake a boring picture or poster in a frame.