The podium is a modern solution that allows you to delimit the living space. And if a do-it-yourself pull-out bed is installed under the podium, then the functionality of the raised platform doubles. Plus, there is space for small cabinets to store small items. You should not assume that such a structure can only be done in small apartments. This solution will enliven any interior, even in a large room/apartment! Moreover, it never hurts to have an extra bed in case guests or relatives arrive. This design can also be assembled in a rented apartment, because there is no need to raise the floor and make an opening in the wall. So what kind of preparatory work needs to be done to make a pull-out bed and how does the manufacturing process itself go?
Preparation is the key to success
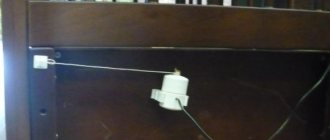
Corner bed arrangement diagram
The design of a pull-out bed can be different. Let's look at an example of a corner location:
- Support wall frame.
- A frame podium that was mounted on vertical strong sides.
- Pull-out bed with mattress on rollers. There can also be several drawers for bed linen, books and the like.
- Several additional corner and side drawers.
- A ladder of one or two steps.
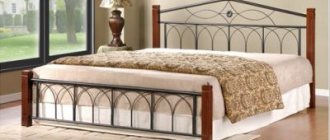
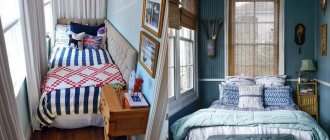
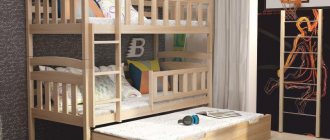
This is how the finished structure with a pull-out bed will look like.
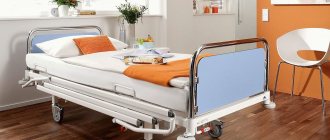
Pull-out bed with mattress on casters
It is necessary to consider the size of the purchased mattress.
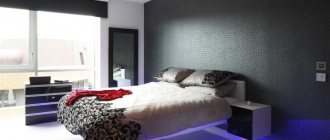
In fact, the space above and near the bed will be a kind of dead zone, since it needs to be pulled out unhindered at night. The height of the mattress and flooring will be 45 cm. This height is sufficient, since a standard apartment has a height of 2.30 m. A person of average height will feel completely comfortable. And on top you can easily place a computer table and an armchair.
Hanging bed
The design is easy to manufacture. An important condition for placing a bed is the availability of free space in the room. The design feature of the product provides for slight lateral rocking.
The components must be of appropriate quality, as should all fasteners. The wood used is not of the highest density, then the product will be light.
Collecting materials and tools
Tools and materials
Everything should be carefully prepared for work. Having made preliminary calculations, you can buy the material. You will need:
- Beam 40×60 mm 25 m.
- Furniture board: thickness 22 mm, size 600×3000 mm in two copies.
- MDF board: thickness 19 mm, size 2070×2620 mm in duplicate.
- There are two furniture casters.
- Screws and dowels.
- Acrylic paint and furniture varnish.
- PVA glue.
The dimensions indicated here are approximate. In your case, the dimensions may be different!
As for the selection of tools, you will need:
- jigsaw,
- electric saw,
- drill,
- milling machine,
- screwdrivers and screwdriver,
- clamp,
- roulette,
- ruler,
- pencil,
- sander,
- sandpaper,
- brush and roller.
List of required tools:
Tools needed for the work: hacksaws for wood, a grinder with a circle for metal, a drill, a tape measure, an electric plane, a screwdriver, a set of drills for wood and metal, a metal ruler.
- Construction stapler.
- Electric planer.
- Hand plane.
- Flat sander.
- Screwdriver.
- Roulette.
- 8 and 10 bit (used for tightening self-tapping screws).
- Simple pencils.
- Drill.
- A set of drills for wood and metal.
- Grinder with a circle for metal, attachments.
- Jigsaw.
- Metal ruler.
- Metal corner.
- Awl.
- PVA and wood glue.
- Wood saws.
- Boards.
- Sheet of plywood (minimum thickness 5 cm).
- Tabletop.
Related article: Features of a wedge valve
Installation of wall frame
Podium drawing for a double bed
First, a support structure is assembled and installed along the wall. You should measure straight. Directly on the floor, markings are made for the bed. These measurements can be plotted. To get the support rails into place, remove the baseboards. Now vertical racks made of timber are installed along the entire perimeter of the flooring. Depending on the expected load, adjust the pitch of the racks.
If you have two or more children, then, of course, you cannot drive them off the podium. For this reason, place the racks in 40 cm increments.
Making a podium
As for the height of the racks, it should be less than the platform exactly by the thickness of the timber. Mount a horizontal beam on top of these supports. This entire structure must be attached to the wall using dowels. The result will be a fairly rigid and strong structure.
Assembly sequence
The height of the box should be up to 200 mm, and its width of the sides should be 50 mm. Therefore, you need to glue several bars together. Wood glue is applied to each side, and each piece is fastened into a group of up to 4 pieces.
The glued bars are adjusted to the required dimensions. The side blanks must have a length of 2200 mm. The central longitudinal jumper is 2100 mm, and two end panels are 1610 mm each.
Read here: How to choose the right windows in Rostov-on-Don
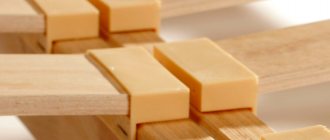
Corner connections are made like a lock. To do this, the upper and lower bars are cut down to 50 mm each. The central block is cut at the end workpiece. Next, the joining points are treated with glue and driven into the groove. The stages of manufacturing and assembling the bed should be carefully followed.
Then the central transverse jumper is installed - 2000 mm. Stop bars are installed on the underside of the box. The central longitudinal partition will rest on them.
Legs are mounted in the corners, fastenings are made using self-tapping screws and bolts. To prevent the center from sagging, several more supports are attached to the jumper located in the middle.
Additional shelves are mounted on the sides of the frame so that the covering boards can be laid on them. After them, the crossbars are laid, but so that they do not lie tightly to each other.
The last stage is surface treatment. This is a brief instruction on how to make a bed with your own hands.
Next up is a pull-out bed
Now it's time to make the bed. The front rounded edge and the bed frame itself should be cut from 19 mm chipboard. The bottom sides and cover must have sufficient rigidity and strength to support the weight of several people. For this reason, it is better to cut the elements of the lid and side wall from a 22 mm shield. Cut out all elements according to the prepared drawing. So, here is the sequence of making a pull-out bed:
- The bed is marked on the board and MDF panel. You will need to cut out the following elements from the slab: the lower base of the bed, which will be rounded at the front. To do this, use an electric jigsaw. The cover for the podium can be cut from a furniture panel. It is recommended to clean each cut so as not to drive in a splinter.
- To strengthen the flooring, cut out the sides from the board. According to the markings, these sides are attached to the floor of the podium. Next, glue stiffening ribs from 40x60 mm timber to the edges of the flooring. The board will have a height of 430 mm. Bed wall 130 mm. Mattress height 200 mm. As a result, the height of the bed structure with mattress will be 330 mm. To avoid any difficulties when rolling out the bed, the side of the flooring can be additionally reinforced with stiffening ribs: crosswise or longitudinally.
- The glue should dry well. After this, cover the sides with a layer of varnish and only then install the structure on the legs.
- It will be necessary to select grooves under the supporting beam. They will act as a support for the triangular niche cover.
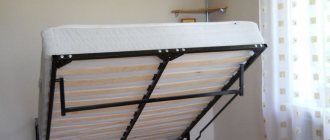
- At this stage, the slatted mattress frame is assembled. Screw the chipboard strips to the slatted base. From two scraps of slab, assemble a semicircular façade. Each of the segments should be secured with screws. Between the bed frame and the rounded front of the bed, insert a stop, which is cut from the remains of MDF.
- Now all that remains is to screw the furniture casters to the lower base of the lying area. And attach the timber parts to the front lower part of the bed. The bed is ready!
Retractable design drawing
Finally, cut out the step and secure it with screws. Triangular covers should also be cut for corner niches. Once all this is done, you can check the functionality of the bed by rolling it out. If everything is working properly, you can continue working.
Screw the side ends of the decking to the beam of the wall frame. Glue the support rail into the finished grooves, which is necessary for laying the triangular cover. This entire structure is additionally secured with screws.
It is better to store seasonal items in niches located in the corners. Since access to these niches will only be required a few times a year. It will be possible to install furniture in these places.
At the end, the ladder is installed and the work is completed.
A few words about the design of the future bed
Drawings of a pull-out bed.
The easiest way before drawing up a project is to go to several stores and look at approximate options in order to determine the requirements for the future bed. It is better to do this in a store rather than on the Internet, as you will be able to touch the furniture, evaluate the reliability of different designs, and photograph some little things that you particularly like. You can calculate the required volume of materials very easily by downloading a special program on the Internet, where it is freely available.
Article on the topic: Panel parquet: types and installation, laying parquet panels, photos, Soviet repair of boards on joists, laminate flooring
The best material is wood. You can buy solid wood or furniture panels from different types of wood: spruce, pine, oak, ash, larch. Shields are much cheaper than solid wood, as they are made of timber. This bed will be safe and easy to use. An important point: before boards are made from the timber, it is dried, so you will be protected from possible future deformations of the bed. The solid wood may not be dried very well, and after 3-4 months of use the bed may become deformed.
Floor finishing
Carpet finishing
The completed frame should be beautifully finished. To do this, the entire surface must be treated with a wood primer, for example, drying oil. The surface must be dry. Then paint the surface in two layers.
If you don’t like painted surfaces, you can lay carpet on the floor of the podium. To do this, distribute the carpet evenly over the surface of the podium. Press it along its entire length with a heavy object. Then make markings that will exactly follow the outline of the entire structure. In places where the bed platform has rounded areas, work extremely carefully and carefully. Use a sharp knife to cut carpet. Each edge can be further processed, for example, with a braided cord or something else. When you have completely adjusted the carpet to size, it should be laid with glue so that it does not move.
This is how a pull-out bed is made. In literally four square meters you can organize a workplace on the podium and a pull-out bed under it. As you can see, making a pull-out bed is not that difficult. It just takes a little patience and effort.