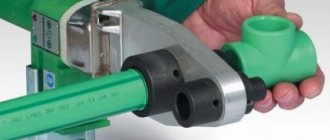
This article will tell you how to easily and simply make furniture from ordinary plastic bottles with your own hands. Such furniture can last quite a long time. Moreover, the cost of its production is very low, due to the fact that plastic containers are available in large quantities to every summer resident and gardener.
Such furniture is very popular for holding various holidays outdoors, as well as for arranging a summer house and plot of land. If you are also a creative person, then from plastic containers you can make many interior items, as well as various kinds of crafts and toys.
Next, step by step, for beginners, we will analyze how interior items are made from plastic bottles.
Making furniture from plastic bottles
It is not difficult to make furniture from plastic bottles with your own hands; in addition, it has a number of advantages, which can be appreciated by home craftsmen who have a wide range of thoughts and skillful hands, and are accustomed to putting any little thing into action.
Such products allow you to create a special, unique appearance of the premises.
Such furniture:
- cheap;
- light in weight, which allows it to be conveniently installed in the right place;
- does not require special storage space;
- It is not afraid of moisture, so it can be left outdoors.
Plastic chair
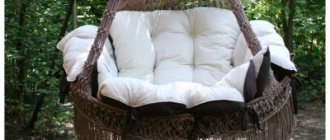
One of the options for “bottle furniture” could be an armchair. It is unlikely to be needed in an apartment or house, but will decorate an open terrace or recreation area on a personal plot. Experienced craftsmen share their experience on how to make a chair from plastic bottles with your own hands. You can learn about the intricacies of this work by attending a master class that craftsmen generously post on the Internet.
The creation of a chair begins with the preliminary preparation of the container.
The chair can be made right on site. If you plan to make a spacious, comfortable piece of furniture, you will need:
- two-liter bottles (up to 200 pieces);
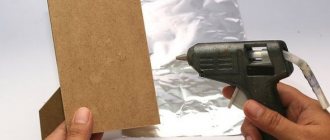
- thick cardboard;
- foam rubber - for a soft seat.
You can additionally use thick fabric as upholstery or cover it while using a blanket or bedspread.
The final stage of creating furniture will be strengthening the structure using tape.
The tools you will need are scissors, stretch film and wide tape.
So-called monoblocks are assembled from plastic raw materials. To do this, you need to cut off the neck of the bottles and insert one into the other. Then connect with film and tape, in accordance with the intended design of the product. A chair with armrests will be even more comfortable.
The main skeleton of the chair is formed (a rectangular ottoman), after which the back and both armrests are attached to it using tape.
Note! Scotch tape will be needed to connect the bottles into monoblocks. The assembled parts need to be connected with stretch film: the tape will not hold the structure.
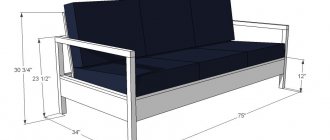
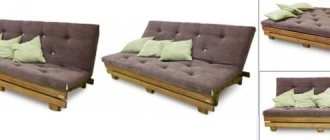
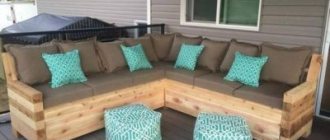
Original sofa
A handmade sofa made from plastic bottles may be convenient to use in your summer cottage. To make it you will need at least 500 pieces. The order of work is as follows: first, the base (seat) is made, then the back and, finally, the armrests, if they are provided for in the design.
For such a voluminous object as a sofa you will need at least 500 two-liter bottles and a strong base that prevents them from being crushed.
All elements are connected with film: in order for all the elements of the sofa to hold firmly, you will need quite a lot of it.
Secure them by wrapping the container with wide tape and film.
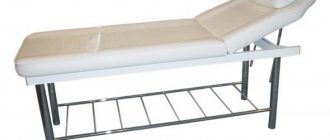
Picnic table
At the dacha you can’t do without a table, but you don’t have to bring it from the city. A home craftsman can make it with his own hands right at his summer cottage. Its base can be assembled from 40 empty two-liter bottles. For the tabletop, use plywood with a thickness of 10 mm or a lid from an old table. It is fixed on a base, which can consist of one stand-leg, three or four - depending on the purpose of the product and the master’s intentions.
As a rule, when making a table, plastic bottles play the role of support for the tabletop.
A small round table mounted on bottles with twisted caps extending onto the surface of the tabletop looks original. Holes can be drilled with a drill.
The tabletop can be taken from old furniture, made by hand, or purchased in a store.
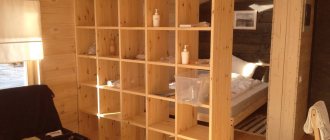
Wall shelves
Anyone who wants to try themselves in this exciting activity can handle this piece of furniture. To make it, you can take bottles of any shape and size and cut the neck, after which:
- paint with acrylic paint or leave them transparent;
- connect the parts with tape;
- secure to the wall with self-tapping screws.
A ready-made rack of bottles can become a functional element in a garage or country house.
Creating a comfortable sofa
It looks great in the hallway and kitchen. Some craftsmen place such furniture in the garden. The sofa is made as follows:
- First, they buy containers. I advise you to purchase 500 2 liter bottles and secure them with wide tape.
- After this, they begin to make the base; it must be reliable.
- All bottles must have the top removed and cut accordingly. Insert the trimmings into the base of the containers, this will make the structure more durable.
- Place one more bottle in each bottle, cover them with the cut-off bottom, and use tape to secure the elements.
- You will get modules, they will be the basis of the design. You need to assemble the seat, then proceed to the support, and then make the armrests.
To secure all elements you need to use tape. You can use fabric as decoration.
Decorating finished furniture
To decorate “bottle furniture”, you can use various techniques:
- bright fabric or leather upholstery of products;
- take padding polyester, foam rubber, and other materials for stuffing;
- painting;
- design with photographs, drawings, pictures;
- use wood, decorative elements made of woven wire, knitted or fabric covers in decoration.
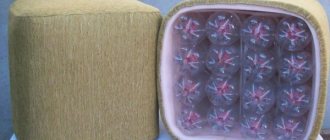
To create a beautiful ottoman, you need to prepare a sufficient number of bottles, which is determined by the size of the product.
Proper decoration will give the furniture an original look and introduce an element of uniqueness.
The blank is sheathed with foam rubber, fabric or placed in a case suitable for the interior.
Hanging shelves for the garden
The shelves are very convenient and can accommodate many small items. Convenient and compact. Shelf design and shape can be any.
At the first stage of work, cut off the neck of the bottle and make 2 strokes of acrylic paint. However, before painting furniture crafts, dip the blanks in sand.
After the blanks have dried, the shelves can be hung on the wall.
Shelves can be mounted in another way. Secure the bottles to the plywood, and only then secure the shelves to the wall with tools. Before hanging the structure on the wall, you need to make cuts in the shape of a cross on the wallpaper and then drill a hole for the structure.
At the end of the work you should get bright shelves, like in the picture.
This is interesting: Basic rules for rearranging furniture in an apartment, difficulties and mistakes
What else can you make from a plastic bottle?
This unpretentious material not only provides the opportunity to make furniture from plastic bottles with your own hands, by attending master classes that can be found on the Internet and step by step going all the way to creating a home “masterpiece.” It opens up a wide field of activity for dreamers.
Even a novice craftsman can cope with the task; children can take part in the production of objects.
You can use it to make not only furniture, but also many other interesting and useful items, including:
- pots for seedlings and indoor plants;
- organizers for stationery and various small items;
- toys and souvenirs;
- curtains made of transparent plastic;
- original lamps;
- hanging or portable “beds”;
- elements of drip irrigation for a vegetable garden or flower garden.
They can be used to make greenhouses, greenhouses and even fences.
The basics of furniture making can be mastered fairly quickly, but you should start with simple items.
Both ready-made design ideas and our own projects are used.
Making a stool
It is not difficult to make such furniture:
- First you need to purchase 10 2 liter bottles and fill them with clean sand. You can use water instead.
- Wrap the parts of the future stool with tape.
- Start making new sections, they will be used as legs.
- To install the seat, cut it out of a sheet of plywood and secure it to the covers with nails.
To make the stool secure, you need to use a lot of adhesive tape.
Choose the decor option that you like the most!
You can line furniture with foam rubber. This material makes it soft and comfortable. Craftsmen also use sheathing or buy special covers. I recommend choosing a material taking into account the color palette of the interior. When using materials from thebestvideo.ru, a link to the source is required.
Photos of 50 options for crafts made from plastic bottles
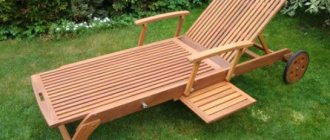
Picnic table
Next we will talk about country furniture, namely a table for breakfast in nature.
How to make such an original table? The principle of working on the product is quite simple. Glue the bottles to any surface, for example, a tray upside down. These will be the legs of the table, and the tray will be the surface.
To decorate the table, the product can be painted with acrylic paints, or various objects, such as old photos or postcards, can be glued to the tabletop. You can also use scraps of fabric for decoration.
If you are planning a large table, then the tabletop should be made of durable materials, for example, plywood, old wood, or a tabletop from an old table would be a good option for the top of a walking table. To give the table strength, you need to use more bottles, and you should also design the tabletop in the shape of a triangle, square, or circle. On the back of the table, make markings with a simple pencil and, using tools, connect the bottles and glue them with lids to the back of the table.
To lengthen and strengthen the table legs, you need to glue the bottles in a certain way. The bottom of the bottles from the first row should be in contact with the bottom of the bottles from the second row. You need special glue for plastic or universal glue.
Here is the finished table:
Decor
The finished product made from plastic bottles needs to be decorated, since the modules connected with tape do not look very attractive. For registration use:
- fabric covering;
- making knitted capes;
- macrame weaving;
- covering surfaces with acrylic paint;
- pasting with pictures, photographs from magazines, wallpaper and other materials;
- a combination of several finishing methods.
Not all possible options are listed. Each master is free to use any method of furniture design, apply one or another finishing technique. There are no restrictions or contraindications in this case. However, materials that are environmentally harmful or have hazardous properties should not be used. In each case, you need to carefully consider the specifics and features of the chosen type of finish. A thorough analysis of the consequences of using a particular type of material will help to avoid unwanted results, injuries or a negative (allergic) reaction of the body. If the choice is made correctly, furniture made from plastic bottles will create comfort and delight the owner with its originality.
Fabric covering
Macrame weaving
Knitted cape
The buildings
PET (polyethylene terephthalate) is a thermoplastic from which bottles are made. It will be useful to know its physical properties:
- density - 1.38-1.4 g/cm³,
- softening temperature (t size) - 245 °C,
- melting temperature (t pl.) - 260 °C,
- glass transition temperature (t st.) - 70 °C,
- decomposition temperature - 350 °C.
Plastic bottles are very convenient to use, but are harmful to the environment, since the polyethylene from which they are made takes more than 200 years to decompose. This same property allows the use of practically waste raw materials as building material. Craftsmen already even build houses from plastic bottles, as well as sheds, dachas, greenhouses, greenhouses, and fences. Various technologies have been developed - the approach is quite serious.
Construction material is ready
How to build a house from plastic bottles
The basic idea is to pour bulk material into bottles, screw them on with caps and use them as bricks. Fill the bottles with sand and soil. Sand is preferable because there is too much plant debris in the soil that can rot. It must be sifted, dried, filled into bottles, compacted well, and topped up. The result is a kind of brick.
The technology came from warm countries, but you can build a country house or barn
To build a house from plastic bottles, you will need a solution that fills the gaps between the “bricks”. There are options here too. This can be a regular mortar, which is used when laying brick walls, or you can make a clay mortar. To keep the “bricks” in the wall until the mortar sets, they are tied with twine on the side of the lids. Later, these “grids” will come in handy when you plaster the walls. They turn out uneven, so you can’t do without leveling.
We make a greenhouse, barn, greenhouse
You can build a greenhouse or greenhouse from plastic bottles. In this case, only transparent plastic is used, since it is necessary for sufficient light to pass through. For the construction of a shed, on the contrary, it makes sense to choose darker plastic - it will be less visible what’s inside.
The greenhouse is different in that you can’t work in it while standing.
The first technology is one to one
The second requirement for bottles as a building material is an even shape. This one, you know, without recesses. Otherwise, folding the walls so that they retain heat will not work - it will “siphon” into the curly cutouts. Remove labels from bottles and dry. You also need to prepare pins or rods - bottles are strung on them. Their diameter is small so that the neck passes freely. Now you can start building a greenhouse/shed from plastic bottles.
To build a greenhouse or shed, pillars are dug in the corners. Frames are assembled from timber according to the size of the walls. These frames will be the base for the bottle walls. We assemble them (the frames) on the ground and, ready-made, attach them to the dug-in pillars. When you make the frames, don't forget the doorway and windows.
We build a frame, cut off the bottom of the bottles, and string them onto a pin. From such “columns” we assemble walls, roof
The construction process begins with cutting the bottom. We string the cut bottles onto pins, pointing the necks in one direction. We insert the bottles with force so that they become very tight. Having collected a row of the required height, we attach it to the frame. You can fasten it with clamps, strips cut from metal, nails... In any way available to you. We press the second row against the first so that there is a slight deformation. We fasten it in this position. So, row by row, we assemble all the walls, then the roof.
A gazebo made from plastic bottles looks good
Using the same technology you can make a gazebo. But here there is no need for tightness, so you can collect shaped and colored containers. This will make it even more interesting (example in the photo).
Second technology - sewing plastic
Bottles will also need to be smooth, transparent or yellow. The central part is cut out of them, resulting in a square-shaped piece of plastic. The pieces are sewn together into long strips. In the strip, the pieces are placed so that they curl in one direction. Then the strips are sewn into canvases. To make the canvas even, the strips are positioned so that they curl in different directions. As a result, they equalize each other. The finished canvases are nailed to the frame. This completes the construction of the greenhouse for plastic bottles.
This type of “cladding” for greenhouses withstands winters well; it does not need to be removed. Due to the firmware (many small holes), there is no absolute tightness, which allows you to regulate humidity. You won’t be able to heat such a greenhouse, but it will delay autumn for you and speed up the arrival of spring.
You can sew plastic for a greenhouse by hand, but it is not easy. It will be easier for those who have non-capricious sewing machines. Old Podolsk machines cope with this task. There may be problems with others.
Fence and enclosure
You can make a fence from plastic bottles in various ways. If you need a serious monolithic fence, you can use bottles as bricks. The technology is the same as when building a house. To avoid plaster (after all, there is a high risk that it will collapse) - select the color of the plastic to obtain the required russian finish. But in this case, you will have to look for “building materials” of the same diameter or lay out patterns from different sizes. In general, the process is creative, no matter how you look at it.
Both the house and the fence use the same technology
You can also make filling for the fence from plastic bottles. Make a frame, say, from wood, and come up with a beautiful filling from shaped containers and their parts.
Original all seasonal flower beds
The summer season is passing, and living flower beds are being replaced by homemade plastic flowers that are no less beautiful than real ones. Their advantage is the ability to decorate the territory at any time. These flower beds pale in comparison to living plants, but in early spring and late autumn they alone attract admiring glances.
For daisies you will need small plastic containers of white (petals), yellow (centers) and green (leaves). You will also need an awl and a candle (for heating), “liquid nails,” scissors and stiff wire in green insulation.
We cut the base of the white bottle to the center, marking 16 segments - these are the petals. We bend the neat edges over the candle flame, and also make 2-3 chamomile corollas, which we connect in the center with an awl. Here the stem with leaves is fixed on a green wire, closing with the middle. We fill the center of the flower with a yellow basket with small cuts from 2 finely dissected circles with a fringe bent over the candle. We supplement the flower with green sepals from the bottom, collect all the parts and fix them together.
From the remaining pieces of green plastic, cut out leaves with a hole at the base (for stringing) and give them the desired shape, heating them over a candle flame. We attach the leaves to the wire handle; they should bend around it slightly. All that remains is for the chamomile to make several “companions” and find a worthy place for the bouquet.
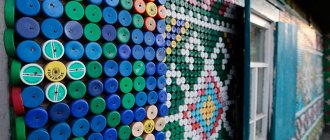
All seasonal flower beds include mosaic compositions made from containers filled with earth. The lids are used to make wall panels. “Butterfly” or “ladybug” - in different versions.