This material will discuss how to produce such popular products as furniture facades independently and without the use of expensive equipment. Let's talk about two technologies - for those who have only a minimal set of tools and for those who own a CNC machine.
There is a fairly large amount of video materials on woodworking on the Internet, but as a rule, such materials tell how to produce original products when working on expensive professional equipment. Unfortunately, not every craftsman has a modern CNC engraving machine in his arsenal. However, there are techniques that allow you to make non-standard furniture and carpentry products with your own hands using hand tools.
On the other hand, we receive a lot of calls from people who want to try their hand at carpentry and ask to talk and make videos about how to work on the workbenches that we produce. Therefore, in this material I will tell you how you can make beautiful products with a minimal set of tools. And the most important thing is that this does not require a large room. Whether it's a small garage or a compact home workshop. Even 6 square meters will be enough. I will show you two options for making furniture fronts.
- The first is using a minimum set of hand tools.
- The second option is for those who have the opportunity to work on computer numerical control (CNC) equipment.
I recommend that you familiarize yourself with both options, since in fact the technology is very simple and interesting, and most importantly, even novice masters will be able to do it. And of course, our PROfessional workbench from our production will help us during the work process. After all, without a milling and circular table, you and I will not succeed.
In fact, we will clearly show how to organize the production of wood products (furniture, doors, frames, platbands, etc.) of factory quality on Isaev.Market workbenches, having a very limited tool park. So let's get started.
Calculation of the future product
Before you begin, you need to prepare a diagram or drawing of the product you will be making. We will produce a furniture facade with final dimensions of 400 x 660 mm, the width of the external edge is 70 mm.
The working dimensions of the panel are determined by the internal dimensions of the “window”:
- width: 400 - 70 - 70 = 260 mm
- height: 660 - 70 - 70 = 520 mm
Assembly allowance - for subsequent gluing of parts - 9 mm on each side. Thus, we obtain the dimensions of the workpiece: (260+9+9) x (520+9+9) = 278 x 538 mm.
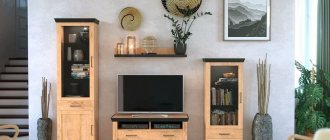
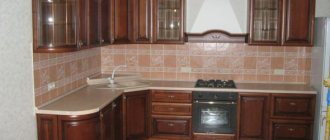
Handles are a practical decoration for kitchen furniture
Handles are not only a functional piece of furniture. They complement and decorate the facades. In styles with strict lines (minimalism, hi-tech), handles sometimes serve as an emphasizing element: large, shiny, but simple in outline fittings are used. Such handles resemble roof rails and are located both vertically and horizontally.
It is better not to weigh down the lightness of fashionable sets with glossy facades or made in the Art Nouveau style with additional fittings. For such kitchens, methods have been invented to open without the help of handles, when you press the door. But sometimes such cabinets are equipped with special fittings, disguising the handle as an aluminum edge.
For rustic and luxurious styles, it is customary to choose antique handles, with a coating that imitates old bronze or made of non-ferrous metal. These are elaborate cast products that should be combined with the decor of the facade.
The handles must be installed after hanging the facades on the cabinets. To ensure that the entire line of handles is placed at the same height above the floor, you can stretch the cord along the entire front of the lower tier. Along this line you need to make marks for installing the handle on each door. The same applies when installing handles on drawers or wall cabinets.
How to correctly install handles on the facades in each individual case is written in the instructions for these products. The holes for their installation can be made in different ways: through in the plane, closed at the ends, or in some other way. When purchasing handles, it is better to purchase several pieces for repairs during use, since these products may be discontinued, and it will be difficult to find a replacement if necessary.
Preparation of materials and cutting
When laying out the parts, it is important to ensure that the color of the wood of the frame matches the color of the panel material. Pay attention to the compatibility of wood textures of the mating parts; this will give a more harmonious picture in the finished product: during the final impregnation with oil, color spots and stripes will not appear, the color of the facade will be uniform.
We use pre-grooved and thicknessed glued furniture panels. Next, we mark the workpieces, starting from the central axes: each side of the part must be carefully cut exactly to size.
Note: the design of the PPOfessional workbench allows it to easily fit into the required tolerances for parallelism and perpendicularity of the surfaces being processed.
We set the panel with a circular saw to the “lengthwise” position, set the parallel stop, and cut off the long sides of the panel.
We move the saw across the table and process the short sides.
The T-shaped grooves of the working surface of the workbench are adjusted very precisely; you don’t have to worry about maintaining a 90° angle.
Moldings, fittings and other decorations for the kitchen facade
DIY kitchen facades
When restoring kitchen facades with chipboard, you have to create volume with decorative elements. The surface of particle board is difficult to process. That's why I use overlay decorative elements. I imitate the protruding frame with an overhead molding. I glue figured patterns from polystyrene foam. They are made to look like stucco and are easy to stick on. After painting, the appearance of the facade corresponds to antique furniture in the rococo and classical styles. It all depends on the choice of decorative elements.
Tools are needed to restore the kitchen facade. They are available to those who love working with wood and making things with their own hands. If you are just starting to make repairs yourself, use plastic, wallpaper, film and paint. Imagine, experiment and get great results.
Shaped processing of frame ends
To obtain a neat and tight joint, shaped tongue-and-groove cutters will be used - they determine the 9 mm of installation margin that we added to the dimensions of the workpiece at the calculation stage. Be careful, cutters are supplied in pairs: one cutter forms the joint groove, the second - the counter tenon. In this case, no additional adjustment is required.
I will use a set of 2 cutters ARDEN 409271 (Furniture strapping).
Reference: the ARDEN 409271 tongue-and-groove cutter set is used in conjunction with milling machines and milling machines to produce tongue-and-groove joints in wooden workpieces. The set contains two cutters, one of which is designed for milling a groove, and the second for producing a tenon. The cutters are made of high quality materials.
The first step in the order of the operation is to cut the tenon: when the tenon side is ready, you can more accurately adjust the mortise response.
We install a removable panel with a router and a stop in the workbench, carefully controlling the perpendicularity of the planes; to do this, just use an accurate square. We set the clearance of the stop and fix the strips.
Important: when working with a built-in router, pay special attention to safety precautions. The parts to be processed are narrow, so it is highly recommended to use some kind of pusher, such as a block of residual material. We lay the workpiece with the front (front) side down, towards the work surface.
The finished tenon allows you to fine-tune the position of the groove cutter.
If everything is done correctly (and without haste), then one careful pass is enough to obtain a perfect connection. We cut a groove, check the tightness and flatness of the parts being connected: the “lock” should be connected tightly, there should be no steps on the outer and inner sides.
Important: if we mill short workpieces after they have been trimmed to size, then I recommend trimming long workpieces after running them with a milling cutter. This is due to the possibility of eliminating possible defects due to failures at the ends of the workpiece during milling. If such gaps form, we will have a margin in length to cut off the defects.
Features of glass table
A glass table in the kitchen is a truly universal solution. And that's why. Firstly, due to modern technologies, glass furniture today is manufactured to be as safe, reliable and sustainable as possible. Secondly, a glass table is much lighter than a wooden one, this is especially true when you need a large table in the kitchen. Thirdly, glass furniture is stunningly impressive, and a transparent glass table looks simply weightless, which is ideal in cases where it is necessary to “lighten” the space.
Kitchen table tops can be clear, frosted or tinted glass. Frosted glass has a slight greenish tint. If this is not desirable, it would be better to purchase a table where the tabletop is tinted in a suitable color.
The base and legs are usually made of wood or chrome, although in some cases they can be made of plastic, forged or wicker. If the kitchen is in high-tech style, then aluminum or chrome legs and bases will perfectly suit this interior, complete with plastic or chrome-framed chairs.
The glass in the tabletop can be framed. In this case, the frame should be made of the same material as the base. Often the underframe can be supplemented with a shelf; it is usually matted by sandblasting. If the base and legs are made of wood, then such a table will fit perfectly into the classic style of the interior. A tabletop framed in a wooden frame will most elevate the table, and classic wooden chairs will wonderfully complement the interior.
A glass table with a wicker base, as well as a rough wooden one, will be harmonious in the ethnic style of the interior. Chairs should be similar.
Curly forged legs will fit perfectly into country or Provence style. Thus, the glass table is truly universal and harmonizes perfectly with most styles, because... a glass tabletop only serves its function, while remaining almost invisible, and does not dictate anything to the interior.
A colored countertop is more eye-catching, where the color emphasizes the style. For example, a black table is perfect for a Gothic-style interior
In general, I must say, black color in the kitchen gives the interior a more luxurious and expensive look.
The color of the tabletop can be absolutely any, including bright - such a table will become the main accent in a monochrome kitchen. The colored glass tabletop is ideal for modern style, as well as colorful pop art.
The disadvantages of glass tables include such things as relatively high cost, as well as transparency, i.e. the ability to view the lower part of the human body (legs) or unsightly floor covering. In addition, some people may be spoiled by the noise of the dishes.
Glass is a cold material (feels when touched), requiring careful handling and proper care, and the disadvantage is that it is not suitable for cooking food on it
Template for arched facades
If you plan to produce arched facades or other curved products, then to facilitate the work it is necessary to make a simple template for the future workpiece. Using this template, speed and unification of production are achieved.
I use a scrap piece of 18mm laminated plywood as the material for the template. With its help, I mark a radius bend on a wooden piece.
Next, using a hand jigsaw, cut off the desired element along the contour.
The result is something like this:
As you can see, after passing with a jigsaw, the edges will not be perfect. To finalize them, we fix our template with the workpiece using clamps.
We insert a groove cutter with straight knives into the router and go along the contour of the workpiece.
As a result, we obtain a perfectly flat curved end surface.
And the finishing operation is to use a cutter to select an internal groove in the workpiece:
At the end we get this detail:
Wallpaper and self-adhesive film as a budget home makeover
Kitchen facade
Related article: How to make a plasterboard corner
My friend and I created another masterpiece by restoring the kitchen façade with glass doors. All we had to do was update the frames and install new glass. Working creatively out of habit, we used wallpaper. They can be glued to panels and varnished. It turns out original when you stick trellises on the back walls of the cabinet. Through the glass you can see the dishes on the shelves. The wallpaper pattern creates an unusual background and makes a monochromatic interior brighter and more fun.
On old wooden kitchen sets, it is enough to clean the frames, soak them with antiseptic and wax. Then replace the damaged glass. The high quality of the facades is surprising. The shiny surface of the glass reflects the rays, creating the illusion of space. Even a cramped kitchen seems spacious and bright. Therefore, we did not cover the doors with wallpaper and film. We found another way to update the interior.
Self-adhesive film is moisture resistant. It can be used on an apron and any facade material. Such decoration can update the facade of the kitchen, covering small defects. At the dacha we simply stuck film on the doors. The advantage of such decor is the ability to quickly change the finish to a new one. Over time, the aunts liked to change the design, and they re-glued the film at the dacha every season.
Making panels
After the frame parts are completely ready, we begin making the panel. For this we will use a panel cutter. In this case, I will use a Fiolent brand cutter No. 3702 with a 12mm shank. It is equipped with a bearing and has 2 knives.
Reference: Fiolent 3702 is a panel cutter for the manufacture of furniture facades. The cutter is used to produce furniture facades in three standard sizes. Suitable for processing all types of wood. The cutters are made of ST10 steel and equipped with carbide knives made of VK8 alloy in the cutting part.
When milling panels, the order of passage of the cutter is extremely important. First of all, we pass the end parts of the workpieces across the fibers. And only then pass the long sides of the workpiece along the wood fibers. This sequence will prevent possible chips from appearing at the ends of the workpiece during milling.
The milling process generates quite a large amount of dust. It is advisable to acquire a cyclonic chip suction device for dust removal, because... a simple construction vacuum cleaner barely copes with its task.
Next, we will process our panel on a milling and engraving machine to obtain a three-dimensional 3D pattern on the surface. When planning the furniture facade, I foresaw in advance that the part would be processed on an engraving machine, so I took the thickness of the workpiece as a reserve for the drawing - 20mm. If you do not have the opportunity to process the facade on a CNC machine, then I recommend taking a workpiece thickness of 16-18mm.
Manufacturing options from different materials
Most often, do-it-yourself kitchen facades are made from wood. This is an easy-to-process, accessible and cheap raw material for the production of materials for the furniture industry. Kitchen facades must be resistant to detergents, temperature and humidity, and wood and laminated panels meet these conditions.
It is easy to make facades with your own hands from the following materials:
- solid wood;
- plywood;
- pressed (chipboard, chipboard, MDF).
To work with the listed types of furniture raw materials, no sophisticated equipment is required; wood can be cut with a jigsaw or a hand saw.
Made of wood
Warm and beautiful material - solid natural wood - is traditionally used for making furniture. Valuable species can also be used to decorate kitchen facades: solid oak or beech will look elegant and noble in a classic-style interior. But for a novice craftsman, soft and light wood of cheaper types is best suited: pine or linden.
You can make 2 types of facades from wood:
- Flat ones are easy to make with your own hands from furniture panels. This is a ready-made material, glued together from individual boards, so the size of the facade can be any, in accordance with the requirements of the master. Shield panels can be smooth. They can be decorated with overhead moldings. To do this, frames of different sizes and shapes are made from shaped slats, which need to be purchased at a furniture store.
- Paneled facades are more complex in design. To make them, you will need to make a frame (trim) with a groove for installing the inner part. Inserts, or panels, for a paneled door are made from solid wood, cutting off the edges of the board, and plywood. You can use a mirror or corrugated glass as inserts. To make the door strong, all the frame parts are connected using grooves and corresponding tenons on glue and dowels. The panels are inserted into grooves or secured using a shaped bead.
Finished solid wood kitchen doors should be varnished or stained to imitate valuable wood, patinated to give an aged look, or simply painted.
From plywood
Plywood facades resemble massive ones: the top layer of birch plywood has a pronounced wood structure, some types of material have a moisture-resistant coating that gives smoothness and a slight shine. To make plywood facades, it is better to choose thick varieties (2-3 cm). This will allow you to install mortise hinges for furniture, and the doors will be strong. Cover the edges of the facades with a special tape, matched to the tone of the wood on the front side.
If thick plywood is not available, beautiful facades can be made using panel door technology. In this case, a board about 2 cm thick is used for the frame, and the inserts are made of plywood.
With the help of additional decor (molding, painting, patination or staining), you can achieve a good result by making updated facades for kitchen furniture with your own hands.
From MDF
The simplest option for making a facade from MDF is to take the dimensions of the doors and panels and order the products from a furniture store. Having chosen panels with a coating of the desired color, the measurement results must be given to the master. Using professional equipment, the material will be cut and the edges will be glued. The customer will only have to pick up the facades prepared for installation and hang them with his own hands.
When cutting laminated MDF panels yourself, you will not be able to avoid chipping the coating along the cut line. Therefore, when cutting, you need to make an allowance of 2-3 mm around the entire perimeter of the facade. After sawing, sand the edges, cleaning the cuts.
To stick the edges with your own hands, it is better to use PVC tape of the desired shade. The material can be easily secured to the edges of the facade using a hot iron, ironing the tape through thick paper. If it is possible to use a router at home, you will be able to perform edging with a tenon tape.
The choice of materials for the kitchen must be approached responsibly: the plastic coating does not protect against water, and in conditions of high humidity such facades quickly lose their shape. When using this type of panel, it is necessary to perform high-quality edging, so it is better to entrust the work to a professional.
Chipboard facade
When choosing a cheap uncoated chipboard, you also need to buy a film for finishing the facade. You can cut a simple chipboard with a jigsaw, and cover the finished facades with film.
Laminated chipboard has a coating that resembles valuable wood or is painted in different colors. It is better to cut such material in a workshop, providing the master with the dimensions of the panels and the location of the hinges. When cutting facades yourself, proceed as follows:
- draw a contour line on the front side of the chipboard;
- Use a sharp knife to cut through the laminated layer of material along a ruler;
- cut the chipboard using a jigsaw along the cut line.
Edging a façade made of chipboard is carried out in the same way as processing MDF.
Glossy
Glossy facades belong to the MDF group. To cover such models use:
- PVC film glued using vacuum equipment onto a panel with or without milling;
- acrylic plastic with PVC or aluminum edge;
- special technology of painting with enamel and varnish.
It is impossible to make such a coating at home. To make a fashionable glossy facade for kitchen furniture, you need to purchase ready-made material. It is better to order cutting and gluing of the edges in a workshop, because when sanding with your own hands, the shiny layer will be damaged, and the facade will not look as elegant as in advertising photos.
When using glossy facades, careful attention to the products will be required. The slightest dirt or fingerprints are clearly visible on the shiny surface. The surface is easily damaged by minor mechanical impact, and the film coating is unstable and resistant to high temperatures.
Bent
Non-standard shaped facades are becoming increasingly popular. Fashionable doors, curved along the contour of the rounded corner of the tabletop, can only be made to order: they cannot be bought ready-made. But for a home craftsman who has the skills to work with MDF and laminated chipboard and has the necessary equipment, it is possible to independently produce such parts for a kitchen set.
The laminated coating is applied in a thin layer to the surface of the pressed board. To bend a solid material, you need to saw through the thickness of the chipboard so as not to damage the coating and leave a thin layer of base (about 1 mm). Therefore, you need to have a circular saw with adjustable cutting depth. You can determine the desired value by measuring the thickness of the sheet and using the experimental method: trying to make cuts of the required depth on MDF scraps.
To make a bent door, you need 2 parts from a sheet 0.9 cm thick: the outer one is slightly larger than the inner one. Mark the back of each sheet into strips 0.5-0.7 cm wide where you want to bend the MDF. Determine the center line of each workpiece.
It should be remembered that both for attaching the hinges and for joining with the adjacent panel, you need to leave straight sections at least 5-6 cm wide. The bend should begin at a distance from the edge corresponding to this value.
After the cuts are made, proceed as follows:
- Place the top of the inner part on the pre-made template for bending;
- fill the holes in both pieces with a mixture of sawdust and wood glue, smooth the surface with a hard brush;
- aligning the marks of the central lines, place the outer part of the curved panel on the inner one with the decorative coating facing up;
- smooth it well over the entire surface, pressing the adhesive layer inside and tighten both parts with clamps, fixing them on the template.
When the glue has dried, you can proceed to further processing.
It is advisable to install hinges with a push-open function on curved facades. This is a special fitting that allows you to make facades without handles. Depending on the project of the owners, it is possible to install decorative fittings, as on other parts of the furniture set.
3D facade processing on a milling and engraving machine
For volumetric milling, it is necessary to first prepare in the program the drawing that we plan to mill.
Next, we set up the operating parameters of the milling equipment, place the workpiece on the work table and turn on the milling program.
At the end of the machine operation, it is necessary to walk over the resulting surface with a polishing attachment for sanding wood. Final polishing will remove unnecessary lint and give the part a finished look. This operation is convenient to perform on our workbench.
Do-it-yourself choice of material for facade insulation
Insulation of facades is the most popular way of exterior finishing of houses and other buildings and saving energy at the same time. Using this procedure, you can solve several problems at once: protect the walls of the house from adverse weather conditions, retain heat in the house and decorate the facade. Today, many companies offer their services for insulating facades, but professional insulation of facades can be unreasonably expensive. For this reason, most homeowners choose to insulate the facade of the house with their own hands.
There is no point in insulating all walls with material of the same thickness. When insulating the facade of a house with your own hands, you can combine materials and insulate your house simultaneously with mineral wool, polystyrene foam or polystyrene foam. Due to the fact that more heat reaches the southern wall, the facade can be insulated with your own hands using sealants of different thicknesses. It is imperative to limit access to various rodents by insulating the façade base with extruded polystyrene foam. The corners must be insulated with a thicker layer of material.
Scheme of wall insulation under siding.
Insulation of the facade, as already mentioned, can be done using various materials. One of the most popular is mineral wool, an inorganic fibrous material obtained from silicate rock melts, metallurgical slags and mixtures of sedimentary rocks. To properly use mineral wool at home, you need to use stone (basalt) and glass materials. performed using the “wet” method or the method of a suspended ventilated facade.
has many advantages. This material is able to withstand temperatures over 1000 degrees Celsius and not melt; it is characterized by high resistance to mechanical stress and significant thermal insulation properties. By insulating the facade with mineral wool, you will additionally provide good sound insulation.
Very often, polystyrene foam is used as insulation. Foam insulation began to gain popularity back in the 30s of the last century, and to this day this material has not lost its leading position. The high thermal insulation properties of this material are ensured by a certain production technology, when polystyrene is foamed using special equipment, and as a result of this, small bubbles filled with air are formed.
Polystyrene foam is almost 98% air, which ensures moisture resistance and lightness of the material. Another advantage of foam insulation is the low cost of such thermal insulation work. Facades insulated with foam plastic can reduce heat loss by approximately 70%. Modern material does not support combustion and actively resists fire. However, if there are problems with rodents on your site, it is better to refuse foam insulation.
To insulate the facade of a house with your own hands, prepare the following tools:
Scheme of insulation of external walls.
- saw (hacksaw);
- stainless steel spatula with a wooden or plastic handle;
- stainless steel smoother 480x130;
- stainless steel smoother with a wooden or plastic handle 280x130;
- plastic smoother 280x140;
- a metal grater for leveling (grouting) the surface of mineral wool and polystyrene foam;
- drill mixer or mixer for mixing adhesive solution;
- building level;
- perforator;
- wallpaper knife;
- hammer;
- brush;
- roller;
- metal drill;
- roulette.
Facade assembly
After finishing the processing of the facade parts, we begin to assemble them. We coat the ends of the frame with glue and connect them to each other. For these purposes, I recommend using polyvinyl acetate (PVA) wood glue brand Kleiberit D3/D4 or wood glue Titebond.
Lightly tap the façade parts with a rubber-headed hammer and connect them.
Carefully remove any glue residue on the ends with a dry rag. Next, using clamps, we press and fix the assembled facade. Be sure to check the diagonals - they must be equal. And leave it in this position to give the glue time to “set.”
After the facade is finally fixed, remove the clamps and go again along the contour of the frame on both sides with a manual grinder.
We fix the workpiece on the table surface and use a hand router to go around the perimeter to remove the figured chamfer.
On the back side of the façade, we drill out mounting sockets for furniture hinges in the frames.
And from the front part we mark and drill holes for attaching the door handle.
Required Tools
In order to independently make a furniture facade that does not differ in quality from the factory product, you need to purchase the necessary tools in advance:
- Boards from which frames will be cut - it is important to select elements with a smooth surface, without knots or chips;
- Sheets of plywood, plastic or glass, no more than 6 mm thick - they are needed to create a panel - an important decorative element;
- Metal ruler with 30-40 cm markings;
- Pencil;
- Electric jigsaw with a set of wood files;
- Roulette;
- Wood glue;
- Brush for glue work;
- Discs for cutting boards, it is convenient to use a milling cutter.
To maintain order while working, prepare a bucket of water and a rag.
Assembly of the finished product
In addition to the façade elements, we made a tabletop from solid wood in a similar way. The frame of the future desktop is made of laminated chipboard - we will attach our tabletop and furniture front doors to it. All that remains is to secure the necessary fittings. The result is this nice desk:
As you can see, using hand tools you can make quite exclusive products. Of course, the 3D surface obtained on a milling machine adds “zest” to this table, but even without it the appearance would have been very impressive and more austere.
As you may have noticed, I carried out all the operations on a workbench of the PROfessional model, version 2. It is convenient, such a workbench will be useful to every craftsman - from a professional to a simple amateur to craft in his free time in a home workshop.
I hope the material was useful. Mikhail Isaev was with you. Good luck!
How is installation done?
For hanging doors, 4-hinged mortise hinges (frogs) are used. Different types of such fittings have different opening angles, so you need to focus on your own needs when purchasing them. To insert furniture hinges on the facades, recesses are made from the inside. When drilling, you need to use a special drill attachment: a cutter with a diameter of 3.5 cm.
Attach the overhead part of the hinge to the screws on the inside of the cabinet. Place the counter piece into the recess on the door and secure it. Hang the façade and adjust it using special bolts. After adjustment, tighten the bolts.
To install a lifting facade on a wall cabinet, you need to purchase gas elevators (lifts). This is a special fitting in the form of a rod with a reservoir. When the door is opened, the elevator locks it in the raised position. Installing an elevator involves attaching brackets to the frame and door.
Front panels on drawers are attached from the inside out. To do this, a through hole is made in the front wall of the box. A self-tapping screw is screwed into the MDF through it so that the fasteners do not go through.