Drawers are an integral part of the kitchen interior. Moreover, these days such drawers are beginning to be actively built into other furniture that has nothing to do with storing kitchen utensils - chests of drawers and wardrobes increasingly require the presence of one or another retractable system.
Drawers not only save space, but also constructively organize the space from the inside, allowing you to quickly access the things you need. We'll talk about what types of drawer systems exist and how to make a drawer with your own hands below.
How to make a drawer with your own hands
Advantages of drawers
Despite the fact that the advantages of drawers are obvious to most owners, let us briefly dwell on the main ones:
- Thanks to the drawers, access to necessary household items is greatly simplified. The opening overview allows you to immediately cover all the items in the drawer, without forcing you to go deeper into the closet or table;
- convenient design eliminates the need to interrupt all other objects cluttering the foreground in order to get to the thing you are looking for;
- You can appreciate the practicality of drawers in the kitchen, because you no longer have to clink pans and dishes, increasing the risk of them falling out. With a drawer, everything you need is at hand here and now.
Drawers allow you to arrange items in different ways
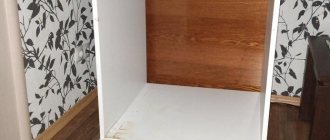
Screwing furniture wheels
I placed furniture wheels on each side of the bottom of the frame and screwed them in. I used small screws to prevent them from splitting the wood and coming out.
Train, filming, home to her daughter: Asmus told how her working day went
From Sherlock Holmes to Leo Tolstoy: who he played and how K. Plummer is remembered
“It suits her very well”: Reshetova shared a photo of her new hairstyle
Disadvantages of drawers
The disadvantages listed below will relate not so much to the weaknesses of the structure itself, but to the features of its manufacture, which are important to consider before starting work. These features include the following:
- price. It is logical to assume that drawers, due to additional parts, are on average more expensive than drawers for traditional cabinets that do not involve complicated mechanisms. When creating retractable cabinets, it is very important to acquire high-quality fittings, which are not cheap, but provide the drawer with a long life and correct operation;
The quality of the fittings largely determines the quality of the future drawer
- reducing the area of the box. Before you start making a drawer, it is important to be aware of what material you will use. When referring to chipboard, it is important to consider that its thickness will affect the available space, reducing it slightly compared to the expected figures;
- time costs. Drawers require more time to manufacture, especially if you are encountering them for the first time. Even professionals need to spend a lot of effort to create a high-quality structure that can last as long as possible.
Assembling a drawer requires a lot of effort and time, but the result is worth it
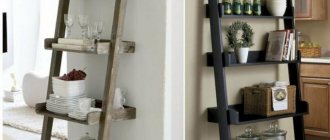
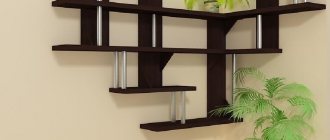
Kitchen shelves made of chipboard or wood
Shelves for the kitchen can be mounted on the wall, installed on the floor or table. You can also make a universal version. To work you will need:
- Jigsaw and hammer drill;
- Screwdriver;
- Hammer;
- Compass, pencil and ruler;
- A piece of plywood, chipboard, wooden boards or boxes;
- Brackets for hanging shelves or ready-made consoles sold in furniture stores (you can make them yourself);
- Sandpaper for sanding;
- Stain, paint, brush, screws, ribbons for decorating the shelf.
The amount of starting material is calculated depending on the dimensions of the future product.
As for the shape, it is better to make wooden shelves for the kitchen rectangular or triangular (for placement in the corner), but oval and round ones will not be appropriate everywhere. Do not forget about the durability and strength of the structure - special wear-resistant paints are used as a coating, and reliable hardware is chosen for fastening.
Advice! If your kitchen is not large, then massive shelves designed for heavy loads will look too bulky.
How to make kitchen shelves with your own hands? The work is performed in the following sequence:
- Determine the place on the wall where the shelf will hang.
- A design drawing is created. To protect objects from accidental falling, you can install an additional curb in front.
- Select brackets or consoles so that their height is less than the vertical distance between the shelves.
- The product is cut out with a jigsaw, after which the surface of the ends is polished.
- The ends visible after hanging are sealed with a special edge or veneer (if the shelf is made from chipboard).
- Mark the wall where the holes are to be attached.
- The shelf is secured securely.
DIY drawer
The assembly of the box is largely determined by the individuality of the craftsman who chooses certain tools. That is why all existing instructions will differ from each other in one way or another. Some craftsmen use templates, some do not, some craftsmen work only with clamps, and some consider them a waste of time.
In this regard, the sooner you develop your own manufacturing style, the better it will affect your work.
Available materials
To install the drawer you will need the following tools:
- laminated chipboard (chipboard);
- drill and screwdriver (you can choose one);
- hexagon;
- drill;
- self-tapping screw;
- guides;
- awl;
- measuring square;
- ruler;
- pencil.
Step-by-step instruction
Step 1. The first and one of the most important stages in making a box is the correct marking. In order for the parts to connect, the conformation must be located in two places - below and above.
There should be two holes for future screws, as well as markings
The holes should be equidistant from the edges of the side panel
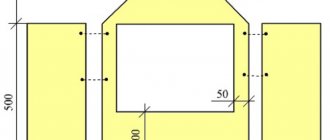
Step 2: Take a 50mm template and make a mark on the top and bottom of the board. It is not recommended to measure less than 50 millimeters, since the fittings can split the chipboard.
When creating a box, you can work without a template, but it greatly simplifies the work
Step 3. Measure half the thickness of the material from which you are assembling the box. For such purposes, it is also convenient to use a template. Repeat this procedure for the top and bottom marks.
The template performs several useful functions at once when making a box
Step 4. To prevent the drill from going away during work, tap a hole at the intersection of the two marks using a screwdriver or any other sharp object.
The hole will be needed for further drilling with a drill.
Step 5. Align the parts of the future box using a template.
Before using the drill, make sure the sides of the box are not warped.
Step 6. Take the drill and press its tip into the indentations already made to fix the tool. While drilling, try to hold the drill straight so that the hole left by it will help the guides fit correctly.
You need to drill the hole gradually so that it comes out neat.
Step 7. Insert the screwdriver into the conformat bit, then insert the conformat itself and position it in place of the hole, smoothly placing it into the recess. If you find that the box has become skewed while placing the conformat, press it out using a hand hexagon and straighten the sides, then clamp it back. To avoid inconvenience, you can use corner clamps, which will immediately give the box the correct angle of inclination.
Insert conformat into the hole made
Step 8. Turn the box over and do the same procedure with the second hole.
Repeat with the second mark
Step 9. Once all other sides of the box have been drilled using the same method, check the diagonals to make sure they match each other.
The side panels folded together should be perpendicular to each other.
Step 10. Screw the bottom to the box, first leveling it. You can use an MDF board (six) as the bottom. If desired, the plate can be coated with enamel.
Fiberboard is often used as a bottom for drawers
Video - How to assemble a drawer
Conclusion
I tried to convey to you the step-by-step principle of assembling a movable shelf. The sizes of tubes and support boards can be selected individually, plus no one forbids you to take a different model of wheels, the main thing is not to change the order of actions and you will succeed.
Did you like the article? Subscribe to our Yandex.Zen channel
February 26, 2021
Accessories,Kitchen design,Kitchen
If you want to express gratitude, add a clarification or objection, or ask the author something, add a comment or say thank you!