Thanks to bright and unusual accessories, a child's birthday or photo shoot turns into a real celebration. One of the popular decoration options is voluminous numbers and letters made from napkins, which are used not only as decoration, but also for entertaining children.
Surprise your guests and personalize your holiday decor!
Materials and equipment for work
Looking at pictures depicting three-dimensional numbers made from napkins, many people fear that it is impossible to do something similar with their own hands. In fact, they are not difficult to make. The process takes some time, but the birthday boy’s emotions of happiness cover all costs.
Not the last place at the holiday is occupied by external paraphernalia - flowers, gifts, music, surroundings.
Tools and materials required for work:
- Paper napkins. They can be single-layer or multi-layer. When choosing a color, you should focus on the occasion of the celebration, the gender of the baby, and the surrounding interior. It is advisable that the napkins be plain. The approximate quantity is calculated based on the planned number of flowers - 1 napkin will be required for each unit.
- When creating numbers from napkins, you can combine several shades, alternating them with openwork and carved specimens. They will make the composition more voluminous and unusual.
- The threads can be simple cotton. For ease of cutting, you will need scissors or a stationery knife.
- A stapler will simplify the fastening process.
- Glue or tape for fixation.
- To create the base you will need a cardboard blank. You can use an empty box from household appliances.
The decor of the room in honor of the festival can turn a traditional celebration into something special.
Important! To ensure a high-quality connection of elements, it is necessary to select the strongest options.
Types of paper napkins and materials for production
Paper napkins are divided into the following types:
- white;
- plain colored;
- white or colored with ornaments;
- single-layer;
- two-layer;
- three-layer;
- with perforation;
- hygienic;
- cosmetic;
- canteens;
- serving.
Paper napkins are made from cellulose.
To make flowers from paper napkins you will need the following materials and tools:
- paper napkins;
- threads or paper tapes;
- needle;
- threads;
- scissors;
- pencil without edges;
- stapler or glue;
- thick colored paper;
- thin hair clip;
- multi-colored paints.
Types of frame
First of all, you should make a frame onto which the paper elements will be attached in the future. It is advisable to choose thick cardboard that will not tear or deform during the decorating process. There are several options for the basis for numbers and letters from napkins. They can be voluminous, flat or frameless.
One of the simple and uncomplicated ways to decorate your home is the holiday trend of recent years - numbers made from napkins.
Flat figure
Flat figures look less impressive compared to voluminous ones. However, their production will require less time and effort. To create such a frame with your own hands, you will need to follow the recommendations.
This decorative element has gained popularity; it is used as a prop at children's photo shoots and at various holidays.
- If the size of the figure does not exceed an A4 sheet, you can find a suitable diagram on the Internet and print it.
- To create large figures, you need to draw a diagram on whatman paper by hand or print it in parts.
- Cut out all components.
- If there are several parts, connect them end to end with tape.
- Then the resulting diagram must be attached to the prepared cardboard and carefully traced around the outline.
- After this, you need to cut out a figure from cardboard.
- If you plan to make several numbers from napkins with your own hands, you will need to repeat the entire process in the same way.
The most important date on which holiday numbers are usually made, of course, is the birthday, especially of children.
Volumetric
Volumetric letters and numbers made from napkins look brighter and more impressive. They will take a little longer to create. Following the step-by-step instructions presented above, the first part is made. After this, you need to perform a few more steps.
Such numbers are used on New Year’s Day, February 23 and March 8, on wedding anniversaries and organizational anniversaries, and at various thematic events.
- Print and cut out a similar pattern that will serve as the back of the frame.
- The next step involves cutting out the tape. It will serve as the end part of a volumetric figure. Its width is equal to the width of the future digit.
- For numbers that have a closed internal space (0, 4, 6, 8, 9), it is necessary to cut out additional side parts.
- Elements with rounded edges (2, 3, 5, 6, 8, 9, 0) should be done very carefully. Making straight edges (1, 4, 7) is not difficult.
- Upon completion of the preparatory process, all components should be secured with tape. The front and back are placed on the sides, the side tape is in the middle.
You can save a lot by making these crafts yourself.
Important information! If the cardboard is wide enough, it is recommended to cut one long side strip. Making folds at the corners is easier and faster than cutting out each element separately.
You can simplify the process by using foam rubber or polystyrene foam. To do this, you will need to prepare a stencil, trace it on the base material and cut it out using a stationery knife.
Looking at such masterpieces made from napkins, it seems that only an experienced craftsman can create this.
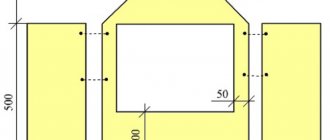
Below is the sequence of actions using the example of a volumetric unit for celebrating 1 year:
- Prepare a suitable hard cardboard box.
- Using a stencil, draw a diagram with the following dimensions: width 35 cm, height 70 cm, depth 12 cm. Dimensions may be different, depending on the desired volume of the figure.
- Use a knife to cut out two main parts and secure them with tape. A painter is best.
- Cover the cavities formed on the sides with tape made of cardboard of a lower density.
- After this, the blank for the number 1 for a year from napkins must be covered with white paper so that the material used does not show through on the finished product.
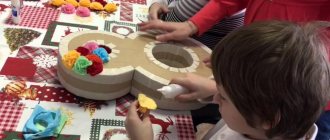
- The final stage is decorating the finished product. It involves attaching all the flowers prepared from napkins to the frame.
In fact, with due diligence, even a beginner can cope with such numbers.
Frameless figures
Some decorative elements do not require the manufacture of a rigid frame. These include figures made using the quilling technique and textile crafts with soft filling that creates volume. To make them, you will need to prepare a model on which the jewelry parts will be attached in the future.
Don’t think that numbers made from scrap materials will look ugly.
General instructions for numbers
General recommendations for all forms are the same. Since the figures imply volume, all numbers require cutting out two identical shapes and connecting them with end parts. You can draw the side protrusions in advance, which will then help secure the two parts together, but it is possible to make them separately.
The first figure is drawn on cardboard with a ruler, as well as using a downloaded and printed template. The second one needs to be traced around the first and also cut out.
Individual parts are made according to the following recommendations:
- Bottom. Flat base, size 25x10. It can be made in two layers to increase mass and stability.
- Sidewall. Rectangular segments of the same width. In complex shaped numbers like 2 or 6, they should be short in length to ensure a rounded shape.
Glue is selected separately. The most accessible method is PVA. School stationery is suitable for one-time use. Its problem is long drying time. In this case, “Moment” is preferable, which dries in seconds and holds much better.
But an even faster method is hot melt glue. It will allow you to fix large pieces of cardboard. It will allow you to fix large pieces of cardboard. In addition, it allows you to glue joints, and drying occurs in 1 minute.
Read: LED floodlight
You cannot use regular tape. It is dense and has no pores, so napkins simply won’t stick to it. Masking tape works better because its surface has a cellulose base.
Flowers from napkins
Flowers are a universal decorative element. It is not only suitable for girls. Volumetric and bright chrysanthemums or asters will certainly delight boys. There are many color options for napkins for numbers. When choosing the right one, you need to take into account your own skills and the amount of time spent.
In the process of work, only number templates and napkins that were at home were used.
It is important to maintain proportionality. On a small product, flowers that are too large will look out of place. The larger the figure, the greater the number of buds required. To speed up the process, the end parts can be covered with corrugated paper or pasted over with multi-colored cardboard.
Try to make a similar charm with your own hands, discover the professional decorator in you.
Chrysanthemums
To create a voluminous chrysanthemum you will need:
- Cut the unfolded napkin along the folds.
- Place the resulting squares on top of each other.
- Fold the stack like an accordion. Imperfect lines will add naturalness to the finished product.
- Tie the resulting accordion tightly with a thread in the center.
- Using scissors, round the edges on both sides.
- Starting from the first layer, gradually straighten all layers of chrysanthemum.
- The result is a lush flower.
This decoration will delight both children and adults.
Roses
To make a rose for a number from napkins, you can use several techniques. The simplest and fastest one includes the following steps.
They are light, and children can play with them, they are beautiful and evoke a lot of pleasant emotions.
- Fully straighten the single-layer napkin.
- Next you need to fold it diagonally several times.
- A strip with beveled edges is formed.
- Next you need to twist it, but not too tightly.
- Tie one end with a thread so that the product does not fall apart.
- Carefully unfold the opposite free part, forming a rose.
The numbers can be made flat or three-dimensional.
Original and unusual buds can be made using a pencil.
- Cut a single-layer napkin into squares along the fold lines.
- Alternately roll each square onto the pencil until it reaches the middle.
- Press the workpiece tightly towards the center, forming a roll. Remove it from the pencil.
- Twist all other squares in a similar way.
- Tightly twist the middle of one element. Then attach the remaining parts less tightly to it.
- Collect a flower.
A voluminous figure will require more time and materials.
Facing technique
Numbers and letters made from napkins made using the cutting technique for a birthday or anniversary look very voluminous. They turn out fluffy and weightless. Corrugated paper is best suited for these purposes. If you don’t have it, you can use plain napkins.
The joyful emotions of your loved ones and guests more than pay for all the time and effort.
The process consists of several stages.
- Cut paper or napkins into equal squares.
- Place a pencil in the center of the sheet and press it with paper.
- Apply glue to the surface.
- Place a pencil, crimped with paper, on the glued base.
- Fill the entire area in the same way.
- After this, smooth out the entire decor with your fingers and carefully cut off the excess parts with scissors.
It is quite difficult to predict in advance how many napkins you will need. But when purchasing, consider the size of the finished product.
Flowers can also be made using the trimming technique.
To do this you will need:
- rectangular sheets of paper;
- stick or pencil for trimming;
- plasticine.
The larger the figure, the more material will be needed for it.
Manufacturing instructions.
- Stretch the plasticine with your hands.
- Wrap the paper around the pencil so that most of it remains free.
- Insert it into the prepared plasticine.
- Do the same procedure for 3 more petals.
- Fill the voids between them with petals of other shades.
- Cut out the center from corrugated paper and attach it to the center of the flower.
The more magnificent the decor, the better the numbers made from napkins look.
The best option for trimming is polystyrene foam. Using it, no glue is required, the stick easily enters the soft material, leaving a trim in it. In this way, you can make decorative lines and patterns on the figure.
It costs from 3 to 7 packs of napkins to prepare.
What else can you use to make birthday numbers?
You can make a birthday number not only from cardboard and napkins. A wooden or metal sheet is suitable for these purposes. The figure will not be voluminous, but it can be interestingly decorated using various materials. Even New Year's balls can be hung on a silver number, and it will look unusual.
You can also purchase ready-made numbers in the store.
If everything is in order with your imagination, then there will be no problems. Paper, cardboard, threads, bags, fabric pompoms, ready-made flowers, beads, ribbons, buttons, soda caps, candy wrappers, balloons, ping-pong balls - everything is useful for creating a festive atmosphere and decorating the figure for a birthday.
A number made from napkins is a great option for a holiday photo. Adults and children will love this gift on their birthday. And it’s not difficult to make a number, but how many emotions will the birthday boy have?
Collecting numbers
Upon completion of all the preparatory processes, you can proceed to the most important and interesting thing - attaching the buds. To do this, you need to apply a small amount of glue to the lower, flat part of the flower (it is most convenient to do this with a special gun) and carefully glue it to the cardboard base.
Important! For high-quality gluing, you should press each element well, holding down the pressure for several seconds.
You will most likely need from 200 to 500 flowers per piece.
All edges of the figure are decorated in a similar way. At the final stage, when making numbers from napkins, you need to wait until they dry completely and straighten all the attached buds.
In the same way, with your own hands you can make not only three-dimensional numbers from napkins, but also parts of words. Having prepared several figures, it is possible to congratulate the birthday person on his birthday by making a composition from the letters of his name.
This way you can make inexpensive, but very effective decor for your holiday.
To make the finished product unique, experienced craftsmen advise paying attention to unusual decor - rhinestones, shiny stones, sparkles. With the help of such accessories, flowers for numbers made from napkins will look brighter, more elegant and solemn. In addition, it is not necessary to make all the buds the same color. Various shades can be used.
The main thing is that they combine with each other and match the rest of the holiday decoration.
Thanks to this article, there should be no questions left about how to make numbers and letters from napkins. Using a little imagination and armed with the necessary materials and tools, you can make not only a children's party, but also any other celebration unforgettable.
General rules for making flowers
You can make flowers with your own hands from almost any napkins, paying attention to the following recommendations:
- single-layer thin material is suitable for airy flowers without clear straight lines;
- In order for the craft to retain its shape for a long time, it is better to use high-density material;
To make flowers, it is better to use plain napkins.
- to add scent to decorative flowers, you can use scented napkins to make them;
- Accuracy is important in the work, since the material of the napkins is not strong enough.