VIDEO: Installation of AVENTOS HF
Please review the Video to further understand the installation process.
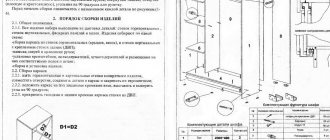
How to install Aventos HF? Everything is quite simple. We will walk you through the installation step by step from design to adjustment. In general, no special knowledge, skills or craftsmanship is required. Essentially, installing an HF lift is like a child's Lego set. If you follow the instructions, everything will work out. We have creatively revised the BLUM installation instructions and believe that this information is quite sufficient, however, if you are in doubt or the information is not enough, use the official BLUM catalogue. Our prices for Aventos HF
Adjustment
The final stage of installing furniture canopies is regulation. After the door is attached to the body, it is necessary to make adjustments in three planes. Of course, you will have to unscrew and tighten the screw several times, but a favorable outcome is guaranteed. Three planes are vertical, horizontal and relative to the depth of fixation:
- adjustment relative to depth helps to press the facade closer to the body or weaken it. Use a screwdriver to tighten the oval hole. This type of adjustment is widely used in rooms where the floors have some unevenness;
- Vertical adjustment helps move the façade in a vertical position. Adjustment is made by tightening the oval holes. After some time, the door may sag. Therefore, it is necessary to regulate canopies occasionally;
- horizontal adjustment involves moving the door from left to right or vice versa. Its purpose is to avoid gaps between the door and the cabinet body. Let's apply this method in rooms with uneven walls and floors.
The adjustment step can be performed when the cabinet is not yet hung. But, in order to immediately find your bearings regarding the walls and ceiling, it is best to hang the cabinet on the wall.
It turns out that you don’t need any special knowledge or skills to attach hinges. Installing a furniture hinge is not difficult at all. The main thing is that when installing a furniture hinge, marking and installation were carried out taking into account all the rules. This allows you to avoid the appearance of cracks on the facade, gaps between the body and the door, and friction when opening. Moreover, work done with your own hands brings a lot of positive emotions.
Installation of AVENTOS HF power mechanisms.
First, we install the power mechanisms on the cabinet body. It doesn’t matter what kind of facades you have, MDF, aluminum frames or something else.First you need to drill two holes with a diameter of 5 mm and a depth of at least 5 mm. This is done in order to fix the Aventos HF mechanism.
The red in the figure shows the protruding edges, which will fit into the drilled holes.
Let's start marking the holes. kH is the height of the cabinet, H is the distance from the top edge of the cabinet, which is what we need. If the body height is from 480 to 549 mm, then H is calculated using the formula:
H=kHx0.3-28mm,
if the body height is from 550 to 1040 mm, then according to the formula:
H=kHx0.3-57mm
Example:
Let’s say our case height is 720 mm, so we calculate using the second formula.
H=720×0.3-57=159 mm
All dimensions are ready, now we drill holes, fix the mechanism and screw in the 4th self-tapping screw with a diameter of 4 mm and a height of 35 mm.
Show prices for Aventos HF
Adjusting hinges on cabinet doors: rules, photos and video instructions
Sometimes, when everything looks completely smooth after assembling the furniture front, most often you have to smooth out the body and adjust the hinges on the cabinet doors. If everything is clear with the box, you only need to correctly align or hang the cabinet once using a building level, then with the hinges everything is more difficult. With constant use, you will have to adjust the position of the shutters using control screws at least once a year.
A lubricated and adjusted hinge will last at least 10 years
Installation, installation, adjustment of Aventos HF
Installation, installation, adjustment of Aventos HF, everything is extremely simple, read the instructions.
Folding lift.
Rotary lift.
Rotary lift for small facades.
Compact lift.
Folding lift.
Vertical lift.
| AVENTOS HK |
| AVENTOS HK-S |
| AVENTOS HK-XS |
| AVENTOS HS |
| AVENTOS HL |
Aventos with TIP-ON.
Rotary lift with TIP-ON.
Rotary lift for small facades with TIP-ON.
Compact lift with TIP-ON.
| AVENTOS HK-S with TIP-ON |
| AVENTOS HK-XS with TIP-ON |
Dish dryers
| Single-level dryers Inoxa |
Single-level stainless steel dryers..
Single-level dryers with Chrome coating..
VIDEO: Installation of AVENTOS HF
Check out the Video to help you understand the installation process ahead. How to install Aventos HF? It's quite simple. We will walk you through the installation step by step from design to adjustment. In general, no special knowledge, abilities or skills are required. In essence, installing an HF lift is like a child's Lego set. If you follow the instructions, everything will work out. We have creatively revised the instructions for installing BLUM and believe that the information given to us is completely sufficient, but if you have any doubts or there is not enough information, use the official BLUM catalog.
Popular manufacturers
Door closers are fairly common elements of modern kitchen furniture. There are now quite a few varieties of such products on the market, among which several high-quality manufacturers can be distinguished:
- The Austrian company Blum produces one of the highest quality products of its kind. The cost of such components can vary widely, depending on the specific purpose of the closer.
- Vauth Sagel. German products of this kind are distinguished by their highest reliability and popularity, which has led to their distribution virtually throughout the world.
There are many other manufacturers of kitchen closers, which allows you to choose an average price-performance ratio to solve certain problems. If you are not convinced which products are best to give preference, then entrust the choice to experienced specialists.
Installation of Aventos HF
1. Now let’s look at the Aventos HF installation. After you have installed the power mechanisms, install telescopic arms, as shown in Figures 1 - 2 - 3, they will also be supports for the upper facade during installation. Please note the warning.
2. Then we place the upper façade on the telescopic arms and snap the upper hinges onto the strike plates, Figures 4-5.
3. Take the lower facade and snap the middle hinges onto the counter strips of the upper facade, Figures 6-7.
4. Now we snap the telescopic lever mount onto the strike plate of the lower façade of the upper façade, Figures 8-9-10.
5. Carefully lower the facades by the handle, down, and see what happens, Figure 11.
Adjusting the power mechanism of Aventos HF
We adjust the power mechanism, insert a special attachment into the adjustment socket; there is an adjustment scale on the mechanism, where you can see the position of the slider. By turning the nozzle, this must be done with a screwdriver at low speed, we weaken or strengthen the mechanism.
We ensure that the facades stop in any position. The slider on the scale of both devices should be in a similar position.
Adjusting hinges and fronts
1. We make preparatory adjustments to two pairs of hinges: upper and middle, ensuring that the facades are installed exactly along the body with similar gaps. What and where to turn is shown in the figure. Don’t forget - this is a preparatory adjustment, equalize “more or less”
2. Next, we align the facade with our hands, as shown in the figure, ensuring that both facades are in the same plane. It is necessary that the latch fig. 1 on the telescopic lever was perpendicular to the lever.
3. Snap the latch Fig. 2, open and close the facades, if there is no plane (the facades are humped), use an awl to pry the latch into its initial state (snap it off) and re-align the facades.
4. Latch again and check, raising and lowering the facades.
5. Adjust the upper and lower hinges again until the fronts are in perfect position.
| First, we install the power mechanisms on the cabinet body. It doesn’t matter what kind of facades you have, MDF, aluminum frames or something else. First you need to drill two holes with a diameter of 5 mm and a depth of at least 5 mm. This is done in order to fix the Aventos HF mechanism. The red in the figure shows the protruding edges, which will fit into the drilled holes. Let's start marking the holes. kH is the height of the cabinet, H is the distance from the top edge of the cabinet, which is what we need. If the body height is from 480 to 549 mm, then H is calculated using the formula: H=kHx0.3-28mm, if the body height is from 550 to 1040 mm, then according to the formula: H=kHx0.3-57mm Let’s say our case height is 720 mm, which means we calculate according to the 2nd formula. All dimensions are ready, now we drill holes, secure the mechanism and screw in the 4th self-tapping screw with a diameter of 4 mm and a height of 35 mm. |
Installation of top strikers.
We install counter strips on the cabinet ceiling. The strike plate is what the top front hinge is snapped onto and secured to (Clip top 120° hinge without spring). This counterplate is the same as for attaching the levers, but more on that below.The 175H5400 strike plate is installed regardless of the type of façade, MDF, aluminum, etc.
The position of the striker along the width of the cabinet will depend on the addition of holes for the hinge cup on the facade; there are no special standards here; either measure these dimensions on the facade or ask the facade manufacturer.
If you have completed this task, let's move on to installing strikers on the facades.
Our prices for Aventos HF
Features of Blum fittings for kitchen cabinets
Accessories - convenient operation of the headset. The company's product range is varied - from lifting mechanisms and removable hinges to extension systems, guides and accessories for bar counters.
All items are of different configurations. Various types of furniture hinges are made to suit every taste: texture, color and shape. Features of kitchen fittings from Bloom:
- full access to the contents of the upper cabinet through the use of a lifting mechanism;
- silent opening and closing of doors;
- adjustable door opening angle;
- soft, silent closing of drawers.
Blum fittings - smooth movements, high quality workmanship and long service life - criteria that distinguish products from competitors. The products are comfortable, practical and durable.
Video: equipment and features of kitchen fittings mechanisms
Advantages and disadvantages
High-quality products have virtually no flaws. Its advantages:
- hinges with closers are equipped with a shock absorption system - soft closing of the door regardless of its weight;
- lifting products with precise adjustment - the door is fixed in any position;
- hinges - easy installation without special tools;
- durability of fittings, quality of parts.
The only downside is the high price of the product.
It is better to buy fittings for 200,000 opening cycles at a higher cost than mechanisms for 50,000, but cheaper.
Installation of strikers on wide facades.
Wide facades are MDF, chipboard, solid wood facades, wide aluminum frames. Installation of strikers for such facades group 1 the same as in the previous section. Note that the positions of resp. strips along the width of the facade depend on the addition of holes for the hinge cup.The second group of reps. The slats are a mount for the HF lift levers. Let's count them. All strike plates are of the same type - 175H5400.
Let's first calculate X using an example. Let's assume cabinet height KH = 720 mm. Then, according to the table at the bottom of the figure, X = 47 mm. This X dimension is set off from the center line of the lower façade.
Difficulties usually arise when calculating the position from the edge of the facade.
SFA is the overlay of a façade on a side wall. Let's look at it with an example.
Let’s say the width of the case is 600 mm, then the width of the facade is 596 mm (but it can be different!), the thickness of the case wall is 18 mm (but it can be different!), then the overlap of the facade on the side wall will be 16 mm. This is SFA.
SFA= Cabinet wall thickness - (Cabinet width - Front width)/2
Then b = SFA + 12.5
For our example it will be 28.5 mm
Difficulties usually arise when calculating the position from the edge of the facade.SFA is the overlay of a façade on a side wall. Let's look at it with an example.
Let’s say the width of the case is 600 mm, then the width of the facade is 596 mm (but it can be different!), the thickness of the case wall is 18 mm (but it can be different!), then the overlap of the facade on the side wall will be 16 mm. This is SFA.
SFA= Cabinet wall thickness - (Cabinet width - Front width)/2
Then b = SFA + 12.5
For our example it will be 28.5 mm
Price calculator for Aventos HF
Categories
- Mechanisms for lifting doors. Used for kitchens with wall-mounted shelves and doors.
- Sliding structures. Products open easily and simply.
- Hinge designs. Used for doors.
- Directional elements. Smooth, smooth opening of drawers.
Aventos lifting parts
Lifting mechanisms are reliable and durable
The Aventos series are mechanisms that allow you to open any facade without effort and, if necessary, leave them in the desired position. Lifts do not require kitchen cabinet handles.
Aventos products differ:
- HF is a folding lift model, suitable for high-hanging cabinets with large fronts.
- HS—folding products with three levels of adjustment smoothly lift the facade cover above the body, which saves kitchen space.
- HL—vertical door lift.
- HK - a rotating mechanism that lifts the door and leaves it in a horizontal position, often used in cabinets installed under the ceiling.
- HK-S is a small model of a rotating product for small and corner drawers.
Blum fittings are popular
Lifting parts of the Aventos series can be equipped with additional systems that improve their performance.
Models are developed for wooden facades and structures made of metal profiles.
The fittings must be of high quality
Installation of the products is not difficult.
- The main parts of the mechanism are attached to the inner side walls of the solid wood kitchen set with a screwdriver. The part of the film with the inscription “attention” is removed and the metal part is pulled out.
- Slip-on mechanisms are attached to the façade from the inside. The door is inserted into metal parts and secured.
- Covers are placed on the main parts of the mechanism.
Other lifting systems are installed in a similar way.
Clip Top Details: Hinges
Kitchen fittings Blum
Hinge system - Clip Top products are compact, durable pieces on kitchen cabinet doors. Shape - any size, ensuring comfortable work with frequent use of the cabinet.
Product line:
- cliptop—a model with or without springs, opening at a large angle, for facades made of different materials (wood, metal, glass);
- modul - economical mechanisms with three-dimensional adjustment and different opening angles (90 and 170°).
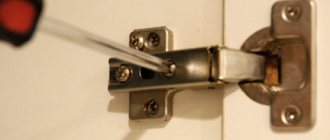
To install the hinges, markings are carried out where the parts will be installed. Holes are drilled in places. The hinge parts are attached to them. A gap is cut out on the door and a mounting plate is inserted.
Make your kitchen more convenient
The door is hung on the cabinet.
How to choose Bloom fittings:
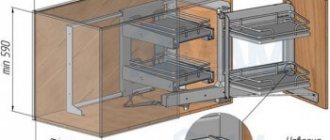
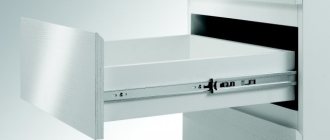
Tandembox: extension
The system ensures easy drawer pullout for varying load levels. Mechanisms with easy installation that can withstand any load due to the reinforced bottom and durable metal sides. Item categories:
- drawers of different heights - N(68 mm), M (83 mm), K (115 mm);
- with one or two railings;
- built-in enlarged side parts - box side (204 mm);
- internal drawers with pull-out components.
Boxes are made in two types:
- metabox - side steel part;
- legrabox - matte glass surface with stone inserts and fingerprint protection.
Motion technologies
The movement is smooth
Due to additional systems, Blum fittings are of high quality.
The blumotion system is a built-in safety feature that allows you to silently open furniture. The mechanism prevents the headset from damage and overload.
Tip-On design - automatic movement. To open and extend, you need to lightly press the surface of the facade. The system is easy to install and provides reliable fixation.
The Servo-Drive mechanism is the use of an electric drive. Opening or extension occurs by pressing a button. The system works flawlessly and gives the kitchen set a feeling of weightlessness.
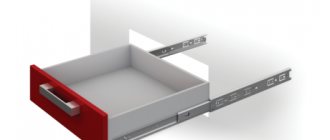
Tandem: guides
Correct kitchen ergonomics
Tandem guide components allow heavy fronts to be opened effortlessly and smoothly. Models are manufactured for full and partial extension and are additionally equipped with closers:
- movento—four-dimensional adjustment with synchronous extension, supporting up to 65 kg of load without deformation;
- standard—guides for wooden drawers with a load of up to 35 kg, fully or partially extendable.
Blum fittings allow you not to hold the door while opening.
Kitchen fittings Blum
Installation of the guides is simple: the sliding parts are disassembled into two parts, one element is mounted on the inner wall of the drawer. The second component is installed on the side wall of the cabinet.
The box is inserted into the guides.
Internal separation systems
Blum kitchen fittings have many uses
Boxes and cargo systems are equipped with division elements. Improved kitchen cabinet fillers with greater width and depth increase storage space for items.
The Orga-Line component is used for the Tandembox and in the wooden box. Ambia-Line is used for Legrabox.
Dividing systems include cutlery holders, stainless steel trays and other utensil storage items.
Installation of hinges.
Clip top 120° hinges without spring.
Clip top medium hinges
First we install the hinges on the upper facade. In the case of wide fronts - these are hinges Clip top 120° without spring for Aventos HF - 70T5550.TL, if the upper facade is narrow aluminum frames, then the hinge is 72T550A.This is a drawing for installing hinges for wide facades, regardless of whether the hinges are top or middle.
Then we install the middle hinges on the lower facade. For wide facades, the 78Z5500T hinge is used. For narrow aluminum frames - hinge 78Z550AT.
Installation of Aventos HF
1. Now let’s look at the installation of Aventos HF. After you have installed the power mechanisms, install the telescopic arms, as shown in Figures 1 - 2 - 3, they will also be supports for the upper facade during installation. Please note the warning.
2. Then we place the upper façade on the telescopic arms and snap the upper hinges onto the strikers, Figures 4-5.
3. Take the lower facade and snap the middle hinges onto the counter strips of the upper facade, Figures 6-7.
4. Now we snap the telescopic lever mount onto the strike plate of the lower façade of the upper façade, Figures 8-9-10.
5. Carefully lower the facades by the handle, down, and see what happens, Figure 11.
Adjusting hinges and fronts
1. We make preliminary adjustments to two pairs of hinges: upper and middle, ensuring that the facades are installed exactly along the body with equal gaps. What and where to turn is shown in the figure. Don’t forget - this is a preliminary adjustment, equalize “more or less”
2. Next, we align the facade with our hands, as shown in the figure, ensuring that both facades are in the same plane. It is necessary that the latch fig. 1 on the telescopic lever was perpendicular to the lever.
3. Snap the latch Fig. 2, open and close the facades, if there is no plane (the facades are humped), use an awl to pry the latch into its original state (snap it off) and re-align the facades.
4. Again we snap and check, raising and lowering the facades.
5. Again we adjust the upper and lower hinges to the ideal position of the facades.
Bloom loops. Part 2. Installation and adjustment. Detailed master class.
After watching a detailed master class, you will learn how to install Blum furniture hinges on a body, learn how to adjust furniture hinges and why shock softeners are needed (damper or mortise shock absorber). This video will help if you assemble furniture with your own hands, be it a kitchen, a small bedside table or any other furniture. Not everyone knows how to install this or that fitting correctly. furniture. When installing furniture hinges, it is much easier to install if you have a furniture jig, but if you don’t have one, you can also use simple, homemade templates. Installing furniture hinges is, first of all, correct marking. If you have already assembled your kitchen with your own hands or with the hands of assemblers, sooner or later you will need to adjust the furniture hinges. 7:32 You can see how to adjust a furniture hinge from this minute. Many manufacturers do not use impact softeners on furniture. This is not correct, because... they not only reduce noise when closing the facade, but also compensate for the necessary hinge gap. Thanks to them, all facades are aligned in one plane. This is part 2. If you haven’t seen the first part of the video, you can watch it here: idplayer.info/show/Wnl6WlFCUEUxNWM.html My VK page: id457010280 Instagram: mebelprostomoskva Facebook: profile.php?… Twitter: vgerasimov469 ****** **************************************** ************ #furnitureissimple #gerasimovvyacheslav #how to regulate the hinges ******************************** ************************************