Creating a home puppet theater is a great way to bond even more with your baby. After all, the child will be very happy to help you not only in making, but also in showing performances. But do not forget that for performances, dolls alone are not enough; you also need to make a screen. In this article we will show you how to create a screen for a puppet theater with your own hands.
DIY table screen
A table screen differs from a floor screen in that it is much smaller in size. If there is not too much space in the children's play area, then it is preferable to choose it.
A table screen can be made in a few hours.
Drawings and diagrams
You can draw the drawing yourself, taking into account the desired dimensions of the future product. There are also ready-made schemes. All puppet theater screens designed for board games are approximately the same.
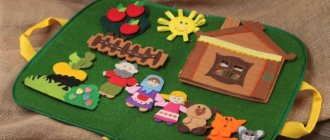
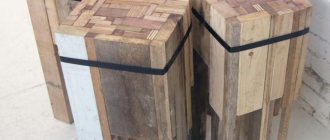
The product consists of three main parts - two side doors and a central part. Their size can be individual. Some prefer to make the doors narrower, some wider. It all depends on the preferences of the master and the amount of material.
The screen should not be made too small. It looks aesthetically pleasing from a design point of view, but it will be completely inconvenient for children to play.
Required tools and materials
The tools and materials to make a screen for a home theater will require:
- chipboard sheet;
- drill;
- glue;
- scissors;
- electric jigsaw or hacksaw;
- small awnings;
- self-tapping screws;
- screwdriver;
- a simple pencil;
- measuring tape;
- sandpaper;
- Velcro;
- small autonomous flashlights;
- acrylic paints;
- brushes;
- decorative elements.
Other materials can also be used. For example, certain types of wood. However, this makes the job more difficult.
A scrap sheet of chipboard will do, even if it's not in very good condition. After decoration, the surface of the material will not be visible. Leftover parquet boards or laminate are often used for screen doors.
Step-by-step manufacturing instructions
You can make a table screen for a puppet theater as follows:
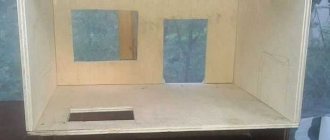
- First, you need to cut three main parts from a sheet of chipboard. For convenience, you should draw out the material in advance with a pencil. This is done using a hacksaw or jigsaw. A large hole is cut in the center.
- Afterwards, the parts are processed with sandpaper, if necessary, painted or covered with paper.
- The side doors are attached using canopies; ideally there should be 4 of them.
- If the goal is to create a shadow theater, then the next step is to sew on a curtain or curtain. It must be sewn in advance, taking into account the dimensions of the structure.
- You need to make a screen - for this you use ordinary cotton fabric. Velcro tape is attached to the edges so that the part can be removed and washed if necessary.
- At the end, small lanterns are attached to the side flaps, aimed at the screen from the inside.
The screen is ready. All that remains is to decorate it with additional elements - bows, stickers and other accessories.
The screen can be replaced with curtains, as is done in the photo. They are a little easier to sew.
It is recommended to use plywood as it is strong, stable, cheap and great for children to play with. But other materials are often used: thick cardboard, plastic, cork. It is important that they are light and of high quality. If your budget is not very limited and you want to make something that will last for many years, then you should be careful when choosing a base.
Materials for garden partition
To make your own screen for the garden, use thin wooden slats. They are knocked together crosswise and fastened with nails to the frame, the result is a panel that is installed on support pillars. In turn, holes of a certain depth are dug in the ground for the pillars. After they are driven in there, the holes are filled with concrete. The entire wooden structure is coated with varnish, stain or special paint. To create a screen, some parts of sports walls or furniture are used. Children grow up, furniture ages and gets removed, and these pieces sit idle. Therefore, they will be an excellent help as a support for plants.
Today it is fashionable for landscape architecture to use wooden products, which are complemented by fabric crafts or mats.
Making a floor screen
The floor screen is made in exactly the same way, but more materials will be needed to make it. The collection process will take several days. The size of the product can be completely different, it varies from 1 to 2 meters in height. It can be made small in width to save storage space and materials.
It is recommended to focus not on your own height, but on the growth of your children. But it is necessary to take into account that they grow quickly, and the screen will be useful for several years to come.
Drawings and diagrams
There is a high probability that the master will have to draw his diagram according to an individual size. This is due to the fact that not everyone has space to store large screens, and there is nowhere to lay them out for play.
If space is very limited, then it is rational to make a table screen, but of a larger size. It is easier to store it disassembled, and it will stand on the floor in the children's play area.
Required tools and materials
Usually the same materials are used. But you'll have to buy something extra.
The size of flashlights, mounts, and decorative elements should be larger. Otherwise, you will end up with something very low-quality, ugly and non-functional. Or there should be a lot of them. Meager decorations look strange, awkward and awkward.
Step-by-step manufacturing instructions
When creating a floor screen for a puppet theater with your own hands, the sequence of actions is as follows:
- Initially, you need to cut out three main parts from plywood - these are the same side doors and the central part.
- Then process them and attach them to each other. It is advisable to use 4–6 fasteners.
- The material must be painted or varnished. It is recommended to do this in several layers so that the paint lays down in a dense layer.
- Then you need to insert a screen into the screen or hang curtains. They may not exist - the height of the product will allow you to do without them if you screw on homemade shutters.
- The last stage is screwing on the lanterns and decorating the doll screen.
It is important to take into account that if the child is small, then he does not need a high screen. It is difficult for children to move the structure independently; it does not suit their height. And if such a large thing falls, it can cause any injury to a girl or boy.
If the task is to make the screen lighter, then it is wiser to use not sheets of plywood, but wooden beams covered with fabric. But it should be understood that such a design will be slightly less stable.
The plywood is covered with fabric and instead of being painted. Dense materials such as corduroy, velvet, and linen should be used. The wood should not be visible, otherwise it will look unsightly.
Decorating a screen for a puppet theater, made yourself, is an even more exciting process. It is worth paying attention to the color scheme of the playing area. It is recommended to paint the plywood in the same colors as used in the interior. You can also make its design thematic by painting the plots of some fairy tales. It is advisable that the child himself take part in decorating the product.
There is a lot of different decor that can be changed if you get tired of it. Another option is to leave the puppet screen monotonous and decorate it for each performance.
Garden partition
Screens are not only used for puppet shows; they can serve various functions: supports for plants in the garden, decoration or architectural structures.
Depending on the style in which the garden is decorated, the partition is selected. But any style has its own rules, and they must be followed. Most often, the screen is made by hand in a small size and with a lattice design.
The most suitable place for it is a patio or a green lawn; a corner screen is used to protect, for example, a summer kitchen from a children's playground.
Transparent model
A decorative element of the interior of any shape and size, having an openwork fabric that does not hide what is on the other side. Either translucent fabric or mesh is stretched over the frame. Products of this type are used only for decorating the room.
Note!
Do-it-yourself installation of interior doors - preparation of the structure, selection of doors, installation step by step + instructions from professionalsDIY shoe rack - types of designs, manufacturing materials, step-by-step master class with simple diagrams and drawings
Do-it-yourself sliding wardrobe - manufacturing manual with a full description of the stages, types of structures, choice of manufacturing materials (photo + video)
Casement model
A classic product consisting of a durable frame, the elements of which are connected to each other either using piano hinges or parts made of thick fabric or leather.
The most common are three-leaf structures, but four-leaf ones are also found. The number of elements depends on the area of the room. The height of the product reaches 180-200 cm.
Single screen model
This partition consists of one continuous leaf. For stability, it is either attached to the floor or fixed with one edge to the wall. This deprives the product of mobility.
Single-screen screens are often installed in offices to delimit workspaces, in kitchens to highlight a dining area, in studio apartments to designate the living, sleeping and kitchen areas of space.
Single-leaf partitions have also found their use in small cafes or restaurants to separate tables from each other.