Often, the layout of standard residential premises does not allow all residents to be accommodated with decent comfort, especially if there are many children in the family. A multi-level sleeping place will come to the rescue, allowing you to save space and provide normal sleep to users. In order for the structure to last for a long time, we will study how to assemble a bunk bed correctly. It is worth noting that the installation principle of factory and home-made models is almost identical, although there are some nuances.
General assembly principle
Wooden elements used in the structure must be selected in size and have a smooth surface. To fix the transverse strips, side stops (drawbars) are used. During assembly, special glue is applied to them, and after installation, the boards are fixed using clamps. After the adhesive has dried, the clamps are removed and screws are screwed in flush in their place. If desired, the screw head can be masked with furniture plugs or putty. Particular attention is paid to the stability of the device. It must be designed in such a way as to withstand not only the weight of the child, but also his possible pranks or active games. In addition, if a sleeping place is being prepared for a preschooler, it should be built taking into account the fact that the child will grow.
Special requirements in arranging a bunk bed made of wood are placed on the legs on which the side panels are attached. These elements are best made from hardwood blocks. Additional stops are attached to the parts or grooves are cut out. To give the design an aesthetic appearance, patterns made of thick cardboard are used. It is advisable to make grooves using a jigsaw, which ensures the most accurate cut line. All roughness and cut areas are treated with sandpaper.
Step-by-step manufacturing guide
And now about how to make a bunk bed for children with your own hands. You need to perform several manipulations to make a bed with two floors.
Follow this sequence:
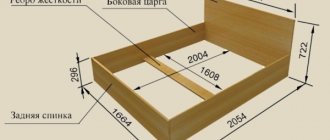
Cut out all the material based on the data in the drawing. Please note that the size of the frame for the sleeping place should be slightly larger than the size of the mattress. To be more precise, it is 8 cm wide and 10 cm long. In the part of the bed in which the stairs are fastened, you need to add another 4.5 cm. All ribs on the outside need to be chamfered. You can use a hand plow for this. All elements must be sanded and polished. Markings must be made on all structural elements for installation of fasteners. You make the lower and upper frames from the bars that you cut at the initial stage. Fasten it using screws. It is recommended to make at least one partition - it will significantly strengthen the structure. If possible, make 2-3 partitions; they will not be superfluous. You can make a bunk bed from timber with your own hands faster if you prepare all the elements in advance. Using self-tapping screws, you need to screw 20x150 and 20x200 boards to the frame on both sides. They will subsequently perform the function of sides. To make corner support legs, you need to connect 50x100 mm beams along the length at a right angle. The result should be an end in the shape of the Latin letter L. Then you need to make a hole in the support in the place where the upper tier is attached. Similar actions need to be done in a frame with a side of 200 mm. The holes need to be drilled out and made larger so that the top part of the screw, nut and washer can be hidden inside. Use screws to connect the frame and stand
We advise you to study - Types and types of foundations for a private house
Please note that making a bunk bed with your own hands takes a little time, especially if you have at least a little experience in this matter. Attach the structure to the wall
If the wall is made of plasterboard, the fastening elements must pass through the profiles. Otherwise the screw will pop out. Mark the places where you need to make fastenings; to do this, lean the bed as tightly as possible. Be sure to use a level to install the frame clearly in the horizontal and vertical planes. Then you need to drill holes through the frame. They must match those in the wall. Screw hex head screws into them. They must be recorded in profiles. If the wall is made of brick, the holes will have to be made with a hammer drill or impact drill. Then you need to insert anchors into these holes. Repeat similar steps with the second frame. Now you need to assemble the fence for the sleeping place located on top. It needs to be screwed to the wall and frame. When assembling a ladder, you need to take two bars and crossbars. The assembled staircase is mounted on supporting frames. The staircase can be of any design - attached or built-in. In the second case, it is necessary to make cutouts for fasteners. Sheets of plywood need to be screwed to the lower and upper frames. You will later lay mattresses on them. The base should be made of wooden slats. Making a bunk bed for children with your own hands is not difficult, but you need to look at the sizes of standard mattresses. It is necessary to secure the beams on the support frame bar, between which the slats are laid. It is recommended to nail them to the plank - this will achieve maximum structural strength. At the last stage, all self-tapping screw heads are covered with a layer of putty, which, after drying, is treated with sandpaper. After this, the entire bed is covered with varnish or paint.
When making a bed from chipboard, it is best to use Euroscrews (confirmants). They hold chipboard sheets much better. But the slats that go under the mattress, as well as the rungs of the stairs, must be made of wood.
Do not install boxes on the top floor - chipboard is heavy and the structure will become much heavier. Such a bunk bed for children (you can make it with your own hands in just a couple of days) will be very convenient - it is heavy and will not fall, even if the child turns the entire room upside down.
How to assemble a bunk bed: recommendations
After preparing the components, control measurements are taken, after which markings are applied. If all parts correspond to the drawing, assembly can begin. Special dowels are used as connectors. The sockets for their installation are marked with a pencil, then holes of the required diameter are drilled. After fitting, wood glue is applied to the protrusions and final assembly is carried out.
The bunk bed, the drawing of which is given below, is assembled in several stages. The glued base is fixed with clamps. After drying, it finally adheres to the screws. It is worth noting that the correct fit of parts is the key to the success of the construction of the entire structure, so disassembly and assembly can alternate many times during the process. With factory elements it is somewhat simpler, since they are adjusted in advance at the factory.
The principle of assembling a wooden bed
To make a bunk bed that will become a favorite place for children to play and relax, you need to properly prepare the materials and process the details. Furniture makers in factories have access to a variety of equipment that makes the task much easier, but a good owner will also have the right tools.
- the boards need to be smoothed, leveled, and adjusted to the required size;
- It is better to fasten parts using several methods at once, including glue and self-tapping screws;
- the side racks must be very strong, since the main load will be carried on them;
- if there are curves on the parts, they should first be drawn on a paper template and then transferred to the wood;
- It is better to cut out with an electric jigsaw;
- after all the parts are made, they are tried on;
- The dowels that will hold the structure together require special care.
After the bed is assembled, it is disassembled to be finally connected using glue and screws. If flaws are identified, they are corrected. There is no need to rush into assembly, since the bed must be securely fastened and stable.
Classic model
Assembling a traditional wooden bunk bed begins with making the base. Tsars are made, to which two boards are fixed at right angles. The current task is to make a rectangular box. The support bars are screwed to the ends using self-tapping screws. The resulting box contains slats on which the mattress will subsequently lie.
At the next stage, the installation of the backrest begins. Take three boards, the width of which is identical to the dimensions of the bed, and assemble them with racks into one block. Dowels are also used for this purpose. These parts can be made independently or purchased at a specialized store. Sockets for dowels are drilled into the parts, boards are fitted to the bed posts, and appropriate marks are made with a pencil. The elements sit on the glue only after repeated fitting.
Having made the back, we begin to manufacture the legs and associated parts. The construction of these elements is not much different from the creation of a headboard. The main difference is the number of crossbars. It is important that the top boards of the back and legs are level as they will serve as support for the upper floor. How to assemble a bunk bed next? The second level is made according to an identical principle, only it is mounted on horizontal crossbars and secured with dowels. After installing the upper floor, the bed is reinforced with end posts made of boards.
Metal pipe version
Next, we’ll look at how to make a bunk bed from metal pipes. This option is considered the most durable and hardy. Despite the fact that such a design is simple in nature, its assembly is quite labor-intensive and requires special skills. You will need equipment for welding and cutting metal, as well as appropriate experience in handling it.
Models of this type are manufactured as follows:
- To assemble the base, use a metal corner 45 x 50 mm. Grooves are cut along the edges of the pipes to connect to the frames and ensure maximum joint density (a 32 x 65 mm channel is suitable).
- The frame part is fastened by welding, carefully observing that the corners are strictly straight and the mating elements are parallel.
- The racks are cut from thin-walled pipes (25 mm). Frames are welded to them, followed by processing of the seams.
- The sides are made of metal rods, resulting in a kind of fence with railings.
- A ladder is welded from pipe elements and attached to the structure.
Final stage
After assembling the entire structure, the stairs are installed. The simplest option is to attach horizontal crossbars to a pair of vertical posts. At the very end of the operation, decoration is performed. A water-based paint coating is suitable for this. It is harmless to health, which is a key factor in favor of its choice. If the bed is made of natural wood, a colorless varnish that preserves the natural beauty of the wood patterns is quite suitable.
Collapsible children's version
How to assemble a children's bunk bed? A standard configuration bed is easier to assemble, and instructions for its manufacture are listed above. But there is also a collapsible option. Its advantage is the ability to mirror the location in the room. This means that the right or left position of the steps can be changed by rearranging one panel.
In addition to the fact that it is very convenient, since the ladder also serves as a shelf for books, the design is very compact. The extra weight gives added stability to the system. Another nice thing about assembling this option is that no special tools are required for this purpose. Pliers will be enough to disassemble the panel.
Bunk bed with drawers
To work, you will need plywood panels, wooden blocks, wood glue, a drill, bolts, self-tapping screws, a hacksaw or a jigsaw.
The beginning of the assembly is traditional: two mattresses are prepared with wooden boxes, support sides, a ladder and a masking sidewall.
The construction of supporting walls is carried out from plywood panels, which are filled with nitro varnish. If the height of the partition is 1.5 meters, then its thickness should be at least 20 mm. The width is selected depending on the size of the boxes. Marks are placed on the supporting walls at the places where the mattresses are fixed, after which holes are drilled. Wooden frames are screwed using bolts with chrome-plated heads.
Materials for making bunk beds with your own hands
Studying the assembly diagrams for bunk beds is not the first stage. First of all, you need to decide on the material from which you will make a sleeping place for two. You can make a design:
- from plywood;
- chipboard;
- wooden planks
- metal;
- polypropylene pipes.
Plywood is quite thin and not the most durable option.
The price for a sheet of 150 × 150 centimeters and a thickness of 20 millimeters (optimal for a bed) ranges from 700 to 1000 rubles.
A bunk bed made of plywood will be quite cheap, but not very practical to use. it will support the weight of two small children, but not adults
Chipboard for the bed is much better.
One sheet with dimensions 250 × 180 cm will cost approximately 900 rubles.
If you decide to create a bed from a board, choose natural pine. It is considered the most suitable for sleep. It does not emit harmful and dangerous substances, is hypoallergenic, is particularly durable and resistant to external influences (if it is treated with an antifungal compound at the production stage). A square meter costs 300 rubles. A two-tier sleeping system made of pine will last for 50 years, no less!
To create furniture for sleeping and relaxing, metal is also used, but not sheet metal, but a metal profile is used to create a frame. These are hollow pipes that are characterized by durability
The bunk bed will be strong, which is important if it is used by both adults and children
A meter pipe will cost about 5 thousand rubles. Not cheap!
If you are determined to assemble a system from a metal profile (and it will last more than 50 years), then carry out the work in the garage or on the street.
A bunk bed made of metal profiles looks stylish and original. But to assemble one, you will definitely need a welding machine and skills in using it.
Polypropylene pipes are only suitable for DIY bunk beds. The system simply cannot support the weight of an adult.
The price per linear meter is 50 rubles.
Important: choose any material of your choice. If you don’t have a welding machine or the ability to get a polypropylene pipe, then experts recommend choosing chipboard or pine boards to create the bed of a bunk bed. . The best materials for making a bunk bed are chipboard or pine board.
They are durable, can withstand heavy weight, and last about 50 years.
The best materials for making a bunk bed are chipboard or pine board. They are durable, can withstand heavy weight, and last about 50 years.
The following tools will help you make a sleeping place:
- saw;
- drill;
- self-tapping screws;
- nails;
- roulette;
- level;
- screwdriver
It is not necessary to choose tools of any specific brands and models. Work with what you have at hand. The units can be borrowed from friends or neighbors. Now some hardware stores even rent them out.
Peculiarities
If boxes or a wooden frame are not provided for the mattresses, a sheathing is made between the sides. Wooden blocks are screwed to the walls with self-tapping screws, on which the boards are laid. The sidewalls are fixed to the finished sheathing using connecting pins and the sidewalls covering the mattress.
If the bunk bed, the drawing of which is given below, has solid backs, it is advisable to install a removable ladder. To assemble it, a shield is attached to the box, connected to sticks in the form of steps. For a model whose supports are made of a pair of boards, it is better to mount the ladder between them. Holes 40 mm deep are drilled in the boards at a distance of 100 mm from each other. Glue is poured into the sockets, after which wooden pegs with a diameter of 18 mm are inserted into them, which serve to connect the parts of the back. Drawers are made after measuring the space under the bed. They can be made of plywood, fastened with self-tapping screws, and equipped with wheels at the corners.
Materials and tools for assembling a bunk bed
Often, ready-made models are sold in stores, but what to do if you are not satisfied with such variations. Don’t despair, just read this article to the end and make a bed with exactly the design you like. To do this you will need:
- wooden beam;
- cutting block;
- sheet of plywood.
From this material you can create a bed of any design. If you have welding skills, you can make it from a metal body. But you will need a certain tool:
- Hacksaw or circular machine.
- Stationery set (paper, pencil, eraser, etc.).
- Plane.
- Sanding machine or sandpaper.
- Screwdriver or electric drill.
- Self-tapping screws and bolts with nuts.
- Furniture glue or epoxy.
- Varnish, stain, etc.
"Attic" option
Instructions for assembling a bunk bed with drawers of the simplest type are given above. Next, we will consider another popular option, which can be made with different levels of complexity, depending on the available materials and carpentry skills.
The usual model of this type is a structure that is attached to the wall or ceiling. The device consists of four supports 1500-2000 mm and a berth. First you need to create a drawing, carefully calculating the working dimensions.
Materials
When choosing materials, consider your skills and the range of available tools. Chipboard or solid pine are excellent for work. Let's prepare the tools we need for the job.
You can use sheets of plywood for the base under the mattress.
Depending on whether you will cut the material yourself or entrust it to professionals, we select the set of necessary tools. The best option would be to cut the boards according to measurements using professional tools in a furniture shop. Then all you have to do is connect all the parts.
We need instruments and devices for measuring and fixing. You can't do your work without a simple pencil.
For this you will need: a screwdriver, screws, glue, a level, a drill, a hammer, a grinding machine for processing the finished product, and blank material cut to size.
Making two-tier furniture is not difficult if you prepare all the necessary tools and remember your existing construction skills.
Assembly
How to assemble an attic bunk bed? Stages of work:
- Wooden elements are prepared (sanded, treated with antiseptic).
- According to the drawings, sockets for fastenings are drilled.
- The lounger is made according to the standard scheme described above.
- The berth and support posts are assembled into one block. The top edges of the racks should rise 300 mm above the deck chair.
- The strapping is done from above and below by screwing the support posts of the board and sidewalls, which provide additional rigidity and serve as sides.
- The staircase is being installed.
After assembly, the structure is coated with transparent varnish.
Advantages and disadvantages
Purchasing a finished product in a store is quite expensive, and selecting such models to suit the characteristics of the room causes some difficulties. Therefore, it is better to study the question of how to make a bunk bed with your own hands. Homemade designs can be combined with a small sports corner, retractable cabinets, a desk, and storage compartments.
Any home craftsman with minimal carpentry skills can make basic modifications to a summer cottage. In apartments, such sleeping places are often equipped in children's rooms, which makes it possible to free up space for homework and games.
The disadvantages of double-decker beds include a high risk of injury. For children's versions, it is necessary to organize reliable sides on the upper floor. It is strictly not recommended to place children under three years of age on the second level.
Model with sofa
The assembly diagram for a bunk bed with a sofa allows you to save even more space than its classic counterpart. An ordinary sun lounger on the ground floor does not allow you to just sit comfortably, read a book or watch TV, since there is no comfortable backrest. To ensure comfortable living conditions, you will have to additionally install an armchair or small sofa.
The way out of this situation would be a bunk bed with sides and a sofa. At night, the lower part will serve as a comfortable lounger, and during the day – as a comfortable sofa for relaxing while sitting or lying down. When folded, the structure will not take up extra space, and when unfolded it turns into a full-fledged sleeping place. To make such a set yourself, you will need to purchase a sofa, on the basis of which you can build the rest of the structure, which is stable thanks to the massive lower part.
Arrangement of bed stairs
How can you make a bunk bed for children or its adult equivalent as safe as possible? This indicator largely depends on the reliability and type of stairs leading to the second level. The specified element can be in several configurations:
- Vertical type, in which a pair of planks or bars are connected by wooden or metal crossbars. The staircase can be built-in or attached.
- Marching option. This model, the regular version with steps, takes up more space than its vertical counterpart, but is much more convenient. The structure is made from a board with a cross section of 3/8 cm, while the width of the steps should not be less than 35 centimeters, the distance between the rungs should be 20-30 cm. The angle of inclination is taken to be about 70 degrees.
- Option with built-in cabinets or drawers. Since there is free space under the stairs, it is used as storage for things. To do this, drawers are installed on the sides or a kind of cabinet is built.
The type of staircase you choose depends on who will be using it. For small children, it is advisable to build a marching version; other versions are quite suitable for teenagers and adults. For children, it is recommended to make a model with railings and correct calculation of the step, which will make it possible to make the operation of the system as safe as possible.
Modifications for large families
How to properly assemble a bunk bed in which the lower floor is a double bed? This design is suitable for a one-room apartment, in which the first tier is allocated to the parents, and the top floor to the child. The bed is made in the form of a trapezoid, its manufacture is no more difficult than the traditional version. Not so many materials will be required, and stability will be more reliable due to the massive and expanded lower tier when unfolded.
Another option is a bunk bed with drawers of four loungers. This design is perfect for large families. This option is more difficult to manufacture than all the others. Despite the labor intensity and cost of material, it will be possible to preserve as much usable space in the room as possible. Essentially, these are two or three classic bunk beds assembled into one set. The device can be modified by creating drawers.
Design Features
Before you begin the manufacturing process, you need to decide on the size and design. Create a bunk bed project with your own hands. This will help not only calculate the amount of materials required, but also organically fit the furniture into the room. Avoid possible mistakes and unnecessary additional waste of time and money to eliminate deficiencies. Even at the planning stage, take into account all the nuances.
There are many types of bunk beds for children. The most convenient and popular:
Traditional. A bed in which “tiers” - sleeping places are located one above the other.
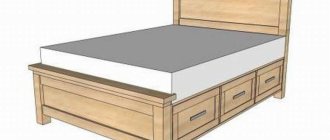
With drawers. This model provides not only two independent sleeping areas, but also additional storage space.
With a sofa. Very convenient and functional model. Allows you to equip not only a sleeping place, but also an area for daily relaxation. It is distinguished by aesthetics and attractiveness. Ideal for small apartments.
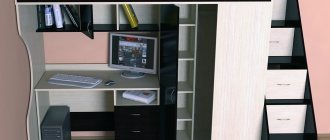
Loft bed. Not only beautiful, but also a very practical option. Allows you to use the space under the bed to create a work or play area, build in a closet or a sports corner.
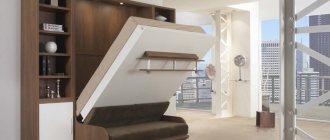
Roll-out. A transforming bed allows you to hide the lower berth if necessary.
The designs also differ in the location of the sleeping places. Recreation areas may be located:
- one above the other;
- have a corner location;
- located along one wall with a shift to the side, etc.
Sides and stairs
The stairs and sides are another important point that must be taken into account when drawing up a drawing of a bunk bed with dimensions. Because these details will play a decisive role in ensuring the safety of the child.
You should not neglect the sides even when equipping a sleeping place for teenagers. It will protect your child from accidentally falling while sleeping.
As for the design of stairs, they can be of the following types:
Vertical flat staircase. One of the most standard options. It takes up little space and is mounted directly to the base of the bed, acting as a protective side for the lower tier. The main disadvantage of this type of staircase is the lack of railings, which makes it unsafe for children under 5-6 years of age.
A curved or flat inclined staircase. Convenient for children of any age, safer option. Among the disadvantages is that it takes up much more space.
A staircase with steps, under which there is a built-in cabinet or drawers. Very convenient and easy to use design. It will provide not only safety during descent and ascent, but also additional storage space. But it is worth considering that the length of such a bed will be at least 2.4 m and it will not be easy to fit it harmoniously into a small room.
Dimensions
The question of how big to make a bed is very individual. You can make furniture to suit the height of a child or immediately design an adult model for growth.
Basic rules to follow when designing a bunk bed:
- The width of the structure should be sufficiently spacious and correspond to the standard dimensions of the mattress. The optimal size is considered to be from 80 to 100 cm.
- The height of a bunk children's bed should be approximately 1800-2000 cm. When determining this value, it is worth considering not only the height of the ceiling in the nursery, but also the distance between the upper and lower tiers necessary for comfortable use of the structure. You should not make a bunk bed too high with your own hands, otherwise sleeping on top will be very stuffy and uncomfortable.
- The recommended length of the bed is from 1900 to 2000. It fits perfectly with standard mattress sizes and will allow even a tall teenager to fit without discomfort.
Material of manufacture
A children's bunk bed is furniture that is subject to strict environmental and fire safety requirements. The quality of the product largely depends on the material used. Most often, chipboard, MDF or solid wood are used to create the structures in question. The last option is the safest and most reliable, since wood breathes and meets all environmental standards. It is necessary to choose dried material without defects from ash, birch, and beech.
However, wood has a fairly high cost, so pressed slabs are often used to make beds. Furniture of various types is made from chipboard. However, for a child’s sleeping place this is not the best option in terms of environmental safety. An alternative is MDF, boards that are made from dried compressed wood pulp. Natural, harmless resin obtained from trees is used as a binding base.
Making a bunk bed with your own hands
It is quite possible and not so difficult to make a bunk bed with your own hands. The whole process can be divided into the following stages:
- Preparation of sketches and drawings for the required dimensions.
- Preparation of tools and materials.
- Making a crib.
Drawing for making a bunk bed
A drawing is the first stage in the production of any furniture. If you do not have the necessary skills for this, you can use a ready-made one. For example? This option is ideal for a small children's room with a crib located in the corner. This way you will save on materials, since fewer supports can be made.
The second tier can be made a little lower if the ceiling in your room does not allow such a structure. Do not make the second tier too high, as this may be dangerous for the child who will sleep there. Firstly, injuries are possible due to a fall (not so much during sleep, but during games). Secondly, warm air rises, so sleeping directly under the ceiling is very unpleasant in the warm season. Thirdly, children often like to play on the “2nd floor” of such a crib.
However, you cannot lower the upper bed too much, since an adult will sit on the lower berth and it will be inconvenient for him to constantly bend down or bang his head. It should also be taken into account that children will not always be so short, which means that the distance between the upper berth and the ceiling should also be suitable for an adult.
For the upper bed, you should definitely make handrails. They should be high enough so that the child does not accidentally fall while sleeping.
At the stage of planning and creating a drawing, pay special attention to the location of the stairs to climb to the upper berth. It will need to be well secured and made durable, as it will be used often
It may be worth ordering a ready-made metal structure. This will increase its strength.
Materials for creating a bunk bed with your own hands
It’s easier to make a crib from chipboard yourself, since wood and metal require skills to work with them. The quality of the finished product will be no worse than that made from pine boards, which are often used to make children's furniture.
Calculations of the required materials are made based on the drawing. You can save your time and order chipboard cutting in professional offices. This will slightly increase the cost of production, but all the cuts will be perfectly even and you will only have to glue the edge onto them using an iron or hair dryer.
In addition, you will need 2 sheets of plywood to place under the mattress. Its thickness must be at least 9 millimeters. Theoretically, chipboard sheets or wooden slats can be used for the same purposes, but then the price of the product will increase.
To make the crib, which we presented in the previous figure, you will also need the following components:
To work with chipboard and make a crib you will need the following tools:
Making a crib with your own hands
After completing the preparatory work, you can begin connecting the parts. If the chipboard was cut correctly, then there will be no problems with installation.
We advise you to study - Foam plastic. types and applications. properties and features. how to choose
This completes the production of a children's bunk crib. Wipe all its surfaces thoroughly, place the mattresses and you can make the beds and use them!
You can see another option for making a baby bunk bed in the video:
The main space in the room is occupied by beds, and when the children were small, there was no shortage of free space. As children grow older, they need larger beds. If there are two children in a family, then the current solution is bunk beds, but they are expensive. Or you can make bunk beds with your own hands - this is a fascinating and useful process.
Recommendations and nuances
A staircase in the form of drawers is one of the safest designs
To ensure that the result – a bunk bed for children’s sleep and rest – is pleasing and lasts for a long time, construction professionals advise taking into account the following nuances:
- To make an attic-type bed from wood, parts of different sections are used. Work begins with assembling the left end element
- A pull-out bed (often used in rest rooms in kindergartens) can be assembled from MDF sheets with a thickness of 19-22 mm
- The wooden structure is fastened using tenons and chops, which are pre-lubricated with wood glue, or using ordinary metal screws
- The backs of the tiers should be made soft to eliminate the risk of the child hitting himself in his sleep.
- For reliability and strength of the structure, both tiers are attached to the wall with metal corners
- A transverse rail is installed in the frame to give the frame rigidity
- Traditionally, a staircase has 3 steps, but sometimes it is advisable to make more steps, and as children grow older, change the distance between the elements
- To give the structure stability, the lower tier is placed on the fifth leg, which is placed in the middle of the transverse beam of the base
- It is preferable to connect wooden parts using an oblique flush joint
- For greater safety, the stairs are made inclined, with railings, and anti-slip pads are glued to the steps
For stability, the two-tier structure is screwed to the wall and “placed” on the fifth leg
Whatever model and design is chosen for self-assembly, the main thing that attention is paid to is the accuracy of calculations and the quality of the materials used . When it comes to assembling children's furniture, the characteristics of safety, reliability and convenience come to the fore.
If you take the measurements correctly and the work itself is careful, then a bunk bed assembled with your own hands will not be inferior in performance characteristics and service life to factory models, and will surpass them in design.
Classic bed drawing
A step-by-step guide with drawings on how to make a classic wooden bed with your own hands. The basic tools you will need are a miter saw and a jigsaw. To make a bed, you mainly use 2 x 6 boards and 4 x 4 lumber. Also, do not forget to prepare wood filler and stain. You can read the full list of necessary materials and tools on the website. Below is the cutting of the bed parts according to the diagram in the picture on the right.
A - 2 pieces of 4×4, 52 inches (132 cm) long, 2 pieces. 15 1/2″ long (36.5 cm)B – 4 1×6 boards C – 13 2×6 boards 36 1/2″ (93 cm) long D – 2 2×4 lumber – 78 1/2″ long (200 cm), 1 2×6 boards 80 1/2″ (205 cm) long E – 2 2×10 boards 80 1/2″ (205 cm) long, 1 piece – 71 1/2″ (182 cm) , 1 2×6 board 71 1/2″ (182 cm) long side rails F – 3 2×4 boards 80 1/2″ (205 cm) long, 14 1×4 boards 76 1/2″ (195 cm) long auxiliary strips
View the embedded image gallery online at:
Photo source: howtospecialist.com/finishes/furniture/farmhouse-bed-plans/#more-12846
Drawing of a classic wooden bed
An example with drawings on how to make a classic wooden bed with your own hands.
See diagrams and several step-by-step assembly photos in the gallery below.
View the embedded image gallery online at:
Photo source: www.instructables.com/id/Custom-Bed-Frame/
Drawing of a simple wooden bed
Using this example, you can make a simple wooden bed with your own hands.
A few assembly points
Note that the slats rest on the lip on the inside of the side rails. When assembling the headboard, dowel holes are best drilled by clamping the headboard and drilling the hole all the way to the outside, as shown in the diagram
The footrest is almost identical to the headboard. If you prefer to place your feet at the end of the bed, move away from the top horizontal part and make the posts only 45cm long.
The bed rails have a series of blocks on the inside corners. The goal is to spread the slats and prevent them from slipping.
It is best to glue and screw the 38 x 38mm slat support onto the main part of the track to ensure it is securely attached. Bed frames in general are designed to be disassembled and moved. For this frame you just need to unscrew the side guides. The slats are located between the bed rails and are held in place only by gravity. Blocks on the bed rails prevent them from sliding. See drawings and diagrams with step-by-step photos in the gallery below.
View the embedded image gallery online at:
Photo source: woodgears.ca/reader/richard/beds.html
What you need for work
Of course, you understand that any furniture is made from something and by something, and these components need to be determined immediately. That is, before starting work, you need to prepare the necessary materials and select the required tools.
We select materials
OSB of different thicknesses
In fact, all materials must be made of wood, that is, lumber, but panel products can be different. I’ll just list what you can use, but you’ll have to choose on your own. So, we make a choice:
- block 50×50 mm;
- board 50x70 mm (instead of a block, but this is optional);
- board 100×50 or 150×50 mm;
- moisture-resistant or laminated plywood or oriented strand board (OSB-3 or OSB-4) - here you need a choice;
- dowels with a diameter of 8 mm;
- self-tapping screws (it is better to take white or yellow ones, they do not rust, therefore, they will last much longer);
- wood glue or PVA, it may be useful, but maybe not, it all depends on the assembly method;
- varnish (see footnote!).
Attention! There are different varnishes, but don’t forget that you are making a bed for a child! So, look at the instruction sticker, the varnish can be alcohol, alkyd, alkyd-urea, nitroglycerin, polyester, polyurethane, acrylic, oil and water-based. The latter is natural, therefore, cannot cause harm to humans when inhaled (safe not only for adults, but also for children).
What tools will you need?
An electric jigsaw is more convenient than a manual one
Generally speaking, a hammer, a hacksaw and a screwdriver will suffice, but why complicate your life? Now there are many electrical tools that are always useful in the household and these are:
- electric jigsaw and/or circular hand saw;
- screwdriver and/or electric drill with attachments;
- set of drills;
- metric tape, pencil.
Note. Sandpaper or a sanding disc on an angle grinder can also come in handy, but this is not always the case.
Assembling the bed frame
This bed frame is designed to accommodate a full-size mattress. The design is created in such a way that all parts can be installed manually without the use of screws or glue. The bed is 30cm above the floor and a system of connecting bars divides the bed into 12 support squares. The parts are created from a 3D model for CNC cutting. Using Shopbot Alpha, the bed pieces are cut from two sheets of plywood measuring 10 x 20 x 2 cm. All cuts are made using a 1/4" Shopbot end mill.
After cutting the files on the CNC, you need to sand the edges of the parts by hand to ensure that all parts fit snugly.
Then assemble the bed starting with the center slots. Lay out all the parts and start assembling from the central slots
Carefully insert the five pieces that interlock and hold the center of the bed. Then attach the perimeter using butterfly joints
The last part of the assembly is to cut the outer legs, which connect to each other using couplers at the corners, and mortise and tenon slots to connect to the centers. For a tight fit, tap with a hammer so that the parts lie in the same plane. Bed included! Assembly takes about 15 minutes and disassembly takes 8. The bed frame is lightweight, and all parts can be disassembled and transported in a sedan car. For stability, use wood glue. Add a mattress and enjoy.
View the embedded image gallery online at:
Photo source: www.instructables.com/id/Slotted-Bed/
How to make a wooden bed frame
If you already have a mattress, making a wooden frame is not a problem.
Use this tutorial with step-by-step photos and in just a few hours you will have a finished bed frame for your bedroom. Detailed instructions can be read on the website.
View the embedded image gallery online at:
Photo source: www.addicted2decorating.com/diy-stained-wood-platform-bed-frame.html
Upholstered platform bed
To make a bed frame with your own hands, it is important to correctly calculate the dimensions. When the measurements are ready, take the longest sides of the bed
Shorter pieces can be placed inside. The frame width is 150 cm. Remove 1.5 cm from each side. The crossbars should be 144cm long. The center support of the 2x4s is 200cm apart, which is less than 8cm from the front and back of the bed for a length of 193cm. All cuts are at a 90 degree angle. There is nothing special here, just measure, draw a line, measure again, draw...then make cuts (circular saw). Once you get into the rhythm, this part goes surprisingly quickly. When you're done cutting, you should end up with the following: 12 1x4 boards 144 cm long, a 2x6 board 200 cm long and one 2x4 block 193 cm long. Read the full instructions on how to assemble and upholster the bed frame on the website. The assembly process is shown in the master class with step-by-step photos.
View the embedded image gallery online at:
Photo source: www.instructables.com/id/ReBuilding-a-bed-foundation/
The platform bed, a very popular design today, is an interesting and unique design. A platform support system has an integrated foundation, which will consist of a system of support bars or may include a panel base within the structure
Why is it important? Metal frames that rest on the ground usually have a maximum of two or three thin metal cross supports. This is not adequate support for the mattress
This is where platform frames come in handy with their slats and solid panels that are designed for just that. Modern platform bed designs add a contemporary style to your bedroom. Below in the gallery are several options that you can make yourself.
View the embedded image gallery online at:
Stages of work
Design option for 2 tiers for children's sleep
Before purchasing materials and direct assembly, determine the main stages of creating a bed yourself:
- Selecting a model (shape, design)
- Collecting measurements (room area, height of children who will sleep in the bed)
- Drawing up a diagram, drawing with specific parameters
- Selection and purchase of materials (wood, chipboard, metal, profiles)
- Preparing the necessary tools
- Manufacturing of parts in accordance with drawings
- Assembling parts into a common structure
- Painting, varnishing, decoration
- Mattress installation
French style bed
This French-style bed was made from the textbook The Art of the Carpenter, written by the famous sixteenth-century cabinetmaker and author of a treatise on woodworking, André-Jacob Roubaud (1739-1791). Of course, this is not an exact reproduction of the manual, the author changed and adapted several things, but, nevertheless, somewhere close to the original. Roubaud describes 2 types of French beds, one with wooden slats and one with slats. He prefers straps as he claims it makes the bed softer, but with modern mattresses being quite comfortable, the author opted for the slatted option. All in all, this is a very interesting project to reproduce a sixteenth century bed.
If you like stylish furniture, be sure to read the instructions on the website, where there is not only a description of the process, but also quotes and recommendations from Andre-Jacob Roubaud himself. In addition, the author took very detailed 110 step-by-step photos, which are presented below in the gallery.
View the embedded image gallery online at:
Photo source: www.instructables.com/id/French-Style-Bed-Roubo/
DIY bunk bed with canopy
If you want to create a cozy place for a child, make a canopy bed with your own hands.
It's very simple, you just need to add curtains. How to do this quickly and efficiently, read the instructions on the website. For clarity, the process is shown in step-by-step photos.
View the embedded image gallery online at:
Photo source: www.instructables.com/id/Bunk-bed-hack/
Family modification
How to make a family-type bunk bed? If a family has children of different ages, or an adult has to sleep with a child in the same room, this project will be the best way out of the situation, especially in small rooms. The lower part is intended for the older offspring or parents and should be larger in size. This method causes some inconvenience, but sometimes it is the best option.
Stages of creating such a design:
- First you need to build the top tier, consisting of a pair of footrests. To fix the slats in the headboard, you need to start this operation from the central part. If the elements do not fit tightly to the outer parts, the remains of the head part are used as a separator.
- For the lower level they make a full-size classic bed, without footboards, but with two headboards.
- The placement of the upper part is measured, marks are also placed on the caps of the lower level. A hole 100 mm deep is drilled in the center of the marks. On the upper bed, a similar nest is made in the center of the lower part of the legs. To fasten the floors, use 150 mm metal screws without heads or dowels made of hardwood.
- How to assemble a bunk children's bed with the possibility of an adult resting at the final stage, we will consider further. At this stage, the stairs are built. A pair of 20 x 40 mm bars, 1600 mm long, are cut, both edges are cut at an angle of 25 degrees from the square, parallel to each other. A mark is made at the upper end at a distance of 40 millimeters from the front upper corner. The square is used to draw a line perpendicular to the bottom cut. The cut is made along this line, which will be the sides of the stairs. The crossbars are screwed to the sidewalls using 50 mm screws. To increase the strength of the structure, the joints are additionally treated with glue. Metal brackets can be used as fasteners for stairs.
The main thing is the size
Bed drawing
Before you develop a bed design and start making it, you need to consider some points. First, you or your child must choose a convenient place where it will be located. Secondly, consider the location of the stairs that will provide access to the second tier. Well, an important point is the dimensions, which will be ideal for a comfortable and safe location on the first and second tier.
If we talk about sizes, there are certain rules that need to be taken into account when designing:
The distance from the lower tier to the floor should be such that an adult feels comfortable sitting on it. Please note that you can store some things under the lower tier. The distance between the lower and upper tier should allow an adult to sit comfortably inside. This will be convenient both for parents, who will be able to spend time with their children, and for children, who will not hit the top tier when jumping out of bed. The height of the ceilings in the apartment or house should be taken into account. The upper tier should not be located too high so that the child does not hit the ceiling.
The top tier should not be too high
The bed, the manufacturing instructions for which we provide, is intended for a room with a ceiling height of 2.5 m. The thickness of the mattress is chosen to be 20 cm, and the size of the sleeping place will be 180 cm by 80 cm.