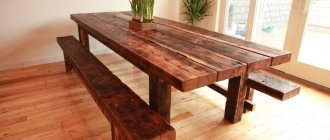
A banquette can be called a popular type of furniture for the hallway. Over time, its design has not undergone fundamental changes. This is not only a comfortable pouf on which you can seat guests, but also a stylish piece of furniture; it will look great in the hallway, kitchen, bedroom and living room.
The stores have a huge selection of these soft poufs: with cabinets, shelves, drawers. Each manufacturer designs the banquette at its own discretion. But what to do if you still haven’t found a suitable option for your interior? In this case, the question may arise: how to make a banquette with your own hands?
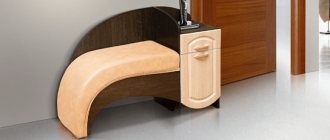
The basic design of a banquette is quite simple - a stool with a soft seat.
The fabric is folded inward at the edges and secured with staples.
Drawings with dimensions of the bench
Note! To implement a project, you need to carefully prepare. To do this, it is important to follow the order of all actions. Then you will receive a high-quality and neat product that can be used in everyday life.
One of the important stages is preparation. It is necessary to draw up an accurate diagram of the future furniture. Using this data, you will assemble the structure. You need to think about the features, the presence of additional shelves, wheels for movement.
Dimensions and proportions are taken into account so that every detail looks harmonious. When calculating the length and width, it is necessary to take into account the amount of free space for one person.
You should also pay attention to the following nuances:
- Think over the main parameters. It is important to decide in advance on the functionality, as well as the necessary components of future furniture. This could be a seat with a backrest, built-in legs, wheels, drawers, etc. In small rooms, the latter option is especially beneficial.
- Calculate the amount of materials. Depending on the number of seats, the dimensions of all parts and components are determined. To do this, it is enough to carry out calculations in the specified proportional ratio.
- Decide on the frame. If you are planning a rather complex structure with a large number of additional elements, it is necessary to prepare a template according to which the remaining components will be adjusted.
- To cut the parts, you will need an electric jigsaw.
Structural elements can be cut with an electric jigsaw.
Note! If the project provides for various legs, additional drawers or shelves, you should decide in advance on their location. This will allow you to use the bench for storing shoes and other things in the hallway, which will save free space for other items.
Decoration
It is better to choose buttons to match the color of the upholstery. The quantity depends only on personal preference. You can diversify the bench with a decorative cover, which you can also sew yourself. All you need is skill with a sewing machine.
If you do not have cutting skills, then it is better to use a ready-made product pattern found on the Internet or watch a master class on making it yourself.
The capacity of the banquette is calculated: one person occupies an area of 45*55 cm.
The parts are cut out with a jigsaw and the edges are sanded.
For an Empire or Baroque style interior, you can make a carriage screed. This model looks very interesting and presentable.
The parameters of the hallway and the maximum possible dimensions of the product are determined.
If there are a lot of parts - partitions, shelves, back, it makes sense to make a pattern and then start cutting the plywood panel.
So you learned that making a banquette yourself, with minimal carpentry skills, is quite possible. The main thing is not to rush and pay due attention to each stage. Then the product will turn out neat and beautiful. This type of furniture will not only be useful in terms of comfort and space saving, but will also become a stylish and original addition to the interior.
Choose a model: with a back - quite difficult to implement with a minimum of experience, with shelves, drawers, on legs or supported on the sides, and so on.
Based on the dimensions of the seat, the parameters of the remaining elements are determined and a sketch is drawn.
How to do it yourself?
All work is carried out in stages. It is necessary to strictly follow the instructions to achieve the desired result. Experienced craftsmen recommend following consistency during the work process. There is no need to cut out all the solid wood parts in advance. It's better to do it gradually. During assembly, inaccuracies may be discovered and adjusted as the project progresses.
The furniture manufacturing procedure includes the following main steps:
- First, the seat is cut out. This is the main element around which the rest of the decorative elements and other furniture sets are based.
- To install the legs, the side strips to which they will be attached are pre-installed. To secure the part, self-tapping screws are used, as they guarantee a stronger and more reliable connection of all components. The cutters will give the legs a more attractive appearance. This device can be used to create a wide variety of protrusions, roundness and other decorative elements.
- The workpieces are processed with sandpaper to remove the rough outer layer and level the surface for further processing.
- If solid solid blocks are used as support, all parts for assembly are cut out at once. Next, it remains to secure the cut components using pre-drilled holes and self-tapping screws.
- Before completing the assembly of the structure, each part is varnished to improve external characteristics and protect the wooden surface from damage.
- When the entire frame is assembled, you can begin laying soft foam rubber on the seat. It attaches in different ways. To do this, you can use a special adhesive or a stapler. Before laying the soft layer, a stiffer fabric is installed. This will extend the service life of the product and improve its performance characteristics.
Important! The last stage is upholstery. First, the fabric is cut out according to the dimensions of the seat. After this, it is secured using one of the selected methods.
Of what?
You can make a banquette from different materials:
Forged metal.
This option is suitable for Baroque, Renaissance or Empire styles. Forged products can be decorated with leaves and flowers, vines, and numerous curls of different shapes. They will give the product openwork, airiness and exclusivity.They do not have drawers, additional shelves or cabinets. It is appropriate to install them in hallways or on verandas. Making forged furniture yourself is quite difficult. This requires special equipment, materials and the ability to work with a welding machine.
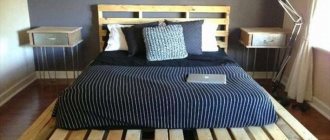
- Tree. This is the most common option. Such furniture can be functional and equipped with drawers, shelves, and cabinets. It can be placed in the hallway, kitchen or living room;
also used to make a soft bench :
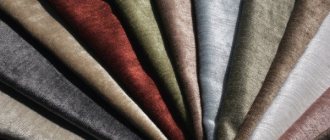
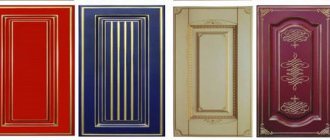
Textile. It can be silk, cotton, linen. Such fabrics are easy to care for, have a wide color palette and are environmentally friendly.- Leather.
This material is suitable for upholstering furniture in classic interiors. But genuine leather is difficult to care for and has a high cost. Nevertheless, banquettes with such upholstery look noble, elegant and luxurious. - Faux leather. Its advantages include affordable cost, ease of maintenance and aesthetic appearance.
What materials and tools are needed?
To assemble the bench, you need to select suitable materials. The easiest way is to make a wooden product at home. Creating a metal frame will require certain skills. In general, the following materials will be required:
- solid wood with specified parameters (depending on the planned dimensions of future furniture);
- legs - you can make them yourself from wood or use old ones from chairs, tables or other furniture;
- plywood - one sheet of appropriate width and length;
- fastening - self-tapping screws, special quick-drying glue, corners.
Note! For the upholstered part of the furniture, fabric and foam padding are used.
Tools you will need:
- sandpaper;
- roulette;
- screwdriver and screwdriver, hammer;
- drill, electric jigsaw;
- threads and needles;
- stapler
To install furniture you will need the appropriate tools.
Important! To cover a wooden surface you will need varnish. You can use paint.
Build process
The procedure is performed in stages. The following steps should be followed:
- First, a seat of the required dimensions is made. The remaining parts will be adjusted to size.
- To make the legs, you need to install the strips, leaving small indentations along the edges.
- The legs are made from solid timber. Using tools, you can give the part any shape you want.
- Next, all the elements are assembled. To make the seat soft, you need to lay foam rubber. Burlap is pre-laid on the bottom to make the structure more durable.
- A piece of the required size is cut out of the fabric. It is secured with glue or a stapler.
The assembly process consists of several stages.
After this, you can begin creating decorations for the finished design. You should decide on the design in advance.
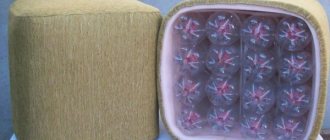
Round or semicircular ottoman
Ottoman ball
Such original and unusual ottomans for the hallway can be easily made from simple and affordable materials:
- polyethylene;
- threads with a needle;
- sewing machine;
- two pieces of fabric of different colors;
- filler;
- graph paper.
Manufacturing
Graph paper is convenient for preparing patterns. You will also need any round object; you can take a big ball. Divide the length of its circumference by 2, then by 5, so that you get 2 end fragments and 3 in the middle of the same size. This is how we find out the diameter of the circle and the width of the stripes.
Draw a line below along the width of the resulting parts. Cut out the plastic bottom. Place it on the first page and secure the edges with tape.
Also get the mid-range element by transferring it to paper.
The pattern of the future product is prepared from fabric of different colors, and it is necessary to leave 1 cm of seam allowance. Sew the pieces together to form a single strip.
Now, one by one, we combine the stripes with the round parts. Do not sew up the end of the middle strip; Place the filler through the hole. Sew the hole closed with an invisible stitch.
Congratulate yourself on a beautiful ottoman!
Decor and decoration
To make the product more attractive, it can be decorated. The main thing is that the decor is combined with the overall design of the room. For example, you can sew a cover with frills or buttons. You can attach a bow or ribbon at the seams. To create a fashion accessory, just knit a case with your own hands - it always looks profitable and attractive.
conclusions
Making a banquette for the hallway with your own hands is quite simple if you know the sequence of work and accurately determine the shape of the product. Materials are selected based on the style of the room and the intended purpose of the banquette. Don't rush while working. This will help avoid serious mistakes. As a result, you can get a beautiful and practical structure. Such furniture is not only useful for guests to relax, but can also serve as a storage place for various small items. With the right choice of banquette style, it becomes a decoration for the hallway.
Recommended Posts
Wardrobe wardrobe in the hallway + photo
Hallway interior for a narrow corridor + photo
Wallpaper in the hallway under the doors
Decorating the walls in the hallway with decorative plaster
Sliding wardrobe in the hallway
DIY plasterboard arch
Making a cover for a banquette
The cover is created in accordance with pre-prepared drawings. It is necessary to measure the fabric according to the dimensions of the seat. After this, it is laid in such a way that it fits tightly to the surface, but does not overtighten. Next, all that remains is to secure the cover with buttons. They are carefully stitched into pre-marked holes. The cover can be decorated with braid, ribbons or other decor.
Modern ottomans
Nowadays, ottomans are usually used in the corridors of modern apartments and houses and serve for the convenience of putting on shoes. They take up little space and therefore will fit even into a modest-sized room. Now their shapes and sizes, as well as colors, can be varied. Moreover, the pouf can be either extremely simple in execution or decorative and very beautifully decorated. Also, absolutely soft bean bags have now appeared, which, by the way, are used not only as places to sit, but also for the rehabilitation of some patients.
Ottoman in the hallway
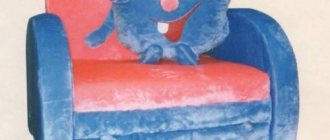
A modern pouf can be a great addition to your interior. For example, made in the shape of a ball or an animal, it is perfect for decorating a child’s room.
Original ottoman
The design features of ottomans are as follows.
- In any case, this product occupies an extremely small area, and therefore can stand under a table, cabinet, in a corner, under a hanger and not disturb anyone.
- The pouf does not have a back as such.
- The pouf can have simple wooden or metal legs that are very short. And sometimes instead of legs there is a small platform or wheels.
- Inside the ottoman can have a drawer for storing things. Solid hollow products are also produced that are not intended for storing anything.
- The ottoman is lightweight and mobile; you don’t need to expend much effort to move it from place to place.
- An ottoman can serve as a decorative decoration for any room and will help emphasize style.
The ottoman will decorate any room
On a note! The main purpose of using an ottoman is to simplify a person’s life and make it more comfortable.
The most common use of ottomans is installation in the hallway. As a rule, structures made for this room are no higher than 45 cm in height, but they can have different widths or lengths (for example, they can be longer and look like a couch). As for the appearance, there are so many variations that choosing the most suitable one for the interior is quite simple. Based on their shapes, there are square, corner, round, rectangular ottomans, etc.
Bedside model