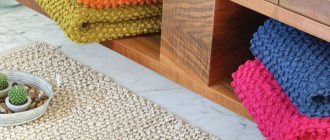
Is it difficult to knit rugs with your own hands from threads? There are various options that you can use to knit the most suitable product for a particular room, such as a bathroom, hallway, bedroom, etc. You can choose the easiest option, which will allow you to produce this product in just a few hours. There are ways to knit longer. In any case, using the idea, you will end up with wonderful thread rugs for home comfort.
A thread rug will look appropriate in any part of the house - from the threshold to the bedroom.
How to crochet rugs on a mesh
For knitting, thicker threads of yarn are chosen. You need to knit, taking into account the size of the mesh cells, which will be the basis for the product. The knitting should completely cover the entire mesh, which should be invisible. When using thin strands of yarn, it is better to fold them, for example, in half.
Products made from different yarns are suitable for different rooms.
For example, it is best to make a rug for the bathroom using synthetic fibers in constant contact with water.
This type of thread is also suitable for a hallway rug. It is best to place a silicone mesh under the product to prevent slipping. It is inexpensive and is always on sale. For the bedroom it is better to use natural threads, that is, wool or cotton. This will make walking on the carpet with bare feet more pleasant. All that remains is to choose the right hook number, which should be larger, since it is inconvenient to knit small ones.
Rug pompoms can be made from various materials: wool, fabric, ribbons, and even bags.
If after knitting any items there is excess yarn left, you can make a rug from these leftovers with your own hands. The product can have a round square shape or any other. You can make a product using the following tools that should be on hand:
These materials can be used to create a rug made from pompoms using tools. It is best to take yarn of different colors.
To secure the pompoms, you need to crochet a mesh. To start making pompoms, take thick cardboard. Next, all work is performed in stages:
- Cut out a circle of suitable diameter from the pompom, in which a circle of smaller diameter is marked in the middle. After this, cut it out by making a hole in a circle of cardboard. Two such parts are made.
- Take the yarn and wind it around a cardboard ring. The amount of yarn should be large. When winding, the needle is threaded between the cardboard and the yarn.
- When the entire ring is wrapped with yarn, the last thread is secured and the thread is removed from the needle, putting it away.
- Take scissors to cut the yarn from the outside of the two wound rings.
- The two rings are separated, and the yarn is tied with thread in the middle.
- Having removed the cardboard, tie the pompom tightly, and leave the threads for tying long.
- Be sure to trim the pompom, cutting off excess threads.
Using rubber bands
It's no secret that over time, rubber bands can fail and break. This is not a problem for me, but my friends are often interested in this issue. If you are concerned about the prospect of restoration and do not want to use elastic bands, you can choose another fastening option.
You can secure the parts using a thin cord that you will use to tie the piping instead of an elastic band. An ideal option would be a thin rope with an elastic band running through it. Pull each connection tightly and secure with a double knot. After this, you can cut off the excess cord.
In this case, the work will take a little longer than when using elastic bands, which, in my opinion, securely fasten the edging. But you have the right to have the opportunity to try other options.
I will not hide that the process of making a rug of this size takes a lot of time. I wove it for a month. True, I only did this 2-3 hours a day in the evenings. Despite the fact that I spent a lot of time, I was satisfied with the results of the work.
Even a person who has never done handicrafts can cope with this work if he has the patience and desire to do something with his own hands. This can be a fun evening ritual that you can do while watching your favorite TV series. A very enjoyable pastime, similar to knitting. But when you complete the work and receive an original and very nice rug, you will be proud to show it to your friends and acquaintances.
Sophistication with a touch of brevity: tips for creating business summer looks
Find hotels with free breakfast: what not to forget for traveling in 2021
It all comes down to money: why the best employees leave and how to solve the problem
How to make a base for a product
Weaving pattern for a rug based on.
A knitted mesh is used as a base. It is necessary to make a set of 4 air loops, connecting them using a connecting post. The mesh should be knitted in a circular pattern, the points of which correspond to each subsequent row.
- Starting from the center of the chain, single crochets are knitted 8 times.
- Knit 2 single crochets through each stitch of the first row.
- Knit 1 stitch on 1 loop without a crochet, on the other 2 stitches also without a crochet. This scheme alternates.
- In the fourth row, 1 stitch is already knitted as in the third row, but on two loops, again repeating the pattern of the third row, increasing the gap by 3, 4, 5 or more stitches in subsequent rows.
As a result, after knitting 19 rows, a circle d = 32 cm is obtained. Then it is set aside and the second one is knitted in a similar way. When both round products are ready, the pompoms are fixed on one of them, threading the pom-pom threads left after tying them through the holes obtained when knitting the columns. Each pompom should be tied on the wrong side of the rug with strong knots. After this, unnecessary threads are cut off. A second round product is sewn on the wrong side, after which the rug can be used.
Decorative mini rug or chair cover
If you don’t know how to make a step-by-step pattern for a rug made of bright pom-poms on a chair with your own hands, take a centimeter and measure the parameters: seat and back. Add 2 cm to the resulting numbers on each side and cut out the base for the cape. Fabric is a better base for a soft, round pompom rug for a chair.
It can be made for one seat, or it can be created in the form of a rectangle so that it covers both the back and the seat at once.
Sew the balls tightly onto the base. Place fabric on the wrong side to hide the knots and threads on the cape. There is no additional need to compact the product; it should not be thick so as not to lose its flexibility and fit well to the furniture. The edges of the work can be finished with knitting or sewn with braid, according to your choice.
Small square products are suitable for the chair.
There are three landing options.
You can sew satin ribbons to the stool seats.
With such a wonderful, step-by-step DIY carpet made from bright pom-poms, the chair will be transformed: it will not only be beautiful, but also comfortable.
If you add cute threads in pink, white and dark tones, you will get cute pompoms, like in the picture.
Use your imagination and come up with your own unique products. A soft pom-pom rug is an excellent solution for any living room: as a cozy decorative element or as a practical and warm thing for sitting on the floor.
Colored bedside rug.
Source
How to make a rug from threads
Scheme for making a pompom for a rug.
A rug you make yourself will look great in the interior of the room, making it more comfortable. You can make it in a simple way in just a few hours. With minimal costs, the result is a unique soft product. You can make a rug if you use a fillet mesh, which is made using a regular mesh consisting of flax threads. The mesh is knitted by making double crochets and 2 chain stitches by alternating them. Fillet mesh is usually purchased at a building materials store.
To create a rug, cut threads about 10 cm long. You can cut the threads by winding them around a suitable object. The threads are cut on each side of the rectangular object for winding. To get started, you need to prepare a thick hook. To each cell, threads folded in half are attached to one of its sides. Each thread is grabbed with a hook and pulled into another adjacent cell. After this, the tails of the threads are pulled into the loops, tightening them. This method is similar to attaching tassels to a bedspread.
Master class on knitting rugs from threads and knitwear
If you have old T-shirts in your closet that no one will wear again, or other types of knitwear, you shouldn’t throw them away right away. You can make a rug out of them using leftover threads. It can be made very easily, all you need is mastery of a crochet hook. With the right amount of patience, you can knit a rug, just like our grandmothers did before us.
You should knit the product not from strips of knitwear, but using a hook and thread, tying them. At the same time, the product will not be rough, like only from threads, so it will be easier to wash. It will dry faster after this.
This is interesting: DIY crafts from wine corks
The materials and tools that we will need will be the following:
- Knitted T-shirts that are no longer needed.
- Yarn.
- A hook numbered according to the width of the thread.
First, strips of T-shirts are prepared. They must be cut to a width of 2 cm. You should not worry if the fabric of the T-shirts has already faded, since the threads used can hide all defects. You can make strips of different lengths. The first strip is folded into a ring, starting from the very edge. Then the resulting ring is tied with posts. You should make about 10 such columns, tying the ring you received at the beginning of the work.
Then they continue to crochet in the round. Loops are knitted without double crochet through each loop of the previous row. In this case, it is required to make each increase in loops evenly, knitting 2 single crochets from each loop. You can also make increases using a special pattern that allows you to crochet in the round.
If you have experience in crocheting, then you can add stitches by distributing them “by eye.” After inserting the hook into the loop in the previous row, pull the thread through it. The knitting technique in the round involves inserting a hook into a loop in the previous round. After this, the thread is pulled through both halves of the loop at once so that they cannot stretch too much. So you need to tie the thread around the entire circle.
As you finish each knit strip, you need to take the next one to attach it to the tip of the previous knit strip. You should continue knitting a rug from threads until all the strips are finished. At the end of knitting, a rug with the required diameter should be obtained.
Second life for old things
The house always accumulates a certain amount of old things that can be used to create an original, soft rug or runner. You won't find this product in a store - it is made by cutting out ribbons from unnecessary things and attaching them to a mesh.
Soft fabric rugs
Not much is required to get the job done:
First of all, prepare the material for work: fabric, old T-shirts, shirts are cut into strips measuring 200*25 mm, 100*15 mm, or as desired.
Attention! If the fabric is plain, then the ribbons can be painted with a special paint for fabric. You should choose high-quality paint so that when you walk, the paint does not remain on your feet.
The edge of the mesh is glued on both sides with tape along the perimeter of the base piece. You can crochet a rug and hem it with fabric - this is done so that the mesh does not fray.
Gluing tape along the edge of the base
For work, it is better to use a carpet hook, but if there is none, then use a regular one for knitting. The strips of fabric are attached as follows:
Start working from a corner horizontally. All ribbons are attached in this way - the product on the front side has a voluminous, fluffy appearance.
Knitted bath mat
This rug is suitable for the bathroom, hallway, even for a pet’s favorite place. It is easy to wash, dry and make.
Homemade crafts: making an original rug from simple threads on a mesh
This rug can be made from any remaining yarn
There is no need to explain why there is a carpet in the house. It quietly and imperceptibly entered a person’s home and became a real stronghold of warmth and comfort. This yarn product has an ancient and rich history. Interesting fact: archaeologists believe that man first laid a fur skin on the floor, and only then realized that it could be put on his body. In the East, in European countries, for centuries, a carpet was considered a symbol of wealth, and sometimes an object of art, because its production required long and painstaking manual labor of craftsmen.
Today, resourceful needlewomen weave, knit from threads, sew rugs from scraps or old things with their own hands, and all this with minimal monetary costs, and sometimes for nothing. There are many ways to make a masterpiece of carpet weaving at home, one of the simplest is to weave a rug from threads. Do you want to decorate your home with an exclusive fluffy rug? We offer several simple home crafts master classes.
Where to find inspiration
To be able to knit a beautiful carpet, it is advisable to have before your eyes a color illustration depicting a sample. The easiest way is to find photos of knitted rugs on the Internet.
Today, many home craftswomen are happy to post pictures of their work on the Internet. This limitless platform gives them great opportunities. Many of them start their own pages, helping with advice, consulting and telling newcomers where to start working. How to become a first-class needlewoman yourself.
In particular, for knitted rugs, there are several techniques that help translate this concept into amazingly beautiful handmade products. For those who want to delve into this science, the masters are ready to share their secrets and experience.
The exchange of information takes place via the Internet, the most accessible collection of necessary data for many, and individual manuals in the form of printed literature.
Detailed video lessons are recognized as the best type of training. Studying patterns and descriptions of knitting certain rug models can take a long time and painstakingly. It is not a fact that the information will be correctly absorbed. Designations, signs, encrypting actions are sometimes incomprehensible. Once you see the process, you can internalize it and carry it out without fear of making mistakes.
Cozy shaggy rug
To make a soft carpet that can adequately decorate your home, you will need carpet canvas or fillet mesh. This knotless base is traditional. It is better to use canvas, tarpaulin mesh, burlap or matting. Synthetics, wool or silk can become electrified and slide across a smooth floor. Carpet canvas can be bought in a store; as a rule, it is sold in rolls 1 m wide. For the decorative part you will need threads. You can use any leftover yarn; the more shades, the more fun and bright the product will be. A hook with a foot will be useful for this work, but you can also use a simple crochet hook.
To make it more convenient, we will divide the whole process into several stages:
- The first step is to prepare the threads that will become a decorative component of the future carpet product. Cut the yarn into pieces of equal length. The “fluffiness” of the pile will depend on the chosen length of the threads.
- Let's proceed to the most labor-intensive but interesting stage - tying the threads on the warp. Using a hook, we pass the thread through the canvas square and tie a knot. So we “dive” the hook into each cell and fill each one with yarn.
Advice! The rug can be made monochromatic, made into an ornament, or made into a whole picture. For patterned weaving, you can use embroidery patterns or apply the design directly to the base. When marking, you need to leave a couple of centimeters around the perimeter of the product for the canvas.
- At the final stage, we need to “comb” our rug a little so that it looks neat. During the process of tying the threads, their length may differ slightly from each other, so the pile must be trimmed. The principle is as follows: the shorter the pile, the more clearly the pattern is visible.
Tips for beginners. Master class on crocheting a rug.
There are several ways to tie threads to the base. For example, using a special hook with a foot, you can make loops that do not need to be trimmed at the end of the work. In this case, the knot is still tied, but the ends of the threads are not pulled out completely. For this technique, you can also safely use embroidery patterns.
Making a rug with your own hands
Shaun the Sheep made from pompoms
Another simple way to make a rug from threads with your own hands is from pompoms. These rugs can have a classic geometric shape, or you can get a little creative and give the product the shape of an animal. This rug will be an original addition to the interior of a children's room.
Rug in the shape of a lamb made of pompoms
The essence of the process is simple: you need to attach fluffy pompoms made of thread to the base. How to make them?
There are several ways, each needlewoman can choose the more convenient one for herself:
- Tool. In craft stores you can buy a special template, which you can wrap around to create a perfectly shaped ball. It can be used repeatedly.
- Cardboard template. The most common method for making thread balls is using cardboard circles. To do this, two “donuts” of the same diameter are cut out of thick cardboard. The principle is as follows: a thread is inserted between them and wound tightly onto the pattern. The thicker the layer of yarn, the more voluminous the ball will be. At the end, move the halves apart a little, tie them tightly in the middle with thread, and then cut along the edge.
- Fork. An ordinary cutlery can be a convenient tool for making pompoms. To do this, the thread is wound crosswise around the teeth, and then cut on the sides. The result is a dense but miniature pompom.
Pompom on a fork
To make a rug in the shape of everyone's favorite cartoon character Shaun the Sheep, you will need white and black wool blend yarn, mesh or fabric for the base, scissors and decorative eyes.
- Draw a pattern in the shape of a sheep on cardboard and carefully cut it out. You can use a ready-made template or draw it yourself. Transfer the template to fabric or mesh and cut it out. The edges can be immediately processed - hemmed or crocheted.
- Let's prepare the “wool” of the sheep. Using any convenient method, we will make pompoms from threads, white ones for the back, and black ones for the paws and head of the ram.
- We begin to attach the blanks.
Advice! If the product is made of mesh, the pompoms are simply tied on, and if the base is fabric, then the pompoms are sewn on. We make sure that the balls are located tightly to each other, so the rug will turn out fluffier.
- When all the balls are fixed, we sew the eyes to the muzzle. A beautiful and fluffy rug for the nursery in the shape of a cheerful lamb is ready.
This is interesting: Alexey Pimanov and Valentina Pimanova Why they got divorced
Shaun the Sheep pompom rug
In a similar way, you can make a rug in the form of a juicy watermelon, a multi-colored butterfly, the sun or your favorite cartoon character, decorating the children's island in the house in an original way.
Ladybug pompom rug
Fantasy is the engine of progress in creativity. Using the ideas of experienced craftswomen, you can make luxurious home decor from the most ordinary things. It is interesting that many needlewomen have made the production of rugs with their own hands from threads not only a favorite hobby, but also a way of doing home business. Making interesting and simple crafts can be used as lessons on developing motor skills for children, turning the process into an exciting family game.
How to quickly make a lot of pompoms
Rug made of pompoms
Idea 3: pompom rug
An original pattern for a rug on a mesh can be made using pompoms. Such a product will definitely surprise your loved ones, since carpets with pom-poms are not only very soft, but also interesting in appearance: you can give them an unusual shape or make them in the shape of some kind of animal.
Begin preparation by cutting out the required mesh shape, as well as by creating the pompoms themselves. Pom-poms are made according to different patterns: without a base, and also with a base, as in the photo example.
Next, you need to sew all the pompoms to the mesh in a predetermined order. In this case, it is important to maintain the same distance between the individual elements: it should be minimal so that the mesh does not show through the threads.
If you do this job carefully, you will get a cute rug that will keep you warm in the cold. It is advisable to cover the bottom of such a product with a backing fabric with a dense texture. Then it will serve you longer.
DIY rug made from threads on a mesh
Why do you need a carpet in your home? For warmth and comfort. What about the rug? The same. A handmade rug has become a symbol of wealth, art and labor of a worker. Today's needlewomen will weave and knit rugs, rags, and rugs from yarn and threads with their own hands and on a low budget. There are many ways. The simplest one is to weave a rug from threads. Let's share this master class.
Making pompoms
At the next stage, prepare pompoms for the rug. It will be absolutely easy to make such elements with your own hands. Place 4 fingers together and wrap yarn around them, making 12 turns. Don't wrap the yarn too tightly. Remove the wrapped bundle from your fingers. Tie it in one place with strong thread or yarn. Cut the loops. Your pompom is ready. Make as many of these pom-poms as possible at once for the background of the rug and for the design.
Materials and tools for manufacturing
The basis
To make a soft, warm and comfortable rug you will need carpet or loin canvas
net. Such materials are often used in practice, but it makes no difference which of them is used. If you have other materials at hand: canvas/tarpaulin mesh, burlap/matting, then you can take them.
Attention! It is better not to use synthetics, wool and silk for the base. They can slide on the floor, causing inconvenience for you and your guests.
Carpet canvas can be purchased at the store. Usually it is cut off in 1 m sections.
As an option, you can also use construction mesh , it is strong and durable.
Other materials
For decoration you will need threads . Leftover yarn of different colors will do, it will be even brighter and sunnier.
The equipment you need is a hook with a foot
. If it is not there, then you can work as a regular knitter.
Popular questions from beginners.
Beginners are most often interested in:
What's the best way to choose colors? In this case, attention is focused on the combination of colors. On the interaction of bright, soft or rough tones. If we remember that among household yarn scraps it is difficult to find many colored “joyful” shades, we have to combine what seem to be gloomy tones. With a skillful approach, the colors will sparkle in a new way.
How to choose the right hook. This tool, just like knitting needles, has its own varieties. To ensure that your fingers don’t feel tension while knitting a rug, it is important to know which hook is best to use. This instrument, as stated, has several types.
Known plastic hooks, wooden, metal (steel), aluminum. There are bone and combined options. The listed species are attractive, each in their own way. Some are more popular, for example, steel hooks or combined ones.
Other types are less in demand (wooden, bone). To ensure that the rug does not come out hard, but is pleasant to the touch, the choice of hook is no less important than the selection of colors.
How to make a rug from threads on a mesh
- First you need to prepare the threads. They will be the main look and decoration of the product. They need to be cut into equal lengths and widths . The larger, or rather, the longer, the thread, the fluffier the pile.
- Now you need to attach the threads to the base. A hook will help here. Using a crochet hook, you need to push the thread through the square of the canvas and tie it on the reverse side . So labor-intensive, slowly but carefully you need to tie each cell with a thread.
Attention! If you wish, you can do everything in one color, or you can do it with a pattern, ornament, pattern.
For other weaving, you will need embroidery patterns, which you can search on the Internet.
- When marking, be sure to leave a few cm for the outline.
- At the end of the work, we “comb” the product to make it neat and fluffy. When tying yarn, the length may vary. To prevent a big difference, you can trim with scissors. Everything is different here; the shorter the haircut, the clearer the drawing.
You can tie a crochet hook with a foot a little differently. The knot is tied, but the thread does not come out completely.
Idea 2: crochet yarn
More experienced craftswomen will be able to crochet a rug on a mesh from threads. First, decide on a knitting pattern: it can be floral images, scenes with animals, landscapes, abstraction, geometric patterns and much more.
Now get ready for work: you will need a mesh with square cells or canvas for carpets, bright yarn and a hook with a foot (or at least an ordinary one).
We recommend choosing thicker yarn. Then it will be easier for you to close all the gaps in the mesh and make the rug as soft and cozy as possible. You can purchase colored yarn, as well as canvas, at any craft store.
Tip: when choosing threads, pay attention to their properties. For example, for the interior of a bathroom, synthetics that are more resistant to constant moisture are better suited. And for the bedroom, natural wool or cotton threads are suitable.
To ensure that a homemade yarn rug on a mesh retains its shape, use a dense and rigid base. If you want to make it softer, you can use a silicone base.
As for the hook, it should be large enough so that you can easily handle the knitting process on a warp with large holes for threads.
Pay attention to the following features of crocheting a rug on a mesh:
- start by inserting the hook into the cell from top to bottom. From the reverse side, the thread is pulled out and passed through the loop on the hook;
- When using as the beginning of the outer edge of the base of the rug, continue working by tying the perimeter of the entire surface and moving to the center. This method will allow you to not change the yarn so often;
- There is another simple option - knitting in vertical or horizontal rows. Moreover, you can combine several colors, getting unusual shades in areas where different yarns intersect each other;
- in case of frequent replacement of yarn or when knitting one horizontal or vertical row, you can cut the threads to the fringe;
- Most often, the outer side of the rug is completely decorated with loops of yarn. At the same time, the design resembles the appearance of products knitted using standard methods. The inside of the rug will be different, but you won't have to worry about the finished product sliding on the floor surface of the room.
One example of such a knitting pattern is in the photo below:
Using this method, you can get many interesting carpet products for your home. To make your rug neat, prepare the threads in advance. They must be the same size.
Tip: the easiest way is to adjust the parameters of the strands to each other by winding the roll on cardboard with a width of up to eight centimeters. After removing the yarn, all you have to do is cut the threads at the top and bottom, similar to the process for making pom poms.
After choosing an ornament, it is important to correctly calculate the size of the canvas or mesh. Considering that part of the material chosen for the base may go to the hem, calculate the length and width of the carpet: the number of holes should correspond to the number of cells in the selected diagrams.
When the composition on the rug is completely ready, we recommend adding finishing touches - and slightly straightening the height of the threads. To do this, use a special device or level the height of the carpet with scissors.
Please note that as the pile height decreases, the clarity of the pattern will increase .
Rug made of knitted tapes on a mesh
And there is another way in which weaving is done from narrow patchwork strips. They can
come from ordinary things: T-shirts, knitwear and other fabrics. It is important that the strips should be at least approximately the same length. In addition, you will need scissors and a hook.
Now let's start weaving.
- The ends of the mesh need to be secured with tape, since the base may bend or fray during operation.
- The required fabric needs to be cut. We repeat: the shreds should be at least approximately the same length with a parameter of one by one and a half cm. If you take a longer length, the rug will be fluffier and softer.
- The same as described above. You need to pass a flap through each hole of the mesh and tie it. You can use a hook, it’s more convenient.
Really, be patient. If all the patches are untied, you can sew or glue them to the base. For example, to burlap or other dense material.
The rug itself can be placed anywhere. Little time will be spent. If you have time and creativity, then why not make a spectacular and stylish rug? Good luck!
DIY rugs made from threads and knitwear for home comfort
Is it difficult to knit rugs with your own hands from threads? There are various options that you can use to knit the most suitable product for a particular room, such as a bathroom, hallway, bedroom, etc. You can choose the easiest option, which will allow you to produce this product in just a few hours. There are ways to knit longer. In any case, using the idea, you will end up with wonderful thread rugs for home comfort.
A thread rug will look appropriate in any part of the house - from the threshold to the bedroom.
Weaving features
Leave the first column free because you will need it later to attach the tassels. Without cutting the yarn, twist the end and thread it through the top, under the vertical side of the chicken wire square, and back through the other side.
Tie a knot of thread about 1.5 cm long at the protruding end of the cut and pull tightly. Be careful not to tighten too much or the plastic wire will begin to curl.
You can then trim the side of the yarn that is still attached to the ball at the same height. You can trim it more evenly later. Keeping the yarn in a ball is ideal to avoid wasting a lot of yarn since you need long pieces to tie into knots.
A Brazilian travels 36 km by bike every day to take his loved one home.
"Dad is offended." Agata Muceniece about her relationship with Priluchny after the divorce
Smooth and fresh skin: dermaplaning, or why a woman needs to shave her face
Continue tying knots. When you get to the part of the wire mesh that has a black design on it, be sure to change the color of the yarn.
Since the black design is quite subtle, there is no need to skip the vertical rows on the squares that have been painted black. This will ensure that the black lines appear well.
How to crochet rugs on a mesh
For knitting, thicker threads of yarn are chosen. You need to knit, taking into account the size of the mesh cells, which will be the basis for the product. The knitting should completely cover the entire mesh, which should be invisible. When using thin strands of yarn, it is better to fold them, for example, in half.
Products made from different yarns are suitable for different rooms.
For example, it is best to make a rug for the bathroom using synthetic fibers in constant contact with water.
This type of thread is also suitable for a hallway rug. It is best to place a silicone mesh under the product to prevent slipping. It is inexpensive and is always on sale. For the bedroom it is better to use natural threads, that is, wool or cotton. This will make walking on the carpet with bare feet more pleasant. All that remains is to choose the right hook number, which should be larger, since it is inconvenient to knit small ones.
Rug pompoms can be made from various materials: wool, fabric, ribbons, and even bags.
This is interesting: Velor fabric for upholstery
If after knitting any items there is excess yarn left, you can make a rug from these leftovers with your own hands. The product can have a round square shape or any other. You can make a product using the following tools that should be on hand:
These materials can be used to create a rug made from pompoms using tools. It is best to take yarn of different colors.
To secure the pompoms, you need to crochet a mesh. To start making pompoms, take thick cardboard. Next, all work is performed in stages:
- Cut out a circle of suitable diameter from the pompom, in which a circle of smaller diameter is marked in the middle. After this, cut it out by making a hole in a circle of cardboard. Two such parts are made.
- Take the yarn and wind it around a cardboard ring. The amount of yarn should be large. When winding, the needle is threaded between the cardboard and the yarn.
- When the entire ring is wrapped with yarn, the last thread is secured and the thread is removed from the needle, putting it away.
- Take scissors to cut the yarn from the outside of the two wound rings.
- The two rings are separated, and the yarn is tied with thread in the middle.
- Having removed the cardboard, tie the pompom tightly, and leave the threads for tying long.
- Be sure to trim the pompom, cutting off excess threads.
Creation sequence
Roll out the chicken wire and cut it to the desired size. Lay it out on kraft paper because the plan is to create a black design on a mostly white rug.
So, take a marker, indicate the size of the future rug, and then draw a drawing with a pencil on craft paper. This is the easiest way to find out which design of the finished product will be optimal.
Then, once you have decided, transfer the design with a marker onto the wire mesh. You can make it any color or design you want! Drawing a pattern on the wire will help you know where to weave the black yarn. For ease of drawing, it is better to attach the grid to the paper using tape.
Once the design is drawn, take the fluffiest white yarn you can find. You will need to work your way down the horizontal rows of wire mesh, skipping each other and tying only a piece of yarn to each vertical side of the square.
How to make a base for a product
Weaving pattern for a rug based on.
A knitted mesh is used as a base. It is necessary to make a set of 4 air loops, connecting them using a connecting post. The mesh should be knitted in a circular pattern, the points of which correspond to each subsequent row.
- Starting from the center of the chain, single crochets are knitted 8 times.
- Knit 2 single crochets through each stitch of the first row.
- Knit 1 stitch on 1 loop without a crochet, on the other 2 stitches also without a crochet. This scheme alternates.
- In the fourth row, 1 stitch is already knitted as in the third row, but on two loops, again repeating the pattern of the third row, increasing the gap by 3, 4, 5 or more stitches in subsequent rows.
As a result, after knitting 19 rows, a circle d = 32 cm is obtained. Then it is set aside and the second one is knitted in a similar way. When both round products are ready, the pompoms are fixed on one of them, threading the pom-pom threads left after tying them through the holes obtained when knitting the columns. Each pompom should be tied on the wrong side of the rug with strong knots. After this, unnecessary threads are cut off. A second round product is sewn on the wrong side, after which the rug can be used.
Which yarn is best?
In any case, for weaving a rug using this technology, soft rather than hard yarn is best suited. For example, chenille yarn, which is fashionable today, can be a very good material option for a rug. This yarn has a plush surface and looks very cute - like velvet or a special type of fur.
It is better to choose viscose or acrylic chenille for the rug. This type of yarn is cheaper than cotton and is more soft. The most suitable option would be acrylic chenille. This yarn is not at all afraid of ultraviolet radiation and never fades in the sun. In addition, the acrylic chenille rug can then be safely washed even in a washing machine. It is guaranteed not to lose its shape.
In the 1960s, almost everyone was called this: in the Ukrainian village, 85% of men have the same name
Mercedes EQS will be presented in the spring: first details
Parents don't realize the danger: why children need to be prepared for the digital world
How to make a rug from threads
Scheme for making a pompom for a rug.
A rug you make yourself will look great in the interior of the room, making it more comfortable. You can make it in a simple way in just a few hours. With minimal costs, the result is a unique soft product. You can make a rug if you use a fillet mesh, which is made using a regular mesh consisting of flax threads. The mesh is knitted by making double crochets and 2 chain stitches by alternating them. Fillet mesh is usually purchased at a building materials store.
To create a rug, cut threads about 10 cm long. You can cut the threads by winding them around a suitable object. The threads are cut on each side of the rectangular object for winding. To get started, you need to prepare a thick hook. To each cell, threads folded in half are attached to one of its sides. Each thread is grabbed with a hook and pulled into another adjacent cell. After this, the tails of the threads are pulled into the loops, tightening them. This method is similar to attaching tassels to a bedspread.
Cotton piping or yarn sizes
You can use any thickness of piping or yarn to make this rug, but be aware that the thinner the yarn, the more material and time you will need to create it. For example, if you are using piping or yarn that is 0.4cm thick, you may need to double the net weave thread to get a thick, comfortable piece. But if you are using material that is 1.2 cm thick or more, you will not have such a need.
You can buy a different size of piping that you prefer, but first buy a small amount of the base material, for example, a meter of different thicknesses, so that you can test them first and understand which thickness suits you best. Only after this can you buy the required quantity.
One and a half times: Russians began to return their debts to creditors faster
Gymnastics and more: how to relieve stress after a working day
Leo will successfully pass the interview: according to the horoscope, who will have an increase in income in the summer