Do you think colorful, soft, original, practically free rugs are a myth? Look around! Do you have threads, cord, rope, unwanted knitwear or old T-shirts at home? Then let's make the house even more comfortable with our own hands, and at the same time protect our planet from excess garbage!
This article contains original ideas for needlewomen for home comfort. Do-it-yourself carpets will be the envy and admiration of your neighbors and friends.
Modern carpets
Modern manufacturers are ready to offer carpets and rugs to suit every taste, color, pile length, size and, of course, budget. Such creations elegantly or originally decorate the premises and become a source of pride for the owners.
However, more and more often, even in expensive interiors, you can see charming homemade rugs. They charmingly complement design in all ethnographic styles, add homely warmth to apartments and houses in a rough industrial loft, complement rooms without strictly conforming to a specific style, and become indispensable in country houses and cottages.
Advantages of homemade carpets
A DIY carpet will become a completely unique creation that will highlight the housewife’s ability to create (and save the family budget).
This is a great activity that will take up boring winter days and evenings or will be an excellent sedative after a hard day.
This is an opportunity to involve children in needlework and listen to their darkest secrets, because social work unites.
This is the ability to decorate a room in an unusual way or give a great gift to your family and friends, and maybe even open your own business.
Materials for the creative process
Original rugs are created with your own hands from everything soft that can be found in the house.
You can even use hard objects, such as pebbles or plastic bottle caps. They make excellent massage mats.
But cozy carpets made from old clothes, terry towels, ribbons, and woolen threads are still more popular.
We knit a pentagonal rug according to the pattern
When knitting such a rug, it is better to use soft knitted items . You need to start by knitting a circle of 5 loops. In the 1st row - 3 air loops, 2 double crochets in the first loop of the bottom row, 2 in. p., *3 double crochets, 2 in. p.* Perform the pattern between the stars 5 times. In the 2nd row - the same as in the first row. But after 3 double crochets, knit 1 chain stitch and then follow the pattern below.
Related article: DIY button panel for children: master class with photos
Knitting the rug in the round is done to the required size. Each corner of the star is knitted separately.
Manufacturing techniques
Modern homemade rugs offer the opportunity to use a wide variety of techniques for creating them. So the needlewoman has the opportunity to use methods known to her or master a new method of creating unique things.
Knitting
Older people probably still remember do-it-yourself rugs, crocheted from old dressing gowns, shirts, and T-shirts. Similar multi-colored round rugs decorated the bedrooms of grandparents, wooden stools in the kitchens, and were constant decorative items in village houses.
Similar knitting is still used today. The number of patterns and geometry of such floor decorations has only increased.
It is possible to create a knitted creation without using a crochet hook or knitting needles. For example, a rug made from socks with your own hands. The video will show the whole process, and the work itself will get rid of a bunch of slightly torn socks or socks that did not find their pair after washing.
But you will need a lot of socks, so you can unload not only your linen drawer, but also rid the pantries of your parents and other more distant members of the extended family from such unnecessary things.
Woven models
Rugs from shreds can be woven using a base. It looks like a small loom. Make a frame out of wood that will fit the size of your rug. It can be rectangular or square, it all depends on your idea. You need to put nails on the frame at a distance of 2-2.5 cm from each other.
For these purposes, you can use a furniture panel or an old table. Making the machine is not difficult, and it will serve you for a long time.
Strengthen warp threads made from pieces of fabric onto them. On the leftmost warp thread, reinforce the working thread. It's best to sew it on. Weave the rug by passing the rope over one warp thread and under the other. You can use more complex techniques and weave with two working threads at once. During the weaving process, the fabric must be constantly pushed up to make it denser.
Related article: Secrets of growing geraniums
After weaving is completed, sew on the working thread. Remove the resulting rug from the loom studs and form a fringe from the remaining warp threads. The rectangular rug is loom woven and can be perfectly placed by the door to welcome your guests.
To create a round rug using the described method, you only need to select a base. It can be made from an old hoop or metal-plastic pipe. Holes are made at equal distances in the base and the working thread is secured in them. Weaving should be done in a circle from the center of the intersection of the warp threads.
Weaving
In addition to knitting, more modern weaving is often used. Do-it-yourself rugs made from old T-shirts in macrame style look especially beautiful and stylish. Of course, before you learn how to weave carpets, you will have to master the not entirely simple technique of this type of needlework and practice on simpler crafts.
But, having mastered this technique, you can create completely unique things that look good in any interior, so they can easily be put up for sale. A beautiful DIY rug will quickly find a new owner.
Note!
DIY satin ribbon bows: photos of original design ideas, step-by-step DIY master classDIY hair bands - ideas for decorating homemade rubber bands + step-by-step instructions for making them yourself
DIY shadow theater: step by step how to do it at home! 175 real photos
The materials for creating such a nice carpet can be ordinary clothesline, ribbons, thick woolen threads.
The choice of material and technique for making a rug depending on its purpose
First, you need to determine the purpose of the future rug, which will be made using the patchwork technique or another method. If the product is intended for the bathroom, it is better not to make it too thick so that the mat dries quickly. If the product is needed for a child who likes to play on the floor, it is better to make it denser and the pattern brighter.
The scraps of fabric from which the rug will be made can be sewn together in different ways. There are many different techniques for joining workpieces. The product can be woven, knitted or simply sewn. In the latter case, you will get the thinnest and most delicate option, and a knitted rug made from shreds is much denser.
To work, you will need scraps of any fabric, fur, leather or suede. If you have old T-shirts or colorful socks that you don't mind throwing away, you can make a rug from knitwear. For a rug using the patchwork technique, you will need a base - a dense material, such as burlap or drape-type coat fabric. Original products are made on the basis of construction mesh - it holds its shape and has large cells in which it is convenient to attach flaps.
Braid rug
If you have a question about how to make a rug, but there is no particular desire to learn how to weave or weave, the technique of creating a rug from braids will come to the rescue.
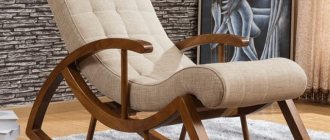
These homemade fluffy rugs made from terry robes or bath towels will perfectly decorate the bathroom (and will also quickly absorb excess water) and will become a delight for the feet, located near the beds of adults and children. Instead of towels, you can use other materials, but it is desirable that they be soft and cozy.
This is the simplest technique that allows you to create rugs from old things with your own hands. And it will not require special equipment, and needles and threads can be found in any home.
Braided rugs
You can weave a rug in different ways, and to do this, the scraps again need to be joined into long strips.
Braid rug
This method is very simple, it does not require any tools or equipment other than a needle and thread.
Step 1.
Sew three patchwork strips together.
Sew three patchwork strips together
Step 2.
We braid them into a regular braid. It should turn out to be quite long, so the strips will have to be extended as you work.
Braiding
Step 3.
We secure the end of the braid with a pin and begin to roll it in a spiral on a flat surface.
Twisting a braid
Step 4.
We fasten each turn to the previous one on the reverse side, sewing it with threads.
Sewing a braid
Step 5.
You can do it differently: first twist the entire braid, and then carefully sew the turns in a spiral.
Making a rug
An oval rug is made in the same way.
Braided rug
Terry mat-braid
Curly rug made from braids
Rug made of towels
But if you need a rectangular shape, it is better to weave several braids of the same length, lay them close to each other and sew them in a straight line. And weave the ends with cord or sew on a typewriter.
Scheme for making a rectangular rug
Rectangular woven rug
Advice. Such a rug will hold its shape better if you add a lining to it on the back side.
The lining can be an old towel
Braided rug
To make such a rug you need to make a frame for weaving. Its size should be slightly larger than the desired size of the canvas. Nails with small heads are placed on two opposite sides or wooden pins are installed to secure the base. The distance between them is 2-2.5 cm.
Weaving frame
Advice. If you add another intermediate crossbar to the frame, which can be attached at different levels, you can make rugs of different sizes.
Step 1.
We begin work by securing the warp threads. This can be cord, twine, thick yarn, or scraps tied into a long ribbon. The end of the tape is tied to the upper corner stud, after which it is snaked around all the pins of the upper and lower crossbars in turn. You need to stretch the base well, but not too tightly.
Fastening the warp threads
Step 2.
Preparing working threads. They should not be too long so as not to make weaving difficult. It is better to attach the next strip as you shorten the previous one.
Preparing working threads
Step 3.
We begin weaving by alternately passing a strip of working thread over and under the stretched warp threads.
Let's start weaving
Step 4.
Having reached the end of the row, we wrap the working thread around the outer warp thread and continue weaving in the other direction.
Weaving from the edge
Step 5.
Every few rows, compact the fabric by pulling the woven rows up. To do this, you can use a special device in the form of a wooden fork or simply use your hands. The denser the weaving itself and the smaller the distance between the rows, the less noticeable the warp threads will be.
Thread compaction device
Step 6.
We make the required number of rows, periodically increasing the working thread or changing it to a strip of a different color.
Weaving a rug
Step 7
If the color of the working thread needs to be changed at the edge of the rug, it is cut close to it and hemmed, or the next strip is tied to the cut end, and the knot is left on the wrong side. But you can do it differently: tie the strips on the edge, leaving long tails. In this case, the edges of the rug will be fringed.
Weaving a rug with fringe
For reference. The fringe on the other two sides can also be done at once, if you do not wind the warp threads around the pins, but tie them to each pair with separate strips.
Chair cover with fringe
At the end of the work, the canvas is carefully removed from the nails.
You can complicate the weaving by taking two working threads instead of one at once, and interweaving them both with each other and with the warp threads.
How to weave a rug without a loom
Video - Rug made of shreds on a frame
You can also weave a round rug in a similar way. A hoop can serve as a frame for it.
Round wicker rug
The process of weaving a rug on a hoop
Braid rug: circle
How to make a carpet with your own hands? Easy and fun! First you need to cut old towels into strips 3-5 centimeters wide.
The longer the strips are, the less hassle they will be during subsequent work. The colors can be monochromatic, the same color scheme, or completely different colors, as long as the resulting product pleases its creators.
Note!
- DIY bracelets | Selection of the best models and master class on making beautiful bracelets
DIY bird feeder - interesting ideas on how to make it quickly and easily from scrap materials
- Do-it-yourself cold porcelain: the best options for porcelain products, step-by-step instructions and recipes for making it yourself (photo + video)
When the towels run out and the strips are represented by a small slide, begin to connect them into a single whole.
There are two options for such work. The first involves creating long strips at once, but it will be inconvenient to intertwine them later. The second option requires fastening the strips as they are completed. This is easier, but will require you to always have a thread and needle on hand.
Once the braiding method has been determined, start creating the braid. It is braided exactly like a regular girl's braid.
The three strips are sewn together and intertwined in the most ordinary way. Even a child can be entrusted with such work, but their caring mother will have to hem new ribbons.
If a child knows safety precautions when working with scissors and needles, he can easily weave such a decoration on his own, without outside help.
The finished braid is rolled into a spiral, the turns are periodically sewn together to strengthen the entire structure. The tail is hidden in the last turn and is also carefully stitched. Instead of sewing the coils together, you can use the technology of tying them together using twine or thin rope.
The product is solemnly demonstrated to relatives and takes its place near the bathroom or bed.
Preparation of flaps
Depending on the chosen technique for making the rug, scraps of fabric of different sizes and shapes may be required. It is better to select and cut the required amount in advance so as not to be distracted while working.
Preparing long strips of fabric for knitting or weaving a product can cause some difficulties: sewing them together is a long and tedious job. And if you tie them in knots, the rug will turn out rough and sloppy. But there are ways to avoid this.
https://www.youtube.com/watch?v=56vNg5-URqQ
This method is used when preparing fabric strips from old clothes: T-shirts, turtlenecks, T-shirts and even tights.
Step 1. Cut off the rough bottom seam, the cuff of the sleeve or the toe part of the tights. For a T-shirt or turtleneck, cut off the top part right below the armholes.
Trimming seams
Step 2. Place the product on a flat surface with the side seam facing you and cut it into strips of the required width, without cutting a couple of centimeters to the opposite seam.
Cutting strips
Step 3. In this way we cut the entire workpiece into fringe.
Workpiece cutting
Step 4. We straighten the workpiece so that we can see the entire uncut part, and cut it not in a straight line, but at an angle, directing the scissors from one slot to the adjacent one on the other side of the product.
Cutting fabric
As a result, we get a closed ring, which to obtain a tape you just need to cut across one of the seams.
Blank for making a rug
Blanks can be wound into balls
If the length of the tape is not enough or you need to connect many short pieces with each other, the simple technique shown below will help you do this.
Image Description Step 1 Cut small holes at the ends of adjacent strips that need to be connected. Step 2 Place the strips on top of each other, aligning the slots. Step 3 Pass the second end of the top strip into the slot from below and pull the entire strip through it. Step 4 Tighten the connection. If necessary, repeat these steps to further lengthen the tape.
From scraps joined into long ribbons, a rug can be crocheted, just as napkins are crocheted from ordinary yarn. True, for such work you need a large hook, 6-10 mm thick.
Begin work by tying a braid of 5-6 air loops, which are closed into a ring. Then the fabric is knitted in a spiral with double crochets, periodically knitting two stitches from one loop to increase the diameter. After each row, the work must be laid out on a flat surface to control the plane.
Crochet
Crocheting a rug
Such a simple round rug does not require any special skill; even those who have picked up a crochet hook for the first time can knit it. If you have experience, you can create real masterpieces of any form.
Crochet rug
Handmade children's rug
Bright knitted rug
Multicolored rug
Very soft and cozy rugs are made from patchwork pompoms filled with holofiber, padding polyester or foam rubber. You don’t have to buy filler either - you can “get it” from old jackets, blankets and stray pillows.
The choice of patches depends on the purpose of the rug. For children, old knitted T-shirts and T-shirts in bright colors are best suited.
To work you need to prepare:
- a large number of scraps or old unnecessary knitwear;
- needle and thread;
- scissors;
- filler;
- thick fabric for the base;
- glue gun
Step 1. Cut out circles of the same size from the knitwear according to the template. Their diameter should be approximately twice the intended diameter of the pom poms.
Cut out circles
Step 2. Using a simple stitch, we quilt the blanks in a circle, stepping back a little from the edge.
Quilting the workpiece around the circumference
Step 3. Place filler in the middle and tighten the thread. We get a soft ball.
Filling included inside
Step 4. We make such balls from all the blanks.
Preparing pompoms
Step 5. Cut out the base for the rug from the fabric and use a glue gun to sequentially glue patchwork pompoms to it. They can also be sewn on.
Attaching pompoms to the base
To make a similar rug for the bedroom, you can take a coarser and more wear-resistant fabric, and for the bathroom - old terry towels.
Rug made of pompoms
Old rugs and bedspreads of strict monochromatic colors will make an interesting rug in the shape of flowers or a clearing. If the fabric is thick and dense enough, you can even do without filler or use very little of it.
Rug "Polyanka"
Rug made of pompoms in the shape of a leopard skin
The manufacturing algorithm is the same, with minor nuances.
| Step, no. | Description |
| 1 | We cut out a base from the fabric in the shape of the future rug. From working fabric and scraps we cut out rounded oval and round shapes to create “stones”. We make them quite large. |
| 2 | We bend the edges of the blanks inward and sew them on the wrong side. If they are not voluminous enough, put a little synthetic padding inside. |
| 3 | We prepare the required number of parts so that they fill the entire area of the cut base. It is advisable to make “pebbles” of different textures, shapes and sizes to make the rug look more natural. |
| 4 | We lay out the blanks on the base in the required order and sew the adjacent ones together. |
| 5 | Sew the “pebbles” to the base fabric. |
| 6 | We especially carefully fasten all the parts around the perimeter of the rug together. |
| 7 | We cut out the backing from thick fabric according to the size of the resulting product, making small allowances for the hem. And we sew them together along the edge. |
READ MORE: How to make a floor screed in a garage with your own hands, depth of soil layer
This method is suitable only for craftswomen who are good at machine sewing.
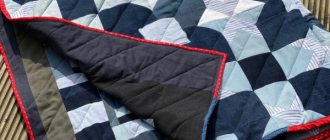
Rug made of triangles
To make such unusual and very beautiful rugs you will need scraps of fabric of the same density.
| Step, no. | Description |
| 1 | We cut identical squares from the fabric with a side of about 10 cm and fold them twice diagonally. |
| 2 | We pin the resulting corners to the fabric, forming the middle of the rug. And we attach them along the edge using a typewriter. |
| 3 | We lay the next row so as to close the seam, shifting the corners relative to the ones already hemmed. |
| 4 | Having sewn the second row, we form the third and subsequent ones in the same way, gradually expanding the circle. |
| 5 | We attach the last row close to the edge and finish it with bias tape. |
In the example described, the corners of the patches look into the middle of the rug. But you can do the opposite: start sewing the triangles not from the center, but from the edge of the product, turning them outward. In this case, you will have to decorate the middle with a round patch.
From the scraps you can make not only corners, but also other shapes - petals, scales, beaks, etc.
Beautiful rug in the shape of a flower
Such different rugs are made from scraps of fabric and old things that no one wears anymore. Instead of adding to the amount of waste on the planet, you can put old things to good use, while decorating your home and saving money on buying rugs, pet bedding and kitchen stool covers.
Denim rug
Rugs made from old jeans
Round rag rug
a sheet of thick cardboard; scissors; colored cotton thread; scraps of old clothes; a stationery knife.
| Illustration | Description of action |
| Step back 2 cm from the top and bottom edges and make a mark 1 cm wide. | |
| Cut the cardboard according to the markings. | |
| Fasten a thick cotton thread in the slot on one edge, stretch it across the entire width of the cardboard, insert it into the slot on the other side, then bring the thread into the next slot and pull it again to the first edge. In this way, stretch the thread across the entire width of the cardboard. | |
| Stretch the tape between the stretched threads in a checkerboard pattern across the entire width of the base. Use your hands to bring it as close to the edge as possible. | |
| Stretch a strip of the second color between the free threads so that a “checkerboard” is obtained. | |
| In the same way, alternating the base threads, pull through all the pieces of fabric. | |
| Trim the excess edges of the patchwork tape. | |
| Fasten the thread and needle in the corner to the base thread. | |
| Secure all edges of the scraps with loops. | |
| Carefully remove the cardboard and align the base thread. |
A beautiful rug will become a real interior decoration
Braid rug: square
You can create a similar rug from old things with your own hands in a more formal shape; it will look better in a small room.
To do this, several braids are made, they are sewn together, forming a rectangle or square.
For beauty, such a creation is decorated with applique, and lush pompoms are sewn on the sides. Although the nice rug looks very decent.
How to wash and clean a homemade rug?
A rug made from shreds will have to be cleaned or washed from time to time. This must be done carefully so as not to spoil the item. Can only be washed by hand at 30 degrees, twisting is not recommended. You can only squeeze it and hang it so that the water drains from it.
If washing is delayed, the rug can be vacuumed from the underside. If stains appear on the front side, it is better to remove them using a stain remover, then rinse the product in clean water. “Shaggy” rugs or faux fur items are treated with a carpet cleaner - the liquid forms foam that penetrates into the most difficult to reach places. Next, the foam is collected along with the dirt by wiping the product with a damp cloth.
Patchwork
DIY patchwork rugs have as long a history as knitted rugs. True, today this technique has come to be called the beautiful word “patchwork,” but the technology does not change because of this. As before, the pieces of fabric are sewn together in a certain order.
These rugs can be made in a variety of ways. The most famous are the classical technique, square within a square, Russian and American square, triangles, chrysanthemum petals and freestyle. The latter is often called crazy; there are no restrictions in him except external beauty.
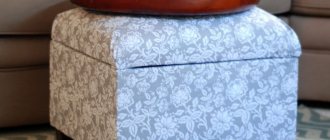
Soft mat
You can create a cozy rug with your own hands that is very cozy, warm and soft. To do this, light padding polyester is wrapped in small pieces of fabric, the edges of the bag are tied or sewn (a longer method of creation, but the rug is much softer).
The resulting lumps are sewn to the base. It can be a regular window mesh, a construction mesh, or a special vinyl canvas. A homemade piece of tailoring art is suitable for the children's room of a very young apartment dweller.
Master class 1: rug made from old fabric
To prepare it you will need enough old clothes or bedding. It’s good if the fabric is soft and voluminous. For example, you can take old terry sheets or towels, soft knitwear, terry pajamas. It is important that there is initially a lot of raw material.
You can make any ornaments
To work, in addition to the fabric, prepare:
- Sharp stationery or sewing (tailoring) scissors;
- Hook (must be large or the size of the base cells);
- Base mat with cells (lattice type). These are usually placed in the bathroom. As a base, you can use a special rubberized backing, which is often used under carpets sliding on linoleum or laminate. Can be purchased at any hardware or hardware store. And any length and width.
We do the work like this:
- First, cut the fabric into equal strips. Their width should be slightly larger than the base cells. And the length is 7–10 cm. You need a lot of blanks.
- Now we take each piece of fabric and thread it into the cell. You can work with a hook (if the cells are small) or do without a hook (if they are large). It is important to stretch one strip of fabric into one cell. Bring it from the bottom up and tie it with a knot at the top.
In this way, he guides all the strips of fabric into the cells, forming a shaggy rug.
If the pile is too long for you, cut it a little.
Interesting: Ways to hang a picture without nails
Pompom carpets
For older children, you can create a rug with your own hands from multi-colored or plain pom-poms.
This is a great way to get rid of a lot of wool balls or knitted items at once. But they will have to be dissolved first.
You will have to make quite a lot of pom-poms, so this work is suitable for anyone who wants to lose weight. Instead of carrying around goodies, your hands will be busy making fluffy balls.
The resulting pompoms are tied to the net. If you think through everything in advance, you can even draw a charming picture with the sun, a house, and cars.
Made from denim
Due to the fact that denim fabric is quite dense and rough, it is recommended to make strips of it for knitting floor rugs as thin as possible. But the problem is that this material is very friable. During cutting, as well as twisting into balls, its structure quickly collapses and the strength of the prepared yarn is lost. To avoid such troubles, after cutting denim products into strips, it is advisable to treat their cuts with fire. The threads sintered along the edges for a long time prevent the yarn from shedding and create more comfortable conditions for working with it.
Due to its density, denim yarn is difficult to crochet. The best option for making a rug from this material would be to prepare a chain of air loops, crocheted, which will subsequently be assembled into a spiral and secured in layers.
Fluffy rugs made from leftover rags
Small scraps and ribbons that don’t fit anywhere else should not be thrown away with regret. They will help you create an amazing and unusual rug. To do this, the patches are tied or sewn to the base. The creation is trimmed, transforming into a smooth, lush clearing.
In the same way, a carpet is made with your own hands from yarn on a mesh.
There are a great many ways to create a soft carpet, so each craftswoman chooses the most convenient method for herself and ennobles the room with a unique carpet, rug, rug, rug, mat.
Simple round crochet rug
Crocheting rugs from round rags is not difficult if a person knows how to hold a hook in his hand and knows how to make two loops - a chain stitch and a single crochet stitch or just one stitch.
In order to avoid a hole in the center of the rug, experienced craftswomen recommend starting work with a ring of yarn formed by twisting it twice around the index finger. With this method, after knitting the first row of loops, it is convenient to eliminate the gap in the ring by tightening the end of the yarn remaining from the entanglement. Next, this remainder is hidden inside the knitted posts and cut off.
- After knitting the first row, it is closed by connecting the outer column to the first, pulling the captured working thread under the two arcs of the initial loop through the loop on the hook.
- Next, to complete the second row, you need to knit 2 lifting air loops. This technique prevents the canvas from skewing and also maintains its flat shape.
- Then knit the second row with the same single crochets. But in order to create the correct round, rather than domed, shape of the rug, you need to make 2 stitches in each subsequent loop of the previous row. Finish the row in the same way as the first.
Each subsequent circular row is knitted similarly to the one below, but to maintain the flat shape of the rug, additions must be made. Their number and frequency are calculated individually. This depends on the number of stitches in the first row, the thickness of the material used and the knitting density. With existing experience and skills, the need for additional loops is determined visually.
After reaching the desired diameter of the product, the outer row is closed, secured and the end of the yarn is hidden inside the knitted loops.