Smartphones in the modern world are replacing many items that were familiar just a few years ago. Player, clock, navigator, voice recorder, mini-cinema - one gadget contains maximum useful functionality. If previously this device spent most of the time in the bag, then with the advent of additional capabilities it migrated to the desktop. How to make a phone stand with your own hands and what materials are preferable to use, read on.
How to make a phone stand with your own hands?
Paper clip stand
The stand can be easily made from a paper clip. All you have to do is bend it correctly. This won't be difficult because the paperclip can be easily shaped and is strong enough to break under the weight of the phone.
Paper clip stand
How to make a phone holder? One of the simplest homemade coasters consists of a paper clip. You can use this phone stand on your desk.
Now we will talk about creating a more advanced design. However, to create it you will again need office supplies - paper clips.
Step 1. Find the clamps You need to take 1 or 2 medium-sized clamps. You can choose any color you like.
Step 2: Bend Bend one end of the clamp so that it becomes a J-shape.
Using one clamp, one of its ends is grasped. You need to bend it into a J shape. This will keep the phone in place. You can use the gap between two tables or a desk drawer. Insert one end of the clip between the tables and then bend it to form a J shape.
There is also an option to insert the end when closing the desk drawer. You need to close the drawer until the clip forms a J-shape.
Step 3. Paste one into the other. Now you need to insert the first clamp (J-end) inside the second clamp.
The first J-end clamp must be inside the second clamp. Both clamps should be parallel to the table. One end of the first clamp should be able to hold the phone while its J-shaped end should be parallel to the table.
You can also add a USB dongle at the top of the end of the first clip. This will provide a larger area for the back of the phone. Everything worked out!
Holders that attach to the wall
If you want to turn your smartphone into something like a television panel, you can use an old disc box as the base of the holder. The work is performed according to the following scheme:
- After measuring the device parameters, the case is disassembled into two parts.
- The smartphone diagram is printed on a flat plastic part. The design will require a rectangular back panel with four sides along the edges.
- The parts are cut according to the markings. To prevent the screen from scratching on sharp edges, they are dulled with sandpaper.
- Now we need to connect the structural parts with a glue gun.
- An element with openings for self-tapping screws is attached to the upper part of the holder on the wall side. The bottom edges are supplemented with corners and a soft film to prevent the device from accidentally falling.
All that remains is to screw a couple of screws into the wall and hang the finished structure on them.
A hanging holder can be easily made from a bottle. To do this, the neck and part of the front wall are cut off. All that remains is to make a hole for the hook in the upper back part. Using a similar scheme, holders are made from containers left over from shampoos or shower gels.
Dinosaur stand
If you have a plastic toy lying around (in this example there will be a dinosaur), then you can also make a stand out of it. Please note that it should be returned to its original condition.
Step 1. Find the dinosaur. A favorite toy is selected. You need to make sure that it stands firmly and securely. You should also look at its tail to see if it is long enough to rest on the surface, since it is through this that the stand will be held.
Step 2. Cut. Using a utility knife, the dinosaur is cut in half. It is better to use a toy that is hollow inside.
Step 3. Seal the space. The dinosaur's tail must be caulked. You should use your fingers to make sure that the inside is caulked.
Note!
Do-it-yourself easel - types of designs, choice of materials for creation + step-by-step instructions and simple diagrams for beginnersDIY wedding glasses: a detailed master class for DIY decoration, selection of decorative elements and materials (photo + video)
Do-it-yourself busy board: we make interesting educational boards for boys and girls from different materials
Step 4. Insert the suction cup. While the caulk is still wet, you need to insert the suction cup. The phone is applied to ensure that the suction cup is at the correct angle. Remove excess putty using a small brush.
Step 5. Seal the legs. This is important to ensure that the dinosaur's tail stays in place when used as a stand.
It is worth noting that the caulk inside the dinosaur tail takes several days to dry (about 4 to 5 days). But having a phone stand with a dinosaur is original, interesting, and inexpensive. So for the sake of this, you can be patient.
Wooden structures
It is worth considering that the stand for the tablet is made taking into account the weight of the device. Therefore, it makes sense to use harder and more durable materials for it. So, to make a structure from wood beams, you need:
- align the edges of the workpiece;
- outline the dimensions of the smartphone;
- cut along the markings with rounding and surface treatment to remove roughness;
- mark the locations for the grooves at the back;
- cut holes, clearing them of debris;
- sand the product, then treat it with stain;
- assemble elements into a single structure.
As an alternative, you can use a board in which you will have to cut a gap in the middle with a table saw.
The excess material is cut off. The groove must be made at an angle to ensure the desired tilt of the device. The hole made needs to be sanded and coated with oil.
Stick stand
If the reader likes to make vlogs through his phone, then this project recording stand is what he needs. A very simple project on how to make a smartphone stand out of chopsticks.
Step 1. Glue the chopsticks together. Chopsticks are glued into the desired shape using wood glue. You can start with a U-shape. You will need 13 chopsticks. 6 sticks on each side, 12 in total. Then the last stick is cut into small pieces. It requires gluing them on the bottom of two glued 6-piece chopsticks. You need to make sure that the phone can slide into the U-shaped stand.
Note!
- DIY photo album - step-by-step instructions for creating a photo album
DIY lampshade - a detailed description of how to make different types of lampshades
The most interesting DIY home crafts: a selection of the best interior crafts
Step 2. Stick as a bolt. Using another chopstick as a bolt, you need to secure the U-shaped phone stand. This U-shaped stand is ideal for many recording needs. But you can always think about other projects and find what best suits your needs.
Suction cup stand
Step 1. Take the suction cup. With the suction cup you choose, you can start creating your own design on it. The design is limitless - whatever you want can be done. Using different colors of nail polish, the suction cup can be painted.
Step 2. Hole. Now you need to make a vertical hole in the top of the suction cup.
You can use something metallic or sharp. For example, heat a needle over a candle. When it is still hot, you need to immediately poke it into the center of the suction cup, starting from the right side. Repeat this until the top of the suction cup on the left side is pierced.
Step 3. Insert the ring. Once the hole is large enough, the key fob ring is inserted into it. Do this until everything goes through.
Great, now your DIY phone holder is ready! You can use this device both as a smartphone stand and as a holder. Quite convenient combination of 2 functions in one element.
Charging station made of plywood
I've been missing a simple stand for my phone for a long time, so I decided to make something myself. A limited amount of materials and the presence of good friends who helped me with production allowed me to make a simple charging stand.
Step 1. Cutting the material with a laser cutter
I asked a friend to cut out all the details for me from the material I provided (wood 64 cm long). I gave him a file with diagrams of each part and he cut them out for me.
I then took all the prepared pieces and secured the pieces with wood glue. I haven’t installed the small sides yet - I’ll still have to climb inside.
The laser cutter is the most important tool in the entire job.
Step 2. Blocks for greater stand strength
Using small pieces of wood, I made small blocks, then installed them inside the structure and glued them together. According to my idea, they will not only become a support for the corners, but will also help raise the back panel, which serves as a stand for the phone.
Blocks are the main thing that will need to be installed inside
Step 3. Small walls
Now that I have installed the blocks inside, I can trace one of the sides. The other one should be left open. Why? This will make it easier to access the charging cable if it slips out of place and ends up inside the box.
One of the sides must be closed
wood glue
Step 4: Install the plate at the back
The last step is to install the back panel into the large cut out slot at the top. The support from below will be the blocks located inside.
When I was done, all I had to do was insert the cable and place the phone. Now it can be charged. Simplicity of assembly and ease of use makes my stand a rather interesting budget option. This way I can protect the cord from wear and tear, and it’s easier to charge my phone this way.
This is how the docking station turned out
Modern charging stations combine not only a pleasant appearance, but also very good functionality. Simple for wired charging and cool for wireless charging - they are all equally useful. And it’s especially great that you can make them yourself.
Stand from a hanger
If you have an unnecessary clothes hanger (which is made of thin metal or wire), you can also use it to create a stand for your smartphone with your own hands. The hanger's durable wire will contribute to the stand's strength and durability.
Step 1: Cut the wire. First you need to cut the wire from 35 to 45 cm long. Then bend it in half, but do not bend it.
Step 2. Make two 90 degree turns. Mark the center. Then you need to measure about 6.5 cm in any direction from the center. Bend two corners 90 degrees in one direction. Now you have a three-way wire with an open end.
Step 3. Bend each side 90 degrees perpendicular. Measure 1.3 cm on each side of the triangle. Bend the wires 90 degrees perpendicular to the previous bends.
Step 4. Bend each segment 45 degrees in the opposite direction. Fold again to 2 cm, approximately 45 degrees in the same direction on both sides.
Step 5. Bend each segment 90 degrees in the opposite direction. Raise the checkmark halfway and bend it approximately 90 degrees. This will hold the gadget in place.
A do-it-yourself smartphone stand made from a hanger will hold the device in both portrait and landscape mode.
In a similar way, but with different dimensions and a thicker section of metal, you can make a stand for your tablet yourself.
Models from scrap materials
If you need a DIY smartphone stand urgently, items lying on the table may come in handy:
A simple design is made from stationery clips and a plastic (or paper) card. It is enough to secure the binders on opposite sides of the base by placing the device on them.
An alternative to clamps are paper clips, bent into miniature stands. No cardboard base is required for this holder. Two large paper clips are usually enough to hold a smartphone.
An unusual DIY phone stand is made using a toilet paper roll, which is a hollow cardboard tube. You can make a device in it where the device will be located. And plastic cups around the edges will give the design the appearance of a portable speaker.
A compact stand can be made from a plastic card. Considering that after such an upgrade the bank card will become unusable for its intended purpose, it is better to use an unnecessary discount card or gift certificate.
The plastic is cut off from one corner to create a support, and on the other side a connector is cut out that matches the width of the phone.
The base for the stand can be wire 2-3 mm thick. You just need to bend it into the shape of two letters “L”.
If you wish, you can assemble the holder from Lego. Various combinations are allowed here. Moreover, the homemade structure is just as easy to disassemble.
If you have any tape cassettes left in your home audio library, you can borrow a case from one of them for a while. To conveniently place the phone, just turn the design back side out.
If you have 6 pencils in stock, you can make a stand out of them, fastening them with elastic bands. In order for the structure to stand firmly, it needs to be made like a pyramid. The phone is placed on the base of a triangle made from two pencils.
Another version of the stand is made from wine corks connected to each other.
The simplest support for the gadget will be a roll of tape. If the diameter is sufficient, the smartphone can be placed inside.
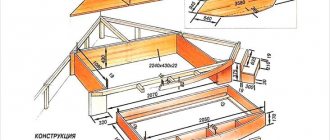
Wooden stand
First of all, for a wooden phone stand, you need to choose two bars so that they contrast with each other in color. Then you should make sure that they are the same height and their edges are square.
Dimensions of the wooden stand. The sizes are selected in accordance with the parameters of the gadget. If necessary, you can find a project diagram on the Internet.
Making a wooden stand. A band saw is used to cut a thin strip of a larger piece of wood. Then the 3 parts are glued together. In this picture you can see the final dimensions of the main face.
Then another piece of wood is taken, which must be cut, giving it an acute angle (about 55 degrees).
Now you should glue it to the main structure.
You also need to cut a small piece of wood that will hold the smartphone. It is also glued to the body. Your DIY wooden phone stand is ready! The final stage. After sanding, the smartphone stand should be varnished.
Adding creativity
A telephone “on plywood” does not look good in the office of a respectable businessman, but at home it can turn out to be very nice. Wood carving is a delicate art, but plywood provides great opportunities for artistic creativity using simple means.
Thick plywood of the highest and 1st “a” grade is an expensive material and is not sold in pieces, but the strength of a regular thickness of 6 mm is more than enough to support a smartphone. Therefore, the simplest plywood phone stand consists of 2 parts, on the left and in the center in the figure:
Simple plywood phone stands
A tray for the device with a depth of 4-8 mm (depending on the thickness of the material) is selected with a round file and smoothed with sandpaper, as described above. Before assembly, it is advisable to impregnate the parts with a construction primer for stone (water-polymer emulsion, WPE). Assembly - with PVA glue or dry. The back can be artistically decorated by sawing, and the parts can be connected using the through tenon and groove method, on the right in Fig.
How to cut a corner?
When making the stand on the left/center in the figure, it is easy to acquire the initial skills of figure sawing from plywood - after all, you need to saw right angles. This is done quite simply: having reached the corner, the longitudinal pressure on the jigsaw is stopped, i.e. they do not move it forward along the cut. But they continue to saw and move up and down, while gradually turning the tool in a horizontal plane until the file is perpendicular to the original cut. Then they finish cutting to the next corner and repeat the procedure. You can immediately cut at a corner if you insert a round file for shaped cutting into the jigsaw; You can most likely find one in an art store. By the way, a round jigsaw file breaks much less often than a flat one, but the cut is thicker, from 0.6 mm.
Note : in a similar way you can make a wooden phone stand from 2 parts. Thin, from 10 mm, planks made of any wood, not necessarily dense, fine-grained, will be used for it, see for example. video: