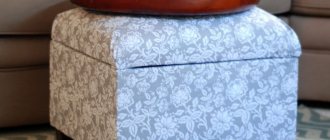
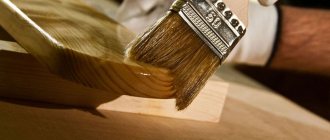
Chipboard ottoman cover
To perform finishing work you will need the following tools and materials:
- decorative fabric for upholstery;
- a piece of padding polyester or foam rubber;
- furniture stapler;
- glue gun;
- sewing machine.
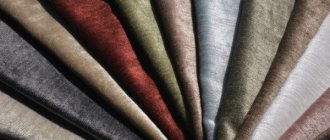
Choice of upholstery fabric
First, you need to choose what stylistic solution your new upholstered chair will have. Depending on the style, I cover the ottomans with various fabrics of dense texture - tapestry, suede, velor, velvet, eco leather, eco fur and other materials.
Furniture velor
For example, a pouf covered with satin or brocade-like fabric is perfect for a classic design.
Satin for upholstery of poufs
If you are planning to decorate a room in an ethno style, then a matting pouf will look very good in it.
Gozhka
Modern interior styles will perfectly complement original pieces of furniture made in patchwork style.
Patchwork style furniture
To make such a cover, you will need several scraps of dense fabric of contrasting colors, from which you should cut out identical wedges and sew them together. You will get a very bright and stylish seat for the ottoman. The sides of the chair cover can be cut from a plain fabric that matches the color tone of one of the patches.
Stages of work
Take your old ottoman or make a frame for the ottoman from sheets of chipboard or plywood. In accordance with its dimensions, make patterns from the prepared fabric.
Making patterns
We cut out a piece of foam rubber according to the size of the seat.
Tightening the lid
Next, you need to measure and sum the width of all sides of the pouf. Based on the measurements obtained, taking into account the height of the product, we cut out a piece of padding polyester and cover the side parts with it. We secure the padding polyester using a furniture stapler.
We tighten the sides
To make this work easier, you can first apply special glue to the walls of the pouf frame. In the same way, secure the foam rubber blank to the seat of the chair. Attach the patterns cut from upholstery fabric with a stapler to a soft base, tucking the edges.
Applying a decorative pattern
At the junctions of the parts, glue a suitable decorative cord or apply a decorative pattern to the sides.
Poof is ready
Another way to update an ottoman with your own hands is to sew a cover from the selected material. This option will be more practical, since if necessary, it can be removed, washed and put back on the pouf.
Case update
To do this, fabric patterns must be basted together and stitched on a sewing machine.
Making patterns
We sew all the details
After we sew all the parts together, we need to cut off the excess fabric and smooth the seams with an iron.
Trim off excess seam allowances to ensure a tight fit of the cover.
The bottom edge must be hemmed by machine or by hand and also ironed. We turn the cover inside out and put it on the pouf, straightening out the folds.
Putting on the cover
At this point, the work on the updated pouf is not completely finished - if desired, it can be decorated. For example, you can sew a large button into the middle of a seat made of scraps, having previously covered it with decorative material in the color of the sides.
An ottoman trimmed with ruffles or lace is perfect for a girl’s bedroom or children’s room.
Pouf decor option for the bedroom
A fringe sewn on the bottom will look good on a product intended for an interior in a baroque or classic style.
Pouf with fringes in Baroque style
Types of ottomans
Ottomans come in several varieties. They are classified depending on certain characteristics. Depending on the material they are made of, they can be of three types:
- wooden;
- metal;
- textile.
The first ones have a base made of wood, particle board (chipboard) or plywood. The second is a metal frame. Finally, the third is a kind of large pillow that is placed on the floor.
Depending on the presence of a rigid base, a piece of furniture can be:
- frame;
- frameless.
The frame ottoman is distinguished by the fact that it has a rigid base covered with fabric. It can be made of metal or wood. Textile products are frameless. They do not have such a basis. For this reason, they also do not have internal storage compartments. But it is very pleasant to sit on such poufs - in terms of comfort they are comparable to armchairs.
Depending on the design of the base, a piece of furniture can be:
- monoblock;
- designer.
The first type is a traditional pouf, which cannot change its original shape. The designer can perform various functions by changing the position of certain parts. For example, some folding models can turn into a small couch or sofa. This occurs due to the extension and unfolding of a metal frame hidden inside the product.
Depending on the design of the lower part, the pouf can be:
- traditional;
- wheeled;
- on legs.
Traditional models have a completely flat bottom surface. Sometimes it has small rubber spacers so as not to damage the floor covering. Wheeled products have small wheels that make them easy to move from one area of the room to another. Ottomans with legs, as you might guess, have low legs and vaguely resemble a stool.
screwdriver
Down with foam rubber and leatherette - give “grandma’s pouf” a fashionable velvet cover
A pouf with a removable lid is an international phenomenon: it is a comfortable thing and can hold a lot of small things. But the appearance is usually far from perfect. Such poufs with a removable seat are still actively sold in provincial furniture stores, often inherited from parents or grandmothers. In our master class, we decided to show how to reupholster an ottoman with your own hands, turning it from an obsolete item into a fashionable piece of furniture.
Before:
An old ottoman with shabby upholstery and not a very good color.
After:
Upholstering the ottoman with our own hands took us a little time. We chose velvet in a fashionable blue shade, and the updated item now looks much more impressive.
You will need:
- furniture stapler and staples of a suitable size;
- tape measure and tape;
- sewing machine, thread, scissors, tailor's pins and chalk;
- upholstery fabric.
Tip:
If you want the new pouf upholstery to last longer and look better, you can line it with a thick material (like canvas) under the main layer of fabric.
Step 1: Take measurements
Start by measuring the diameter of the seat and the main part of the ottoman. Mark the same dimensions on the upholstery fabric, add extra space for hemming the material (depending on the height of the seat and the size of the ottoman itself). For example, we added 10 centimeters to the hem and seams.
Step 2: Cut and sew the bottom upholstery
Lay out the fabric for the main part of the ottoman and apply the preliminary pattern. Then you can attach the marked fabric to the pouf so as not to be mistaken with the size of the new one.
«
dresses
»
.
If you rarely sew, mark the seams with pins first. Then baste the fabric along the marks to create a sort of velvet tube and machine stitch. More skilled people can sew everything on a typewriter right away.
Step 3: Measure the top of the lid pouf
Place the lid on the fabric and trace around it. Add a 10cm margin for seams and hems and draw a new line. Now you can cut out the round part.
Step 4. Upholstery of the pouf
We decided not to remove the old upholstery; it was in good condition. If the old ottoman upholstery was worn out, the old staples holding the fabric would have to be removed. I usually use a screwdriver to loosen the fasteners.
Place the top of the pouf on a round piece of fabric. Make sure there is enough fabric left for hems on all sides. For convenience, you can fold the edges and temporarily attach them to the pouf with tape.
Step 5. Fasten the pouf upholstery with a stapler
First, we staple the four edges (like a cross - vertically and horizontally). Then we carefully stretch the fabric, bend the remaining edges and also fasten them with a stapler.
Step 6. Add folds if necessary
When working with round objects, you can add small folds. Make sure the fabric lies naturally, then staple the fold into place. Once all the staples are attached, trim off the excess fabric.
Step 7. Attach the bottom upholstery
Stretch the resulting velvet “tube” onto the base of the pouf. Make sure there is extra fabric at the top and bottom. We decided to unscrew the legs of the ottoman so it would sit directly on the floor.
Fold the fabric over the top and bottom of the ottoman and staple it evenly.
Done! Upholstery of the ottoman with your own hands is finished. This item can be used for more than just sitting. But also instead of a bedside or coffee table, if the top of the pouf is flat enough.
YOUR TURN...
Reupholstering poufs is not such a difficult task. Share your experience and ideas if you have already tried to upholster an old ottoman with new material. Show photos in the comments section!
Seat
To make the seat, I cut out foam and fabric similar in size to the old ones. I placed foam rubber on the base, then covered it with a square piece of upholstery. First of all, I fixed the center, and then began to tighten and secure each side.
The first side was without much of a stretch. I folded the edge of the fabric and attached it to the base with a stapler. The gaps can be made arbitrarily, but I decided to make more fastenings so that the fabric does not lie down. After securing one side, I began to work on the opposite.
How Derevianko lives after breaking up with Myasishcheva, who bore him daughters
The role of Renesmee in “Twilight” made her popular: what the 20-year-old actress looks like
Shining copper and other fashionable shades for blondes: ideas for spring 2021
The maximum tension made it possible to make the surface even. Then I processed the third and fourth sides of the square in a similar way. The corners need to be tucked in as tightly as possible so that the diagonal connection looks neat. When everything is ready, trim off any unnecessary edges around the perimeter and corners.
How to choose materials for an ottoman
What to make a cover for an ottoman from
As a rule, an ottoman consists of a frame, filling and cover. The latter is best sewn from dense, durable fabric. The following options work well:
- tapestry;
- velours;
- jacquard;
- velvet;
- natural and artificial leather.
You can also make a cover from scrap materials: unnecessary curtains, an old coat or a leather jacket.
How to fill the ottoman
The choice of filling depends on the shape of the ottoman and the method of its manufacture, as well as on whether there are any allergies in the house. Here are the most common options:
- foam;
- padding polyester;
- sawdust and shavings;
- down and feather;
- buckwheat husk;
- expanded polystyrene granules;
- holofiber;
- textile.
What you need
In order to replace the seat of the ottoman and cover it with leather, you need to prepare the following tools and materials:
- a piece of leather (well, if it is as dense as possible, then the seat will last for many years. The choice of color and texture does not matter much, it all depends on taste and personal preference);
- material for lining (it is better to use soft products, for example, synthetic winterizer or foam rubber);
- measuring devices (for example, a measuring tape);
- construction stapler;
- glue gun;
- scissors;
- leather braid;
- pencil or marker
- decorative elements.
How to make an ottoman from a plastic bucket
Frame: DIY Lily Ardor / YouTube
What you will need
- Plastic bucket with flat lid;
- fabric for the cover;
- fleece;
- padding polyester;
- a piece of tourist foam or polyethylene foam;
- glue gun;
- construction stapler;
- scissors;
- ruler;
- needle;
- threads;
- pencil;
- chalk.
How to do
If the bucket has a handle, remove it; you won't need it.
Frame: DIY Lily Ardor / YouTube
Using scissors, cut the fleece lengthwise into wide strips. You also need to cut out two circles from it, repeating the size of the bottom and lid of the bucket.
Frame: DIY Lily Ardor / YouTube
Apply glue to the bucket and wrap fleece strips around it until it has the correct cylindrical shape, without any protrusions. If the container is initially flat, then just a few turns of the fabric will be enough, just to make the ottoman soft.
Frame: DIY Lily Ardor / YouTube
Glue a layer of padding polyester on top of the fleece.
Frame: DIY Lily Ardor / YouTube
Attach the edges of the padding polyester to the bottom of the bucket.
Frame: DIY Lily Ardor / YouTube
Glue a fleece circle cut to fit the bottom over the folded edges of the padding polyester so that the bottom of the ottoman looks neat.
Frame: DIY Lily Ardor / YouTube
Place the lid of the bucket (or any other suitable size disk) on the foam and trace it with a pencil.
Frame: DIY Lily Ardor / YouTube
Cut out the circle along the resulting outline.
Frame: DIY Lily Ardor / YouTube
Glue the foam to the lid.
Frame: DIY Lily Ardor / YouTube
Wrap the lid with padding polyester and secure it on the back with a stapler.
Frame: DIY Lily Ardor / YouTube
Measure the height and circumference of the ottoman bucket. Lay a strip on the cover fabric, adding 5–6 cm to the width, and cut it out.
Frame: DIY Lily Ardor / YouTube
If the edges of the fabric are fraying, overcast them or fix them with glue. Trim off the excess.
Frame: DIY Lily Ardor / YouTube
Wrap the fabric of the cover around the ottoman so that the extra width falls on the top of the product, and firmly sew the edges of the panel with thread.
Frame: DIY Lily Ardor / YouTube
Carefully glue the edges of the cover to the fleece bottom of the ottoman.
Frame: DIY Lily Ardor / YouTube
Wrap the excess fabric inside the bucket and attach it to the sides.
Frame: DIY Lily Ardor / YouTube
Glue a strip of fleece over the folded edge.
Frame: DIY Lily Ardor / YouTube
Place the bucket lid on the fabric from the cover and draw a circle with a radius 10 cm larger than it. Cut it out.
Frame: DIY Lily Ardor / YouTube
Wrap the lid into the resulting circle and fold the edges of the material over it.
Frame: DIY Lily Ardor / YouTube
Secure in the middle with three or four staples. This is necessary to temporarily fix the fabric; they will need to be removed later.
Frame: DIY Lily Ardor / YouTube
Carefully staple the fabric around the entire circumference of the lid, retreating approximately 3 cm from the edge. After this, remove the temporary staples in the center.
Frame: DIY Lily Ardor / YouTube
Peel off excess fabric.
Frame: DIY Lily Ardor / YouTube
Glue a fleece circle on top that fits the lid to disguise the staples and cut edges.
Frame: DIY Lily Ardor / YouTube
You can watch the full instructions in this video:
What other options are there?
You can decorate an ottoman made from a bucket with a carriage tie:
Or give it this original two-part shape:
Mobile pouf with drawer
This model with wheels is functional and convenient, since the pouf can travel from room to room without the slightest difficulty, and you can store many small but necessary things in it. However, to make it, minimal skills in working with the material will not interfere.
To produce such furniture you will need:
- laminated chipboard;
- timber (40x80x80 mm);
- upholstery fabric, foam rubber;
- jigsaw (hacksaw), drill;
- furniture rollers;
- hinges for attaching the lid;
- glue, screws;
- sewing machine;
- screwdriver (screwdriver).
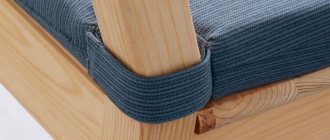
Six blanks are cut out of laminated chipboard: 4 identical rectangles (squares) for the sides of the pouf, two square parts for the bottom and lid. 4 parts are made from timber, their length is equal to the height of the walls of the product.
- A box is assembled from four blanks: the elements are connected using glue and self-tapping screws. 4 bars are glued to the inner corners of the future ottoman and secured with fasteners.
- Wait for the parts to dry. Attach the bottom, proceeding in a similar way. Furniture wheels are attached to the corners of the bottom square with self-tapping screws.
- They make the lid: glue a piece of foam rubber to the workpiece. The top is covered with upholstery fabric, future seams are marked at the corners of the ottoman, sewn on a machine, and the edges of the piece are also processed. The finished upholstery is stapled to the chipboard.
- Sew a cover for the pouffe box. If desired, foam rubber is also glued to the sides. The finished seat is connected to the ottoman using furniture hinges.
Design options may be different, but even the simplest one - decorating the lid with decorative buttons - will require additional work: drilling holes in the chipboard for the cord with which the buttons are attached.
Design features
According to their design features, poufs are transformable . That is, with the help of special mechanisms, they turn into:
A folding bed. Such models can be put forward according to different principles. A folding pouf is suitable for both small and spacious apartments. It will not be possible to completely replace the sleeping place with it .
But it will be useful if you suddenly have overnight guests. During the day, such a piece of furniture is used as a seat; at night, it can replace a bed for one person.
Armchair. When unfolded, the pouf will be no different from a comfortable and functional chair. It will harmoniously fit into the surrounding environment and become a beautiful decor for any room. Coffee table with two seats. Such a piece of furniture will help comfortably accommodate two people for tea, a board game or for pleasant communication.
Master class: luxurious ottoman from an old stool
An old stool that is out of fashion, but not out of order, can serve as an excellent basis for a stylish and modern ottoman, which will add fresh notes of charm and originality to the interior.
To make a stylish ottoman you will need:
- Durable stool;
- Thick upholstery fabric;
- Filler (sintepon or foam rubber);
- Super glue;
- Duct tape;
- Decorative jewelry - beads, ribbons, buttons, etc. (optional).
Having prepared all the necessary materials, as well as having stocked up with patience and diligence, you can begin making a stylish accessory.
From the selected filler you need to cut out a circle, the diameter of which should be 50 cm. Stick it on the seat of the stool and let the glue dry completely. This time can be devoted to upholstery. From the prepared fabric you need to cut out the side blanks, starting from the size of the stool. In this case, it is necessary to leave a few centimeters on each side in reserve. You also need to cut a round blank with the same diameter as the filler blank (about 50 cm). It is necessary to make a stitch along its entire edge, tightening it slightly. You need to sew adhesive tape to the narrow edges of the side blanks. Lightly trim the bottom edges. Sew the upper edges of the side blanks to the round base. It is recommended to do this work from the wrong side to avoid unsightly seams. If suddenly they do work out, this problem can be easily decorated with the help of various ribbons or beads, which can be used to cover the unsuccessful seams on the front side. The resulting thick cover remains to be put on the stool. This creates an elegant and stylish ottoman with a soft seat!
Tip: When choosing additional decor, you should take into account the color of the fabric, as well as the overall design of the room in which you plan to place the ottoman.
Option to create a new ottoman from scrap materials
Many professional craftsmen who can restore anything have come up with an amazing way to make an ottoman from a car tire. Procedure:
- Remove the iron disc from the old tire.
- Cut a wooden surface to the size of the tire, which will serve as the basis for the future ottoman.
- Individual parts need to be attached using self-tapping screws, and string should be glued to the surface. When the surface is ready, treat it with a special varnish, due to which the ottoman will take on an attractive appearance.
All the proposed options will allow you to create new furniture, while the financial costs are minimal. Regardless of what you decide to restore, it is worth mentioning the benefits that the owner of the furniture gains after completing the process.
Replacing upholstery for a pear chair
Pouf-pear
If your favorite beanbag chair has lost its former beauty due to wear and tear of the fabric on the outer shell, then you will have to restore the ottoman. You, of course, can throw it away and buy a new one, but believe me, repairing it will be a more pleasant and less expensive task than buying a new bag.
If the inner burlap is in good condition, and the filling has not shrunk and still holds the shape of the chair, then you can quickly update the product.
The simplest option is to remove the old cover from the bag and, in accordance with the shapes and sizes of its wedges, cut out new pieces of fabric. To do this, we select a dense and strong material for the new outer shell of the bag, make a pattern and sew all the parts together from the wrong side. Then we cut off all excess fabric, steam the seams with an iron and turn the product inside out. We sew in a zipper and update our old pear ottoman by putting a new and beautiful outer cover on it.
Using the same principle, you can sew a stylish and fashionable ottoman from old jeans. It will look pretty good in a children's room or youth apartment. To do this, you will need several pairs of unnecessary jeans and a great desire to sew an ottoman out of them.
If you already have burlap with filling, all you have to do is make a pattern on paper, examples of which can be easily found on the Internet, and transfer it to pieces of jeans that have been previously ripped at the seams.
When choosing a pattern, keep in mind that the width of the bean bag chair wedges should be no larger than the width of the pant legs.
Next, according to the scheme familiar to us - you sew together all the wedges of the bag, sew on the base, steam the seams, turn the fabric inside out, sew on a zipper and put the denim cover on the bag with the filling.
Now you know how to cover an ottoman at home with your own hands and you can easily give new life to your old, but very beloved, soft and cozy pieces of furniture.
Dismantling
First of all, I started dismantling the old ottomans. I needed a drill, but you can use other tools to completely disassemble the seat. Pay attention to how old the items are. If the seat is worn out, it makes sense to replace the foam with new one. That's exactly what I did. I temporarily left the upholstery and foam rubber in order to cut out new fragments from them. Once everything was removed from the ottoman, I washed the frame and began preparing it for painting.
Astronomers have assessed the danger of a giant asteroid approaching Earth
Taking large amounts of vitamin D without a doctor's prescription harms your kidneys
I don’t put a microwave on the refrigerator: if I see it at a friend’s house, I warn you
Materials, tools and patterns
The easiest way to show how to sew an ottoman is with its cubic shape. The pattern of such a seat consists of only 6 squares, of which 4 are the side edges of the soft chair, and 2 are its top and bottom. The size of the squares depends on the size of the ottoman. To work you will need a pencil, ruler, paper. You will also need to prepare scissors, needles, pins, threads, and a sewing machine. And, of course, you need fabric for the ottoman cover, filling and, if desired, finishing material.
You can sew an ottoman not only from new fabric. An old bedspread, curtains, dress, etc. are quite suitable for this purpose.
Thin silk or knitted fabrics stretch, the machine stitching on them turns out to be tight, so thin fabric is duplicated with a denser one.
Scheme for collecting cut out parts for an ottoman.
You can use an old linen sheet for this purpose. The backing fabric prevents the cover from deforming; all seams are clear, which gives the product a beautiful shape.
Work begins with a pattern. In this case, the pattern is the most elementary - a square, the side of which is equal to the height of the ottoman. 6 squares are marked along it on the main fabric, not forgetting to make allowances for the seams, adding 1 cm on each side. The backing fabric is also cut out. A total of 12 squares are cut out. Now they need to be folded in pairs - a square from the base + a square from the backup fabric (base + backup).
Advantages of furniture restoration
Even the most thrifty housewife's furniture becomes unusable over time. To avoid throwing it away, you can resort to simple steps that will make the furniture last for many more years. Among the advantages of furniture restoration are:
- after the process, you will have new furniture in your apartment that can be used for many years;
- If the process is carried out correctly, you can get rid of scratches, chips, and dents formed during operation.
Any furniture that is in your home has the right to a second life, and you, in turn, can realize this by resorting to the simplest techniques.
Video: Detailed instructions on how to make an ottoman with your own hands
Photo: apairandasparediy.com
You will need: - thick fabric (in this case, a textile mat about 2 m long was used); - burlap; — a pillow of the appropriate size with a “ball” filler (made of polystyrene balls); - pins, scissors, sewing machine and thread.
Photo: apairandasparediy.com
1. Based on the size of the pillow, draw out 5 parts on thick fabric: 1 square for the top and 4 rectangular sides.
Photo: apairandasparediy.com
2. Cut out the pieces.
Photo: apairandasparediy.com
3. Cut another square piece from the burlap fabric.
Photo: apairandasparediy.com
4. Pin the pieces together.
Photo: apairandasparediy.com
5. Sew the details from the wrong side, leaving one side free. Turn the product inside out.
Photo: apairandasparediy.com
6. Place a pillow inside and sew the pouf by hand.
Photo: apairandasparediy.com
Photo: nomadicdecorator.com
You will need: - thick fabric for the pouf; — a pillow of the appropriate size and shape with a “ball” filler (you can also use a pillow with foam rubber or other dense filler); - stencil, acrylic paint for fabric, wide flat brush or sponge for applying paint; - scissors, sewing machine, thread.
1. Prepare a pattern: two circles for the base and top of the pouf, plus a rectangular cloth with a length equal to the circumference of the base of the circle and a width corresponding to the desired height of the future pouf. Cut the fabric, not forgetting the seam allowances.
Photo: nomadicdecorator.com
2. While attaching the stencil to the fabric, use a brush or sponge to apply the design with acrylic paint.
Photo: nomadicdecorator.com
3. Sew the rectangle piece to one of the circle pieces, sew the side seam, turn it inside out. Place the pillow inside and sew the second circle.
Photo: nomadicdecorator.com
Photo: creativeoutpour.com
You will need: - thick fabric; - Velcro tape; - sewing machine, threads; - material for filling the pouf - unnecessary padding polyester pillows, old clothes cut into ribbons or shreds, and so on, plus plastic bags.
1. Make a pattern: 2 large squares for the top and bottom of the pouf and 4 rectangles for the sides. Cut the fabric, not forgetting the seam allowances.
Photo: creativeoutpour.com
2. Pin the pieces and sew them on a machine, leaving an opening of about 20 cm.
Photo: creativeoutpour.com
3. Turn the pouf inside out. Fold the edges of the fabric of the hole inward, pin and sew on Velcro.
Photo: creativeoutpour.com
4. Fill plastic bags lightly with filler. Then place them in the pouf - enough so that it retains its shape, but is not too hard.
Photo: creativeoutpour.com
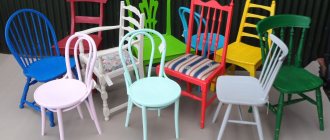
Pouf-chair options:
Photo: somuchtomake.com
Photo: cooldiys.com Photo: vasti-fernandes.blogspot.com
The question of how to make an original ottoman with your own hands is of interest not only to experienced needlewomen, but also to novice craftsmen. And for good reason, because this is an affordable way to update the furniture in the living room or hallway, while spending mere pennies. The task is greatly simplified by the fact that on the Internet you can find a lot of step-by-step instructions on how to sew a soft pouf with your own hands from unnecessary things and scrap materials. Such home master classes are especially relevant for students and young families whose budget does not allow them to get hold of brand new furniture.
What you need for repairs
When starting to carry out repairs, you need to make sure what to cover the sofa with, how to cover everything with your own hands, what items and accessories to use in this process.
Therefore, first of all, we determine the list of things needed for repairs:
- upholstery fabric;
- buttons;
- foam;
- needles and threads;
- pliers;
- screwdriver;
- varnish and wood stain;
- sandpaper;
- furniture stapler;
- brushes
These are all the main accessories for successfully reupholstering an ottoman; of course, if necessary, you can find other accessories that can be used during repairs, but these are more specific materials.
Carrying out restoration with your own hands is quite difficult. It is worth considering that when making repairs you need to know exactly how to use all the materials and know exactly the distance between the staples from a furniture stapler.
Plus, an old ottoman may already be decrepit if it was used for other purposes or was in a room with high humidity.
Also, many owners, in cases of inexperience in the restoration process, turn to specialized services that repair old furniture for help. It is also important to remember that when making repairs, it is advisable to use higher quality and more reliable fabric than was available before the restoration.
Replacing foam rubber
If the old foam rubber begins to deteriorate, it is easy to replace. To do this, you need foam rubber of appropriate thickness. Foam rubber with a density of 25-30 kg/m3 is better suited.
Draw the outline of the ottoman seat on the foam rubber and cut it out with a sharp knife. In furniture production, foam rubber is glued with specialized glue. At home, you can use any glue that does not contain toluene.
Ottoman cover
The process of tightening the ottoman is one of the most important stages of creative work, which requires special care and patience.
To carefully and beautifully upholster a homemade accessory you will need:
- Upholstery material (to your own taste);
- Sintepon;
- Foam rubber;
- Furniture stapler;
- Super glue.
First of all, you need to make a soft foam base for the seat. Then cut out a rectangle from padding polyester that corresponds to the height and width of all four sidewalls in total. Cover it with a thick layer of glue and glue it to the frame. To make the structure more durable, it is recommended to secure it with a furniture stapler.
The final stage of creative work is, in fact, covering the resulting accessory with the selected material. To do this, you need to cut blanks that correspond to the dimensions of the seat, sides and bottom. In this case, you must leave a few centimeters on each side for the fold. You can attach the resulting blanks to the ottoman using a furniture stapler. The resulting ottoman can be trimmed with various ribbons and other decorations.
This way you can transform not only a homemade accessory, but also an old shabby ottoman, making it sparkle with new colors!
How to design a cover for an ottoman
- For decoration you can use various rhinestones, sequins, beads and beads.
- You can create a unique and interesting ottoman by using a different fabric on each side.
- You can also decorate the ottoman with buttons of different shapes, pins and zippers.
- The ottoman cover can be knitted or crocheted. This will make it look cozy.
- Covers in the shape of animals, butterflies and flowers are suitable for a children's room.
- Leather has become very popular as an upholstery material for ottomans. When making a case, you can add various leather elements.
Now you know not only how to sew an ottoman, but also how to decorate it. You can easily surprise your guests and household members with a homemade product or delight your children with a new colorful addition to their room.
Source
Choice of design and construction
When deciding on the structure of the accessory, you should build on your own abilities and skill in needlework. For those who master carpentry skills, it will not be difficult to make a multifunctional wooden product with many convenient drawers.
Experienced seamstresses can easily create a designer ottoman of any size, shape and color.
For those who do not have special skills, it is better to get by with a frameless accessory made from simple materials. Tires, a regular household bucket or a wooden box are ideal for this.
When choosing the external design of an ottoman, you should take into account the overall interior design. The classic style is perfectly complemented by a simple accessory made of wood. The upholstery should ideally be made of expensive fabric, such as velvet or silk. Luxurious fringe cords will also luxuriously complement the product.
For apartments with a more modern design, a pouf with leather or fur upholstery is ideal. Accessories with an abstract print or an original patch will look interesting. Also, the decor in the Art Nouveau style will be perfectly complemented by a plain soft ottoman in a bright color.
How to make an ottoman from a tire
Shot: HGTV Canada / YouTube
What you will need
- Car tire;
- 2 plywood disks with a diameter slightly larger than the inner diameter of the tire;
- knife;
- drill;
- rope;
- glue;
- furniture legs;
- self-tapping screws;
- gloves.
How to do
Place a plywood disc on the center of the tire and screw it with self-tapping screws.
Shot: HGTV Canada / YouTube
Turn the workpiece over and screw the second plywood circle on the other side.
Shot: HGTV Canada / YouTube
Wear gloves to avoid getting your hands dirty. Apply glue to the center of the plywood disk and place the tip of the rope, rolled into a snail, on it. Let the fixing compound set: the rope should hold well.
Shot: HGTV Canada / YouTube
Lubricate the surfaces of the plywood and tires with glue, lay the rope on them in a spiral turn to turn. Wrap the entire ottoman with such tight rings, leaving only the bottom surface empty.
Shot: HGTV Canada / YouTube
Mark the places for the legs on it.
Shot: HGTV Canada / YouTube
Screw the legs.
Shot: HGTV Canada / YouTube
Here's how this ottoman is made:
"Iconic" ottoman
This furniture can be called a “symbiosis” of an ottoman and a stool. In this case you will need:
- wood: timber or board for legs, plywood or chipboard for seat;
- foam rubber: regular and rolled for the backing - on the seat;
- upholstery fabric.
The process itself looks like this:
- First they work on the legs. For them, take 2 elements (50x50 mm), their length is 480 mm, their ends are cut at an angle of 45°. A groove is cut out in the middle of each, then the legs are connected crosswise, having previously been coated with glue. Additionally fixed with self-tapping screws.
- The second crosspiece is assembled in the same way. Both parts are connected in their center with a block - first they are glued, then screws are screwed in, having previously made holes with a drill of a slightly smaller diameter than the fastener.
- Crossbars are nailed to the top of both crosses to secure the legs and the future seat. The semi-finished product is treated with stain: several layers are applied. Varnishing - at your own request.
- A rectangle with sides of 400 and 600 mm is cut out of chipboard or plywood (minimum thickness - 10 mm). A part of the same dimensions is cut out of foam rubber. Made from rolled material - a rectangle with a good margin for hemming.
- Foam rubber is laid on the plywood, and a backing is placed on it. Its edges are folded and nailed to a plywood sheet. A piece of fabric is secured using furniture decorative nails. The last stage is fixing the seat to the crossbars of the legs.
To fasten the seat, use only self-tapping screws. In this case, it remains possible to wash the material, or replace the upholstery or filling.