In what cases do you need hand-made furniture?
Let's look at a few situations where making furniture yourself can be justified.
The first case is described above, when the room has a non-standard size or configuration. It is not possible to select factory furniture for such a room. And ordering from a furniture company will be too expensive.
The second situation refers to the case when the creative component comes to the fore.
Creating your own version of furniture will not only help you save money, but will also bring emotional satisfaction from the work done.
Features of the production of children's furniture made of wood
All items in a children's room should be reliable and durable and, most importantly, not dangerous. In addition, it is important to observe the following details:
- There are no sharp corners, it is better to round them so that children cannot get injured.
- Non-toxic paint coating.
- No small parts (it is better to use large elements to avoid the child tearing something off and swallowing it).
- The connections are made without the use of nails (the best option is self-tapping screws).
- Simplicity of the design solution (it is better to use more bright colors than complex shapes - it will cost less, and the child will like it more).
The advantages of making furniture yourself
Making furniture yourself has its advantages, so you shouldn’t immediately give up the opportunity to create furnishings taking into account personal preferences and interior features. If you lack experience, you can start with simple things - a cabinet, a cabinet, a table, a stool.
The main advantages of making furniture yourself include the following:
- The first and main advantage is the ability to manufacture furnishings according to individual sketches, when there are no restrictions or frames.
- Personal execution is personal control of the quality of execution of each stage (selection of material, its processing, assembly). The result is a high quality product.
- When choosing materials and fittings, when making furniture yourself, the emphasis is not on reducing the cost, but on quality and durability.
- There are no restrictions on the number of items made in the same style - this allows you to create an organic atmosphere in the interior of all rooms of a house or apartment, rather than looking for suitable items in different stores.
- Making furniture is a creative process that allows you to escape from current worries, get a lot of positive impressions and pleasure from time spent usefully.
- Even when purchasing high-quality materials and fittings, we can talk about preserving the family budget, since furniture made with your own hands will last for decades.
If you make it yourself, you can decorate the facades as you wish.
Note! Over time, after gaining experience, a hobby can become a good source of additional or even main income.
Wooden furniture for the kitchen
Of all the interior items, kitchen sets are the most structurally complex, as they involve many drawers and shelves.
Note!
- Book-table: design features and photos of new designs
Flooring for the kitchen - what to choose?
DIY round table: master class on making stylish wooden tables
To make kitchen furniture from wood with your own hands, you need to follow the following procedure:
- We are drawing up a project. To correctly draw up a project, you need to draw a floor plan and designate the necessary areas (sink, work surface, cabinets, and so on).
- Next, we purchase the necessary materials and accessories.
- We cut the sheets into the necessary elements.
- We assemble the structure. The main thing is accuracy and attentiveness - then the kitchen will be durable and will last for many years.
Nuances that need to be taken into account when making furniture yourself
Making furniture yourself involves some nuances that you need to know about in advance. It is advisable to have minimal skill in working with tools and to know about the properties of the material that will be used to make furniture.
Solid wood furniture for baths
You will need to consider the following:
- The cost of raw materials indicates its quality. Therefore, as a furniture material for a dacha, you can choose cheaper raw materials than for an apartment. Operating conditions will also have to be taken into account.
- The work of making furniture requires physical strength, especially when working with solid wood.
- You should not expect that it will take little time to manufacture the product. On the contrary, especially with a lack of experience, a high-quality result of your work can be obtained after a few days, or even weeks.
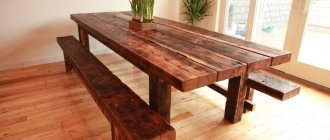
Solid wood dining group
Note! In the process of manufacturing parts, you will have to work on machines and use power tools. It is important to follow safety precautions and use personal protective equipment.
Tools for making wooden furniture
To make your own furniture, you will not only have to master basic skills and techniques for working with wood, but also stock up on the necessary set of tools. It includes electrical, manual, measuring, as well as consumables and equipment.
For those who want to make their own furniture for the first time, it is recommended to choose a product with the simplest possible configuration and set of tools.
The best place to make furniture is a workbench.
Cutting out the parts that make up the overall structure
When you plan to work with chipboard, it is impossible to do without cutting. Using a machine, we cut chipboard, on which we distribute all the workpieces in advance. This will help reduce material consumption. It is recommended to use a high-performance machine, due to which the optimal sawing frequency is achieved, since a scoring saw is installed here.
It is easier to work with ready-made laminated chipboards. In stores you can buy options covered with a decorative layer to suit every taste. All that remains is to cut out the necessary parts from them. If the furniture is made from unprocessed raw materials, then you need to paste over the already cut parts. The cladding can be done with self-adhesive film or special plastic.
We make cuts with a machine
Processing slices
Before assembling the cut parts, you need to process the cuts. For this purpose, adhesive-based edge tape is used. Before work, it is important to pay attention to the conditions in the room:
- The humidity percentage should be as low as possible;
- It must be warm to avoid deformation of the material.
To paste parts with edge tape, prepare a breadboard or construction knife and an ordinary iron. Most often, the edge is sold with an already sticky layer, and no additional surface treatment is required.
You can use a professional iron. During operation, it is important to keep it at a certain distance from the surface in order to avoid displacement and secure all parts tightly in place.
It is important to remember that the iron must be held on the edge for a short amount of time, otherwise it will overheat and bubble. As soon as the edge is fixed and takes a certain position, take a knife, trim the edge and smooth out all the irregularities with sandpaper.
Trim off excess parts Glue the edge
Marking points for fittings
The finished parts must be laid out on a flat surface. Next, mark the places where the fittings are attached, in accordance with the plan of the finished product. Check all dimensions; an error of just 1 mm can cause the entire structure to become distorted.
The cabinets will stop opening, the doors will not fit together correctly. Next, you need to drill all the holes of the required diameter to secure the fittings.
Lay out the parts on the floor
Drilling holes
We fasten the fittings
Assembly
After all the parts have been cut out and polished according to the diagram (this stage can be entrusted to specialists or implemented at home), you need to prepare the necessary tools for making furniture and assembling it at home: a screwdriver or drill, a set of screwdrivers and shaped keys, brushes and rollers for paint and varnish products. In addition, you will need fittings such as handles, curtains, mounting angles and various fixing consumables.
Wooden furniture is fastened using self-tapping screws or bolts with nuts to fix right angles; plastic corners of different widths are used. If you are creating a large dining table, the legs will need to be attached using special metal adapters and additionally reinforced with jumpers.
First, the body of the product is assembled. Then the moving parts and internal components are hung.
Drawings, diagrams and projects for self-production
The primary stage of work is design. You should create drawings and sketches of furniture for self-production, with an accurate calculation of their size. As practice shows, detailed planning will allow you to avoid rework and unnecessary material costs in the future.
The great popularity of handmade furniture is due to the fact that it does not require expensive materials.
Creating a project includes several mandatory steps:
- Decide on the location of the furniture.
- Sketch a diagram of the arrangement of objects with the required façade size.
- Make a detailed assembly drawing, indicating the dimensions of individual elements and their attachment points.
- Select material for manufacturing. Here it is important to consider not only financial capabilities, but also the complexity of processing. The most inexpensive and easiest to use are chipboard and MDF sheets. Solid wood is difficult to process, so it is more suitable for experienced furniture makers.
- Make a list and prepare the necessary tools and small parts: fittings, screws, self-tapping screws and foam.
Most often, furniture at home is made of wood, MDF or laminated chipboard.
Additional Information. A special program will help you design furniture yourself. Such a designer will help you create a model of a future product, as well as find and correct defects. The most popular: PRO-100, KitchenDraw, Woody.
To fasten parts made of wood and its derivatives, self-tapping screws, nails, staples and dowels are used, further strengthening the connection with corners.
Cabinet furniture
When designing cabinet furniture, it is important to correctly measure the room in which it will be located. It is necessary to measure the length of the room along the baseboards and the height of the walls in different places, since it can differ significantly.
Making cabinet furniture with your own hands begins with taking measurements and drawing a drawing.
Also follows:
- Create a preliminary sketch, taking into account the placement of communications. This is the location of windows, doors, sockets and switches. For a kitchen set, in addition to everything, take into account the presence of water supply pipes, gas and sewerage pipes, as well as household appliances.
- Develop drawings of the entire set and each element separately.
- Choose the height of the furniture and the location of wall cabinets so that they are easy to use and match the height of the owner.
To furnish your home in a non-standard way, you can try making furniture with your own hands.
To make wooden furniture with your own hands, make drawings and diagrams in the same way as with any other. Particular attention is paid to finishing work: the surface of the parts must be sanded and varnished or painted before assembly.
Drawings of furniture for self-production can be designed on paper using a pencil and eraser, or use a simple and accessible program.
Important! It is recommended to treat the wood with special means: moisture-resistant impregnations and protection against parasites.
Cabinets
Making a cabinet is easy even for a novice craftsman. Initially, choose the height, width and number of drawers. Then markings are applied to the material and the blanks are cut out. You should also make accurate calculations of the location of the holes to avoid distortions.
If you make your own cabinet with drawers, you will need to purchase special fittings for them - guide mechanisms.
In addition, you will need:
- Prepare fittings and edges for finishing edges.
- Buy wheels, if provided, and drawer guides. They must be of good quality to be silent and durable.
- Wood glue for better fastening of workpieces.
The final stage is drilling holes, processing the material and assembling the finished product.
A bedside table can not only be a wonderful element that will complement the interior of the room, but also a good option for emphasizing the overall atmosphere.
Tables
The table can be of different sizes and configurations, so its choice directly depends on the area of the room. It can be with a round, square, oval or shaped tabletop.
A table is the piece of furniture with which any novice furniture maker can begin their thorny path of knowledge.
Important stages of work:
- Consider the location of bedside tables and drawers, and take care of purchasing components.
- Apply dimensions to the working material.
- For better fixation, lubricate the grooves with wood glue and secure with corners and self-tapping screws. Attach the table top.
- Sand the surface of the product, coat it with primer and varnish.
Additional Information. A corner table will help save space. If you install it along the window, you don’t have to install a window sill.
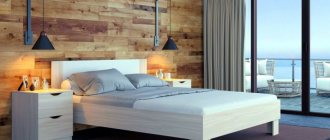
Bed
A DIY bed is a master class that is popular. For manufacturing, it is better to select wood with a high moisture content.
The bed can be made by both a novice craftsman and an experienced furniture maker who has special woodworking equipment.
The process looks like this:
- a diagram is drawn, materials and accessories are purchased, the necessary tools are selected;
- the frame is assembled: the bars are fastened together with self-tapping screws;
- the edges are filed down and smoothed with a sanding machine;
- the frame is painted with a composition for wood;
- supports for the slatted bottom are made;
- holes are drilled in the frame, bars are mounted;
- wooden slats are attached to the supports, the distance between them should be the same;
- The legs are made from wooden blocks, their cross-section and length should be within 10 cm.
Having decided on the dimensions, you should think about the design of the bed and its design style, and draw up a drawing or sketch.
Important! The number of blocks should not be less than 6 pieces;
- the legs are mounted to the frame;
- The furniture is sanded and top coated with varnish.
The bed can be decorated with various types of decor, which will greatly decorate the bedroom where it will be installed.
Decoration can be different: painting, carving, original painting. To ensure that the furniture is level and not skewed, a building level is used at all stages.
Cabinets
Sliding wardrobes are the most convenient furniture design due to their compact placement and can be partially or fully built-in, straight or L-shaped.
The cabinet can be made according to your own sketch from various materials.
Making such a cabinet will require certain stages of work:
- Selecting a design and taking measurements.
- Installation of the internal frame.
- Leveling the position, sealing cracks, finishing the back and side walls.
- Installation of shelves, drawers.
- Fastening guides and installing doors.
If you wish, you can make a cabinet with your own hands from any available material that will fit perfectly into the interior and be as functional as possible.
Important! If the ceiling in the room is suspended, you should make the upper wall of the cabinet to which the guides will be attached.
Children's furniture
Independent production of children's furniture consists of the same basic steps as conventional cabinet furniture. There are many options for realizing your imagination - from compact “attics” to separately made elements.
When furnishing a children's room, you need to pay close attention to every detail.
It is worth paying attention to the following features:
- The material for the manufacture of children's furniture must be of high quality, preferably from natural wood.
- The design should not contain sharp corners or protruding elements that could injure a child.
- Furniture must be strong and stable so as not to fall and injure children.
Important! It is not recommended to use toxic paints and varnishes to coat products. Furniture, fabric and materials must be certified and safe so as not to harm the health of the child.
How to make furniture for a gazebo from wood with your own hands
Gazebo furniture is often made from wood. This material is easy to process, durable and environmentally friendly. For open spaces, sets of tables and chairs are used. Making a simple table is not that difficult.
First, blanks are cut out and treated with varnish or paint. Then the tabletop is assembled. In this case, the boards are secured with transverse bars and screwed with self-tapping screws. After this, a support with a jumper and legs is made. The supports are attached to the tabletop.
Durable option for verandas and outdoor terraces
When choosing garden furniture options, it is worth considering the following features:
- built-in or portable design. When choosing a built-in option, it is important to plan the distance between the table and the bench within 5-10 cm;
- choice of material. You can use a combined option. For example, a frame part made of metal;
- bench width;
- product configurations.
Benches can take up a significant portion of the area
Types of furniture for gazebos
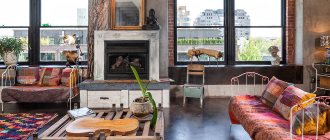
Most often, a table, a couple of benches or chairs are chosen for the gazebo. In order to decorate a small dining area, you can even use a china cabinet. A convenient option is rattan furniture for open gazebos. For convenience, pieces of furniture can be covered with pillows or other soft seating options.
Compact design
Massive objects made from logs
Compact holiday kit
When choosing furniture for a gazebo, you must take into account its resistance to moisture, sun, as well as changes in high and low temperatures.
Do-it-yourself wooden garden furniture options
You can make original country furniture with your own hands from wood. Photo examples allow you to see the most original ideas. A good option is a structure made of willow twigs. Wickerwork looks elegant and does not clutter up the decor.
For ease of design, you can use pillows made of upholstery fabric
You can make interesting designs from pallets. These elements are used to create armchairs, sofas, tables and even beds. You can use folding structures that can be easily removed when it gets cold and do not take up much space during storage.
Wicker compositions will decorate landscape design
Stationary benches and benches can become a real decoration of a summer cottage. When using sofas and benches, pillows and covers will be an additional advantage. With high-quality processing, the surface of the wood will become invulnerable to external factors.
Wooden set for relaxation
How to make furniture for a bathhouse with your own hands from wood
When creating furniture for a sauna or bathhouse, certain requirements must be taken into account. The material of the products must have low thermal conductivity, be safe and not emit harmful components.
Bath products can be quite simple
If there is resin in the wood, it can even cause burns. Therefore, it is worth choosing varieties of deciduous trees. Cedar furniture is useful because it releases essential oils when heated. For the steam room, attributes made of linden or aspen are suitable.
This wood has a light shade and is also resistant to moisture. In addition, linden has a pleasant smell, but is susceptible to fungi. But aspen may darken over time.
Functional design
Among the exotic varieties, abashi wood is popular. This tree grows in Africa. Its advantage is that it does not heat up and you cannot get burned on it. But this option will be very expensive.
There are certain options for bath furniture:
- A mandatory attribute is shelves. It comes in different configurations, is installed near the walls, and can be in the shape of the letter P or G. You can also put special footrests and headrests in the steam room;
Comfortable back design
- benches come in different shapes and sizes;
Compact and simple design
- stools are used as stands for buckets, tubs and tubs;
Stool with stand
- hangers are used;
Lacquered coat rack with shelf
- A table is installed in the rest room. Thermoses with tea and cups are placed on it.
Set for a recreation area
It is important to carefully process all the parts so that the edges are rounded and the parts are carefully polished. The parts are fastened using oak wedges, for which grooves are made. When using screws, the caps should be recessed to a depth of 5-6 mm.
Soft pillows are used for a comfortable rest
When assembling bath furniture, all boards should be placed with a gap, and not closely, which will solve the problem of water drainage. In this case, the wood will be better ventilated.
Selection of natural wood and other materials
In order for the product to be durable and beautiful, you need to choose the right material from which it will be made; it could be:
- solid wood;
- furniture panels;
- composite materials (chipboard, fiberboard and MDF).
In Russia and European countries, the most common materials are walnut, pine, oak, beech, ash, and maple.
When making your choice, it is worth considering the pros and cons of each of them.
- Solid wood furniture is beautiful, strong and durable. It is characterized by environmental friendliness and resistance to harmful bacteria, mold and fungi. Among the disadvantages are the inability to use in rooms with high humidity levels and the rather high cost.
- Furniture panels have all the qualities of natural wood, but due to the water-repellent film that covers their surface, they can be used for the manufacture of furniture for bathrooms and kitchens.
- Materials made from wood waste are much cheaper than the first two, but are not durable. When exposed to moisture, they lose their shape and look extremely unsightly, quickly going out of use.
When choosing the type of wood, it is important to decide in what conditions the furniture will be used.
When choosing solid wood for work, it is worth considering the characteristics of the species:
- pine is the most common material with low thermal conductivity and high strength; DIY furniture made from solid pine will be cheap, durable and beautiful, delighting you with a wonderful wood pattern;
- spruce also has good strength, but is susceptible to rotting; treatment with a special antiseptic can protect against it;
- fir has the same positive properties as spruce; it can be machined, glued, and painted;
- cherry is an amazingly beautiful material; it is easy to process and polish, resistant to fungi;
- alder is well processed to a perfectly smooth surface, has a unique texture that can imitate other species;
- poplar - when creating furniture, it requires veneer finishing.
The microclimate in the room, as well as the load placed on the products, can play a significant role.
Attention! Cedar is a durable and beautiful material, easy to process, but quite expensive. It is used for luxury interiors, so it is not suitable for beginners.
What types of wood are used to create furniture?
Let's look at the materials for homemade furniture. Wood is not always expensive. There are options for special furniture panels. There are two types of such shields:
- solid shields are made from a piece of wood, subsequently processed;
- The compressed material is made by pressing thin shields. In the end, you get fairly strong plates.
Materials from forest industry waste
Quite often, MDF and laminated chipboards are used in the manufacture of furniture - they are made from wood chips. The materials have less strength compared to natural solids, but at the same time they have a more favorable cost.
The main advantage of laminated chipboard is that as a result of processing the material has become moisture resistant. In addition, it does not deform even with temperature changes.
MDF and laminated chipboard are often used to create various designs, both by professional furniture makers and beginners
Making a drawing
A drawing begins with a sketch. Sketch - from an idea. On a piece of paper you need to draw several options for future furniture, determine its shape, design, proportions. You can look for inspiration among ready-made solutions on the Internet and in special printed publications.
Sketch sketches allow you to choose the best option
After the best option has been selected, we begin to develop a drawing that reflects the main dimensions of the product and the parameters of all parts, as well as the places and methods of their fastening.
Designation of main dimensions
So, when making a drawing of a kitchen set, the following are taken into account:
- The area of the room, its configuration, dimensions (height, length of walls, along which the set will be installed, distances to protruding elements).
- Choose the type of arrangement of the headset (linear, L-shaped, U-shaped, island, peninsular, parallel).
- It is also necessary to take into account the average values of furniture, which are calculated for the average person: the floor stand has a height of 850 mm, a depth of 500 mm and a width of 300 -800 mm. The wall cabinet has a depth of 300-350 mm, its width corresponds to the width of the lower modules.
- The distance between the lower and upper modules is 600 – 650 mm.
Drawing basic dimensions when designing a kitchen unit
You can develop a drawing on a computer using one of the many design programs. A special article will tell you about the main nuances of making kitchen furniture drawings yourself.
Having a drawing of the product with the main dimensions reflected on it, you can make detailed detailing, as if disassembling the drawing into its component elements.
Parts for making furniture from plywood
When making a furniture drawing, you must consider the following:
- It is important to assess the dimensions of the room and choose a place in it to place the piece of furniture so that it does not interfere with free movement around the room.
- When making built-in furniture, it is necessary to take into account the size of the gaps.
- Take into account the free space for hidden fittings (guides) when choosing the module size.
- Take into account the upcoming load that will be placed on a single element. Select a suitable design and provide stiffening ribs.
- Take into account the dimensions of the sheet material and the possibility of manufacturing parts of one format or another from them.
- Try to reduce the load on the fittings as much as possible. So, when attaching a facade to hinges, to reduce the load, the width of the parts is made smaller than the length.
- Consider the proportions of the product and its stability.
Video - How to draw a kitchen drawing
Making a drawing of a chest of drawers
Table 4. Nuances when drawing up a drawing for a chest of drawers
| Illustration | Description |
| As an example, we can consider a chest of drawers with overall dimensions of 1200 x 832 x 500 mm. | |
| The product consists of three sections. The central one is equipped with drawers, and the side ones have hinged doors. | |
| The modules will be independent. | |
| To install the modules, a common base and cover are provided, the dimensions of which will be the same. The width of these elements will be equal to the width of the modules. Some craftsmen recommend making the cover longer from the wall side, so that there is room at the back to leave free space. | |
| The width of the central section, which will be equipped with drawers, is 600 mm. With a total overall size of 1200 mm, the outer sections will have a width of 300 mm each. | |
| With a cover width of 500 mm, the depth of the modules is reduced by 20 mm and is 480 mm when the facade is made from the same material (16 mm thick chipboard). It is important that the gap between the drawer and the stiffener ensures free movement of the box. | |
| The height is selected depending on the width - the product must be stable. It is also necessary to maintain the proportion: distance between shelves/height of drawers: height of the chest of drawers. |
DIY furniture ideas
Pallet chair
The trend in recent years is creating furniture with your own hands from wooden pallets.
You can buy used pallets inexpensively or even take unnecessary ones for free.
Having purchased fabric and foam in advance to make the seat, you will turn it into a comfortable chair using the following instructions.
- Sand and varnish the pallets.
All external surfaces must be treated to avoid splinters.
- Place several small pallets on top of each other. This will be the base of the chair, the height of which should be the same as that of a regular chair.
- Connect the pallets together using screws.
- Next, take a pallet that will serve as a backrest.
It is placed on the edge, right on top of the base and secured with corners.
- Make several parts from an old pallet.
The pallet is sawn into several parts to make armrests. They also need to be secured with corners.
- Now all that remains is to cut a sheet of plywood to the size of the seat, put foam rubber on top and cover it with fabric.
- When the seat is secured, you can work on the backrest. Using the same principle, it is covered with fabric.
The result will be original furniture that is suitable for a loft or industrial style interior.
Beds, shelves and cabinets are created from pallets in the same way.
Benches made from stumps
Wooden furniture is found everywhere, but untreated wood is not usually used.
A table made from a wide stump and a glass top looks very original.
A set made from an old log or log looks interesting. The easiest way is to place the tree stump on the floor and use it instead of a stool.
It looks much more interesting with metal legs or wheels.
Another idea is to attach a backrest for convenience.
There is no need to paint or treat the wood, as it should be associated with the forest and nature.
To create an original solution for the interior, simple materials and imagination are enough.
A very original and stylish solution for old car tires.
You can make furniture from intricately shaped wood taken from your site, car tires and other things that at first glance seem unusable.
Wall shelves
Having purchased fastenings and boards, you can build shelves. They can be quite unusual.
For example, you can arrange them in the shape of a tree with branches or a complex geometric figure.
To make furniture with your own hands, plexiglass or plastic is suitable.
They will go well with LED lighting.
An original idea is to arrange closed shelves in the shape of a ladder.
Then the inner area will become a storage for books, and the shelves themselves will be a house and a place for entertainment for the cat.
Window frame coffee table
Many people are now ordering the replacement of an old window with a plastic one. During the dismantling process, a lot of waste remains, including frames, which can last another ten years.
They are easy to turn into original tables.
- Take one of the window sashes that does not have a window, that is, with solid glass.
- Pull out the glass. Unscrew the fittings - hinges, handles, latches. Rub the surface with sandpaper.
- Attach the table legs to the frame.
Legs can be bought at a hardware store or taken from an old cabinet.
- All that remains is to cover the frame with plywood or secure it with durable plexiglass
The original furniture is ready.
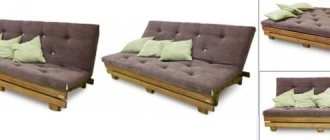
Cutting fabrics and sewing a cover for upholstering a corner sofa
Sew covers to cover the sofa from furniture fabric.
You should not use, for example, a curtain. The parts are sewn together using a regular connecting seam. If you have enough skill, the seams on the seats can be made with double stitching (4-7 mm between lines). The fabric cutting pattern is given for a 1.4 meter wide fabric. Most furniture fabrics have this width. 10.2 linear meters of fabric are required. The fabric is cut wrong side up. Don’t confuse the side of the sofa, you can see what our sofa looks like here, if your sofa is on the other side, then you need to cut all the details in a mirror image.
We upholstered the sofa with flock fabric. Seam allowances are made in the amount of 1 cm (that is, the cutting diagram is given with exactly these allowances). If the edge of your fabric frays a lot, you may need to increase your seam allowances or overlock the seams.
In the diagram, the parts are pink, gray is waste fabric (which, however, is also useful). Dimensions are given in centimeters. Other designations:
– cut line
– dimension line
- detail number
For the case, you can make a pattern for parts 14 and 15 yourself. Simply attach a piece of fabric or paper to the foam-covered frame or use the pattern sheet:
Layout of the cutting details on the upholstery of the finished corner sofa:
The picture below explains how to sew a cover for a lifting sofa seat. The width of the fabric will not allow us to cut out the part in one piece, so we slightly lengthen part number 1 with part number 9. In addition, we make a rounding on the back to make it easier to raise and lower the seat.
Parts 16 are pillows.
If you want to have point tightening (recesses) on the sofa seat, you need to sew them to the fabric in advance. How to do this can be seen in the picture below. Not only will tension bands change the look of your sofa, but they will also help hold the fabric in place, reducing the formation of wrinkles on the surface of the sofa seat. We sewed the drawstrings in increments of 25 cm and drilled holes for them (more details here and here)
You can leave your comments and questions in the Guest Book
All rights reserved © 2007 – NovaMebel74 When copying materials, an active hyperlink to the source is required.
Source: novamebel74.ru