Unusual decoupage with old newspapers: features and advantages
Old newspapers are found in almost every home. Sometimes they take up space unattended in closets and on cabinet shelves. To free up space and at the same time make a nice and beautiful thing with your own hands, you can do decoupage with newspapers. Newspapers always look stylish and beautiful.
The main feature of decoupage with newspapers is its cost-effectiveness: they can be used to decorate even large furniture.
Even a beginner can do decoupage. To do this, first of all, you need to decide on the item that will be decorated. The most common options for decorating with newspapers are furniture and souvenirs (boxes, wooden figurines, kitchen utensils). The most important thing is the harmonious combination of the new design object with the general style of the interior.
Old newspapers are great for decoupage beginners because they are inexpensive
Advantages of decorating with newspapers:
- Economical. You can cover even the largest area with newspapers, of course, if you have a large collection of old newspapers in your house.
- Originality. Despite the fact that newspapers are a fairly popular way of decorating, such products always look stylish and unique.
- Ease. Even a novice master can do decoupage with newspapers. The main thing is to follow the instructions and advice of more professional masters.
In order for decoupage with newspapers to have a beautiful appearance, the entire work process must be done very carefully. Don’t worry if some newspapers tear during the gluing process - when gluing, the breaks can be beautifully decorated. After all the newspapers have been glued to the surface, the product is allowed to dry thoroughly.
Tricks for transferring a drawing
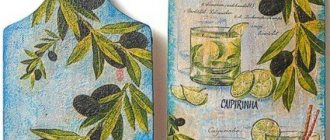
- If a whole napkin is used for decoupage, it is better not to glue it dry onto a tray, but to transfer it using plastic film.
- To do this, the napkin is placed on the film with the pattern down, moistened with water and leveled.
- And this workpiece is carefully turned over onto a tray. This reduces the likelihood of tears, wrinkles and damage.
In addition, in this way it is convenient to join the fragments together.
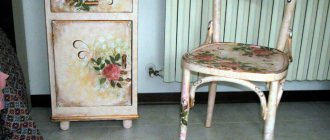
Decoupage with newspapers: master class on decorating an old chest of drawers
Very often, old furniture is not given a second chance - it is thrown away when its appearance becomes unusable, despite the fact that its design can last for many years. Simple newspapers will help bring life back to an old chest of drawers. Usually a collection of them can be found in every home.
Before you start decorating the chest of drawers, you need to thoroughly clean it of old dirt and also repair visible cracks.
To decoupage a chest of drawers, you will need a standard set of materials and tools. It is best to purchase materials for decoupage in specialized scrapbooking stores, but you can find products in art and stationery stores.
Before decoupaging an old chest of drawers, it should be cleared of old paint and sanded using sandpaper.
Master class on decorating a chest of drawers:
- First, you need to walk over the surface of the chest of drawers with sandpaper - it will smooth out all the unevenness and remove dirt.
- Cracks and crevices must be sealed with putty. It can be purchased at a hardware or art store. The putty solution is easy to prepare yourself. It should be applied with a spatula or rubbed in with your fingers.
- The surface of the chest of drawers must be primed - this will protect the wood from damage and drying out. It's better to do this several times.
- Cut newspapers into pieces or carefully tear them - this will create an antique effect.
- Before gluing, the materials should be immersed in warm water for a few minutes - this will make gluing easier.
- Grease the surface of the chest of drawers with decoupage glue or PVA. Stick newspapers onto the surface, smoothing them with wet hands.
- To remove bubbles from under newspapers, you need to go over them with a roller.
- The chest of drawers should be left to dry, after which 2-3 layers of varnish should be applied.
To cover the surface, it is best to use a specialized decoupage varnish. It is important that all finishing materials are of high quality - the appearance and durability of the decorated product depends on this. It should be remembered that the chest of drawers must fit into the overall interior design.
LiveInternetLiveInternet
—Tags
—Categories
- SCHOOL (0)
- ACCESSORIES, FLOWERS, BROOCHES (66)
- Fabric flowers (35)
- Flowers made of paper and other things (15)
- MK leather flowers (36)
- leather flowers review (9)
- AROMAGY (67)
- OILS (34)
- ASTROLOGY, NUMEROLOGY (20)
- BUTTERFLIES (18)
- PAPER (16)
- Music sheet, newspaper (31)
- BOTTLES, VASES, FLOWER POTS (94)
- Jars-jars (17)
- Bottles (19)
- Vases (7)
- Pots (13)
- HOUSEHOLD CHEMICALS, SHAMPOOS, CLEANING PRODUCTS (30)
- WREATHS, TOPIARIES (73)
- Spring and Easter wreaths (18)
- New Year's wreaths (23)
- Autumn wreaths (15)
- SPRING (17)
- SITE DECOR (23)
- DECOUPAGE (31)
- bottles (1)
- furniture (3)
- INTERIOR DESIGN (318)
- Bathroom (27)
- Living room (18)
- children's bedroom (15)
- rest room (5)
- kitchen (26)
- stairs (2)
- summer kitchen (2)
- Lighting - lamps, chandeliers, floor lamps (37)
- hallway (7)
- workplace (3)
- bedroom (12)
- dining room (2)
- plot, terrace, gazebo (55)
- Storage - cabinets, racks, chests of drawers (15)
- Curtains, pillows, rugs (24)
- FOR HOME (142)
- pebbles, shells, sea (21)
- interior decor (21)
- Interior Decor (17)
- Decorative items (47)
- plug (11)
- Repair (4)
- FOOD (128)
- In the oven (26)
- Second (10)
- Dessert, sweets, pastries (76)
- drinks (16)
- First (7)
- usefulness (4)
- salads, snacks (39)
- HEALTH (91)
- WINTER (109)
- Christmas trees (20)
- LEARN, APPLY (25)
- CARDMAKING, SCRAPBOOKING (153)
- MK (24)
- Men's (8)
- CD covers (14)
- postcards (42)
- children's cards (3)
- postcards for March 8 (1)
- birthday cards (2)
- New Year cards (11)
- scrap albums, notebooks (11)
- PICTURES (35)
- for decoupage (2)
- black and white (17)
- COFFEE (28)
- BEAUTY AND COSMETICS (101)
- hair (33)
- clay (6)
- face (31)
- hands (4)
- body (6)
- PERSONAL (241)
- astrology, numerology, (5)
- gift ideas (45)
- interesting diaries (8)
- books (6)
- poetry (37)
- about women (19)
- about loveoff (2)
- psychology (37)
- FURNITURE (18)
- THINGS FOR BEAUTY (22)
- BURLP, LINEN, TWINE, ROPE (53)
- MONOGRAM, MONOGRAM (5)
- MUSIC (1)
- SOAP (70)
- soap made from soap (23)
- base soap (15)
- INSCRIPTIONS, LABELS, LABELS (55)
- CLOTHING, FASHION (148)
- Accessories (21)
- Boho (11)
- top (4)
- bottom (4)
- shoes (4)
- AUTUMN (28)
- PAPIER-MACHE (7)
- EASTER (29)
- PLASTIC ready-made jewelry (6)
- my! (2)
- PLASTIC master classes (51)
- (1)
- UTILITIES (88)
- POETRY (25)
- ABOUT KIDS (200)
- education and development (78)
- books, coloring books (52)
- entertainment (25)
- poems (11)
- PSYCHOLOGY (7)
- MISCELLANEOUS (211)
- computer (75)
- DIY beauty (19)
- MISCELLANEOUS FOR THE HOME (166)
- newspaper tubes (23)
- Basket boxes (42)
- packaging (21)
- storage (16)
- DRAW (1)
- HANDCRAFTS (210)
- jeans (18)
- bags (20)
- candles (42)
- SCRAPP PAPER (13)
- POEMS (7)
- PVC PIPES, CARDBOARD TUBES (43)
- JEWELRY FROM EVERYTHING (44)
- FIGURE, SPORTS, EXERCISES (5)
- PHOTO (49)
- PHOTOSHOP AND OTHER GRAPHICS EDITORS (43)
- Corel (11)
- FLOWERS, PLANTS (120)
- Indoor (9)
- Vegetable garden (14)
- Flowerbed design (36)
- CLOCK (5)
- TEMPLATES, Stencils (27)
- SHABBY CHIC, VINTAGE (54)
- SHABBY CHIC, VINTAGE. MK. (15)
- ECO-STYLE INTERIOR (12)
- HUMOR (8)
How to make decoupage on newspaper tubes
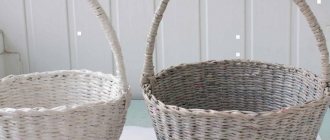
Recently, a popular weaving technique among needlewomen is the weaving of various objects with newspaper tubes. This technique involves quite painstaking work, which must be performed scrupulously and accurately. Products made from newspaper tubes look beautiful, but sometimes you want to complement them with beautiful and original drawings.
Decoupage of baskets from newspaper tubes is one of the stages of decorating wicker products. Very often, only decoupage of the bottom of the wicker product is performed.
All materials for decoupage baskets are sold in the craft store
The technique of decoupage on newspaper tubes is almost no different from the classical design. However, there are some variations. For example, some needlewomen prefer not to varnish the decorated bottom, but instead iron the pasted pictures through a thin fabric.
How to decoupage a basket from newspaper tubes step by step:
- Prepare materials for decoupage - separate the top layer of napkins from the bottom.
- Cut out the required images.
- In the places where the picture will be located, glue is applied to the wicker product. It is important not to use too much glue - the work will look sloppy.
- The pasted surface is varnished.
Varnishing helps protect the surface from damage, peeling and peeling off patterns. Decoupage on newspaper tubes looks stylish and beautiful. For decoration, three-layer napkins are most often used. Modern manufacturers offer a wide selection of bright and memorable pictures.
Sequencing
- The working surface must be cleaned and degreased. If you are decoupaging a plastic tray, its surface may be too smooth. This product needs to be lightly sanded so that the coating adheres well.
- The tray is painted with a white acrylic base. Then (optional) - with colored paint.
- The cut out design is placed on a tray and coated with glue using a brush. You need to try very hard to even out the paper layer without leaving any air bubbles or folds. Some craftsmen find it more convenient to do this with brushes, while others work with their fingers coated with glue. The main thing is not to tear the thin layer of napkin.
- When one element is laid out, they move on to another.
- The entire composition is allowed to dry thoroughly.
- Cover the napkins with several layers of varnish, drying each thoroughly.
- The work is completed.
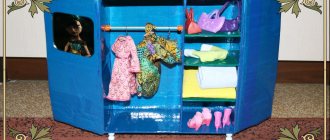
Original newspaper rack decoupage: step-by-step instructions
Often little things bring some special atmosphere of comfort and coziness to the interior. It’s especially nice when these little things are made with your own hands. There is nothing easier than making a newspaper rack that will decorate your home and serve a functional purpose.
You can make a newspaper rack yourself - all you need is a regular cardboard box or a wine box.
An original solution is to decoupage a newspaper rack using a newspaper with a picture of a retro car on it.
Even a beginner can decoupage such a product. First of all, you need to prepare the materials that will be used in the decorating process. These include: decoupage napkins, decoupage glue or PVA, acrylic paints, brushes, sponge, scissors.
Master class on newspaper rack decoupage:
- You can cut a newspaper box from a cardboard box.
- Before starting the main work, the box must be tinted using acrylic paints - they can be used to create beautiful backgrounds. It is better to squeeze the paint into a special bowl, then dip the brush into the paint and apply it evenly to the surface of the box. Professionals advise using light-colored paint.
- The selected image is carefully cut out from the napkin. Then the top thin layer with the image is separated from the two lower layers. Paper can be used as a gluing material.
- It is best to glue the pattern from the center to the edges - this prevents the appearance of bubbles.
The newspaper rack can be given an aged look. To do this, use a sponge and acrylic paint that contrasts with the main surface of the newspaper rack. There is no difficulty in creating such beauty. The main thing is accuracy and attention to detail.
Preparing the napkins
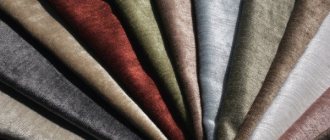
- Typically napkins consist of two or three layers. Only the topmost, colored layer is used in the work.
- You must first cut out (tear off with your hands) the desired fragment of the design from a whole napkin, then layer it, taking the top layer.
- Sometimes there are thick napkins made of four layers. In them, the pattern can be preserved on the second layer, but be paler.
For some designs this is a godsend. Erased colors are ideal for antique trays and artificially aged surfaces.
Decoupage of a basket from newspaper tubes (video)
The decoupage technique became widespread back in the 17th century. This is an easy type of decoration that allows you to imitate painting a picture on the surface of the item being decorated. Today, decoupage is performed with a variety of materials: napkins, newspapers, paper, fabric. The choice of material depends on the wishes of the needlewoman, as well as on the type of surface to be decorated. Decoupage with newspapers is an advantageous type of decoration. Old newspapers can give new life to old wood and glass items.
Important information for beginners before starting to create a product
Do you have a lot of old magazines? You can use magazine clippings to decoupage desks. And who made the rule that only napkins can be used to decorate furniture? Experiment with magazine clippings, photographs and newspapers. Look at the photo below how one craftsman used an ordinary map of the world - he covered a shelf with it! Great option!