At home, you want to relax in a comfortable environment, feeling coziness around you. A mandatory attribute for its creation is upholstered furniture. The sofas and armchairs presented in stores are not always satisfactory in design or quality, not to mention the current prices. Alternatively, you can make a chair with your own hands, which is guaranteed to meet all individual preferences. Sizes, upholstery tone and level of softness - everything can be chosen to your liking, resulting in a designer piece of furniture.
Preparatory stage
Before starting work on assembling a chair at home, you need to decide on the basic parameters of the future product. You should start with the appearance. In accordance with the style of the room where the upholstered furniture will be installed, a suitable model is selected.
It is advisable to study the range of finished products in exhibition halls or look at photos in catalogs. In the first case, you can clearly see and touch the planned model, but the search will take some time. In the second case, the time spent will be minimal, but the final appearance may differ significantly from the desired one.
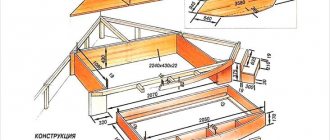
Having studied the range of chairs and decided on the model, you can begin preparatory work. First, you should measure the place where you plan to put the furniture and calculate the dimensions. To avoid mistakes in fitting parts and not to forget anything, competent drawings and diagrams are drawn up.
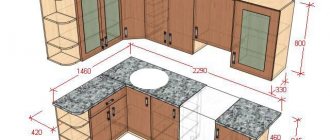
The generally accepted ergonomic seat height is approximately 45 cm, its width and depth vary from 40 to 45 cm. The height of the backrest from the floor should be about 1 meter. For comfortable sitting, a slope of 3 cm is made from the edge to the back.
To make a drawing of a chair on a sheet of graph paper or graph paper, a completely finished model is initially drawn, after which the following are depicted separately:
- back;
- side detail;
- seat;
- armrests.
When schematic modeling, it is necessary to take into account the thickness of the material from which the chair will be made . Synthetic and natural fabrics have different parameters, which can affect the final collection of parts. After completing the drawing, it is advisable to draw part templates on cardboard and cut them out. This will make it possible to try on life-size dimensions and project the necessary elements on the material.
Before purchasing, a full calculation of the quantity of required materials must be carried out. This is done in order to avoid going to the store again and purchasing unnecessary parts.
For components, you can go to the construction market or a specialized store. You can also order materials for delivery, but in this case it will not be possible to visually evaluate their appearance and quality.
Create a drawing
This is the most important stage of all future work; the quantity, ergonomics and comfort of the future product depend on it. This process must be approached with all responsibility; it is best to adhere to the following scheme:
- Measurement of the room;
- Sketches of the future creation;
- Drawing up a cutting diagram for workpieces.
The better and more accurate the measurements are made, the fewer deviations the sketch with future furniture will have. You need to measure the dimensions of the room, the location where it will be located, and the various ledges and steps.
When creating a sketch, you can use various specialized programs that will help you determine the dimensions better and more accurately.
Materials and tools
The frame is an important part for any furniture. To make a chair correctly, you should decide on the material in advance. Most often used:
- tree;
- Chipboard, laminated chipboard;
- plywood;
- metal.
Wooden frames are the most environmentally friendly and do not cause allergies. A chair made from planks will last a long time if the wood is of good quality and chosen correctly. You should not take lumber with bark, cracks, or unclear geometry - all this will lead to cracking and deformation of the finished product.
A homemade chair with a frame made of chipboard is durable if the material is of sufficient density, thickness, dry and does not crumble. Unlike wood, synthetic material cannot be painted to give the surface the desired texture and tone.
Plywood is also used to make the frame of a home chair. Due to the unattractive texture of the material, it is covered with soft upholstery. With proper fastening, plywood thickness 15 mm and above, the part can be used for a long time.
Laminated plywood has appeared on the building materials market, which has an attractive appearance. It can be used for open parts of the chair without losing the visual effect.
A do-it-yourself chair frame made of metal will be the most durable, but its weight will significantly exceed other options. The disadvantage is that it can only be done with specialized welding tools. You can fasten the metal parts with nuts and bolts, but over time such a frame will begin to loosen and rattle.
Regardless of what material the frame for the chair will be made from with your own hands, this part is the main one and must be assembled with high quality and durability.
Solid wood
laminated chipboard
Plywood
Laminated plywood
Thick furniture fabric is prepared for upholstery. The most common options:
- chenille;
- tapestry;
- jacquard;
- velours;
- flock;
- synthetic or genuine leather.
The choice of material is made taking into account future operating conditions . So, if you have pets or children who, due to their age, can damage or stain the fabric, it is better to give preference to easy-to-care, wear-resistant materials. Parts must be cut out with seam allowances, so material should be purchased with a small margin.
Soft elements are filled with furniture foam rubber with a density of 30 and higher. You can make upholstery from scrap materials, for example, use old blankets or pillows instead of foam rubber.
Chenille
Jacquard
Tapestry
Eco leather
To make a chair with your own hands you will need:
- screwdriver or welding machine;
- a jigsaw with the necessary attachments or a grinder saw;
- furniture stapler;
- sewing machine;
- scissors;
- chalk or a piece of dry soap;
- Sander;
- hardware for fastening parts.
All tools, as well as components, must be prepared before the installation process begins, so as not to waste time searching for the necessary elements.
Tools
Advantages of wooden garden furniture
The main advantages of garden wooden furniture include:
Beautiful natural shades that can add a special homely atmosphere of warmth and comfort to any corner of the garden.- Long service life. With proper care and proper wood processing, furniture can serve its owners for several decades.
- Convenience and ease of processing. If you have simple tools (drills, hacksaws, sanders and jigsaws), you can build furniture of unusual shapes.
- Wide flight of fancy. When designing a piece of furniture, craftsmen can embody any wishes. Of course, it is better for beginners to start with simpler models. And for those who already know how to work with wood, you can make exclusive furniture items.
Manufacturing stages based on the model
The process of making a chair with your own hands directly depends on the chosen model. Homemade products may not even be inferior in comfort and appearance to their factory counterparts.
Traditional
A traditional chair is an excellent design solution for creating a comfortable environment in the home. Unlike sofas, armchairs take up much less space, and making them yourself from wood, chipboard or metal is faster and easier.
After preparing the tools, a location for assembly is selected. It is advisable that no one moves the laid out materials. It is important to consider side effects from the manufacturing process and their consequences for others. When cutting wood with a jigsaw, sawdust should not get on furniture or interior items, and when using inverter welding, you must adhere to fire safety requirements. When all preparations are completed, you can begin installation.
Stages of work:
- using cardboard templates, transfer the layout of the parts onto the frame materials;
- use a jigsaw or grinder to cut elements along the lines of the drawing;
- if necessary, process open parts made of beams with a grinding machine;
- use a screwdriver or use a welding machine to fasten the frame parts;
- draw the upholstery pattern on the furniture fabric, cut it with 1 cm seam allowances, sew the parts;
- cut and cut furniture foam, fill upholstery;
- the armrests are wrapped in foam rubber and secured with a special stapler. Decorative wooden armrests, if necessary, are secured on top with a screwdriver and self-tapping screws.
If the wooden chair will be placed in a room with high humidity, after assembling the frame it should be treated with bioprotective agents.
After completing the installation work, you can decorate the chair to your liking. Furniture fabric is used to cover small buttons, which are sewn onto the product in a checkerboard pattern. By applying paints of different colors and sanding, wooden elements are decorated in an antique style with your own hands.
Folding
A folding chair is a great way to organize a place to relax. This piece of furniture, made for use in garden areas, is indispensable in the summer. A garden chair made by yourself will fulfill its functional purpose to the fullest and will not be inferior to factory-made analogues. The possibilities of using a folding piece of furniture allow it to be used in the most unexpected situations: overnight guests, moving, relaxing on the veranda. The wooden chair is made in a variety of styles. Having chosen a design and completed a drawing, you can begin assembly work:
- cut the prepared materials with a jigsaw or grinder to the required sizes;
- treat the surface with a grinding machine to make it smooth, otherwise sharp traumatic particles may separate;
- treat with bioprotective agents and dry well;
- paint all the parts in the desired color;
- assemble the chair frame using a screwdriver, self-tapping screws and the necessary fasteners.
Wooden chairs can be decorated to suit almost any style. Varnishes, paints and patinated enamels are used for processing.
The finished chair should definitely be checked for strength. If all points are performed correctly, a folding chair made of timber will last a long time.
From pallets
Construction pallets are assembled from flat boards that have dried and will no longer change their geometry. Nevertheless, their use as a material for making chairs yourself is widespread. Pallets make original loft-style models that are almost no different from designer options. Manufacturing includes several stages:
- After selecting the model and carrying out the preparation, the boards are sanded using a sanding machine. Without this process, the wood may delaminate.
- Using a jigsaw or grinder, the pallets are cut in half, the edges are sanded and painted over.
- From the elements you need to assemble a frame chair from boards of the desired shape, and then secure the elements with self-tapping screws and a screwdriver.
This DIY garden chair looks no worse than store-bought counterparts. For comfortable use of pallet seats, it is necessary to sew cushions on them. The fabric is selected based on the operating conditions of the furniture. As a filler you can use foam rubber, holofiber, synthetic padding polystyrene, polystyrene foam balls.
Choosing a tree species for the garden
Since garden furniture is used outdoors under unfavorable conditions, the choice of wood type should be taken with full responsibility . Good choices would be:
Acacia.
This wood is a valuable species. It is significantly superior to oak in strength and has an aesthetic appearance. But to prevent the material from cracking during operation, the wood must be well dried. Also, the disadvantages of acacia include difficulty in processing.- Teak. This exotic tree grows in Thailand and Indonesia. It is highly stable and bioresistant. The wood pleases consumers with a beautiful dark shade of golden color. Under prolonged exposure to the atmosphere, the wood becomes almost black or dark brown in color. It is recommended to treat teak with a water-based varnish .
- Beech and larch. These breeds are resistant to natural elements. They cope well with sudden temperature changes, high humidity and exposure to ultraviolet rays. In order for the wood to retain its attractiveness, it must be coated with several layers of varnish .
- Oak. This breed is the strongest, most durable and aesthetically pleasing. Furniture made from it has a unique texture and original design.
- Cedar. The advantages of cedar furniture include: ease of processing, durability, aesthetics, and unusually beautiful texture.
Important : when choosing wood for making garden furniture, preference is given to hardwoods that are resistant to negative environmental factors.
Useful tips
Making your own furniture is a very exciting activity. If the process is happening for the first time, make the most uncomplicated chair with clear lines and simple geometry. It will be easier to work, and the result will be neat.
When you have experience in carpentry, you can surprise family and friends with unusual shapes . A handmade round chair is effective and practical in any interior. Another easy way is to make a chair from a car seat left in the garage.
By being creative and following the instructions, you can make a chair with your own hands that will be used for its intended purpose for many years. In addition, a product made on their own will become a source of pride for the owners and a reason to brag to friends.
Children's chair
If you want to make a child seat with your own hands, you need to take into account that although it is significantly smaller in size, a number of the highest requirements are imposed on the quality of such a product:
- the chair should not be potentially hazardous;
- in the manufacture of a child seat, only environmentally friendly and hypoallergenic materials should be used (carefully choose paint, impregnation and other “chemicals”);
- The design should, first of all, please the baby, and the size should correspond to his height.
Finishing of country furniture
After manufacturing and assembling the garden chair, you can begin finishing it. To make wood attractive, it can be painted with stain or treated with drying oil . When using a piece of furniture outdoors, the wood is treated with antiseptics to prevent rotting and damage by pests. Next, the chair is covered with several layers of varnish. For these purposes, it is better to choose a moisture-resistant water-based varnish.
Tip : for outdoor use, you can make a folding chair or unusual options from tires and pallets. And next to it you can put a folding picnic table or a convenient table for a laptop.
Step-by-step instruction
If you have a drawing of an Adirondack chair at hand, you will get an original product with funny curved legs
It is important that they are slightly higher than the seat. To do this, the ends of the materials need to be shortened by 1.5–2 cm
Step-by-step instructions for any chair model will help you fix from 8 to 10 seat slats, backrests, front and rear legs without errors. It would be useful to make drawings of the lower supports and armrests.
Wooden shell chair
To process solid or 16mm plywood, you will need a jigsaw. The main thing is to stick to smooth movements to avoid slight unevenness and significant deformation of parts. Bent plywood can only be used if you have already dealt with similar manipulations before
At the first stage it is important:
- Make a drawing of the future product indicating the dimensions and location of all elements.
- Cut out the blanks.
- Treat the parts with several layers of varnish: the first time along the fibers, and the second time across them so that the surface is perfectly smooth.
- Fix the elements with wood glue, and connect the individual parts with clamps according to the instructions. Decorative screws can also be useful in your work.
Pallet chair
For creativity you will need several standard size pallets, a Phillips screwdriver, sandpaper, fasteners and paint. First, the pallets must be sanded using abrasive materials. If time is short, it is better to use special grinding equipment. Then we form the seat. To do this, we determine the central point of the first pallet and then cut it along the material. The result will be two products of different lengths.
The larger part with four support bars can be used to make a seat. In the same way we make the back of the chair at an angle, but from the second pallet. The remaining material will be needed to assemble the base and armrests. If you need to increase the stability of the supporting elements, attach additional bars to them. Before using the chair outdoors, do not forget to soak the wood with antiseptics.
Soft chair
You can use 20 mm thick plywood as a base, and waterproof fabrics (heat-resistant Oxford or impermeable membrane) for upholstery. All parts are cut out according to pre-made templates, where their optimal dimensions and angle of inclination are clearly indicated.
Next, it is important to process the ends of the product and form bends. After the sidewalls have absorbed the stain, you can begin to fit the frame.
First, they upholster the back of the chair, and then the seat. For this purpose, carpenters recommend wallpaper nails with voluminous heads.
To hide the slats, artificial leather or foam rubber is fixed along the edge at the back of the frame part. And if you need to increase the shelf life of garden furniture, the fastening points are additionally treated with wood glue.
Chair for the garden
When starting to assemble a two-seat “throne”, you need:
- prepare 2 sidewalls, 40 transverse slats and 3-4 drawers;
- chamfer the side members and cut out the side frames with a width of 110 mm;
- form the frame of the future product;
- attach the bars to the seat;
- fill the cracks, eliminate unevenness and coat the finished chair with varnish.
High back chair
If a regular product requires 5-6 boards with a slab width of 5 to 7 cm, here the back will consist of approximately 8 more voluminous elements. The optimal distance between them is 1 cm. For a slightly rounded design, the gaps in the lower part of the product will have to be narrowed. Wooden parts are fastened using the groove method, and joints using wood glue and self-tapping screws. To securely fix the supporting elements, you will need several vertical boards. For upholstery - pleasant to the touch chenille, or better yet, wear-resistant split.
If there is a detailed diagram of the product indicating the location of the cross bars, armrests, legs and backrest, the probability of technical errors does not exceed 3%.