People's lives are closely connected with the world around them. Trying to bring nature as close as possible to themselves, they bring a piece of it into their houses and apartments, fill the interiors with various plants and flowers, growing them in pots. For many, growing home plantings turns into a hobby, and the flower stock increases so much that there is no longer enough space on the windowsill or table to place the next green favorite. At this moment we have to seriously think about organizing new areas. To solve the problem, flower shelves are often used. Finished products can be bought in specialized stores, or made with your own hands.
Shelves for flowers: species diversity
A plan for the arrangement of plants in the room will help you decide what shapes and proportions to make a flower stand.
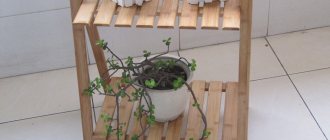
Basically, in order to save space, they try to raise them on the walls or use hanging shelves for flowers, but this is not always possible. There are plants so large that they can be placed exclusively on the floor.
This allows products to be classified as:
- wall;
- floor;
- hanging.
Further, the designs may vary in shape. They can be done:
- straight;
- curly;
- corner;
- multi-level.
- Shelves for flowers and their capacity will be divided into subtypes.
- Single, double and multi-seat models are conventionally distinguished here.
The first ones are good for wall mounting. Liana-like plants and small bushy, densely flowering greens look great on them.
- Plants with identical conditions, most often of the tree family, are placed on double shelves
- Multi-seat models are universal. You can see such shelves for flowers on the wall, on the window, on the floor. It is advisable not to place overly heavy pots on wall-mounted models. They may not withstand the load and fall out with a piece of the wall. But the one made with your own hands for flowers is initially designed to carry serious weight.
So if you build a greenhouse with large plants, then only on it.
Any of the designs considered can be assembled in a corner format. In this way, space will be saved and design talent will be demonstrated.
Fans of climbing plants may like the photo ideas for hanging shelves for flowers with ceiling mounts.
The classification is clear. What are flower stands made of? They can be assembled from any materials of sufficient strength. There is glass, plastic, and plywood. But still, for many, wood remains the priority of choice. Let's look at the most interesting solutions.
Flower shelf models
Today, there are countless decorative elements that are of practical importance in family life. We have compiled a list of existing models:
- Wall shelves. Such options are used for arranging small flower pots. They take up little space, but require mandatory mounting on the wall.
- Floor models. Comfortable, original, varied in shape. Sufficiently sustainable home accessories.
- Corner shelves. This is the most profitable option in terms of saving living space. The model fits well into any corner and fills voids, if any.
- Hanging options. Some designers affectionately call this model a “swing”. On such a shelf you can place pots with climbing plants, or you can use the crossbars of the shelf to place flowerpots.
Designer models have a huge selection of different variations. The following types of flower shelves are often found in shape:
- Ladder. The multi-stage model will create a cascade effect in your floral corner.
- A-shaped floor models. This variation, in addition to the cascading body, has a double-sided position, which favorably emphasizes the visual picture of the flower gallery.
- Rack. The simplest form of floor or wall shelf options. Here you can find the most unusual types of products: angular, straight, without crossbars.
- Sliding rack. The model is complex in execution, but convenient in practical use.
- Hanging swing. We have already mentioned this variation - horizontal planks are laid on suspended supports.
Materials that can be used in work:
- Tree. Any type of raw material is used to create a homemade shelf.
- Sheets of plywood. These are the simplest materials, but with the help of decor you can create unique accessories for your home flower garden.
- Fittings. Twisted crossbars for shelves can be made from curved metal rods.
- Sheet iron. Wide shelves with massive and durable bridges are perfectly prepared from sheets of metal.
Wall mounted flower shelf made of plywood
It’s probably impossible to find a simpler and cheaper material for making wall structures. It is easy to cut out shapes from plywood, and of any size. And you don’t need any special skills to work with it.
So where do you start creating a flower shelf with your own hands?
Are you thinking about tool preparation? Not at all.
The creative process will begin with the creation of a sketch. And here, on paper, you can pour out all your fantasies. Then there will be plenty to choose from. You can pore over the design of a future masterpiece for a long time, carefully working out all the details, but when you get carried away by aesthetics, it is important not to forget about the main purpose of the product. Wall shelves for flowers must be durable and withstand the expected load.
The next step will be to create a design drawing, indicating the dimensions and type of fasteners. We will transfer it to a plywood sheet.
It is most convenient to cut out the workpiece with an electric jigsaw. The cut lines of the finished canvas are cleaned. This can be done carefully with sandpaper. We treat the plywood with a protective impregnation to increase its moisture resistance and leave it to dry.
The finishing touch to working on a wall shelf for flowers will be to open it with varnish. If desired, the product can be decorated. How?
- Cover with beautiful self-adhesive film.
- Paint with paints.
- Decorate with rhinestones, beads, buttons, shells, etc.
- In general, show creative thought.
They try to fix the structure to the wall using metal corners and brackets.
The window shelf for flowers will be assembled using the same principle. It is fixed on the slopes of the window opening. Cascades of such small products look interesting.
From thick plywood it will be quite possible to assemble a stand for tall plants in large pots standing on the floor. But when working with your own hands on a floor shelf for flowers, you will need to think not about fasteners, but about the legs.
Ordinary pieces of timber, sawn into neat cubes, are suitable for their role.
For such a stand, stability will be very important, so it is better not to experiment and leave the structure with all 4 legs, although their number may vary depending on the shape of the structure. For example, a round, large-diameter shelf can have 8 of them, and the legs are unusually cut - in the shape of hockey pucks.
Metal constructions
If you prefer a welding machine and prefer it to woodworking tools, very unusual and original flower stands and shelves can be made from thick wire or metal reinforcing rods. They are given the desired configuration, and the individual elements are welded together.
Metal flower stand
Video - DIY flower stand
Without finishing, such structures look rough and not aesthetically pleasing, so they are painted with special metal paint. It is most convenient to use aerosol paints in cans. There is another finishing method: wrapping with hemp rope, ribbons or colored cords. So that they hold well and do not slip, they are placed on glue, coating the base with it in small areas during the winding process.
You can decorate products made from fittings using hemp rope
As you can see, anyone can make a flower shelf with their own hands if they wish. You don’t have to worry about complex designs, because there are many easy-to-follow options with detailed instructions.
DIY plastic shelf for flowers on the windowsill
It sounds like a pun, but a shelf for flowers on the windowsill is made from... a window sill. It can be found in finished form in hardware stores or purchased from plastic window manufacturers. In addition to the plastic sheet, you will need:
- nickel-plated pipes;
- flanges;
- brackets;
- work tool.
- The window sill is cut to length into three pieces of identical size.
- Next, three holes are made in each blank into which the rack pipes will be inserted.
- They are placed according to the following pattern: 2 holes at the edges of the back line and 1 in the middle of the front line. The result should be a support triangle.
- The next step in making your own flower shelf is to cut the pipes.
- The three parts are given the same length. We assemble the structure and fix the elements with flanges and screws. For greater reliability, the two rear pipes are attached to the wall with brackets.
Plastic shelf options are very practical. They are not difficult to care for, plus they are not afraid of water, which is very important in the case of flowers.
Plastic rack
The most common place to place flowers indoors is the windowsill. Using such a plastic sheet, flower racks are created. You can purchase it at almost any hardware store or order it from the manufacturer.
For the design you will need several nickel-plated pipes, fasteners, flanges for attaching to the floor and a pair of brackets, do not forget about the tools necessary for the work.
After the measurements have been taken, the window sill is cut to the required length. The next step is drilling holes for the pipes, two at the edges, it is important that they are parallel to each other, and one in the center. The length of the pipes must be the same, otherwise the structure will be unreliable and shaky. The assembled rack is secured using ceiling brackets and floor flanges.
The advantages of plastic shelving are durability, they are not afraid of moisture, and they are easy to care for.
Glass shelves
Working with glass is a rather complex process that requires some skills. If you do not have them, then it is advisable to contact special workshops.
Remember that the work requires glass with good thickness. It shouldn't break if something goes wrong.
To work you will need:
- glass cutting tool;
- hacksaw;
- large glass that is divided into 6 parts;
- 8 iron corners;
- 2 wooden planks.
Progress:
- Cut the large glass into 6 small pieces.
- In the slats we cut a groove 0.5 deep from the width of the future rack.
- We place the boards on the corners, which are attached to the wall from the bottom and top.
- We insert the ready-made rack into the grooves.
Corner shelves for flowers
To create a corner shelf, you can use all the materials listed here. For small products there will be enough leftover materials.
The technology for creating corner shelves with your own hands is very simple.
- A surface of the required size is cut from a sheet of chipboard. A galvanized pipe is threaded into the prepared holes and the entire invention is connected to each other with flanges. Using brackets it is fixed to the selected surface.
- The next stage is treatment with varnish or paint.
- To create a green corner, an interesting solution would be a kind of corner shelving. As they grow, the shelves become smaller, representing a pyramid. On this design you can arrange flowers of different sizes using climbing plants on the sides.
Corner shelf
To save space in the apartment, you can make a corner shelf from lumber. On such a shelf you can keep any plants. The procedure for preparing parts is identical to a regular shelf. The only difference is that the ends of the shelves are cut at an angle.
Assembly steps include:
- We coat the parts of the upper section with wood glue and connect them together at an angle of 90 degrees;
- We also assemble the middle and lower sections;
- after the adhesive layer has completely hardened, coat the workpieces with a primer;
- drill holes for fasteners;
- we install fasteners;
- install the shelf and secure it.
Wooden flower shelves
Wood is one of the most reliable materials used in construction.
Properly assembled and secured wooden racks or shelves can accommodate any number of plants, regardless of size. When choosing wooden wall shelves, you can limit yourself to the simplest option. To do this, take a beam of the required length, coat it with varnish or paint and attach it to the wall using metal corners.
If you replace the fastenings with leather straps, you get a creative design approach that brings individuality.
- Wooden floor racks are made for plants in large flowerpots. They can withstand a lot of weight, allowing you to combine different types of colors.
- A corner shelf can be easily assembled from scraps, even if they are of unequal length. Flowering bushes diversify the boring life of corners with their bright colors.
- For those who like unusual options, we offer wooden shelves that combine several different materials.
- The method of assembling wooden shelves or racks is the same as in the version with plywood.
Variety of solutions and materials
Before starting work, it is necessary to create a rough plan for the arrangement of colors, based on which the sizes and features of future shelves will be determined. Depending on the type of plant, two main options are used:
- wall;
- floor
The number of flowerpots located on the selected structures also divides them into several types:
- Single rooms. In most cases, they are used as wall hangings; small, densely flowering bushes or climbing dense greenery look very beautiful in them.
- Double. It is better to choose flowers with the same care conditions for them. They can be wall-mounted or floor-mounted; for the second option, large tree-like plants are more suitable.
- Multi-seat. The shelves occupy a certain section of the wall, the main thing is not to place very heavy pots to prevent them from falling; in the floor version you can place up to ten flowerpots.
Crafts from waste materials: original ideas
DIY salt dough figurines: instructions, photo ideas
All proposed options can be designed in the form of corner shelves, so you will get space savings and additional opportunities for design innovation. For lovers of liana plants, ceiling shelves are offered for consideration.
To create your own flower racks, you can choose and combine a wide variety of materials. Very often, many people choose a tree. Despite the environmental friendliness and versatility of use, do not forget that you can always find other interesting options at hand that have their own advantages. We will look at some of them in more detail.
Wall flower shelf made of wood and metal
When combining materials for flower shelves, we recommend choosing a combination of metal and wood. A welded metal frame with wooden flooring is used for wall-mounted shelves and fits very harmoniously into a modern interior.
For manufacturing, you will need a drawing with measurements, several rods that will later create the base of the shelf, and a wooden board for the partition.
After welding the main part, it must be treated with an anti-corrosion solution and painted in the chosen color. Next, the prepared wooden plank is installed, the finished product is attached to the wall using self-tapping screws.
Considering this combination of materials in floor options for flower racks, the main work is carried out according to the same plan. Preference is given to options with several tiers, and lovers of sophistication will appreciate forged flower stands.
Making a wooden ladder shelf
First, let's work with the simplest option. For work we will need:
- Wooden blanks.
- Screws, screwdriver.
- Stain, acrylic varnish.
- Brushes for working with varnish.
- Plane.
Step-by-step diagram-instructions for the master:
- Let's make the base for the stairs: this is an A-shaped blank.
- Between the two slats-legs you need to make slots for the shelves.
- We insert the shelves into the prepared slots and secure them with screws for additional strength.
- We install the shelves at such a distance from each other that flower pots can freely fit in the opening (taking into account the height of the plant).
- Each part must be processed before joining into a product. Using a plane, we get rid of uneven areas and possible snags. We cover the workpieces with stain and send them to dry. Next, you need to coat the product with several layers of transparent varnish.
- Wrap the legs of the ladder with felt so as not to scratch them later under the weight of the flower pots.
Place flowers on the shelves and admire the changes in the interior of your home.
Shelves for flowers from furniture panels and bars
Scraps of glued furniture panels can be found in furniture workshops and bought for pennies. After all, shelves require very small pieces that are difficult to find other uses for.
But you can also buy a sheet of the appropriate size.
This material is practically no different in appearance and characteristics from solid wood, it is just as easy to process and also requires a protective finish to increase resistance to moisture. The proximity to which is inevitable when placing living plants on shelves.
Step 1. Decide on the number and shape of the shelves, draw their outlines with a pencil on the furniture panel.
Step 2. From the wrong side we cover the outline with adhesive tape or adhesive tape to prevent chips from breaking off during cutting.
Step 3. Cut out the parts with a jigsaw.
Step 4. We secure the workpieces on the table with clamps and process their edges with a milling machine, rounding them or giving them a shaped shape.
Step 5. Remove all irregularities and minor defects by sanding. To avoid abrasive scratches on the surface, sanding should be done along the grain of the wood fibers.
Step 6. We also process the bars for the legs with a milling cutter, rounding the corners, and grind them until a smooth surface is obtained without scoring or burrs. If there is a desire and opportunity, they can be given a curly shape. If not, normal processing is sufficient.
Also, instead of bars, you can use ready-made balusters for stairs and railings.
Step 7. Turn the bottom shelf over, evenly space the legs on it and trace each one at the base with a pencil. Then in the center of the drawn square we drill a hole with a thin drill so that we can see where to screw in the self-tapping screw from the front side.
Step 8. Coat the ends of the legs with glue, set them in place according to the marks and fasten them with self-tapping screws using a screwdriver or screwdriver.
Step 9. Decide on the position and height of the second shelf. It moves relative to the bottom to the side, so you will need two legs of different lengths: one to the floor and the second to the plane of the bottom shelf. We calculate these dimensions, saw off the bars of the required length and fasten them according to the already known pattern.
Step 10. We attach the third tier, one of the legs of which rests on the bottom shelf, and the other on the second.
Step 11. We cover the finished structure with paint or varnish or impregnate it with a protective impregnation in two or three layers.
Three simple master classes for skilled hands ↑
We offer three options for making flower shelves that you can make yourself. We recommend diversifying the creative process with your own ideas in order to end up making a truly exclusive item.
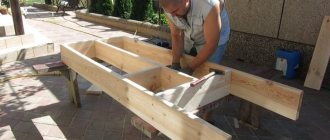
Universal shelf for a room or terrace ↑
If you want to decorate your home, porch or garden with a simple but elegant stand, you don't have to look for the right model in the supermarket. It is enough to select several boards of suitable size and assemble a simple structure from them. A three-tier, hand-made wooden flower rack with large drawer shelves is an excellent solution for amateur flower growers.
Shelf with drawers
First you need to purchase a set of boards. You can order them from a workshop or cut the blanks yourself. The dimensions of the parts can be taken from the diagram provided. This option is more suitable for a terrace or garden, but if you want to decorate a living room or hall with a similar shelving unit, the size can be proportionally reduced.
Shelf diagram
So, you will need:
- boards for the bottoms of drawers – 6 pcs.;
- short fixing parts for bottoms – 6 pcs.;
- drawer wall elements – 6 long + 6 short;
- 4 narrow blanks for sidewalls;
- 6 crossbars of different lengths for the sides.
From the side parts, using a screwdriver and self-tapping screws, we assemble two triangular shapes - sidewalls, onto which the drawers need to be attached.
Side detail
Next, we begin assembling the boxes, there will be three of them. You can do more, but then you will have to increase the height of the shelf, otherwise it will be difficult to care for the flowers. We connect each pair of bottom boards using short, perpendicularly located crossbars. Please note that a gap must be left between the boards (so that water can drain, but this is only acceptable for the garden option).
Drawer bottom
We attach the sides to the bottom with self-tapping screws from the four walls - we get a box. It will take less time to assemble the two remaining boxes.
Ready box
All that remains is to fix the drawers on the sides. Let's start from the bottom. We install it on the lowest horizontal crossbars and fasten it with strong bolts. We do the same with the middle and top drawer.
Drawer installation
The result is a comfortable, spacious shelf stand for garden or indoor crops. In large flat boxes you can grow seedlings for the garden, low greens or miniature flowers.
An excellent solution for caring for home and garden crops
Separately, I would like to say about the processing of wooden parts. It is better to apply a protective layer of antiseptic impregnation, stain, varnish or paint before starting assembly - on all parts without exception. We select the color of the decorative paint to match the surrounding interior. It is better to paint the garden shelf in a natural shade, and in two or three layers - for reliability.
Combined wooden shelf ↑
Wood is a soft and pliable material, easy to work with, which even a woman can handle. From just one small board you can build an elegant stand for three indoor plants. Its peculiarity lies in the installation of pots: they are not just lined up in one row, but inserted into special niches - holes. The photo shows a neat flower shelf suitable for making with your own hands.
To work you will need:
- a fragment of a small board (we select the dimensions ourselves according to the diameter of the pots);
- two ready-made metal brackets;
- tools for wood processing (saw or drill with attachment, sandpaper);
- set of 3 identical pots;
- several large beads;
- varnish or paint for decoration;
- glue;
- screws;
- pencil and square.
The choice of finishing material depends entirely on the style of the interior. This can be a varnish that preserves the wood texture, a dark stain, or bright acrylic paint.
First of all, cut out a fragment of the board of the required length and cut out three holes. Try to make the distances between them the same. If there is no suitable tool, the board can be ordered from a workshop.
Board with three identical holes
We sand the surface on all sides, not forgetting the cuts and ends. We give the workpiece a beautiful look using a pre-selected decorative composition.
Dark varnished base
We fix the side brackets on the base with holes. If you can't find a pair of beautiful metal holders, you can get by with wooden supports. Each bracket has holes on the top - for fastening the shelf, on the side crossbar - for fixing to the wall.
Finished wooden product on metal holders
The shelf is ready, all that remains is to prepare the pots. Let's make a basic drainage system using ordinary beads. We glue the beads to the saucers, and then to the bottom of the pots - this way we will secure the saucers under the pots so that the water does not drain onto the floor.
Lifehack for drainage
The finishing touch is to place the flowers planted in pots in niches. The result is an elegant and original composition.
Shelf with convenient niches for pots
This pot stand can also be placed on the outside wall of the house to decorate a terrace or window with beautiful blooming flowers.
Original hanging rack on ropes ↑
Often, unusual devices are used to attach wooden planes to the wall, for example, thick hemp or synthetic ropes. Rough thick ropes are a wonderful decorative element, and it is not necessary that the room be decorated in a nautical or rustic style.
Convenient shelf for flowers and utensils
For assembly you will need a simple set of tools and decorative material. The main parts are two pieces of strong rope and two (three or four) pieces of wood.
Materials and tools for assembly and decoration
To attach wooden pieces in the corners, you need to make holes using a drill. The diameter of the holes should be slightly smaller than the thickness of the rope.
Hole drilling process
Two pieces of rope are inserted so that loops are formed on top - for hanging the shelves from the wall.
Connecting boards with ropes
The lower elements are secured with large knots, the upper ones with pins or glazing beads (small wooden pins).
Inserting beads
All that remains is to drive in a strong hook or nail and hang the result of the work on the wall. There are a lot of ideas for decorating wall shelves on ropes. Perhaps in the process of work you will come up with a new original version.
Finished product options
Thick ropes can be replaced with bright cords, ribbons or chains - with each new fastening the product will acquire a different sound.
Wall shelf
A small hanging shelf can be made from any sheet material or wide board. Let's consider manufacturing from laminated chipboard, as the most difficult material to process.
The structure will consist of the following parts:
- a base that will be adjacent to the wall;
- the actual shelves, the number of which can be any;
- supports for shelves in the form of right triangles with a straight or figured hypotenuse.
First, as with any other model, a product diagram is drawn up to determine the dimensions and amount of material.
- Then all the elements are cut out from the laminated chipboard using a jigsaw. Markings are made on the base for attaching shelves and supports to it. Holes for self-tapping screws are drilled along the marking lines. The parts are first glued to the base with universal glue, and then screwed into the ends on the back side of the base.
- After the glue has set, the ends of the chipboard and the joints are puttied with wood putty. This is an excellent alternative to edges that are difficult to apply to curved cuts, especially if they are not made very carefully. All unevenness can be easily eliminated with putty.
- When the putty has dried, all surfaces are sanded with fine sandpaper or sanding mesh and painted in the chosen color.
This is how, without much effort and professional skills in making furniture, you can literally make a useful and beautiful thing for your home in just a few hours. Having made it exactly what is needed in terms of functionality and decorative design.
Where is the best place to install and hang flower shelves?
Indoor plants are the best decoration for any interior. But in order for them to look beautiful indoors, you need to choose the optimal place to place them. When creating a flower greenhouse, you should remember that home plantings require a lot of light to grow, and its intensity depends on the variety of flowers planted in pots. Therefore, before hanging shelves or placing your pets on them, you should find out the degree of their light-loving nature.
The most illuminated places in the house are located near the windows. Many flower gardeners fill their window sills with a large number of pots. However, using a window opening to place plants is not a good idea, especially if they are quite large in size and prevent light from entering the room. The optimal solution is to install a floor shelf on the side for large specimens, or use hanging or wall bars for several small flowers.
The appearance and purpose of the room plays a big role in choosing a location. For example, the hall (the hallmark of any home) usually has poor lighting, so it is best to place one or two large plants with lush greenery on floor stands. Most kitchens have little space; a hanging shelf located near the window opening or small shelves on the windowsill would look appropriate here.
The living room is the most spacious room in the house. Here you can place both large lush plants and organize an entire composition, combining different types of shelves. To decorate an accent wall, it is better to use glass structures that transmit light perfectly. It is worth remembering that shelves are not exclusively a piece of furniture; with their help, you can organize entire greenhouses on a loggia, balcony, or on a house adjoining or summer cottage.
Stands, shelves, wall-mounted and hanging options must be securely fastened, and access to even the most distant flower must be free.
Floor shelf with drawers
Such models are quite rare, but they look amazing. The step-by-step manufacturing instructions are almost the same as in the previous case, with the exception of some nuances:
- the area of storage space for pots can be variable;
- it is not necessary to adhere to a specific structure: they can “look” in different directions;
- Such shelves will be supported on a vertical base made of wood or metal;
- they can be attached to it using bolts, as in the general case;
- The most difficult thing will be to make the boxes, but it is quite possible: just prepare rectangular or square elements, and then knock them together, giving the shape of a cube/parallelepiped (depending on the desired shape of the finished structures);
- Of course, it will be necessary to provide legs or wheels; as already noted, it is best to purchase them ready-made.
The procedure is similar , only instead of holes for the rope, recesses are made for installing legs if the shelf is classic, and a special base if it is “standing”.
Which material is better to choose
There are several types of raw materials for constructing shelves:
- metal;
- plastic;
- tree;
- glass;
- combined material.
Metal structures are very durable and can withstand a lot of weight. This configuration looks expensive and solid. But it requires special care and special treatment, otherwise corrosion may occur and the flower shelves will deteriorate.
It is almost impossible to build a plastic cabinet yourself.
It can be ordered in stores or online. They are unpretentious and very easy to use. Sections can be chosen in any shade. Since plastic is very flexible, crafts made from it can have different shapes and sizes. They are easy to wash and move as they are lightweight.
Wooden crafts are very popular. But the furniture is not convenient to use. When watering plants, water often gets on the surface of the stand or board, which can rot and swell.
If you decide to build a shelf out of wood, it must be carefully processed and the surface well coated with a special varnish.
Glass structures have a simple, elegant appearance, but to build it you need to have experience working with glass. They need special care. And you can’t put a lot of weight on such stands. They are good if you need to place one or two pots.
Combination sections include several components. Usually it is wood with metal or glass with metal. The crafts have an unusual appearance. They can withstand a lot of weight due to the combination of materials, and are not very fussy about cleaning.
The benefits of creating a masterpiece yourself
The main advantage is that such work costs significantly less than buying a flower rack in a store.
To make furniture you will need a little patience, raw materials from which the craft will be made and tools.
The range of store stands is very small. Not all purchased ones are of good quality. Most often, in stores and on the Internet, there are the same type of cabinets that are found in every home. Some sections will not fit your interior or room dimensions.
When making a craft with your own hands, you have the opportunity to independently choose the size, shade, design and location of the structure. New universal furniture will only be in your home.
When creating outdoor furniture for plants, it is possible to take into account the nuances of its placement.
Build it so that the flower rack is out of the way and does not have to be walked around. You can create a sliding or moving structure that can be moved to the desired location at any time.
To make a stand, you don't have to buy something from the store. You can build a stand from an old garage cabinet or an unnecessary ladder.
Necessary materials
To make a classic shelf you will need:
- board made of wood, chipboard, MDF, plastic or metal;
- plywood;
- screws;
- plugs;
- additional tools;
- paint for decoration;
- varnish (when working with boards).
Additional tools can also be used to decorate the structure. If the furniture is floor-standing, you may need legs or wheels to secure the cabinet to the floor.
Required Tools
To assemble the configuration you will need the following tools:
- screwdriver;
- building level;
- electric drill;
- saw;
- pencil for marking;
- hammer;
- screwdriver;
- roulette;
- ruler.
The choice of fasteners will depend on the raw materials of the future configuration. The heavier the raw material, the more powerful the fastening is needed. If you plan to install a wall-mounted flower rack made of metal, then you must use a welding machine for fastening.
Otherwise, there is a chance that the stand will fall soon.
The final stage is decoration
When creating a rack, you can come up with your own product design. By choosing the right materials and spending a little time, you will get a unique masterpiece!
- For example, a plastic product comes in different palettes. To make the design original, you can attach decorative handrails to it.
- The wooden shelf is coated with glitter varnish. This gives shine and shine to the product.
- Glass shelves are often decorated with patterned metal elements.
In addition, for a craft to become beautiful, it is not necessary to paint it or attach anything to it. It’s enough just to place pots and beautiful pebbles, toys, and shells on it. Furniture can also be decorated with various fakes and toys.
Don't be afraid to experiment! Create new masterpieces and improve your skills! A rack for indoor flowers is just the beginning. Nothing decorates your home like handmade items.
Corner shelf made of wooden blanks
Now we will find out how you can decorate your apartment with home flowers while saving space. For work we will need:
- A blank made of reinforcement or sheet iron.
- Wooden bases for shelves.
- Jigsaw for working with workpieces.
- Stain.
- Acrylic lacquer.
- Brushes.
- Parts for connecting parts (screws, screwdriver).
Step-by-step diagram-instructions for the master:
- Metal crossbars can be welded from twisted reinforcing strips, but ordinary iron slats can also be used.
- The base must be stable and have fastenings for shelves (these must be wide metal platforms).
- We work with wooden blanks. Prepare a template in the form of a patterned sheet. According to the layout, we draw a figure on each wooden layer. Using a jigsaw we cut out our shelf sheets.
- We get rid of unevenness and roughness (you can use sandpaper).
- We cover each part with stain and several layers of acrylic varnish.
- After our product has dried, we begin assembly. We place the shelf leaves on metal platforms and fasten them with screws.
- The main thing in this model is the location of the corner shelf parts. The central axis of the frame must be strong and large enough in diameter.
- Additional branches with metal platforms are attached to the central bar. The main idea of this model is the formation of figured shelves at a distance from the central axis in a checkerboard pattern and at different heights.
Install the floor model in any free corner of your home. If you plan to place a large weight on the shelf, we recommend strengthening the central bar by screwing it to the underlying wall.