Choosing wood for the countertop
In order for the tabletop to maintain its impeccable appearance for as long as possible, you first need to choose the right wood from which it will be made. Of the domestic wood species, the most moisture-resistant are:
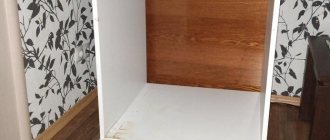
- Larch,
- Nut,
- Oak,
- Ash.
Oak is rightfully considered one of the most moisture-resistant wood species.
Less resistant breeds include the following:
- Cedar,
- Alder,
- Spruce,
- Pine.
Attention! It is not recommended to use linden, birch, aspen, maple and beech wood in the bathroom. These rocks, regardless of the quality of their processing, quickly absorb moisture and begin to rot.
In addition, wood of the same species can be of different quality based on its density, age and location in the tree trunk.
The appearance of the countertop depends on the chosen processing method. Both thorough grinding, which guarantees a perfectly smooth surface, and deliberately left uncut and rough edges are considered acceptable. In some cases, brushing, artificial aging or firing is used. The processing method provides only a visual effect and does not affect the performance properties of the product. For this reason, the choice of wood treatment depends on the preferences of the craftsman and the overall style of the room.
Materials
The durability of the product is determined by the materials used.
Tree
An array of dense rocks is the most moisture resistant. The tired articles about merbau, “mahogany”, and yacht teak are far from the realities of amateur craftsmen. Oak and larch are worthy candidates, proven over centuries. Other local lumber requires particularly careful moisture protection.
Solid oak panel.
Larch
Visual difference of a spliced shield.
The benefits of wood are known:
The optimal thickness of the shield is 40 mm, the shelves are usually twice as thin. Considering the presence of cutouts and dampness, a shield made of solid longitudinal bars is preferable.
Once you've forked over the cash, get ready for painstaking work that requires skill. Haste will ruin the workpiece: take into account moisture, hardness, fiber direction, and the presence of defects.
Wood-based substitutes
Budget chipboard is allowed only in laminated version - laminated chipboard. Pay special attention to the quality of the edge edges. The boards swell due to water penetration along the peeled melamine film.
The imaginary well-being of a laminated facade.
The initial stage of cracking of the coating.
In terms of performance in a humid atmosphere, it is inferior to laminated MDF. High density samples (more than 700 kg/m³) are preferred. “Loose” chipboard holds fasteners worse than MDF, not to mention solid wood. The result is falling fittings, doors, moisture saturation, peeling protective and decorative layer, formaldehyde emission.
The negative is partly brightened up by low cost and good workability. Cut MDF sheets, due to their microporous structure, do not crumble and are easily sanded, surpassing the performance of laminated chipboard.
The running thickness of chipboard sheets is 20 mm. Waterproof grades of plywood and fiberboard go to the bottoms of the boxes. Vulnerability is mitigated by coatings. An analogue is a plastic sheet 3–5 mm thick.
Drywall, glass
Built-in furniture is often made from plasterboard. The galvanized frame is sheathed with gypsum board sheets, the profiles are screwed to the wall in order to increase the rigidity of the frame and save construction. The bedside table turns out to be stationary.
Fast processing, minimum required tools are attractive; democratic price. The plasterboard countertop is tiled over waterproofing. The solution provides water resistance, hygiene, and stylish design.
The disadvantages are similar to those of particle boards: hygroscopicity, loosening of hardware. Drywall needs two-sided finishing. It is interesting to cover the façade with flexible PVC panels and paint the inside.
Glass is potentially traumatic. Glass doors and shelves are suitable for living rooms; do not take risks by placing glass, even tempered glass, near the bathtub floor.
How to choose material for a bathroom countertop
There are several options for making a countertop, and not in all cases it should act as a supporting structure for the sink. Sometimes you can have the sink supported on wall brackets, but still have a matching countertop. In this case, there are no great demands on the tabletop in terms of strength. If the sink will rest on the countertop, then the material for it should be strong:
- a natural stone;
- fake diamond;
- solid wood;
- MDF;
- Chipboard.
Naturally, the thickness of the material should be greater, the lower its density. If stone is chosen as the material - no matter what: artificial or natural - such a countertop is easier to calculate and order at the factory, because even if you have a stone-cutting machine, not everyone can cope with the figured cutting of the hole for the sink. But it must follow its contours with high accuracy.
It’s somewhat easier with wood or materials made from it. A jigsaw can handle them. But we must not forget that the bathroom is a wet room, so such materials require mandatory trimming. Otherwise, the edges will swell and take on an extremely unattractive appearance. It turns out that a bathroom countertop cannot always be made from such materials. Trimming products may not be available for home use. So all you have to do is install the countertop itself. Well, you can also assemble a cabinet with shelves under it and attach doors to it.
Preparation for installation
Before you begin installing a sink, you should familiarize yourself with the main points that every owner should know about.
What is needed for installation
To complete the installation of a built-in sink, you will need the following tools:
- building level;
- a jigsaw or drill; if you don’t have them, you can use a screwdriver;
- cardboard, tape measure, pencil;
- silicone based sealant;
- screwdrivers, self-tapping screws;
- steel corner;
- masking tape and sandpaper.
For high-quality installation of a built-in sink, you need a template, which often comes with the sink. If it is missing, then you can make it yourself by taking the measurements correctly.
Mounting options
There are three installation methods that can be used to install an undermount sink:
- Recessed - with this installation method, the edges of the sink are located at a height below the level of the countertop. If the choice is in favor of this installation method, then it is necessary to use a product with a side. The cut edges of the tabletop should be treated with silicone sealant.
- Flush - when this installation method is used, the countertop and sink are a solid structure. The edges of the tabletop should be cut in such a way that the edges of the product will then lie on them. A sink installed this way has the longest lifespan because drops can be brushed away and will not end up under the sink.
- Elevated - this installation method is used for the bathroom. A large range of products allows you to create a luxurious design, even using inexpensive plumbing fixtures.
Advantages and disadvantages
The following arguments speak in favor of a homemade countertop with ceramic cladding:
- affordable price . Branded granite and marble countertops, especially those made to order according to consumer sketches, are much more expensive;
- diversity. There are countless types of tiles on sale with different textures, colors, patterns and surface types. This allows the home designer to create an exclusive product that fits perfectly with the bathroom interior;
- excellent characteristics. Ceramic tiles are moisture-resistant, durable, stable to temperature changes, and are easy to keep clean. Porcelain stoneware has the best characteristics: due to the absence of pores, it is close to natural stone in terms of strength, wear resistance and water resistance.
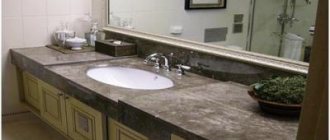
Popular design ideas
Monolithic design
Fashionable design solutions for bathroom interiors:
- Shells are selected depending on the wishes of the owner. They can be symmetrical or asymmetrical. Double sinks, which are mounted into the countertop or located above it, are popular.
- Use of a single color and material. The requirement applies to the design of all surfaces: walls, ceilings, furniture. More often they stop at pale shades. When choosing a dark color scheme, be sure to add light spots: plumbing fixtures, lamps or decorative elements. Otherwise the room will be gloomy.
- The popularity of monolithic countertops with a sink is growing. They look stylish and easily fit into any design.
Depending on the cost, they buy a budget model in a retail chain or choose individual production to order. Designer products are more expensive.
Which bathroom countertop is easy to make with your own hands?
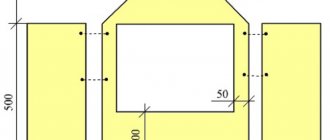
Standard bathroom countertop sizes.
Standard bathroom countertop sizes.
There is a surprisingly pliable material for processing that is easy to work with at home. This is drywall. But is it really suitable for such a damp room as a bathroom? If you approach the problem creatively, then everything can be solved. It’s just that the countertop will need additional finishing that is not afraid of moisture, and which will be as easy for you to handle as making the countertop itself.
The structure made from plasterboard will be hollow, so you do not need to remove the brackets that hold the sink from the wall. They will simply end up inside this countertop, and even if there is no cabinet underneath, this will not change anything: they will become hidden, which will only improve the aesthetics of the room.
Scheme for installing a sink in a countertop.
Scheme for installing a sink in a countertop.
Now we need to decide what we will cover the tabletop with in order to provide it with reliable protection from water. It would be logical to use the same material as on your bathroom walls - tiles. If the walls are simply painted, then it doesn’t matter what you cover the tabletop with, but not with paint, since over time it will not withstand drops of water or even small puddles.
An excellent choice would be tile, glass or mosaic. But besides tiling your countertop, you need to think carefully about the seams, because they will also be exposed to moisture. Therefore, tile adhesive should be chosen that is moisture-resistant or intended for outdoor use, since outdoor tiles come into contact with precipitation and are subject to significant temperature changes. But also a made countertop in the bathroom
will be no less susceptible to the aggressive effects of the surrounding microclimate. And the smaller the bathroom, the more pronounced this impact will be.
Features of installation of built-in models
Installing a built-in sink, or rather connecting it to water supply and sewerage systems, is not much different from the process of installing other types of washbasins. The difference is observed only at the installation stage of the bowl itself. Installation of a sink built into a bathroom countertop is carried out in several stages.
Preparing the base
After dismantling the old washbasin, check whether the new sink is the right size. The main thing when installing a built-in sink is that the dimensions of the bowl match as closely as possible with the hole in the countertop. If yes, then you just need to insert the bowl into the hole. To prevent the bowl from sliding and turning during operation, a rubber edging is glued around the perimeter of the cutout in the tabletop.
If the bowl does not match the size of the hole left after the previous plumbing, you will have to purchase a new countertop. If the cutout turns out to be smaller than the size of the bowl, in order to save on expenses, you can simply “expand” the boundaries of the hole in the old countertop. The easiest way to do this is to outline the contours with a pencil, placing the bowl on the surface and outlining it.
To prevent the bowl from completely “failing” into the hole, retreating 10 mm to the inside of the intended contour, draw a new contour along its entire outline, along which a cut is subsequently made
At the same stage, marking the installation site of the mixer is carried out. When placing the bowl, it is important to observe two conditions:
- It should not be located close to the wall.
- It should not be at the very edge of the tabletop.
Using a jigsaw, cut out the internal niche. To do this, first drill a hole at the edge of the niche. A jigsaw blade is inserted into it and then it is cut along the contour.
Fastening the structure
After the cut tabletop niche is removed, you need to remove sawdust from the cut and remove dust. The end surface of the cut hole is sanded with sandpaper or a file.
Precision processing of the edges of a cut hole in a tabletop can be done using files equipped with medium to large teeth.
The cut areas are covered with a thin layer of silicone sealant. A sealing tape made of foamed polyethylene or thin rubber is “placed” on the sealant. The edges of the sealing tape protruding above the surface of the tabletop by more than 1 mm are carefully cut off with scissors or a knife.
After this, the tape is degreased with alcohol and re-coated with a layer of sealant.
The bowl is placed on the cut, ensuring as close contact as possible with the edge of the surface. To ensure a tight fit, the bowl should be rotated slightly.
To adjust the contours of the tabletop relative to the dimensions of the bowl, you will need files.
Built-in bathtub sinks are secured to the inside of the countertop with special brackets or screws that come with the product.
It is better to tighten the screws with a screwdriver, since using a screwdriver can only cause harm by accidentally overtightening and breaking the fasteners. All cracks and gaps between the bowl and the countertop are treated with a sealing compound.
The same actions are performed when treating the places where the mixer comes into contact with the countertop. Silicone that is squeezed out beyond the cut when installing the sink should be removed with a damp cloth.
At the final stage, the built-in sink is connected to the water main and sewer drain. The connection technology is similar to that used when installing conventional sinks.
Installing a built-in sink into a countertop is a simple but painstaking process. By strictly following the installation technology, you will create a reliable and durable structure that will delight you with its presentable appearance and excellent performance.
Video review of built-in sink options:
What to look for when choosing a bathroom countertop
Basic moments:
- Resistance to moisture (for durability, the tabletop must be resistant to moisture; materials such as wood and drywall do not tolerate moisture well).
- Quality of material and high-quality work (you shouldn’t skimp on the craftsman and buy cheap material, otherwise over time there will be many problems with the countertop).
- Resistance to temperature changes (it happens that the material is of high quality and the work is done correctly, but after a year (or less) the tabletop needs to be replaced; some materials are not able to withstand temperature changes).
- Installation method (this point must be thought through from the very beginning, how it will be located, how it will be installed or how it will be fastened).
- The material from which the countertop is made (there are a large number of different materials, when choosing which you need to familiarize yourself with all the nuances).
- Harmony with the interior (color, shape of the countertop, its location, and how it combines with the overall decor of the bathroom).
- Convenience and practicality (it should be aesthetically beautiful, comfortable and functional, contain everything you need).
Built-in sink shape
For such washbasins, the bowl configuration can be very different. The most important point is that the size of the bowl and the hole in the countertop match. In any plumbing supply store you can find the following types of built-in sinks:
- The oval-shaped sink is a traditional model, characterized by practicality and versatility of use;
- The rectangular sink has strict and laconic shapes as its characteristic features. The product built into the countertop looks the most advantageous;
- A built-in sink with an unusual configuration is an ideal choice for those who want to create a non-standard interior in their bathroom.
Stages of countertop manufacturing and installation
- Stage 1. Place the wooden board on a flat surface and fix a special template on it for cutting out the necessary holes (for washing). You can use tape to attach the template.
- Stage 2. Drill holes for fasteners, then use a jigsaw to cut holes for the sink and other communications.
- Stage 3. Decide on the installation height of the sink, which depends on the thickness of the floor covering, glue and other parameters. Measure the length of the legs, transfer the measurements to a previously prepared board, and then cut two blanks from it.
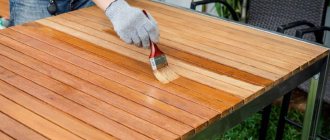
- Stage 4. High-quality sand the tabletop and workpieces, remove all accumulated dust. Treat materials on all sides with antifungal and water-repellent agents. Then cover the wood with 2-3 layers of varnish, wax or paint. Wait until the workpieces are completely dry.
If you follow simple recommendations, a do-it-yourself tabletop will delight its owners for a long time - Stage 5. Prepare markings for fasteners on the bathroom wall. To do this, place a level to the base at the proper height and make marks with a pencil (the distance between them should be 40-50 cm).
- Stage 6. Drill holes in the wall according to the marks, insert dowels and screw the brackets using self-tapping screws. L-shaped brackets reinforced with stiffeners are often used. If the brackets do not have holes for fastening to the tabletop and wall, then they are drilled in advance.
Attention! It is necessary to double-check the horizontal position of the brackets to avoid distortions.
- Stage 7. Attach the legs to the wooden tabletop using metal corners and screws. Place it firmly against the wall and screw it to the brackets. Insert the sink into the hole, connect the siphon and turn on the water supply. Then treat all joints with silicone sealant. Video instructions that can easily be found on the Internet will also help you complete this work.
How to decorate a countertop with tiles?
This process is performed according to the following algorithm:
- Cover a sheet of plasterboard or plywood in two layers with a waterproofing compound. Bitumen mastic is perfect for this job.
- Place a gypsum fiber sheet on top with a hole made in a format suitable for a sink.
- Apply a special glue suitable for working with tiles to the plywood. Press down the gypsum sheet firmly. It is recommended to treat the place where it connects to the wall surface with a silicone-based product.
- Lay the tiles. To make the work as successful as possible, make markings: mark the middles on both edges, draw lines through the indicated points so that they are located at an angle of 90º relative to each other. At the bottom of the surface, attach the slats, which in this situation will act as supports. Cover the surface with a primer. After it has completely dried, it is recommended to start laying the tiles. Apply the adhesive using a staple. Start laying from the corner part. To ensure that the finished countertop looks neat, check the evenness with a level.
- Grout the joints. For this purpose, it is most convenient to use epoxy resin, which is recommended to be spread over the surface with a spatula. Remove excess substance with a slightly dampened rag.
At this point the work can be considered completed.
How to choose grout for a countertop
Water may accumulate on the horizontal part of the countertop - this is a natural process. This means that the grout must withstand a humidity of 100%. Only antibacterial grout can do this. She is good in this situation from a hygienic point of view. It is best to choose a material that is used for swimming pools, since in its bowl there is water, and unusual, but very aggressive parameters, which are due to the bleach and copper sulfate dissolved in it. We remember from school chemistry that vitriol is a reagent! But the grout can withstand it.
The countertop will be subject to approximately the same “chemical attack” when the housewife begins to rub it with all sorts of “comets”, “domestos” and other aggressive hygiene products. So, firstly, the grout must withstand all these household chemicals, and secondly, the housewife herself should have less reason to use such radical means. That is, the tabletop should be easy to clean by rubbing with a damp cloth and not accumulate dirt. If the tile is chosen in a dark shade, then you need to try to find a colored grout for it, which will also not be very light, so that it does not seem dirty, even when it begins to fade with time.
Features of caring for a wooden tabletop
To ensure that a wooden tabletop does not lose its attractiveness for as long as possible, you should follow a few simple rules:
- Avoid prolonged contact with water - any splashes or drops should be wiped off immediately with a clean cloth;
- When cleaning, do not use hard brushes, abrasives or caustic chemicals;
- periodically the surface must be treated with water-repellent compounds;
Water repellent - Chips and scratches should be repaired as quickly as possible using putty or varnish.
Tikkurila putty
Furniture varnish
Traditional methods of furniture restoration
With careful use, the countertop will always look like new, and you won’t have to replace it for a long time. If you want to change the interior, the wooden tabletop can be repainted in a different color or decorated with tiles - as your imagination dictates. How to install a boiler in the bathroom, read the link.
Below is a master class on making a massive countertop for a bathroom sink made of oak.
Advantages of built-in sinks
These sinks have several advantages.
- They look attractive.
- Compared to overhead products, they are cheaper.
- The installation process does not pose any big problems.
- In small spaces, using built-in sinks is the most profitable option.
- Built-in sinks eliminate the need for wall mounting. Therefore, the owner can keep the newly created wall cladding intact.
- By installing a washbasin built into the countertop, you can hide under it such unsightly elements as a drain, shut-off valves, and pipes.
Do-it-yourself ventilation for a cabinet under the countertop
If you are going to store laundry under the sink, there must be air access to it. To do this, you can make the doors so that there is a natural gap above them. But the geometry of this gap must be calculated so that it does not look sloppy and does not create the impression of improperly trimmed or incorrectly hung doors. Everything should look proportional and organic.
If the doors are made of chipboard or MDF, then they do not need to be finished. The main thing is that they have a trim. If you plan to make gaps not only in the doors, but also in the sides, then you need to do a complete processing of the end surfaces. Drywall should also be laid inside the hole, and mosaic should be placed on top of it. This dictates the shape of the vents: they should be either square or rectangular slits.
If you still prefer round holes, then be prepared to insert, or rather, glue pieces of plastic pipe into them. Its edges need to be beautifully processed, for example, with a chamfer. And the pipe itself must have a tight connection with the tile or mosaic due to the same moisture-resistant glue and grout. Pipes need to be selected according to color so that they are in harmony with the rest of the design of the countertop.
Another option for ventilation is perforated doors. If the style allows, you can even install artificial rattan doors. Their wicker structure facilitates the passage of air inside the cabinet.
When the cabinet is ready, you can install the sink in place and pay due attention to the drain hole, or more precisely, to its sealed connection to the siphon. The future “health” of your countertop largely depends on this. There should be no leaks under the sink. The edges of the sink adjacent to the countertop must be coated thoroughly with sealant. And everything will be ready.
How to choose a countertop for a bathroom sink
You can argue endlessly about which is better, since there is still no ideal choice. Each material or shape has its own advantages and disadvantages. You can choose the best option for a given situation, but to make a decision you need to clearly know the properties, pros and cons of each solution. So that the operating features are not an unpleasant surprise.
There are very unusual options
Made from laminated chipboard and MDF
Both chipboard and MDF are made from wood scraps. It is crushed and then formed into slabs. The difference is that in the production of chipboard, a larger fraction is used and a binder is added for strength. This binder releases formaldehyde, which can be harmful to health in large quantities. This parameter—the release of formaldehyde—is controlled and specified in the documents. It is designated by the Latin letter E and numbers from 0 to 3. The safest class is E0 - the level of emissions is no more than that of wood. E1 is safe - it can be used in the manufacture of children's furniture. Other classes are not permitted for residential use. Therefore, when choosing a countertop for a sink, pay attention to this aspect.
Moisture-resistant MDF bathroom countertop
In the production of MDF, wood is split into very small fragments, almost into fibers, then it is pressed under high pressure without foreign additives, sticking together due to the natural binder contained in the wood (lignin). When finished, the wood fibers adhere so tightly to each other that moisture practically does not penetrate inside. That is why, if you choose between a countertop made of chipboard and MDF, you should choose the second option. In addition to being environmentally friendly, it is also less susceptible to moisture. For a bathroom this is a very important property.
Even if the bathroom countertop under the sink is made of moisture-resistant chipboard or high-pressure MDF and covered with a laminating film with a pattern on top, you should not count on a very long service life. The weak point of such products is the edges and back side. Only the front surface and edge are laminated. The rest are left without protection. To extend the service life, all open sections (the cutout for installing the sink too) are treated with sealants. Sanitary sealants are excellent for these purposes; you can use silicone sealants for aquariums.
MDF and chipboard - economical option
But even with this treatment, the service life is several years. And the main condition is that the laminating film on the surface remains intact. These countertops are easy to clean - all dirt can be easily removed from the smooth surface, but you can only use a damp cloth, make sure that water does not remain on the surface for a long time, and do not use abrasive products. In general, quite problematic.
Natural and artificial stone
They are actually two different materials, but the appearance may be similar. A bathroom countertop under a natural stone sink is made from a slab several centimeters thick. Holes are made in the right places, then ground and polished.
The stone looks very beautiful, but requires large volumes
These are expensive models that look good in spacious bathrooms. They are durable, not afraid of water, but they weigh a lot, which makes installation difficult. There may also be problems with care. You need to know what kind of stone the countertop is made of so you know what cleaning products you can use. For example, marble cannot be treated with chlorine-containing preparations; granite does not withstand such tests. So care must be selected individually. In general, it’s expensive, beautiful, reliable, but maintenance can be a problem.
Artificial stone is natural stone crushed to a state of fine crumbs, mixed with a binder (polyester resin or acrylic). This mixture is poured into a certain shape, after hardening we get a monolithic slab with an integrated sink (or without).
Artificial stone can take any shape
The advantages of this material are the ability to obtain any shape and a wide variety of colors. The performance characteristics are excellent: artificial stone is not afraid of water, it is easy to care for, you can use non-abrasive detergents (to avoid scratching) and wet rags or sponges. The material is resistant to loads and does not wear off; significant force must be applied to damage it. And only countertops using acrylic as a binder have a limitation - it can melt at high temperatures. But if no hot work is expected in the bathroom, you can use such countertops without restrictions.
From glass
The glass countertop fits perfectly into large and small bathrooms. They are made from thick tempered glass. It can be completely transparent or with some tint, or it can even be colored. No one doubts the moisture resistance of this material, but many fear the fragility of glass. Of course, there is a chance to break this glass, but this requires significant effort. In families with small children, they probably shouldn’t be installed, but in other cases there are no contraindications.
The glass looks great, but you will have to rub it often
Just keep in mind that any stains on the glass are very noticeable. You will have to rub the surface constantly to ensure cleanliness. In general, a glass countertop for a bathroom under the sink is for those who love cleaning.
Wood
Many people think that wood in the bathroom is not the best choice. This may be true, but with proper processing it will serve no less than earthenware or porcelain. Yes, it requires more careful care, but this drawback does not negate the decorative properties of wood.
Floor
An optimal and easy-to-install option that is in consumer demand. It is enough to place the structure where the washbasin is located and adjust the height.
Once connected to the water supply, you can freely use the countertop. Built-in cabinets contain the necessary things, some models are equipped with shelves.
The choice of countertops suggested by nature itself
Wood has long been considered a unique and versatile material. The texture, color tone, strength, and environmental friendliness of this material have always attracted designers, architects and builders.
Wood products are timeless classics that will be appreciated at all times.
Without a doubt, the choice of a wooden worktop expresses the good taste of its owner, who has realized the dream of an original and sophisticated bathroom, characterized by prestigious solutions that reflect an individual lifestyle.
Metal countertops
Among the huge assortment of finished goods, you can also find metal countertops, which are also popular today. They have sufficient strength and go well with almost all interior styles.
In addition, in the production of bathroom furniture, preference is given to metal alloys that are resistant to corrosion, which significantly extends the life of the countertop.
Applying oil to an oak countertop
For application I took a piece of foam rubber. After use, you can immediately throw it away, but you can use any other application methods. Although the oil I chose does not contain aggressive solvents or biocides, it is still better to work with gloves.
Apply the oil in an even layer and let it soak in for 30 minutes. Afterwards, if there are dry areas, distribute the oil from other parts of the countertop. If it shines evenly, then wipe it with a rag. We get a matte, uniform surface. Leave for a day, then apply a second layer and leave again for a day.
Attractive idea and practical disadvantages
A sink with a bedside table combines the functionality of two devices. There is space saving, which is relevant for a small bathroom. Additionally you receive:
An original hand-made cabinet for a ceramic sink in a home bathroom will bring ideas to life and, if desired, save the family wallet.
The rosy impressions will be spoiled by:
To make a do-it-yourself bedside table for a standard sink in your bathroom, you will need:
Branded bath furniture is designed taking into account the operating conditions. When starting creative work, evaluate the feasibility by comparing costs and characteristics.
How to install the structure
There are several ways to install a countertop in a bathroom:
- with the help of brackets - solid structures;
- to the finished cabinet;
- with installation of the frame - installation.
Installing floor structures will not take much time, while wall mounting will require the use of additional tools. In this case, they often resort to the help of a specialist.
Modern finishing materials allow you to give free rein to your imagination and create your own masterpiece. Don’t be afraid of experiments, create, try, and then the result of your creativity will serve you faithfully for a long time.
Criterias of choice
Let us remind you that the product range includes four groups of products:
- Built-in below the tabletop.
- Built in from above.
- Semi-recessed.
- Universal.
There are a number of characteristics common to all types of products. In addition to the material and shape of the product, these are:
- dimensions – height, depth, width;
- presence or absence of a pedestal;
- equipment - bottom valve, siphon, drain-overflow;
- installation method - to a cabinet or to a tabletop.