The hallway creates the first impression of the apartment and the people who live in it. The beautifully designed entrance area communicates the homeliness and hospitality of the owners.
If the room is well planned, there is enough space in it to comfortably dress and put on shoes, help a lady take off her coat, put bags and shopping. Let's take a step-by-step look at how to make a hallway with your own hands.
Design project
First, let's analyze the planning features of the room.
Hallway configuration
An elongated narrow corridor needs to be visually expanded. A sliding wardrobe with mirrored doors installed along a long wall will add air and light.
Painting the ends of the room in darker colors than the side walls will help visually shorten the length. Horizontal stripes will expand the space.
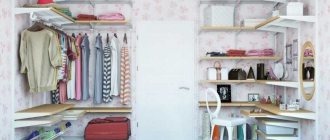
A small hallway will require a thoughtful, compact solution to save every centimeter. Mezzanines, narrow wall hangers, and folding shelves would be appropriate here. A corner cabinet will help save space.
A large hallway allows you to create additional storage areas for sports equipment: bicycles, skis, skateboards, and for household items: vacuum cleaner, ironing board.
Key points
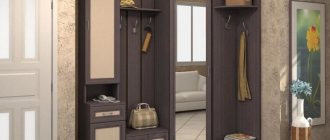
Often hallways have a small area. Accordingly, it is recommended to install narrow furniture, the depth of which is no more than 50 cm. The main thing is that the passage in the corridor is not blocked. Otherwise, such a cabinet will simply be inappropriate. You can immediately remove a couple of cm from the total depth, as they will be eaten by the doors. However, if the hallway is of an accessible size, you can afford a larger wardrobe (depth 60 cm).
For hallways with a small area, narrow cabinets of small depth (up to 50 cm) are ideal.
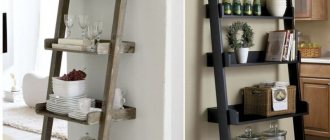
Be sure to take into account the fact of filling. For example, in a bedroom or living room, shelves and laundry baskets serve as standard filling elements. The closet in the hallway requires you to allocate space in addition to clothes for service items. The more additional components and elements for filling are present, the higher the cost of the product. Therefore, before purchasing, think about how many things you are going to store.
One example of filling the space of a hallway closet.
Design
It is advisable to design the hallway in the same style as the rest of the rooms. At the same time, the design can be diversified with artifacts that express the individuality of family members.
Posters or paintings placed in frames on a free wall will tell about your passion for art. An original banquette with ethnic motifs and exotic little things will communicate your love of travel.
Required materials and tools
Prepare in advance:
- saw or jigsaw,
- screwdriver,
- sandpaper,
- construction knife,
- furniture screws,
- roulette,
- corners,
- loops.
You will also need material for making a hallway . We recommend that you give preference to furniture board , since it is made from natural components without the use of synthetic resins. Such a shield is completely safe for the health of people living in the house. However, this material has a high cost.
common laminated chipboard is popular . It contains bonding resins, which can negatively affect the occupants of the house if the edges of the laminated board are not covered with edging. But at the same time, the material has a relatively low price and excellent characteristics (it is easy to work with).
Floor repair
To repair the floor, the old covering is removed and unevenness is corrected with a thin layer of screed. Then a soundproofing or other underlying layer is laid, depending on the type of flooring.
Quite often, large-sized ceramic tiles or porcelain stoneware are used in the hallway. The solid material is resistant to mechanical stress and has various textures similar to natural stone and wood.
Another popular material is laminate, usually at least 32 washability class. These materials can be combined: the entrance area near the door is covered with porcelain stoneware, and the rest of the hallway is covered with laminate
A common covering option in the hallway is semi-commercial linoleum. It is also resistant to heavy loads and comes in a variety of colors and textures.
Ceiling repair
The ceiling is made of suspended plasterboard. You can hide electrical wiring behind it. Drywall allows you to beautifully play up the differences in protruding structures on the ceiling and highlight individual functional areas.
- Pool finishing: description of all types and features of modern finishing
- How an independent examination of construction work is carried out: an overview of all stages
Fasteners for the construction of frame houses: features of the right choice
A stretch ceiling will look beautiful in a large hallway. A glossy monochromatic surface visually increases the height of the room. A suitable pattern on the canvas will help complete the stylistic design of the interior.
The hallways of small apartments have a small height. The surface of a low ceiling is leveled with putty, cleaned and painted with water-based paint or finished with ceiling tiles.
What can the hallway be made of?
Today the most popular material for furniture production is MDF. This is due to its performance characteristics, wide variety of textures and affordable cost. Also, hallways can be made of chipboard and have plastic or metal parts.
Small entrance hall in a modern style corridor
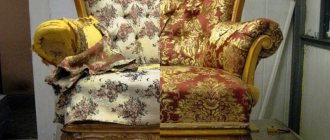
However, wood has been and remains the most attractive material in terms of aesthetics, environmental friendliness and durability. But the price of solid wood structures is significantly higher than models offered by manufacturers made of slab materials, which also contain wood.
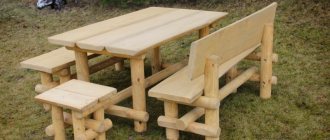
A hallway made of solid wood is a chic and practical interior design solution.
Furniture finishing can also be different. You can decorate interior items using decorative and mechanical processing of wood, using inserts made of material or leather, using interesting fittings.
It is quite possible to make the elements of the hallway with your own hands. Let's look at a few examples.
Furniture in the hallway
DIY wardrobe
A home craftsman can independently make the main element of the hallway - a wardrobe. First, you should draw a sketch and plan where outerwear will hang, shoes will stand, and where hats will be placed.
The dimensions of all elements are determined in the drawing. To work you will need:
- furniture panels;
- plywood;
- furniture fittings;
- screwdriver;
- self-tapping screws.
Blanks from furniture panels are cut out according to given dimensions: side strips, base and shelves. A sheet of plywood is used as the back wall. The top cover must be overlapped. The entire structure is assembled using self-tapping screws, and wood glue is used for reliability.
Mark the location of the clothes rail. It should be located 4-5 cm below the top shelf. Now you need to screw the holders and insert the bar itself.
The doors are cut out of panels and each is hung on three hinges. Finally, the handles are attached and all surfaces are tinted with varnish.
conclusions
It is believed that the hallway is the face of the room. It is by its arrangement and appearance that one can draw a conclusion about the owner. Therefore, you should carefully consider all the details and equip it with beautiful, practical and compact furniture.
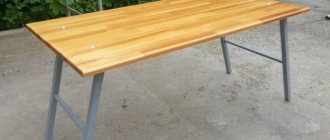
- Do-it-yourself folding table - step-by-step instructions for building and decorating a stylish design (80 photos)
DIY gates - 120 photos, drawings and sketches of simple modern and classic gate options
Shelf for a phone - 100 photos of different models and tips for choosing a functional shelf
The size of the furniture should be selected based on the parameters of the room. Most often, it is in this place that all outerwear, shoes, and other necessary items are stored. Therefore, furniture designed for this should be as spacious as possible.
Furniture can be purchased or individually ordered, taking into account your own preferences. But, you can make furniture yourself. This option is budget-friendly, and the item you make will become a source of pride and will complement your chosen style direction.
DIY cabinet in the hallway
A cabinet is made in a similar way, which can be adapted as a shoe rack or used to store various small items. The side parts are connected to the base and back wall using wood glue and self-tapping screws.
For drawers, ready-made guides are attached to the side strips. The boxes are assembled and inserted inside the cabinet, and then the top cover is attached.
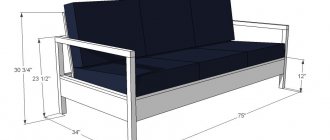
The top of the cabinet can be designed as a seat. To do this, glue a piece of furniture foam rubber onto the top cover. On top it should be wrapped with padding polyester, and on top with beautiful furniture fabric. The fabric is attached to the lid from the bottom side with a furniture stapler. As an option, the seat can be made folding by attaching hinges to the lid and to the back wall.
The composition will be complemented by a mirror in a wooden frame, a stand for umbrellas and bags.
You will find more ideas in a selection of photos of a hallway decorated with your own hands.
Step-by-step instruction
Blanks
Parts are cut according to ready-made drawings. If you have experience, you can handle this yourself. But after sawing the material with a jigsaw, chips may form.
It is advisable to turn to professionals for cutting blanks. The sheets will be cut beautifully and accurately, and there will be no jagged edges.
After cutting the parts, edging is carried out with furniture PVC tape. The edge is glued using an iron heated to a certain temperature.
Assembly Description
Preliminary markings for fasteners are carried out with maximum accuracy.
Important! The holes for the fastening elements must be located strictly in the middle of the thickness of the end of the workpiece, since the confirmations are screwed into the end.
Install the bottom and walls of the cabinet according to the diagram:
- Check the accuracy of the dimensions, put the walls and bottom in place.
- Make holes to fix the base and partition in the center.
- The base and central partition are secured. Confirmats are screwed into the bottom of the side walls. To protect them from exposure to moisture from the part that rests on the floor, use a waterproof profile.
- The upper shelves are mounted to give rigidity to the frame. A rear wall is installed for reinforcement.
Important! A screwdriver will not work to secure the lid. The fasteners are attached manually using pliers. Additionally tighten with a ratchet or hex wrench.
Proceed to installing the side shelves. They are secured with four confirmations (2 on each side).
If the side shelf is located at the same level as the inner shelf or bottom, confirmats cannot be used .
They are fastened with dowels - wooden cylinders. They are inserted into pre-prepared recesses in the wall and pushed into the same holes in the shelf.
Door assembly begins with the installation of the rear door. Use a level to check whether the cabinet is aligned accurately. Secure the upper level by placing 2 supports and a running lower profile on it. To assemble the rear door you will need a set of fittings:
- rear door running roller with and without trunnions;
- 2 rear door corners;
- 8 screws 4x25;
- 10 screws 4x16;
- 6 screws;
- seal.
If the insertion of glass or mirror is planned, install sections of the seal along the length of the dividing profile. When installing parts made of chipboard, a sealant is not needed .
When assembling the door, the inserts are placed face down on the foam to avoid damage. Glass or mirror is installed in a horizontal dividing profile. When installing two glasses, the seal is placed on both sides.
The combined door is assembled using dividing profiles. A sealant is needed at the joints with the glass. The main door profile is attached to both sides of the door. If it is made of chipboard, use 4x25 screws. They are fixed to the connecting profile with screws using a screwdriver.
Important! One profile is fixed in a horizontal position. The second is based on the vertical position of the door.
The profile handle is installed on both sides, directing the bend to the front side, controlling the tightness of the joints. If necessary, beat with a mallet and the joints are aligned along the entire length. The restrictive sealing corner of the rear door and the running roller without a trunnion are mounted on the handle-profile side.
The rear door is hung on the running profile and moved to the front door. The same set of fittings is prepared as for the back door. The front cabinet door is assembled in the sequence described above.
At the final stage, hangers and baskets are installed on the side walls. Check the functionality of the doors. They should open and close without any extraneous sounds and easily .
If the production is completed successfully, you can start working on the bathroom cabinet.