- To main
- Assembly and production of home furniture
It happens: you know what and how to do, but not in what order? Because of this, the work does not go well, takes a lot of time and takes a lot of effort. To ensure that your work is coordinated and flows almost automatically, Infosborka.ru will tell you about the stages of making bathroom furniture with your own hands.
Coating
How to make the surface of a manufactured cabinet or other piece of furniture waterproof and waterproof?
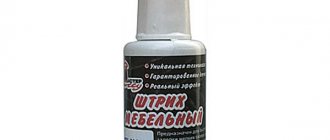
I used acrylic latex based rubber water dispersion paint The name is “Rezel+”, the manufacturer is the Sevastopol LLC “Accent”, the price is about 120 rubles per kilogram.
Inexpensive rubber paint made in Sevastopol.
What attracted her?
- Wear resistance. The coating can be cleaned with any detergents, except abrasive ones;
- Absolutely waterproof. Suffice it to say that this paint is recommended by the manufacturer as a roof sealant;
- No odors (composition: water-based acrylic latex);
- Dries one layer in just one hour.
To apply the paint I used a regular soft brush. The painting was done in four layers, with each layer applied perpendicular to the previous one.
If you use a roller or sprayer, the coating will be smoother.
Waterproofing paint isn't the only coating that can withstand splashes and high humidity. For another project (my daughter's changing table) I used alkyd urethane yacht varnish. It emphasizes the texture of the top layer of veneer, which has a very pleasant effect on the appearance of the product.
Yacht varnish is a coating designed for constant contact with water.
There are several subtleties to applying varnish.
- After applying the first (priming) layer with a brush or roller and drying it completely, all furniture surfaces are sanded again. The varnish lifts wood fibers on the surface of the veneer and makes it rough to the touch. Sanding will allow you to get a smooth finish without applying dozens of layers of varnish;
The raised pile made the surface rough.
- Subsequent varnishing is performed in one go. The varnish is not applied with a brush or roller, but is poured onto a horizontal plane and evenly distributed over it with a wide steel spatula . This method of varnishing will allow you to obtain the coveted smooth glassy surface with a minimum number of flaws;
This coating method is often used when varnishing parquet.
- The next surface of a cabinet, cabinet or other product is varnished in the same way after drying the previous wall. Drying at room temperature takes at least two days, so you have to be patient.
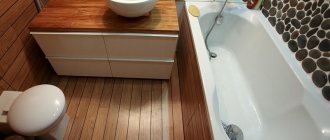
Concrete bath
Concrete construction is considered better than brick, but the manufacturing process is also more complicated. The absence of joining seams makes the font strong and durable.
The advantages of a monolithic bath are as follows:
- the bathtub can withstand a lot of weight;
- Over time, only decorative cladding can deform;
- long service life;
- the ability to implement any idea and design idea.
Design disadvantages include:
Selection of cement and preparation of mortar
The choice of materials depends on the further lining of the container. If you plan to leave the surface concrete, then you need to choose a cement mixture with additional plasticizers. This composition will help make the bottom and walls smooth and durable.
In the case where acrylic or tiles will be applied to a concrete base, you can use a cement-sand mixture without additives.
Planning and wiring of communications
To make a concrete bathtub, a plastic mold is used, which helps to choose the size of the future bathtub and correctly carry out the wiring of communications.
It is recommended to approach the location of plumbing fixtures with extreme care. In the future, they will be covered with a layer of concrete, and it will be problematic to redo anything.
Formwork and frame
The construction of the base of the tank consists of 2 stages. At the first stage, a frame is created from reinforcement, the diameter of which should be no thicker than 8 mm. First, vertical rods are installed in the corresponding holes in the ceiling, and then horizontal rods are attached with wire. It is impossible to use the floor as the bottom of a bathtub, so it is necessary to design fittings for these purposes.
At the second stage, the formwork is erected. Most often, smooth wooden slabs are used as a basis, which are easily detached from the concrete and do not leave marks.
Pouring concrete
Before pouring, you need to make sure that there are no cracks, the frame is installed firmly, and all drain holes are closed with plugs. For the first stage, a more liquid version of the solution is used, which corresponds to the consistency of sour cream. It will spread better over the formwork and fill all the cavities of the future container.
When the bottom is completely filled, you can begin to create the sides. To do this, take a mixture of standard density
It is important to complete the entire fill in one go. Otherwise, layers and leaky areas may form.
Now, using vibration, the structure must be rid of air accumulations. If there is no vibrating machine, you can use a simple hammer. Lightly tapping the walls of the bowl will prevent the formation of voids.
Removal of support structures and sanding
At the current stage, the wooden structures are removed and grouting of the container begins. The tool used is sandpaper or a grinder. If further decorative design is not required, after sanding and polishing, the bowl is coated with a special impregnating solution for stone, which acts as a waterproofing agent.
Decorative cladding
Ceramic tiles, acrylic or mosaic are used as a decorative covering for a homemade bathtub.
The first option is considered the fastest and simplest. The tiles are laid with waterproof adhesive, and the seams are grouted with a special grout for bathtubs and swimming pools. This design can only be used for square and rectangular structures. If the font has roundness, it is better to resort to another cladding option. The tile has good resistance to moisture, cosmetics and can withstand heavy loads. Moreover, it does not require special care.
Self-leveling acrylic protects the concrete structure from moisture and gives the surface an elegant glossy shine. When using this type of filling, the bowl is additionally sanded with plastic and moisture-resistant putty.
The most popular method of cladding non-standard plumbing structures is tiled mosaic. It is highly moisture resistant and, due to its small size, easily fits into rounded, curved products. Mosaics, like simple tiles, are glued to a waterproof mortar, and the seams are treated with epoxy grout. The only drawback is the laboriousness of the process.
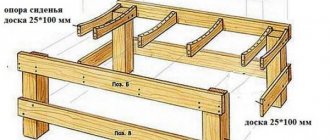
Alternative
The financial limit forces the use of chipboard. The first step is to develop a diagram, determine the main dimensions and number of elements. We take a 20 mm sheet as a basis.
Calculation tips:
The author of the following video, using a computer program, received detailed details. By simply adding legs, the design turns into a floor-standing design.
It is problematic to cut perfectly with a jigsaw; you will have to align the edges. Only an experienced carpenter can avoid blockages and maintain straightness and parallelism. Errors will be reflected when edging is performed with an iron. It makes sense to entrust the job to a specialized company; you will be left with the assembly according to the sketches.
Semi-professional chipboard cutting.
Note to experimenters:
We fasten the constructs with confirmations.
We provide a stiffening jumper.
We pull it to the edge of the sidewall.
Let's try on the sink.
Mark the arc of the cut out part using a metal ruler.
We cut out a segment and check by applying it.
Screw the fitted part.
We assemble the frames of the boxes according to the specifications.
Donyas are often made from laminated fiberboard, nailed or stapled. Fiberboard is not durable, nails and staples become loose from shocks. It is more reliable to tighten with self-tapping screws with a diameter of 2.5 - 3 mm through washers. To avoid cracks, the chipboard is drilled with a 1.5 - 2 mm drill, respectively. Spare no expense, buy stainless screws.
We nail the bottoms with laminate inside.
If desired, the uncovered ends of the fiberboard are primed with drying oil 2-3 times and painted with oil paint.
We select ball guides; the video explains the installation nuances:
Mark the middle of the side panel.
We separate the ball guide.
We screw the runner in the middle, maintaining parallelism.
We mark the places for the response nodes and install them.
We drill holes for fastening the facade.
We press the front panel.
Tighten the screws.
The legs of the floor modification are secured from the inside.
It is reasonable to ask to silicone the seams, removing the excess with a dampened glove.
Finally, screw the handles.
Information on assembling the ordered kit:
Selection of components
At this stage you have to select fasteners, fittings, handles, etc.
Types of fastenings:
- dowels: the final appearance of the furniture will be attractive, but the structure will not be dismountable;
- Confermat: practical, but not very beautiful;
- Euro-ties: a unique and optimal option, which looks beautiful and allows you to disassemble the furniture at any time.
As you can see, the choice is obvious. Modern fastenings are the most profitable option.
As for fittings, give preference to products made of chrome and stainless steel. Don’t even look at the plastic handles; in two or three months the paint will be erased, and the rich gilding will be lying on the floor.
DIY linen closet
Plywood, veneer, solid wood
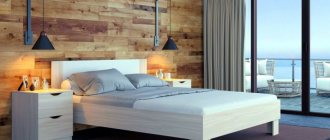
The ability of wood to “play” with changes in humidity and temperature is known to everyone. Also, to make bathroom furniture, you should not use wood species that are prone to rotting and fungus formation - for example, pine, birch and, accordingly, pine and birch plywood. But oak performs quite well under conditions of humidity changes. With proper surface treatment and impregnation with surface-protecting compounds, of course.
In the premium segment category you can find many pieces of finished bathroom furniture made of solid wood and with veneer inserts. But it is intended for fairly spacious bathrooms, where there are no problems with ventilation and humidity is not so critical.
Design and drawings
Before making a cabinet or cabinet, it is necessary to take very accurate measurements. As experience shows, in a bathroom there is often very little space with a large number of fixed elements (bathtub, pipes, walls, sink, toilet), so the resulting discrepancy in size even by 10-15 mm can be critical.
There are only three options for designing furniture:
- choose a suitable model in a furniture showroom and copy the drawing
- find a ready-made assembly diagram on the Internet and adjust the materials according to it
- completely draw the architecture yourself (by hand or in a 3D editor)
Despite the fact that the drawings are made at an amateur level, it is necessary to maintain high accuracy and precision in their execution. It must be taken into account that they may subsequently need to be provided to the sawing shop or to the seller when purchasing material and fittings. To avoid misunderstandings and not pay extra, you should check the accuracy of the drawings after finishing work on them. It is better to do calculations on furniture parts separately and in a large format. This will help avoid confusion.
We make our own hanging version
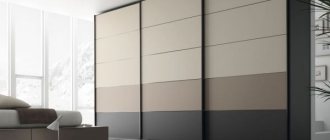
For toothbrushes and paste, creams, combs and other small items, a small module of several shelves, which will be covered with hinged doors, is enough. This design is often called a pencil case, and it can be combined with a mirror by hanging it on the sash, inside or outside. However, if the shelves are made of glass, the doors can be made sliding, entirely from mirrors. But first of all, you need to make the cabinet body, and for this you will need boards or narrow strips of MDF or fiberboard. We mark the length of the sidewalls, as well as the bottom and top panels.
You should immediately decide whether the module will have 1 or 2 shelves; the distance between them should be sufficient to accommodate tall bottles and containers with shampoo. Based on this, it is determined how long the segments for the walls should be. The shelves can be narrower than the top and bottom panels of the body or equal in width, and at the same time they must be shorter by twice the wall thickness. We make the doors last, according to the dimensions of the body; they can be cut out from MDF or fiberboard sheets, or assembled into rectangular frames from bars and narrow strips laid across them, closely or at small intervals.
Cabinet made of MDF sheets
Assembling the cabinet can be done in an open way, that is, by fixing the sides with self-tapping screws through the top and bottom panels, coating the joints with glue (you can also coat the screws with it). The shelves can be attached using the same method. Or the body and compartments can be fixed from the inside using corners, in which case the screw heads will not be visible from the outside. But the best option is assembly on dowels (round tenons), in this way you can achieve maximum reliability and durability of the cabinet, and the connection is hidden. Holes are drilled in the panels, one part along the edge of the plane, and the other at the end. Then glue is poured into the blind holes of one of the panels and spikes are inserted, which are pushed into the holes of the other part, also filled with glue (the joint is also lubricated with it).
The suspended module should have adjustable awnings very precisely installed, with the help of which the housing is attached to the wall. They are installed under the top panel from the inside.
We'll take measurements
In order to correctly purchase the required amount of materials and the correct parameters, you need to take measurements before going to the construction hypermarket.
When purchasing, it is very important to pay attention separately to the evenness of the surfaces of each sheet of material. Remember, you won’t be able to make even and perfectly smooth cabinets with your own hands, so try to select initially even materials.
For a more detailed picture, experts recommend drawing a rough plan in advance, thanks to which you can more rationally arrange furniture and plan the bathroom area.
You can also add a mirror to the shelves
Floor-mounted narrow cabinet made of MDF or fiberboard
The next design is more complicated, although the principle is the same: the same length and width of the sidewall. Since this cabinet, by definition, should be more spacious than a “pencil case,” the compartments should be made deeper, which means that we cut out fairly wide walls from MDF or fiberboard; boards are not suitable for this purpose. The top and bottom panels, as well as the shelves, are of the same dimensions and match the width of the sides. All compartments can be open, or, if desired, provide some of them with doors.
What furniture materials can be used to make furniture for the bathroom and toilet
Chipboard
Laminated chipboard as a material for bathrooms is quite acceptable under two conditions:
- If the end is well processed. It serves as protection against moisture penetration and subsequent swelling. Ideally, PVC with a thickness of 1-2 mm.
- If the furniture is located “away” from sources of direct moisture (bathtub, sink) and there are no problems with ventilation.
Both conditions must be met. Otherwise, literally in a couple of weeks you will get something like this.
But for some add-ons over the toilet with combined bathrooms, laminated chipboard shows itself quite well.
Moisture-resistant laminated chipboard is little better. Moisture resistant does not mean waterproof. Its protection in the form of additional impregnation of the chips will only provide a delay. But if there is a problem with humidity in the bathroom, then the result will be the same - it will swell.
MDF
MDF as a furniture material is denser than chipboard and more resistant to moisture. The only question is about its cladding.
Painted MDF performs well (aka MDF enamel, MDF with enamel coating). But before the first appearance of a chip. At the point of the chip, the integrity of the coating is disrupted and moisture finds a “path” and the material also swells. The same can be said about places with fasteners - if they are not processed.
MDF covered with PVC film is usually used for the facade and countertops, since the film coating in the standard version is one-sided, and the “wrong side” of the facade remains laminated. Typically, all options for ready-made budget furniture for bathrooms and toilets are offered in PVC film. The inner casing can be made of laminated chipboard or laminated MDF (the latter option is preferable).
MDF in High Gloss for bathroom furniture , with a varnished, almost mirror-like surface. MDF coated with plastic has approximately the same characteristics .
The problem is the same as with laminated chipboard - processing the ends. But MDF has better adhesion to PVC, since the material is denser and without such large fractions as chipboard. Therefore, the moisture resistance of PVC edges of MDF under plastic is much higher.
ADVICE! Don't be afraid to choose dark shades of MDF under plastic or in High Gloss panels.
In the end, they turn out to be much more practical. When used at the ends, at the junction with the PVC edge, the glue darkens. If the surfaces are light, it looks very untidy.