Icer
3565 0 0
Icer March 7, 2018Specialization: master in the construction of plasterboard structures, finishing work and laying floor coverings. Installation of door and window units, finishing of facades, installation of electrical, plumbing and heating - I can give detailed advice on all types of work.
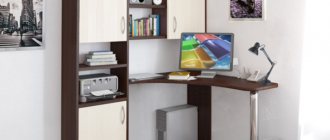
If you need a cabinet for a hood, you can order it ready-made and spend money, or you can do the work yourself and save significant money. The process of assembling the structure is quite simple, and almost anyone can handle it, you will see for yourself after reading this short article, everything is described in detail from beginning to end.
A modern hood cabinet should not only be attractive, but also functional.
Exhaust equipment
Before integrating a hood into a kitchen unit, it would be logical to understand its structure. It is based on a centrifugal fan, which is driven by a terminal block and a speed switch.
You should decide on the location where the stove will be located, since the hood is installed above it. The design features of the model depend on the installation location of the slab.
The motor driven by an alternating household network creates an effort to absorb at least 112 liters of air/minute. This figure increases upon removal of the grease filter, but such manipulation is not recommended.
The service life of the filter directly depends on the intensity of use of the stove and hood.
Other elements of the exhaust system include the following:
- exhaust duct ventilation grilles;
- light switch;
- shield;
- power cable;
- outer motor housing;
- wire retainers;
- backlight lamp;
- regulator of active and passive ventilation.
The more impressive size of the case makes it possible to install larger fans than in flat ones.
It is important to know! The air duct assembly diagram is made inside the kitchen unit or on its upper plane. The use of plastic fittings with 90-degree corners, as well as ventilation ducts with connecting elbows, is acceptable and does not affect the throughput of the drainage system.
Thus, most of the questions regarding how to build a hood into a cabinet with your own hands are resolved. It remains to follow some rules for the placement and assembly of the outlet line.
A flat hood is an inexpensive option with built-in filters that takes up little space.
The complete outlet channel assembly consists of the following elements:
- ventilation duct;
- flat duct connectors;
- round connecting elbow;
- wall plate for round channels;
- the connecting elbow is flat-round;
- round duct connector without valve;
- holder for flat channels.
The main advantage is that it hides in kitchen furniture or countertops and does not spoil the overall style of the interior.
Much better than standard ventilation
It must be said that no alternatives to such a device can currently be found. A typical ventilation system opening onto the roof will, of course, create the necessary air circulation.
However, it will not adequately remove strong odors from meat and fish. But it is precisely these that need to be pumped out onto the street as soon as possible, which will only be possible with equipment specially created for this purpose.
Installation rules
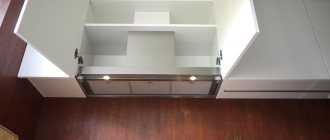
The first rule is to compare the sizes of the kitchen set. If the cabinet is suitable for the hood, has a reserve of internal usable space, and its lower plane is made of material with a thickness of 10 mm or more, you can begin making holes.
Installing a built-in hood in a cabinet is easy to do yourself and there is no need to call a paid technician.
All mechanical cuts are not protected from moisture, so secondary sealing is carried out before installing the hood. For this purpose, household or aquarium sealant is used. Complete drying takes up to 2 hours, and the resulting layer also has a passive property - damping vibrations, reducing noise at medium and high fan speeds.
A hood built into a cabinet is the most optimal solution for small spaces.
The second critical rule is the technology for connecting the power cable. If the kitchen set does not have a 220V socket, the extension of the power cable, or its connection to other network connections, occurs exclusively through clamp terminal blocks.
Worth knowing! Copper terminal blocks on the bus can withstand double the permissible current. This will eliminate a fire hazard in the room.
In order to correctly install a built-in hood, measurements are taken of the slab and the existing cabinet into which the equipment will be built.
Since the supply network has a voltage of 220V, and the device itself is in contact with the pair, a dedicated grounding line with a wire cross-section of up to 0.5 square meters is required. Otherwise, even without the possibility of electric shock to the operator, the accumulated static electricity will negatively affect the condition of the hood components. First of all, the welds and points of the outer body begin to rust.
Having chosen the right model for a kitchen that fits inside, you can complete the installation yourself, without the help of specialists.
Operating and control modes
One of the main differences between hoods is the operating mode used. Devices can be of the following two types:
- Flow type - have a standard built-in dome with an air duct leading into the ventilation system or directly to the street. Such models have the highest performance and are recommended for kitchens where a stove is often used. When the fan operates, air is drawn in and discharged through the duct system.
- Recirculation systems are closed-type systems in which the intake air passes through several filters and re-enters the kitchen area. For cleaning, carbon filters are used to block odors, as well as porous filters to retain steam and grease particles. Such systems are compact in size and are convenient if it is not possible to directly connect to the ventilation system or you need to save space. The disadvantage is the relatively low productivity of the equipment.
What are furniture confirmations, advantages and disadvantages
? Control of the device can be mechanical. In this case, standard fan on and off buttons are used, and the rotation speed is adjusted manually. Electronic control can also be used - in more complex models with programmable modes, timers and other options that allow you to control the operation of the equipment without constant human intervention. Some options have an automatic activation system that responds to steam or smoke.
Flow-through
Recirculation
How to install a hood in a kitchen cabinet
When dealing with the question of how to integrate a hood into a cabinet, you have to face the task of upgrading an existing hanging cabinet. All work on inserting into the cabinet is carried out according to the following principle:
- Removing the cabinet.
- Opening the back wall and removing the door.
- Marking the plane of the lower part using a pencil and ruler.
- The corner points are pre-drilled with a drill, the diameter of which will allow the jigsaw blade to pass through the hole.
- The resulting edges are treated with sealant.
An important point to consider: the distance from the stove to the hood. It should be such that parts of the appliance are at a safe distance from the heat of the stove.
Fastening process
Installation of a built-in compact or full-size hood in a cabinet occurs using standard fasteners. Typically, these are metal plates and corner spacers that are attached to the bottom shelf of the cabinet using a “pie-pie” method. The result is achieved quickly if you follow the product instructions. If for some reason the latter does not have fasteners, you can resort to using a single plastic profile.
The width of the equipment should ideally match or be 1-2 cm wider than the hob.
The sequence of actions is as follows:
- the profile must be mounted on self-tapping screws in increments of no more than 5 cm;
- all attachment points are pre-marked with an awl;
- the outer profile is attached to the wall, ensuring reliable fixation of the hood and its main support point;
- Using bolts without heads, the hood is fixed to the single profile in the places of the standard holes.
A built-in hood is a good option for those who want to save space and maintain a beautiful interior.
Telescopic installation options
Telescopic hoods occupy a special place among such structures. Their advantages include:
- Higher power than conventional dome options;
- Wider air capture area;
- Possibility to use a work panel that can be easily stored in a cabinet;
- One hundred percent compatibility with any interior.
How to cut holes for an air duct
The easiest way to make a hole for an air duct system is to use a drill bit of the appropriate diameter. If there is no such tool, you can outline the mounted channel element with a pencil and use a regular drill to perform frequent drilling around the perimeter of the contour. Removal of the excess element occurs with a hammer and chisel. The first direct channel must be installed using a level.
This solution will also be best for a private home.
Installing all elements
How to quickly install a built-in hood in a wall cabinet in the kitchen with your own hands is already clear from the above material. All that remains is to correctly assemble the air duct system. Installation of the latter is carried out along the factory grooves, always using sealing silicone inserts. They guarantee tightness and relieve the kitchen from humming and whistling when the hood is running. Provides a natural opportunity to fasten with a large step along the internal or external walls of the headset.
How to choose a device
When choosing the most suitable built-in hood model, you should pay attention to the following factors:
- Power. You can determine the required power when choosing a hood using the following algorithm. We calculate the internal volume of the kitchen. We multiply the resulting number by 12 - the air exchange rate established by SNiP for kitchens, and by a factor of 1.2. As a result, we get the required performance - for example, for a kitchen in a standard high-rise building with an area of 6 m2, a hood with a capacity of 250 cubic meters of air per hour is sufficient.
- Noise level . For a comfortable stay near a working hood, the noise produced by it during operation should not exceed 40-50 decibels. The noise of operating equipment is reduced by installing special anti-vibration pads when installing the device. You should also give preference to models with two low-power fans rather than with one more powerful one.
- Dimensions of the ventilation device . Built-in hoods can have different sizes - 45, 50, 60 cm. The equipment should be selected according to its dimensions in such a way that there is a small gap between the inner walls of the kitchen furniture and the body of the hood.
- Additional functions . For comfortable use of the device, additional functions, which at first glance are not so significant, play an important role. These include the presence of backlighting, a timer to turn off and on, the ability to remotely control, and switch operating modes.
- Air purification method . If the kitchen already has an exhaust ventilation duct, or ventilation shaft, then you can opt for a recirculating exhaust device. If there is no separate supply and exhaust ventilation system, you should purchase a exhaust hood, with the simultaneous installation of a system for removing exhaust air from the room.
Attention! In order for supply and exhaust ventilation to function effectively, it is necessary to provide not only exhaust, but also air flow in appropriate volumes.
What to do if there is not enough power
The logical step is to replace the device with a more productive one. If this is not possible, you can remove the existing filters, especially the duplicate carbon ones. This will add up to 5% of the power from the nominal parameters, but will significantly increase noise.
You can install the hood yourself with a minimum set of tools.
Increasing power by partially replacing controls or the electric motor is recommended only after the official warranty for the product has expired. Such work is carried out by workshops that repair household appliances. Changing the layout of the technical part does not entail requirements for changing the air outlet communications.