Types of reflective surfaces
Before you start making a mirror at home, you need to determine the function it will perform. The following reflective surfaces are distinguished:
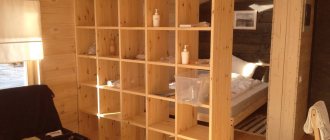
- reflective surfaces of optical instruments;
- reflective surfaces of household mirrors.
Optical instruments can have a wide variety of functions (magnification, light collection). The production of these mirrors requires precise calculations and specialized equipment. Ordinary mirrors only have the function of reflecting objects. In most cases, they are flat and do not require professional skills or equipment to create.
Materials used
To create a mirror at home, the following materials can be used:
- metals; Steel can be used to make a mirror, but you will need special tools and certain skills
- foil; Sufficiently shiny and reflective aluminum foil
- cardboard;
Cardboard for mirror frame - plastic;
Silver Acrylic Plastic Mirrors
- glass.
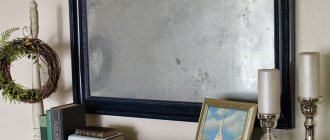
Frame with glass for making a mirror using a special coating.
The most modern option for reflective surfaces is plastic. Mirrors from this material are created using the sputtering process. Working with this material requires special equipment and professional skills.
Anyone can make a mirror from glass or metal by hand. The most primitive working equipment is required, but to silver glass you will need chemical reagents that are freely available.
In addition to the materials described above, foil can be used.
Types of mirrors
All mirror canvases are usually divided into two categories:
- with a functional purpose;
- decorative plan, which are usually used exclusively to improve the design.
| Functional | They are used so that a person can look in them while controlling his appearance. They are installed in visible and easily accessible places: bathrooms, hallways. There are cases when living rooms are equipped with mirrors to make them look larger visually. |
| Decorative | They don't look like people. They are intended to become a decoration of the room. |
There are many types of mirrors, and there is no shortage of choice. It all depends on individual preferences, the size of the premises, and financial capabilities. Today, retail outlets can offer the following unusual types of mirrors:
Features of handmade decoration
Designers consider a mirror to be a universal decoration for any space. But, if you want your living room, bathroom or bedroom to look unusual, you should think about homemade mirror surface decor.
Wooden decor is always in fashion Source i.pinimg.com
Handmade design is becoming an increasingly popular area. Thanks to things made or decorated with your own hands, the house is filled with comfort and acquires individual features. The design of a mirror surface has the following advantages:
- Uniqueness. The final result depends only on your imagination, which can only be limited by the style of the room. The product is unique and reflects the personality of the author.
Fragment of mosaic decoration Source mr-build.ru
- Variety of techniques. The number of techniques used for decoration is incalculable, and every year something new appears. Even the results of using standard techniques like decoupage are endlessly varied.
Tiling in Italian style Source cs5.livemaster.ru
- Variety of materials. If you like original solutions, you can come up with an interesting option using a simple combination of ordinary materials.
Decoupage Source rumpus.ru
- Safety. Sometimes factory products are treated with compounds that are hazardous to health, which can cause allergies or headaches. When you choose how to decorate the mirror, this will not happen.
Summer Memories Source www.jimmyssliceventuracrafteats.com
- Budgeting. In most cases, minimal financial outlay will be required, as well as a little patience and accuracy.
From egg trays Source i.pinimg.com
A few words about frames
It is not at all necessary to insert a metal homemade mirror into a frame - quite often it is a completely cast object. As for silver-plated glass, and even more so for homemade products made from foil and cardboard, in these cases frames are simply necessary.
Glass
A classic glass mirror can be inserted into a wooden or metal frame - it depends on the style of the room in which it will hang. For example, thin planks are suitable for High-Tech or Minimalism, while for Provencal or Baroque you will need rather thick wooden frames with beautiful carvings.
Foil
A mirrored surface made of foil is a simple but modern item; the frame also needs an appropriate frame. It can be made not only from traditional materials. Things like plastic spoons or broken CDs will also work:
- Make a mat slightly larger than the mirror.
- Flatten the spoons and cut into pieces, and break the disks into fragments.
- Make a beautiful composition from the resulting fragments and stick it all on the front of the frame.
A little history
The first mirror was made back in 1240, just after humanity learned to blow glass. To give the resulting glass a reflective effect, tin or silver was sprayed onto the surface.
The first mirrors had a bizarre vessel shape. To create a flat mirror, which is more familiar to modern people, the craftsmen used a special cylinder.
Using a rolling pin and hand tools, the hot glass was rolled out on a special table.
Interesting fact: archaeologists were able to find the first flat glass back in the 19th century in Italy. The master had to blow out a special vessel, spray a composition of tin and mercury, after which the vessel was broken and a panel was assembled from small particles.
By the way, this technique can help with the question of how to make a mirror yourself. Although assembling panels from fragments is a bad omen, this option will fit perfectly into a designer room.
Metal mirror
It is best to order a bronze or steel sheet of the desired shape from a foundry. This can also be done via the Internet, indicating in the application that the sheet must be even. Polishing is a rather labor-intensive process, but the surface can be perfect.
The surface is sanded with abrasive powder. A thick lubricant is used as a binding element - for example, grease. A flat iron plate with a flat surface or a sheet of thick glass is used as a grinding pad:
- Place the sanding pad horizontally.
- Apply coarse abrasive mixed with grease to the workpiece.
- Move the workpiece along the grinder in different directions, without reaching the edge.
- Remove the abrasive and grease from the workpiece and sanding pad with a flannel rag.
- Apply a finer grit abrasive and repeat the procedure.
Important! The abrasive should be changed up to 5-6 times, choosing an increasingly finer fraction. I check the depth of scratches visually by eye and using a magnifying glass. When you are satisfied with the quality of the surface, polish it with GOI paste. Already without any grinder. The unpolished part can be coated with varnish that imitates patina.
Collection by Alena • Last updated: 4 weeks ago
decor, packaging, miscellaneous
Easter silver chicken with a surprise. | Country of Masters
This item is unavailable | Etsy
Seashell Mirror ideas + DIY + Beach Cottage Decor + Coastal Living + Nautical + Perfect for Entryway
UNDERSEA WORLD
I am very pleased. The first day of my vacation was a success! I ran to pack my suitcase! Good luck in your creative pursuits!!!! everyone is welcome!!! thanks for stopping by!!! Greetings
Mare Vecchio
California Artist Marjorie Stafford – mirror detail
Sign in | Etsy
Large GLORYOFTHESEA Fine Shell Art Photo Frame by SeaShellFinery
This item is unavailable | Etsy
Find the perfect handmade gift, vintage & on-trend clothes, unique jewelry, and more… lots more.
Wall Mirrors
Shop wall mirrors at Chairish, the design lover's marketplace for the best vintage and used furniture, decor and art. Make an offer today!
Fancy blue mussel shell and white clam shell wreath | Etsy
This wreath is made on a ribbon wrapped wreath form and comes ready to hang. It is made of mussel shells, cut cowrie shells, white bubble shells, a knobby starfish, a sand biscuit and white clam shells. It is approximately 14 inches in diameter. All of our mussel shells are picked up off the beaches of Massachusetts. This wreath is packaged in a white gift box on a bed of moss.
Large Vintage Sea Shell Encrusted Mirror
Exceptional handiwork and scale are the hallmarks of this large antique mirror in a meticulously constructed sea shell frame, circa 1970s.
Beach Decor Seashell Wreath Nautical Decor WHITE Shell | Etsy
Beach decor seashell wreath. My nautical decor shell wreath is very elegant in elegant all white shells and optional pearls. Great for nautical decor, a beach wedding gift, or perfect for the beach decor in your home. Approximately 12″ overall diameter. This seashell wreath makes a statement of elegance, refinement, and understatement. It would be a beautiful wedding gift for a couple of sea lovers having a beach wedding, or it would go beautifully in a beach condo or breezy beach cottage…
Shell Mirror – Nautical Mirror – Nautical Wall Decor – Beach Decor
Any beach lover will enjoy this beautiful shell mirror which is perfect for all types of nautical decor. This elegant oval shell mirror was crafted with an assortment of beautiful shells. Carefully created by hand, this gorgeous oval wooden frame holds a mirror which is outlined with rope, the finished product is approximately 40″ x 22″'s and weighs approximately 30lbs. This mirror is quite heavy and adds a wonderful touch of nautical decor to your home… The frame is solid wood and the…
Grotto Style Shell Decorated Mirror 40″ x 30″ Great Composition, Detail and Depth
A Grotto style shell decorated mirror. Measures: Height 40 x width 30 inches. Great composition and detail.
This item is unavailable | Etsy
Find the perfect handmade gift, vintage & on-trend clothes, unique jewelry, and more… lots more.
Seashell Ornament Blue Mussel
Brilliant blue mussel seashell ornament. Both sides are finished and sealed 3 times with triple thick crystal glaze for color enhancement and durability. Perfect for hanging in a window, on a wall, on a Christmas tree or gifting. Approximately 5″ not including hanging ribbon. Indoor use is recommended. Colors may be slightly different depending on your computer monitor. Each shell is slightly different but all are made with the same materials. Message for special order inquiries. Custom…
What you will need
Simple mirror
- Glazed picture frame
- Aerosol mirror paint
- Medical alcohol
Mirror with a ghost
- Decorative picture frame with glass panel
- Aerosol mirror paint
- Gloss black spray paint (for frame, optional)
- Medical alcohol
- Black and white image
- Scotch
- Faux gems and/or faux spider web (optional)
- Hot glue for faux gems and/or faux spider web (optional)
How to choose the right frame
Frames for the finished product can be very diverse. The simplest option is to apply black paint along the edge of the mirror, possibly depicting some kind of design. For a more solid frame, metal, plastic or wood are suitable.
The stores have a wide variety of frames, from carved wooden to forged. In addition, you can order the manufacture of a mirror frame according to your own sketch in a special workshop. In this case, the product will turn out to be truly unique and inimitable.
Subscribe to our Social networks
Decor using pasta
Making such a decoration for a mirror is very simple. You just need to buy some glue, a couple of packs of shaped pasta, paint, varnish and stock up on a lot of desire and imagination!
To start, choose a pasta option. Then carefully coat each one with glue and attach it to the pre-greased surface of a homemade mirror.
After this, you will need to wait a while until the pasta sticks. Be careful not to damage them. After all, they are still quite fragile.
After this, carefully paint the macarons in your favorite colors. Make sure everything fits together. Wait a little, and when the paint is dry, coat everything with varnish.
After everything is ready, you can start installing the mirror - hang it on the wall and admire yourself at any time convenient for you! Such work will not only please you, but will also bring pleasure to all your loved ones.
Disco ball
Many people saw him at discos and nightclubs. Main stages of implementation:
- Preparation of mirror mosaic. Using a glass cutter, the mirror is cut into long strips and then into squares.
- Making a base from foam plastic or papier-mâché. In the latter case, inflate a balloon of the required size. The first layer of newspaper paper (previously torn into small squares) is glued onto it using vegetable oil or paste. Subsequent layers are glued using glue or the same paste.
- Pasting the base with mirror mosaic. Before pasting, the ball is suspended from the ceiling. Begin gluing the mirror squares from the top of the ball.
- Hanging a ball from the ceiling. A reliable fastening would be, for example, a nylon rope; it is wrapped around the ball along the “meridians” and “equator”. The threads that are wound around the sphere are coated with glue. The ends of the threads are collected at the top into a bundle.
Don't forget to leave a hole at the top of the papier-mâché sphere so you can pull the balloon out of it later. The hole is also necessary for hanging the product from the ceiling.
After the ball is ready, all that remains is to direct the projector beam at it.
Mirror decor
After drying, the mirror is completely ready for use, but to make it look more aesthetically pleasing, you can decorate it with decorative elements.
How to decorate a mirror with your own hands? Let's look at a few original ways:
- If you have experience in wood carving, then you can make a frame for a mirror in this way. A homemade frame for a mirror, made with your own hands, looks very rich and elegant.
- Another way to decorate a mirror is to crochet it with beautiful yarn.
- A simple and unusual way to decorate a mirror is with satin ribbons.
- The edges of the mirror can be painted with acrylic paints, creating a simple pattern or ornament.
- Glue large rhinestones along the edge of the product and your mirror will shine.
- You can also glue an LED strip along the edge of the mirror. Then it will become not only more beautiful, but also more convenient to use.
Installing a mirror can also be done by yourself. To do this, you just need to choose a reliable and durable fastener
painting
Those who know how to draw at least a little will surely cope with the task of painting on a mirror with ease. The choice of drawing can be anything from landscapes and scenes to simple abstract drawings, depending on your artistic abilities. It is best to paint with acrylic paints, as they withstand bathroom conditions well.
In addition to paints, you will need a palette for mixing, a set of brushes, contours and varnish for the final coat. To create different textures, experts also use a foam sponge, cotton swabs, toothpicks and other improvised means.
Making your own from cardboard
How to make a mirror from thick and thick paper or cardboard? Cardboard is quite an interesting material. It can be used in various fields, but making a real mirror out of it is out of the question.
But this is far from true; if you use a special mirror auto enamel or paint based on it, you can create a fairly simple mirror for decoration. The quality won't be the best, but it's a pretty interesting experiment. However, a beautiful design can hide all the flaws .
You can make a mirror with your own hands, but it will require a lot of effort and time. But a huge number of options and techniques will allow you to choose the easiest way and try yourself in this type of creativity. For many, this can become the main thing in life, since handmade mirrors are highly valued in the market.
The process of making a mirror using glass
- It is necessary to thoroughly wash the surface and edges of the glass using clean distilled water, any detergent and a cloth. Afterwards, the sheet of glass must be thoroughly dried and any remaining water removed.
We prepare high-quality glass intended for making mirrors without cracks or any damage - Before the silvering stage, the surface and edges of the glass must be degreased. Use a fifteen percent potassium hydroxide solution.
To clean, dip it in a solution of caustic potassium 15% - Then you need to put the glass in a container filled to the brim with distilled water to prevent particles of dirt and dust from sticking to it.
Glass after thorough washing - Next, you should mix all the ingredients of the solution, with which the mirror layer will be applied. You need to take thirty milliliters of water and pour 2 grams of silver nitrogen into it, mix thoroughly. Afterwards, it is necessary to pour in twenty-five percent ammonia in small drops until the sediment completely disappears. Add about one hundred milliliters of water and leave the solution for ten to fifteen minutes.
- We proceed to add five milliliters of formaldehyde to the main solution. The solution for the mirror coating is ready.
- Place a sheet of glass in a bathtub or other container and cover its surface and edges with the prepared solution. The silvering process takes from two to five minutes. Then we take it out and rinse it to remove any remaining solution using purified water.
Applying paint from a can due to the lack of certain materials and reagents - The mirror glass already needs to be dried. You can use an industrial hair dryer.
Drying the finished mirror - You should cover the mirror part of the glass with a layer of dark paint (black or gray). We dry it, blot it with a soft cloth, and safely use it for its intended purpose.
- There are two main ways to decorate a mirror beautifully: make a beautiful and original frame or create a glass sheet.
Making a beautiful frame and hanging a mirror
DIY mirror photo
Help the site, repost