We process the edges of the tabletop with an edge
If the installation of the countertop in the kitchen involved a figured cut of the front part, then the edges must be covered with an adhesive edge that is the same shade as the countertop. An installation technician is not required, because a hand-finished countertop will be just as good.
To do this, follow the order:
- It is necessary to heat the iron to medium temperature so that the edge does not burn (check on a small section).
- Then the adhesive side of the edge tape is applied to the end.
- Heat the edge slowly to avoid creases. Creases not only spoil the appearance, but also accumulate water and dirt, which will quickly ruin the kitchen unit.
- After gluing, wait until it dries and cut off the excess with a construction knife.
- The cut edge is sanded to make the end smooth and rounded.
Interesting! If the purchased edge does not have a layer of glue, then you can take “Moment for Wood”.
Mounting on wooden clamps
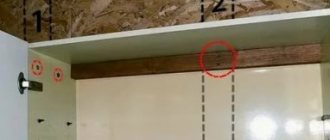
Using homemade wooden clamps is a simple and reliable way to attach a tabletop to a tabletop without purchasing hardware. Clamps work on the same principle as metal Z-clamps. They are easy to make in series from scraps that can be found in every workshop. Of course, this takes time, but often not much more than it takes to go to the store for accessories.
When making wood clamps, be sure to maintain the correct grain orientation as shown in the diagram to give the bracket proper strength.
We install the end
To install end caps for the countertop, you must:
- Clean the surface from dust and apply silicone sealant.
- Then the sealant is applied to the end strip and secured with self-tapping screws. It is important that the bar protrudes no more than 1mm. around the edges. In order for the strip to sit tightly, you need to press down on the plate to squeeze out excess sealant. If the hole in the strip is small for the screw heads, then carefully drill it out with a drill with a diameter of 8 mm.
- After fastening, the end strip for the table top is cut with a hacksaw if the length is too long. The edges must be processed with a file so as not to get cut during operation.
What tools and materials may be useful
To independently attach the countertop to the kitchen set, you will need certain materials:
- High strength construction adhesive for joining parts.
- Silicone for creating a smooth surface and finishing ends.
- Universal sealant for filling voids.
- Sealing tapes
- Connecting profile
- Aluminum connecting strips.
At the preparatory stage, the following tools will be useful:
- Jigsaw.
- Sander.
- Drills of different diameters.
At the second stage, when you need to join and secure the parts together, as well as for installing the canvas and installing the plinth, you will need:
- Miter saw.
- Tool set with pliers, hammer, wire cutters, tape measure and screwdrivers.
- Marker.
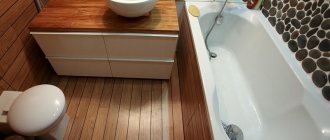
Installation of skirting boards
Installing a plinth will allow you to close the unsightly joint and prevent water from entering. The plinth can be glued or screwed with self-tapping screws. An adhesive composition is suitable for ceramic surfaces. For wooden ones, you can use self-tapping screws.
We restore the kitchen set with our own handsDecorative plaster in the kitchen: its advantages, design features and application techniques, 140+ best photos
How to choose the right kitchen doors: based on functionality and design - 100 photo examples
The steps for attaching with self-tapping screws are listed in the table below.
| 1 | We measure and cut part of the baseboard. It is important to treat the edges with an abrasive compound. |
| 2 | The mounting location is lubricated with silicone to prevent water seepage. |
| 3 | The profile is installed and secured with self-tapping screws. The gaps between fasteners should be no more than 30cm. |
| 4 | The decorative overlay is inserted into the grooves until it snaps into place. |
| 5 | The corner and end parts are treated with silicone and covered with overlays. |
If you need to glue the baseboard, then use the same instructions, but instead of tightening the screws, degrease the surface and stick the profile.
Using Z-shaped holders
Using small metal Z-brackets is another popular way to secure a countertop. The main advantages of this method are low cost, maximum simplicity and accuracy of installation, and no need for additional structural elements.
One end of the steel holder is screwed to the table top with a screw. The second is inserted into a groove sawn in the upper edge of the drawer. The recess is made in such a way that the edge of the bracket does not rest against the wood and moves freely in the groove as it expands. Thus, the fasteners allow the tabletop to change its dimensions in any direction without consequences.
Features of installing countertops made of different materials
Depending on the material, there are many options for countertops: stone, chipboard, MDF, wood, metal, glass. Knowing the characteristics of the materials will help you properly secure the countertop in the kitchen set.
Stone and acrylic
A DIY stone kitchen countertop is attached with glue. However, it will take experience to properly cut the panel and install the heavy slab. On the positive side, they note that the surface does not scratch, does not absorb dirt and is easy to clean.
“Liquid stone” or acrylic is poured onto the surface while it is hot. The resulting coating is not scratched and can withstand high temperatures and water. However, acrylic is expensive.
Chipboard and MDF
Many people are interested in how to install a countertop based on laminated chipboard or MDF. The material consists of resins and wood shavings, so it is prone to swelling from moisture. The laminated coating does not allow water to penetrate the structure and deteriorate the texture.
However, the sides are often open because the surface needs to be sawed to fit. To prevent the ingress of moisture, be sure to treat all open areas with silicone sealant and install an end strip for the countertop.
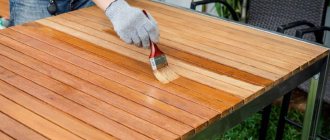
Tree
It is not uncommon to install a wooden tabletop. How is a wooden tabletop attached? With self-tapping screws, of course. But it is important to treat all parts with water-repellent agents. To maintain the original appearance, constant restoration is necessary, but strength and long-term operation are guaranteed.
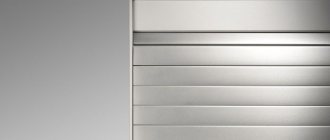
Metal
Among the metals used in kitchens, stainless steel is used. It is durable and resistant to high temperatures. But it is not scratch-resistant, so you need to use it carefully. The metal surface can have a matte or glossy texture.
Glass
It is not recommended to independently attach the tabletop to kitchen floor cabinets made of glass, due to its fragility. Although the glass for them is tempered using a special technology, you cannot hit it too hard to prevent microcracks from appearing. With careful handling, glass will last a long time.
Pitfalls of self-installation
Those who want to try their hand at assembling furniture need to understand that only professionals can get a guaranteed good result. If this is your first experience, the result may not be the best. Those who already have the skill of working with MDF, chipboard or veneered wood have a greater chance of success. These are rather capricious materials.
Mistakes during operation can ruin them. It will be impossible to return the coating to its original appearance, which will lead to unnecessary expenses. If you intend to install a difficult-to-install panel, such as glass or stone, it is better to immediately contact professionals. Let us list the main difficulties in working with various materials:
- Natural wood. If handled carelessly, dents or chips may occur. True, in most cases they can be sanded and restored to an attractive appearance, but this is a job for a master.
- Wood boards. Inaccurate cutting will result in chips that cannot be disguised. There is also a high probability of mechanical damage.
- Stone, artificial or natural. The heavy weight of the coating makes installation much more difficult, this is especially true for the latter. In addition, without special skills it is impossible to make cutouts for the sink and hob, as well as cut the blade.
- Metal. It is quite simple to install and dock, but dents and scratches may appear during processing. However, they can be removed.
Sources
- https://grand-haus.ru/interer/kak-ustanovit-stoleshnicu-na-kuhne.html
- https://kitchendizajn.ru/ustanovka-stoleshnici-na-kuhne/
- https://stroy-podskazka.ru/kuhnya/stoleshnica/ustanovka/
- https://kuhnya.guru/mebel/osobennosti-stoleshnitsyi-na-kuhne
- https://www.ivd.ru/stroitelstvo-i-remont/otdelocnye-materialy/kak-ustanovit-plintus-na-stoleshnicu-na-kuhne-podrobnaya-instrukciya-60041
- https://jkuhnya.ru/mebell/garnituri/97-kak-krepit-stoleshnicu-na-kuhne
- https://mebel-expert.info/kak-krepit-plintus-k-stoleshnice-na-kuhne/
- https://severdv.ru/mebel/kuhnya/kak-prikrepit-plintus-k-stoleshnicze-na-kuhne/
- https://AmiPlus.ru/kuhnya/kak-prikrepit-plintus-k-stoleshnice.html
- https://mebel-v-nsk.ru/dizayn/kak-prikrepit-plintus-k-kuhonnoj-stolesnice-svoimi-rukami.html
- https://eldomo.ru/stroitelstvo/kak-krepit-plintus-k-stoleshnicze-na-kuhne-kak-pravilno-ustanovit
- https://berkem.ru/kuxnya/ustanovka-stoleshnicy-na-kuxne-svoimi-rukami/
- https://www.ivd.ru/dizajn-i-dekor/kuhna/ustanovka-stoleshnicy-na-kuhne-podrobnaya-poshagovaya-instrukciya-36851
130
Photo ideas for countertops
Slicing
For your product to fit perfectly, it must be the right size. This is quite difficult to achieve. Even if you took measurements accurately enough, there is always such a thing as error.
At home, you need to think about how to trim the excess or adjust it so that the new tabletop does not become deformed. There should be no chips or cracks during your work. Cutting can be done in the following ways:
( 2 ratings, average 4.5 out of 5 )