Modern interior design often does not welcome the use of familiar wooden cabinets, cabinets or shelves in the interior. In many cases, it is more rational to use less cumbersome solutions that fit organically into the environment. Drywall shelves, photos of which can be seen in catalogs of construction companies and on the Internet, will help you achieve maximum functionality in combination with decorativeness. With the right choice of their design and design, you can create an interesting and unique interior and make the room convenient and comfortable.
Application of plasterboard shelves
The use of plasterboard in the interior allows you to create beautiful shelves and exclusive built-in niches in the living room, kitchen, pantry and even in the bathroom.
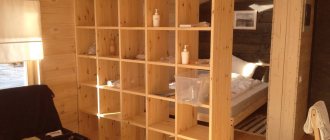
- To zone the room, you can install functional partitions with through shelves.
- Shelves made of plasterboard in the bedroom, made in the form of a separate element or an integral part of the main structure, look very original. In terms of functionality, such shelves are not inferior to standard wooden cabinets and chests of drawers.
- Open shelves and built-in niches are widely used to store kitchen and other household utensils, which can significantly save space in the kitchen and pantry.
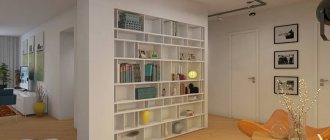
- Shelves and racks are often used to install household appliances in the living room, store books, favorite souvenirs and other small items.
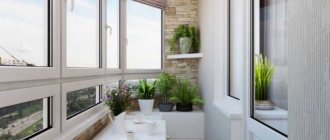
- Built-in shelves on the wall in the bathroom will not only fit harmoniously into the interior, but will also hide pipes and communications. Due to the high humidity of the room, plasterboard with high moisture resistance is used for these purposes.
To decorate such structures, both spotlights and lighting around the entire perimeter are used. You can enhance the play of light with the help of mirrors and glass elements. Such an additional light source will create a romantic atmosphere and bring mystery and grace to your interior.
Design of plasterboard shelves
The technical characteristics that gypsum board has allow you to create decorative elements in the interior of various shapes and sizes. The main advantages of this material include:
- simple and quick installation;
- flexibility of the material (it is possible to create structures of any shape);
- a large selection of finishing options (painting with any paints and pasting with materials of different textures is allowed);
- low cost.
USEFUL INFORMATION: Direct suspension for plasterboard and with traction: factory-made and homemade
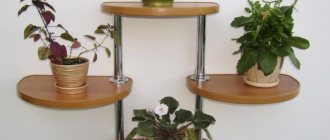
You can add individuality to the room by making corner shelves from plasterboard with your own hands. Such designs will fit perfectly into a nursery, bedroom or living room. The use of corner elements is very important in a small room where the issue of saving space is acute.
Manufacturing and installing a corner structure is an excellent way to use free corners in a room for practical purposes.
The classic option is rectangular built-in shelves of various sizes and shapes. They are built into special niches, which can be part of the wall design created during the renovation stage, or can also be constructed from plasterboard sheets as a decorative element. If you decide to make plasterboard shelves with your own hands, the proposed photos will help you choose the most suitable design, and the installation guide will help you complete the job quickly and without errors.
Manufacturing technology for plasterboard shelves
Once a suitable option has been selected, all materials and tools have been prepared, you can proceed directly to work. They are not particularly difficult, but if you lack experience and skills, you should work carefully and slowly. The entire process of making a plasterboard shelf with your own hands consists of several stages.
Sketching and marking
The sketch of the future shelf is how it will look after installation is completed. This stage involves creating the required dimensions, drawing a diagram of the location of partitions and shelves. In the future, this will allow you to calculate the amount of drywall, profiles, lintels, slats, and fastening materials required for purchase.
Important! Sheets of material have different sizes. Their length varies in the range of 2-4.5 m, and width - 1.2-1.3 m. Thickness ranges from 6 to 24 mm. This makes it possible to accurately select the sheet taking into account the load that will be placed on it.
Next, it is necessary to mark the site of the intended installation of the plasterboard shelf, for which lines are drawn on the wall to facilitate further correct fastening of the profile.
Frame installation
The frame is the basis of the structure on which the gypsum boards are subsequently installed. When making it, it is imperative to use a plumb line, since walls and ceilings are not always level, which may cause problems with the installation of elements. Regardless of whether regular or corner shelves made of plasterboard are planned, the surface must be leveled, because putty cannot be used to eliminate defects.
In most cases, a 50x25 mm profile is used to make the frame. To install it in places where fastenings are provided, holes are drilled using a hammer drill, after which it is attached to the wall with dowels. The greater the load the plasterboard shelf can withstand, the more often the profile should be attached to the wall. Next, guides are attached to it, forming a frame in the form of transverse and longitudinal rails. The ideal option would be to fasten them to the floor or ceiling, as well as to use jumpers between the profile and the wall, which will result in a strong and reliable structure.
Drywall installation
Sheathing of the frame occurs only after certain cutting work has been carried out. To do this, the dimensions of the future shelves are taken, then transferred to paper and then cut out. Drywall is cut as follows: first, one layer of paper is cut, then a break is made along the resulting line and the sheet is bent at a right angle, after which a second paper layer is cut on the other side.
Irregularities along the edges are eliminated with sandpaper or an electric plane. Next, the sheets are attached to the frame using self-tapping screws, and the installation of the end part can be carried out in several ways:
- fastening a whole sheet followed by cutting holes of the required configuration;
- fastening of pre-cut parts.
If the first option allows you to avoid the presence of connecting joints, then in the second you cannot do without them and you should try to keep their number as small as possible.
Curvilinear structures
Drywall is a material that can also be used to make curved shelves with smooth curved shapes. Their manufacture requires a template made of durable materials. The plasterboard blank is pierced on one side with a needle roller, moistened and attached to the template, after which it is left to dry for 24 hours. To fasten the resulting parts, special arched profiles are used, but you can also give the required shape with a regular profile by cutting and bending it.
Processing joints between elements
Built-in plasterboard shelves should be further processed to ensure a smooth surface. To do this, grind the ends of the sheets and apply gypsum or putty to the joints. After this, they are sealed with reinforcing mesh and re-treated with putty. The use of mesh entails the need to putty the entire surface of the sheet, but this will hide all the irregularities and depressions, including those from screws. The finishing layer is applied after the putty has dried.
The aesthetics of the corners is given by special putty corners, which are plastic, galvanized and aluminum. Galvanized ones are the most durable, but they can later be affected by corrosion, causing its stains to appear through the finishing material. In addition, the corners perform a protective function, preventing the destruction of drywall.
Shelves made of gypsum plasterboard are a simple and affordable way to decorate any room, give it individuality, and make it unique.
What adds to its attractiveness is the opportunity to make your wildest fantasies come true, to experiment with shapes, sizes, patterns on the walls and ceiling, and you can do all this with your own hands. Video
Stages of making plasterboard shelves
Before you make plasterboard shelves with your own hands, you need to prepare materials for installing the frame and main elements, namely:
- plasterboard sheets;
- metal profile – load-bearing and guiding elements;
- fasteners (dowels and screws);
- serpyanka mesh;
- primer and putty;
- finishing materials (wallpaper or paint).
Design
Step-by-step instructions for making a shelf begin with creating a diagram. Before making a shelf from plasterboard, the design, purpose and location of the shelf on the wall are determined. After creating a sketch, measurements are taken of the section of the wall where the future structure will be placed.
Correctly carried out calculations make it possible to determine the required amount of materials to create the supporting structure and component parts, as well as the volume of work to be performed.
The finished plasterboard structure can take the form of a built-in niche or a protruding decorative surface. In the first case, the shelves are mounted into the wall during the process of assembling partitions or leveling the surface, in the second - on a flat wall surface.
USEFUL INFORMATION: Installing drywall on a wall without a frame
How to Attach a Shelf to a Drywall Wall
The problem of wall curvature is familiar to every third (if not second) apartment owner, and in most cases this issue is solved with the help of drywall. I made the sheathing, sheathed the walls and you can even install wooden panels, glue wallpaper, or lay out mosaics - the surface is perfectly flat. But how can you attach shelves to such fragile walls in this case, because the drywall will crumble and crumble and will not be able to withstand heavy loads?
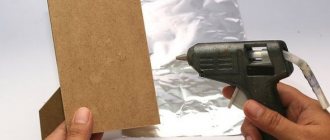
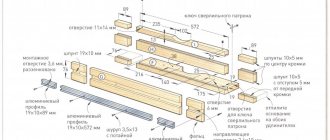
In the image below you can see the answer to this question - installing an embedded beam between the metal guide profiles. It is to this that the shelf can be attached. Wood can handle the load perfectly, and metal rack profiles will distribute it over the wall surface. Screw the embedded beams to the wall using dowel screws. It is better to drill holes for them in advance.
It is worth noting that this should be done during the sheathing process, otherwise you will have to either dismantle the wall and insert bars, or attach the shelves through drywall. This method is only possible if the sheets were glued to a fairly flat wall.
To fix the shelf on a load-bearing wall, you will need a hammer drill or impact drill, a hammer, a concrete drill with a 6 mm nozzle, 6x80 plastic dowels, 75 mm anchors and a screwdriver.
How to hang a shelf on drywall:
- Determine where you need to make holes. To do this, lean the shelf against the wall in the position in which you plan to install it and make markings with a simple pencil.
- At the marked points, drill holes 85 mm deep and develop them properly so that the dowel can easily fit. If the dowel is difficult to drive, breaks or bends, use a thicker drill bit or drill the hole even deeper. It is important that the dowel goes in all the way, otherwise it will not hold.
- Insert the dowels into the holes and hammer them in until they are completely embedded in the wall.
- Screw the first screw into the outermost dowel and level the shelf. When the horizontal position is perfect, you can screw in the remaining screws.
The video shows plasterboard shelves and how to attach them to a load-bearing wall:
Finally, I would like to mention all kinds of fastenings such as “butterflies”, “umbrellas”, “Molly”, etc. There are a lot of them, and they are all different, but their operating principle is quite similar - the fastener is inserted into a narrow hole, where it “unfolds” and is securely fixed inside. However, all such fasteners are designed for lightweight objects and cannot be used to build powerful shelves for TV, books, clothes and other things.
If you need to attach a strong shelf to a plasterboard wall, use anchor reinforcement. The principle of fastening is similar to that described above - make a hole in the right place with a drill, then drive the anchor there. The length of the reinforcement must exceed the depth of the hole by 2-3 cm. The thickness of the fasteners must be at least 6 mm. All that remains is to place the shelf on the driven anchor and screw it to the wall with a nut.
Creating a wireframe
The most labor-intensive and complex process that requires certain skills and abilities. After design, control marks are placed on the surface of the wall, which will correspond to the location of the surfaces of the future structure. To ensure that the shelves are perfectly level when marking, you must use a building level.
After applying the markings using dowel nails, the guides are fixed to the wall. A profile is attached to them in accordance with the drawing, making the frame for plasterboard three-dimensional. The perimeter is made from guides, the reinforcement is made from a supporting (rack) profile.
Creating a Project
The step-by-step guide indicates that the first step is to create a project for the future shelf. This can be done in several ways:
- Draw a project with your own hands on a piece of paper. This is an acceptable option, the main thing is to clearly calculate the size of the future structure.
Project with dimensions of plasterboard shelves - The second option is to create a project in a special program. Today, everyone chooses the utility that is more convenient to use, and there are many of them. The software creates a detailed diagram of the future shelf. Some just make a frame, others pour even the smallest details into the project. It’s up to each owner to decide how it’s more convenient to make a diagram. The completed diagrams are printed and using a photo of the project, the process of assembling the shelf is carried out.
Whichever option you decide to use, in any case, creating a drawing is a very important process. Using a detailed diagram, you can create an ideal design without flaws.
Installation of lighting fixtures
At the stage of creating the frame, wiring is laid for future lighting, if provided for by the project. The wires must be hidden in the corrugation. Holes are cut in a sheet of drywall for spotlights.
The best solution for illuminating a plasterboard shelf is to use an LED strip.
The finished shelf with lighting will harmoniously fit into any interior.
Covering the frame with plasterboard
Before sheathing, sheets of plasterboard are cut into individual parts of the required sizes. Next, along the marked lines, the necessary elements are cut out with a hacksaw or cut off with a sharp knife. All irregularities on the cut lines are sanded with sandpaper.
Using self-tapping screws, individual plasterboard parts are attached to a previously made frame. Possible misalignments of elements should be avoided to prevent fracture and deformation of plasterboard shelves in the future.
Important! In order for the structure to withstand the load, you need to use stronger plasterboard 1.8 cm thick or install standard wall material (1.25 cm) in 2 layers. Additional strength will be provided by frequent placement of frame jumpers.
How to make a rack with your own hands
When choosing a model from a profile, measure the height of the wall and mark the location of the future shelving. For self-assembly, buy a ready-made profile cut into pieces. The set of materials comes with instructions that will help you easily assemble the bookcase.
For wooden models, draw the parameters yourself.
Example of a wooden shelving plan
The profile parts are fastened with bolts or welding. Marking the shelves. For shelving made from profiles, plastic or metal shelves are purchased. They are also bolted to the racks, and the fastening is supplemented with metal corners. For mobility of the rack, rollers are welded to the legs.
To make the structure resistant to heavy weight, it is supplemented with cross-shaped struts.
Required materials and tools
For work you will need:
- bolts, nuts, welding with electrodes;
- Welding may be required if the rack is made of metal;
- grinder for cutting racks;
- drawings, a set of brushes or a foam sponge;
- galvanizing or paint;
- set of profiles, shelves, rollers.
For wooden models or models with plastic shelves:
- screwdriver, nails;
- water-repellent paints;
- level, screws;
- strips for ends, legs and supports;
- plywood for shelves;
- hacksaw.
Processing of joints
To obtain a perfectly flat surface of the shelves, it is necessary to carefully process the joints between the individual parts. To do this, apply a layer of putty to well-primed seams, then seal them with sickle mesh and putty again, not forgetting to also fill the holes from the screws with putty.
USEFUL INFORMATION: Drywall cutter: types of knives and their features
To give the edges of the structure an aesthetic appeal, special aluminum or plastic corners are used, which are glued with gypsum putty and hidden under its layer. The use of such corners will prevent mechanical damage and abrasion of the drywall.
After drying and sanding the treated areas, the entire surface is puttied, which is then also sanded until smooth.
Finishing work
After you have managed to make a plasterboard shelf with your own hands, you can begin finishing the surface. To do this, the structure can be painted or pasted over with various materials.
To create contrast in the interior, shelves and niches are painted in colors that differ from the main color of the walls in the room. To decorate plasterboard shelves in the kitchen, it is recommended to use self-adhesive film with a pattern. You can decorate the shelves in the bathroom using tiles or mosaics.
In addition to performing a decorative function, any finish protects the surface of the drywall from damage and moisture, thereby creating a reliable structure that will last you a long time.
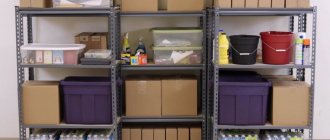
Installation of a rack made of metal profiles
Metal rack with fixed height shelves. Strong fastening is achieved through the use of tension bolts and locknuts, which prevent the structure from becoming loose
Before work you need to take care of safety equipment:
- put gloves on your hands;
- on the eyes - special glasses.
The most popular manufacturing option is to use a metal profile for shelving with wooden shelves.
Preparatory work
Corner prefabricated shelving with the ability to add additional shelves as needed. Any shelf can be removed or moved to another level, which is very convenient for using the structure in a greenhouse
The amount of material for production is easily calculated based on the location in the room.
Please note that:
- racks should be 15 cm less than the total length of the wall;
- height to the ceiling or to the height of the profile;
- take into account the weight of the cargo that will stand on the shelves; depending on this, you need to choose the material;
- the width of the shelves should not be more than 1 m;
- Various items by weight and size will be stored on the shelves of the rack.
- the height of the shelves should be determined depending on the height of the objects (30-50 cm);
- the bottom shelves are always higher than the top ones;
- For strong adhesion, use shelving beam profiles.
After you have measured the wall and thought through the options, now you should make a drawing.
Materials
The simplest design of a prefabricated rack that is attached to the wall and does not have its own base. A design that takes up minimal space, but during assembly you need to carefully calculate future loads on its surface
So:
- The frame racks are made of 3*5 cm metal profile. Alternative replacement with 2*5 cm profiled pipes is possible.
- A perforated profile for shelving 5*2.5 cm is taken onto the frame under the shelves.
- For the shelves you will need a board with a thickness of 5*2.5 cm. Prepare the board in advance, that is, it must be covered in one or several layers with drying oil, and then painted.
- The footage of the material is the sum of all the lengths of the elements according to the drawing.
- Threaded bolts may be needed
Advice! The rack made from a profile pipe is also quite a strong design and worthy of attention, especially since it is assembled according to the same scheme.
Tools
Suspended design of a prefabricated wall rack in finished form. A design that, if properly decorated, can be used even at home, and not just in a greenhouse or garage
You will need:
- welding equipment or drill;
- hacksaw;
- Bulgarian;
- 1 kg of electrodes;
- drill;
- ruler and tape measure;
- level;
- 0.5 kg enamel;
- 0.5 kg primer;
- 2 pcs cutting wheels;
- marker;
- 1 pack of self-tapping screws.