10303 0 0
Icer March 27, 2018Specialization: master in the construction of plasterboard structures, finishing work and laying floor coverings. Installation of door and window units, finishing of facades, installation of electrical, plumbing and heating - I can give detailed advice on all types of work.
Today we will figure out how to assemble a reliable cabinet for an oven and hob. Almost anyone can do the job, the main thing is to have the necessary materials and tools at hand.
Assembling a simple nightstand for a hob and oven is not difficult
Stages of work
Let’s figure out how to properly organize the work process; for simplicity, we will divide all activities into 3 stages:
- Preparation;
- Assembling the cabinet;
- Cutting an opening in the tabletop.
Preparatory work
To get started, gather everything you need:
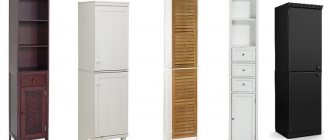
- Chipboard blanks for furniture . They are made in accordance with the other elements of the kitchen set. The standard width of the cabinet is 600 mm, depth is from 400 to 600 mm, the 600 mm option is most often used, most ovens are suitable for it;
- Furniture supports. The cheapest plastic elements will do; they are easy to use and easy to attach;
Plastic supports are great for cabinetry
- Fasteners for the structure . We will tighten the cabinet with euroscrews, which are also called confirmats. The drawer guides are screwed with 3.5x16 mm self-tapping screws;
- Drawer guides . It is better to purchase a ball version; it is much more reliable and durable than standard roller elements.
Ball guides are durable and reliable
The tool you need is the following:
- Screwdriver . In the kit, stock up on equipment: attachments for self-tapping screws and euroscrews, drills of different diameters;
Additionally, purchase a special drill for confirmations; it makes a hole and at the same time selects a countersunk for the fastener head.
The confirmation drill looks like this
- Jigsaw . Necessary for drilling an opening in the countertop for the hob;
- Measuring devices , you can get by with a tape measure and a pencil.
Assembling the cabinet for the oven
Let's figure out how to assemble a cabinet for an oven. Regardless of the size of the structure, it is always assembled the same way:
| Illustration | Description |
| The side walls are being prepared . It is best to order them ready-made, but you can cut the material yourself using a power saw or jigsaw. | |
The side panels are being prepared:
| |
| The guide is set , it is aligned with the outer end of the structure and the previously drawn line. | |
| The guide is fixed . For this purpose, self-tapping screws are used, which are located in holes specially designed for this purpose. There must be at least four fasteners per guide. Another guide is similarly mounted on the second wall. | |
Preparing the bottom of the cabinet. 4 holes are drilled in it for confirmations, the distance from the front and back sides is 50-70 mm, the distance from the edge to the middle is 9 mm, since the thickness of the plate is 18 mm.
| |
| Legs are attached to the bottom side . Points are marked with an indentation of 5 cm from the edges, and the supports are attached there. They are screwed onto 3.5x16 mm screws. | |
| The bottom is placed on the edge, and the side of the cabinet is aligned with it . Holes are pre-drilled in it using a confirmat drill. | |
| The side walls are screwed on . To do this, European screws are inserted into the holes and tightened with a screwdriver so that the head becomes flush with the surface. | |
| A partition is inserted on which the oven will stand . It is screwed with confirmations from the sides. | |
| The cabinet is almost ready . All that remains is to assemble the box according to the size of the opening and attach the corresponding parts of the guides to it. | |
| The finished box is inserted into the opening. The cabinet is ready, you can move on to preparing the tabletop. |
Preparing the countertop for the hob
The tabletop can be either separate or integral for the entire work area. The cabinet is placed, the tabletop is fixed on it and the following work is carried out:
| Illustration | Description |
| The center of the panel location is marked . The line is drawn strictly perpendicular to the wall. For this marking, the outer part of the hob is pre-measured. | |
| The width of the bottom is measured . Determine the size of the part that will fit into the countertop. | |
| The dimensions of the future opening are laid off from the center line and drawn. Make the markings approximately 5 mm larger so that the structure fits freely. | |
| A hole is drilled on the line ; its edge should not protrude beyond the outer marking line. | |
A jigsaw blade is inserted into the hole and the opening is cut out.
| |
| The panel is fixed from the bottom of the tabletop . To do this, use the fasteners included in the kit. |
How to install an oven: steps
In order not to rack your brains over how to accurately install a built-in oven with your own hands, act according to a pre-developed plan.
Preparation of tools and auxiliary materials
In general, to quickly install an oven in a suitable kitchen niche, you will most likely need:
- drill with a set of drills and cutters;
- screwdriver or screwdriver;
- insulating tape;
- standard connecting terminals for wires;
- knife;
- a plug with a piece of cable of the required length, if the oven was purchased without them.
If it turns out that there is no electrical network connected to the installation site, ending with a suitable socket, you will have to take care of the method of laying it and masking the laid route.
Make sure there is an outlet for connecting the oven
Preparation of the workplace
When considering options for how to build in a new oven, you should take care in advance of having a niche that is somewhat larger than the size of the oven. There can be several ways to create it:
- provide an appropriate compartment when ordering a kitchen set;
- purchase a separate module manufactured specifically for built-in ovens;
- select a suitable compartment in existing furniture;
- make changes to the design of the existing cabinet by independently equipping the necessary niche.
The size of the gaps left was discussed earlier.
Important! Deviations of clearances in a larger direction are not as critical as in a smaller direction.
Installation
Before installation, you need to make sure that the cable with a plug can be connected from the oven to the outlet intended for it. If there is no corresponding hole in the back or side wall, you must carefully make it yourself using a drill or jigsaw.
The oven is installed in a niche in accordance with the requirements of the instructions supplied with the product. It can stand on adjustable legs or be attached with special screws to the side walls of the compartment allocated for it. In this case, its front panel with the door becomes an integral part of the interior. During the installation process, it is important to ensure a horizontal position of the device and reliable fixation.
Connection
The stage of connecting the oven is usually combined with its installation, since after final installation, access to the rear wall of the device is most often impossible. There are two ways to connect electrical equipment to the electrical network:
- directly;
- through a plug-socket connection.
Electric oven cable markings
In the first case, it is recommended to use standard terminals designed for suitable power. The second option is more preferable. Ovens are usually sold with an existing power cable ending in a standard plug. Otherwise, you will have to make it yourself by connecting to the corresponding sockets inside the oven body.
During the connection process, it is important to correctly secure the grounding wire to the terminals intended for this purpose on the oven body, in the plug, socket and on the input panel. To eliminate the possibility of error, it is painted yellow or green in three-core cables.
Carefully! Electrical connections of powerful household appliances using twists are not allowed. Direct contact between aluminum and copper should be avoided. Professionals use soldering or screw clamps.
Functionality check
Any installation must end with startup tests. Before turning it on for the first time, it is recommended to carefully remove any remaining grease from the internal surfaces of the oven chamber using a clean and slightly damp cloth. The test run takes place for 30 minutes at a temperature of 250 °C without placing food in the oven. The appearance of a faint burning smell and a little smoke is not evidence of a malfunction. Most likely, it is the factory oil burning out.
After installation, you must start the oven
It is advisable to check the equipment in all modes provided for in the instructions. At the same time, the operation of indicators and useful functions is checked. If no deviations are noticed, you can begin operation.
Product dimensions
Foreign companies started producing ovens. This significantly affected the dimensions of the product.
The standard width of models is 90–120 cm. This corresponds to the European idea of comfort.
- However, the standards of Russian kitchen sets are completely different. Here, the cabinet for the oven and hob is 60 cm wide. In this case, the device manufacturers gave in and began to produce models with the appropriate width. For example, the famous manufacturer of household goods Ikea.
In order to ensure ease of installation, the width of the oven should be 1–2 cm smaller.
- Today you can also find very miniature built-in models - with a width of 45 cm and a height of 60 cm. However, these are rather trial samples. As a rule, even with a width of 45 cm, the height remains standard - 85 cm.
- The depth in most products is 50–55 cm.
A cabinet for a built-in oven is usually equipped with a drawer for storing baking sheets, dishes and other things.
Materials and tools
A DIY oven cabinet is a very real task. There are no special difficulties here. To make it you will need the following:
- plywood or chipboard 16–18 mm thick;
- tabletop thickness of 28 mm or more;
- legs;
- furniture confirmations, dowels and screws;
- guides;
- electric drill;
- wood glue.
Kitchen cabinet calculations
As a rule, the instructions for the oven contain data not only on the dimensions of the model itself, but also on the requirements for the installation niche. This should be used in calculations.
The dimensions of the cabinet under the oven are equal to the parameters of the installation niche plus the thickness of the material used. In fact, it is a box with a double bottom - horizons 1 and 2 and a horizontal crossbar at the top - the body strip. The latter is required for normal fastening of the hob to the countertop. In addition, this part maintains the distance between the sidewalls, which is also important.
First you need to make calculations, then cut out the following parts from sheets of chipboard or MDF:
- sidewalls - the sum of the height of the niche, the thickness of the table top and the height of the legs - 2 pcs;
- horizon - that is, the bottom, the dimensions are exactly equal to the parameters of the installation niche - depth and width - 2 pcs;
- body strip - its length is equal to the width of the niche, and its own width does not exceed 100 mm.
The back wall of the drawer, as a rule, is not included in the detailing: it is made from fiberboard scraps. Usually its height does not exceed 100 mm.
The drawer parts are calculated using the residual method. It's easy to do:
- the height of the facade is equal to the difference between the height of the kitchen cabinet, the height of the legs and the thickness of the first horizon. The façade does not block it due to the installation features of the oven. The width corresponds to 60 cm minus 3 mm. As a rule, there is no handle here: to make it more convenient to use, a recess is made on the second horizon;
- the side parts are equal in length to the depth of the cabinet minus the gaps, and in height - the distance between the two horizons minus the gaps;
- The length of the rear wall takes into account the thickness of both sidewalls and the thickness of the guides.
Chipboard or MDF can be cut to size in a workshop: with professional equipment, the pattern will take much less time, and accuracy is guaranteed. In addition, in most cases, the parts are edged here - the ends are covered with a melamine strip. Otherwise, you will have to do the operation yourself.
Product assembly
The kitchen cabinet for the oven and hob is assembled using confirmations or dowels. The fastening of the latter is duplicated with glue. The holes for them are drilled in advance.
Self-tapping screws are allowed.
- First you need to assemble the box itself - the sides and horizontals.
- Then secure the body strip, lowering it 10 mm from the edge of the sidewall.
- The legs need to be attached to the bottom of the product with self-tapping screws.
- If you decide to make a drawer, then before installing the first horizon, guides - hinged or telescopic - are attached to the walls.
- Install the back wall.
- The product is assembled and installed on the guides.
The do-it-yourself oven cabinet is ready. In the photo you can see a product that is in no way inferior even to well-known brands like Ikea.
Source
Calculation of the box for the oven and hob
In this article we will talk about how to properly design a box for installing an oven, and, if necessary, a hob.
Currently, the vast majority of kitchen sets are designed with built-in appliances, so understanding the design of such modules is very important.
The box we are considering has two unchanged sizes:
- This is its width, which is 600mm
- And the height of the internal opening, which is also 600mm (sometimes the opening is designed to be 595mm high).
Only the size of the lower drawer with the front depends on the total height of the box.
The dimensions of the niche for installing the equipment we are considering can always be found in the instructions for it.
So (see the article about the kitchen sketch), the total height of this module is 870mm, the thickness of the countertop is 28mm, the thickness of the chipboard is 16mm.
Types of structures
There are several types of cabinets for installing ovens:
- Cabinets. In this type of design, ovens are built in at eye level, and spacious cabinets are installed below for storing various kitchen utensils.
- Under the hob . Such devices are more like the classic version of ovens combined with stoves. They are less convenient than pencil cases, because when cooking you need to constantly bend over, which brings some discomfort. There may also be problems with cleaning the oven. But they have advantages in some situations. For example, in small kitchens it will be difficult to install a large cabinet for the oven. Also, this design is suitable for those who concentrate all the cooking items in one place.
Let's calculate the module details:
Horizon – 600 by 460 (mm) – 1 pc.
Side – 870-28-100-16=726 (mm), where 28mm is the thickness of the tabletop, 100mm is the distance from the box to the floor (height of the supports), 16mm is the thickness of the lower horizon.
- Side – 726 by 460 – 2 pcs.
- Horizon 2 – 600-32=568 (mm), where 32mm is the thickness of the two sides of the box.
- Horizon 2 – 568 by 460 – 1 pc.
- Cabinet strip – 568 by 100 – 1 pc.
It’s also worth saying a few words about the body strip.
In this case, it is designed alone, and is located 10mm below the upper edge of the side (more details here).
This is done so that when using a 28mm thick countertop, the hob is normally attached to the countertop and does not rest against the bar itself (sometimes the dimensions of this equipment may exceed the height dimensions of the countertop).
By the way, I have often come across training materials online where the casing strip is not designed at all in the box we are considering.
I think this approach is not correct, since this bar maintains the distance between the sides of the module, and it is necessary in any case.
Features of installation in a niche
When using a built-in oven, installation begins with preparing the niche where it will be placed.
Important points when using niches:
- there should be no distortions of the bottom, walls and panels;
- perpendicular position of the planes of the walls, bottom and ceiling is required.
Violation of these criteria results in poor heating, which can shorten the life of the product. Also, a certain gap must remain between the walls of the oven and the niche itself, the size of which depends on the electrical power of the product.