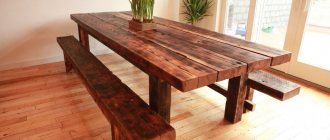
To make a kitchen countertop, you can use boards, timber, oak slab, or a panel of lamellas. Extensive experience is not required to perform the job. In this article we will try to answer the question: how to make a kitchen countertop from wood with your own hands (features of wood processing).
Oak slab.
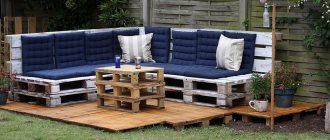
Shield made of lamellas.
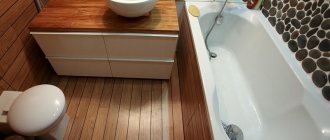
Table top made of slab with epoxy resin.
The popularization of eco-style has led to an increase in demand for furniture made from natural components. To make a wooden countertop for your kitchen with your own hands, you don’t need to spend a lot of money. Boards, beams, saw cuts, trimmings are used. Those who make interior elements themselves are confident in the quality and environmental friendliness.
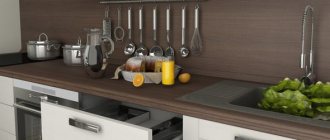
Do-it-yourself wood countertop for the kitchen
Homemade tables have many advantages:
- saving money (it is possible to work with existing balances);
- unique design;
- ability to control quality.
A thing that is made with your own hands is more pleasing than something purchased in a store.
Before you begin, it is important to evaluate the disadvantages of making furniture yourself.
Requirements for a homemade table
In production conditions, furniture is tested for compliance with the quality guarantee and recommended standards. When working independently, the master himself monitors the compliance of new furniture with safety requirements:
- Sufficient strength. Any furniture, even decorative, must withstand the slightest load. It is especially important to check the strength of fasteners and joints on dining and student tables.
- Environmental safety of the materials used. You should not build a table from materials containing harmful resins or toxic impurities. Also, such compositions cannot be used for decorative processing.
- Moisture resistant. If the table being manufactured is intended for eating and preparing dishes, care should be taken to ensure high-quality and timely impregnation of the surfaces with appropriate compounds.
- Mobility, compactness, possibility of transformation. The presence of such qualities will only play into the hands of owners of small apartments, houses, and summer cottages. After being used for its intended purpose, the folding table can be stored in the pantry.
In the process of independent work, it is important to strictly follow the prepared drawing and plan, because the quality and possible service life of the future product directly depend on this parameter.
Wooden countertops for the kitchen: advantages, disadvantages
The advantage of wood, which cannot be disputed, is environmental safety. The family can only benefit from installing wooden furniture.
Other advantages:
- solid appearance;
- pleasant sensations when touched;
- timeless relevance of interior fashion;
- neutrality (combination with any style);
- durability (with proper use);
- maintainability.
However, natural wood requires regular, careful care. During manufacturing, the material is treated with insect repellent. Resistance to moisture is increased by varnishing and oil impregnation.
Other cons:
- tendency to form dents, cuts, scratches (restoring the surface requires time and money);
- the need to select cleaning products (abrasive ones cause scratches);
- relatively heavy weight.
Natural wood is an expensive material. You can save money if you make wooden kitchen countertops with your own hands without purchasing new expensive materials.
Labor costs
The time spent on making a table from timber with your own hands according to the drawings is combined in the following table.
| № | Work stage | Number of hours |
| 1 | Assembling the support frame | 4 |
| 2 | Making a countertop | 4 |
| 3 | Varnish coating | 2 |
| 4 | Total | 10 |
Taking into account technological interruptions in work, it was possible to make the table in 3 working days. A country table made of timber, made by me according to drawings, can serve not only as a plane for arranging objects, but also as comfortable furniture for sitting. This model is attractive due to its ease of manufacture, low labor costs and practicality. When performing furniture assembly work, you must comply with all safety requirements and use personal protective equipment.
How to simply and correctly make a kitchen countertop from boards with your own hands
Solid wood is a natural material in the form of boards, beams, slats. To understand how to make a wooden kitchen countertop with your own hands, you need to have a certain amount of information that will allow you to decide on the configuration, dimensions, and colors.
Table top made of boards
The length and color of the boards do not matter; it is important that the width is at least 4 cm. If the material has been lying somewhere for a long time, a countertop made of boards for the kitchen will not require large financial costs.
In addition to boards required;
- plywood;
- 4 timbers for making legs;
- 4 beams for crossbars;
- glue;
- screws, nails;
- stain;
- varnish
Before you begin, you need to make sure that you have a tape measure, a miter and circular saw, a grinder, a screwdriver, a drill, and a square.
Which material to choose?
When making countertops yourself, the following materials are most often used:
- whole board . The option is the most durable and reliable, but at the same time the most expensive. When choosing a solid board, you need to pay special attention to the degree of drying. Under-dried material may lead to deterioration over time;
- prefabricated array. In this case, a stacked tabletop made of timber, boards, or ready-made furniture panels is used. With this approach, the cost of the product will be slightly lower, there is less chance that it will fail, but there is a chance that over time, cracks will form at the joints due to shrinkage;
- wood products . This option is one of the most affordable, but the least practical and durable. Although, with proper processing and careful handling, even such a tabletop can last ten years without any problems. This includes all types of wood materials:
- plywood;
- MDF;
- HDF;
- Chipboard and laminated chipboard;
- OSB (oriented strand board);
- CSP (cement particle board);
- GSP (gypsum particle board).
When choosing a material, it is also worth considering the type of wood. When choosing which wood to make a countertop from, you need to rely on the individual characteristics of the kitchen and its owners.
- If the room is damp, or the family is large and they cook a lot and often, then it is better to choose dense types of wood. In such conditions, countertops made of oak or walnut have proven themselves well.
The products are not only practical, but also very beautiful. The shades and textures of these materials will decorate any kitchen. The only drawback of these varieties is the price, but it is fully compensated by the quality of the material.
- It is better not to make a tabletop from pine. This type of wood is too soft and will not last long. In this case, it is better to choose an array of larch. Yes, it is more expensive, but this material is more waterproof and practical, so it will last much longer.
If wood products are chosen for the countertop, then special attention should be paid to moisture resistance. It will not be possible to properly process a finished chipboard or MDF board, so you should initially buy only moisture-resistant varieties of plywood and other wooden products.
Making a countertop
If the boards are old, they are cleaned, nails are removed, and laid out on plywood. A countertop made from kitchen boards will look more impressive if they are multi-colored. After adjusting to length, the boards are cut and secured with nails. Irregularities and nail heads are filled with putty. After drying, sanding is carried out.
Making the base
Sequence of work:
- create (find) a drawing of the connection of parts;
- assemble a base from 35x35 mm beams (90° angle, joints are lubricated with glue) using a secret oblique fastening on self-tapping screws;
- strengthen the base with crossbars and a crossbar (hidden screws must be lubricated with glue).
Next, fastening markings are applied to the plywood, laid on the base, and fixed with self-tapping screws. Then the sides are installed around the perimeter, secured with glue and nails.
At the final stage, a kitchen countertop made from boards with your own hands is covered with stain, then varnish, and polished with felt.
Determining the dimensions of the dining table
This version of the product is manufactured most often, so it is necessary to plan its dimensions in advance, based on the number of users.
The normal height is considered to be 75...85 cm, depending (including) on the height of people.
The minimum distance between the legs is chosen in such a way that a person can sit and sit freely without bringing his knees together, that is, at least 50...60 cm. The optimal width of the narrow side of the table is considered to be 80...90 cm.
When choosing sizes, it is necessary to take into account that the drawer (support beam) should be located at least 3...5 cm from the edge of the tabletop; a distance of 8...12 cm is more convenient. The height of the drawer is selected so that its lower edge does not rest against the knees of a sitting person.
How to make a stacked tabletop from bars
This table is suitable for a summer house. It is impossible to buy something like this.
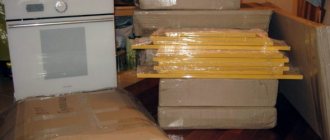
In addition to bars 10x10 cm and 10x5 cm, the following is required:
Bars 10x10 cm.
- roulette;
- level;
- saw;
- drill;
- screwdriver (you can get by with a screwdriver);
- grinder (you can get by with sandpaper);
- pipes,
- self-tapping screws;
- varnish, brush.
Making a countertop
To assemble the table surface, you need to drill holes in the beams and make a countersink for nuts and washers in the outer ones. Next, the edges that will be combined are coated with glue and tightened with pins. Then you need to lay the tabletop upside down on a flat surface and make markings for attaching the legs.
The frame is then turned over and aligned along the center lines. The slats are attached along these same lines in the shape of a rectangle. These are grooves for fixing the base. The surface of the table is sanded, covered with stain, then three layers of varnish
Making the base
First you need to make wide supports from the beams, using glue for connection (while the structure dries, the structure is held together with clamps). Then a square-shaped hole is cut out and jumpers will be installed into it. Their length is greater than the distance between the supports and less than the length of the table plane. The jumpers should fit into the supports, protruding 8 cm beyond. The lock is served by wedges installed in special holes.
Preparatory stage
Even a simple rectangular table on four legs cannot be made without some preparation. Let's figure out what a home craftsman will need during the production process.
Blueprints
This is a mandatory condition that will allow you to visualize the future table and determine the size and amount of material. You can search for finished drawings on the Internet: many craftsmen willingly share the results of their work with Internet users, describing in detail each stage of production.
If we are talking about a unique table design that you plan to create according to your own design, you cannot do without a drawing. You can draw the future model with a simple pencil on a regular notebook sheet. It is recommended to pay special attention to the following points:
- external dimensions (length, width, height);
- attaching the legs to the tabletop. Round models usually have one support post located in the center; rectangular designs require 1 support for each corner;
- mechanisms (relevant for folding options and transforming tables).
It is necessary to carefully consider how all the parts of the table will be assembled together, what additional wood processing will be required before or after assembly.
Material
It is no secret that different types of wood have different properties and not all wood is suitable for artisanal processing. Depending on the species, all wood can be divided into 3 groups.
Soft. This includes almost all coniferous species (spruce, pine, fir, cedar) and many deciduous species (linden, aspen, poplar, alder). This material is easy to process, but the finished table will require additional protective coating, especially if it is intended to be used outdoors. Coniferous wood is dependent on external factors and is prone to deformation and cracks. The exception, perhaps, is larch, which is used in construction wherever possible, including for making tables.
Solid. This group includes birch, oak, walnut and fruit trees: plum, pear, apple, apricot. Even without impregnation, such timber is resistant to a humid environment and exposure to direct sunlight, but during the processing process one cannot do without power tools.
Super durable. This category includes boxwood, acacia, hornbeam and yew. The material has high consumer properties, but requires professional processing, which is only possible in the workshops of industrial enterprises.
Tool
The simplest rough table made of boards can be assembled with your own hands using just a hammer, nails and a hacksaw. But for more accurate execution, additional tools will be required:
- electric jigsaw;
- sander;
- Screwdriver Set;
- drill with a set of drills of different diameters;
- roulette;
- a simple pencil;
- square
In addition, it is recommended to pre-treat the wood with special antiseptics, which will make the finished product more durable and resistant to dampness. If you plan to cut a pattern on the legs or sides, you will need special cutters. A wood lathe or milling machine will be of great help to the master, but not everyone has such tools.
Oak table top
This option is unusual and is rarely used. Expensive to implement and complex. The table cover is created from slab (longitudinal cut) and epoxy resin. For edges, one side of the slab is aligned. Internal (uneven) sides increase the effectiveness of the finished product.
The materials required are plywood, slab, and a mixture of resin and hardener.
Tools:
- 2 resin containers;
- saw;
- drill;
- cutter;
- grinder;
- putty knife;
- level.
For work, you should choose a room with good ventilation. Before starting work, you need to wear a protective suit, gloves, and goggles.
Sequence of work:
- assembling the frame for pouring;
- filling the seams with sealant;
- treatment with wax (vaseline) of internal surfaces;
- removing bark from the slab;
- leveling, staining, varnishing the outer edges;
- leveling the frame;
- location of the slab in the formwork;
- preparing a mixture of resin and hardener (determine proportions using scales, strictly follow the manufacturer’s instructions);
- pouring the first layer so that the resin spreads evenly;
- removing bubbles with a needle;
- heating the composition with a hairdryer for 2, 3 minutes;
- waiting for the end of the curing period;
- filling the second layer.
Formwork options for filling an oak slab with epoxy resin.
There should be several layers. The thinner the layer, the greater the likelihood of high-quality (without cracks and bubbles) drying. It takes a week to fully cure. Then the wooden surface is removed from the formwork, sanded, varnished and installed on the base.
The most important step in making such a table surface is mixing the resin and hardener. The epoxy is poured into the container first, then the hardener. When mixing, low speeds are used. It is advisable to pour the composition from one container to another several times. Then you can add color.
Creating a sketch and drawing
It is necessary to distinguish between the concepts of sketch and drawing. At the first stage, a sketch of the table is created - a drawing that will display all the features of the future furniture (shape, color, finish). You can do it manually. An alternative is to use graphic editors, including online services. Based on the sketch, a drawing of a wooden table is created.
Advantages of silicone transparent table pads, their manufacturers
If you want to make furniture completely yourself, you should arm yourself with paper, a ruler, a pencil and an eraser. Or use online services if special programs are not installed on your computer. Before starting modeling, you need to carefully study the design features of the selected model - what elements it consists of, where and how to connect the parts, how difficult the table is to manufacture. The last point is important, since the level of complexity of the work must correspond to experience, the availability of the necessary tools, fasteners and consumables.
To create the correct drawing and detailing for it, you need:
- determine all the dimensions of the table;
- take into account the thickness of the materials;
- calculate the size of each part;
- draw up a schematic representation of the structure to scale, indicating the dimensions, not forgetting to subtract the thickness of the timber or board;
- separately create drawings of the fastening points of the elements;
- draw up a map of cutting and drilling materials.
To some, such work may seem unnecessarily complicated. In this case, it is easy to find ready-made drawings. They, like step-by-step assembly diagrams, are traditionally posted on thematic online resources.
Based on standard models, exclusive versions of tables are also created, taking into account the design features.
Table top made of lamellas
Lamels are a type of solid wood that is used in industry for the production of laminated veneer lumber, furniture and carpentry panels. The round table made of slats is the simplest.
Materials:
- timber (for legs);
- a sheet of plywood 35 mm in the shape of a circle with a diameter of 1.5 m;
- a 20 mm plywood sheet in the shape of a disk with an internal diameter of 1.04 m and an external diameter of 1.28 m;
- 2 pieces of plywood 106x12x2 cm (for planks).
Tools:
- jigsaw;
- screwdriver;
- drill;
- grinder.
Sequence of work:
- cut the legs out of the timber, sand them, cover them with three layers of varnish;
- to connect the legs with the slats, cut out a 20 mm plywood disc;
- screw the strips to the legs;
- cut a round tabletop from 35 mm plywood;
- secure the legs.
All elements are first coated with stain, then varnish.
Computer desk
If we are talking about a factory product, a computer desk seems to be a rather complex design. It has a pull-out shelf for the keyboard, drawers for storing disks and other elements, the manufacture of which requires experience. However, the model of a table made of wood can be significantly simplified, leaving a minimum of parts necessary for working at the computer.
Here you can try this option:
- steel frame in the form of a welded rectangle made of corrugated pipe with 4 support posts. On one side, a frame is immediately made for the shelf where the system unit will stand, and two similar elements on the other end;
- the tabletop is made from boards or fiberboard sheets cut to size;
- the shelves are made of material similar to the tabletop.
All elements are connected to each other by a threaded connection or angle. Of course, this design is inferior to factory analogues in terms of external design, but it is several times cheaper and copes with its task.
The process of making your own wood countertops for the kitchen
Production technologies are being improved by introducing composite materials that complement natural ones. Wood is always in demand, so if you want to add a table to your interior, you should take advantage of the ability of designers to turn disadvantages into advantages.
Materials, tools
An excellent option is a panel tabletop, which can be made from boards if they are thicker than 1.5 cm. An additional 2 cm board is required to create a prefabricated mass. The length of the workpieces exceeds the length of the table surface by 10 cm (5 cm on each side). Cross members and a side are also used. Plywood is used for assembly. Work can be carried out on any table, supplemented with a thrust board and 4 cm guide bars.
Materials and tools:
- drill, drill bits (1 and 5 mm);
- 2 hammers: epoxy and steel;
- wood glue;
- nails made of copper (bronze), wooden nails 3-5 mm in the shape of a cone;
- 4 clamps;
- square;
- breakdown;
- pieces of plywood as linings.
Assembling the base - joinery panel
The first board of the shield must be attached with clamps to the guide crossbars. The transverse lining is lubricated with adhesive and fixed with nails (you cannot finish it off, then you need to bite off the caps or remove them). The second board (and subsequent ones) is driven in with a tongue and groove (from the corner, using an epoxy hammer).
When using beams, they must be pressed onto glue using clamps one at a time (each gluing takes 24 hours to dry). Clamps can be replaced with 80 cm studs with wing nuts. There are other methods: a wedge on a comb beam and a sawn beam compacted with wedges. The last 2 options are primitive and not convenient. To complete the assembly at once, a large number of tubes are required.
Salary - manufacturing nuances
The frames are made from hardwood. They give the tabletop a finished look and protect your hands from hangnails. If a typesetting board is used to make the surface of the table, the edging is cut out on the solid surface using a milling cutter. You can also make a special beam and nail it with bronze nails. To increase strength, additional glue is used.
Sanding the cut edge of a wooden tabletop
The wood surface must be sanded. If you don't have a grinder, use sandpaper.
How to paint a tabletop
Varnish is most often used. Tsapona is applied in several layers, it can be sanded, it dries quickly, but emits an unpleasant odor. Acrylic and oil based varnishes are applied with a sprayer in 2-3 layers. The second and third layers are applied after the previous one has completely dried.
How to choose a material for making your own wooden table for home and garden
What to make your own dining table from? Best of all - made of wood. The most pliable wood for a new master will be pine. Products made from poplar will look more solemn. For the street you can take mahogany.
If you want a simpler option for your home, then you should consider laminated chipboard with an optimal thickness of 25-35 mm. On the tabletop you can take wooden boards, birch plywood with a thickness of 35 mm. The legs can be made of metal or wooden beams (about 50 mm thick).
In order not to make a mistake with the amount of material, a preliminary drawing of the future structure is made with precisely specified dimensions.
Advice! The suitable height of the product varies between 750-800 mm.
Related article:
DIY furniture made of wood : for the garden, children's room, kitchen, bathhouse, garden, gazebo; how to restore pieces of furniture, useful tips and recommendations from experts - read our publication.