If the base of the cabinet is still strong, but its appearance has aged, there is a way out - to transform it. There are several options: do the renovation completely yourself or purchase certain parts that can breathe new life into the furniture.
A good cabinet is not a cheap investment and can last a long time. Over time, you might just get bored with the way your closet looks. This article offers all the possible ways to decorate and update an already aged closet.
Interesting: the word “cabinet” itself comes from the Swedish word Skap or the German Schaff (schaffen is German for “to put in order”). And the wardrobe we are accustomed to appeared, in general, recently: in the 18th century. Before this, people used chests or just niches in the wall.
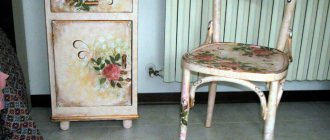
Decoupage
Decoupage is an easy and inexpensive way to give an old cabinet new life. Most often it is made using fabric, wallpaper left over after renovation, table napkins and self-adhesive film. The principle of decoupage is the same, regardless of the materials used. The most important thing is to prepare the furniture for use.
- First you need to remove the handles, doors, pull out the drawers (it is better to decorate them separately).
- The old coating must be removed with a brush or sandpaper, and the surface must be degreased with dishwashing detergent.
- The surface must be puttied and all irregularities removed.
- Cover the surface with varnish.
- Paint it in a pre-selected color.
- Prepare table napkins, newspaper clippings, postcards or photographs.
- Next, you need to apply glue to the surface and carefully attach the selected material for decoupage to it.
- When the glue dries (usually PVA dries in 3-5 hours), you need to coat the product with varnish.
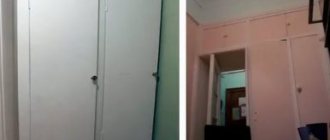
How to update a closet with your own hands: an example of “before” and “after”
You can also cover the top of the façade with craquelure varnish, which will be discussed in the next part.
Materials and tools required for work
To prepare and repaint the cabinet, you will need the following tools:
- brush, paint roller or spray gun;
- paper-based tape;
- putty knife;
- sandpaper with an abrasive layer of medium and fine fraction;
- block for securing the emery.
A spray gun is a convenient tool that requires experience and dexterity, but allows you to get a very even layer
Using a grinding machine or drill with special attachments will help speed up the preparatory work. In addition, you will need a wide container of water and rags for drying and cleaning the surface to be treated.
The master himself determines what is more convenient for him to work with - a roller or a brush.
The brush applies the paint carefully, the layer is evenly distributed over the surface to be treated. Using this tool it is convenient to paint small furniture elements, as well as places where it is difficult to reach.
It's better to have several brushes on hand. A wide one will be needed for applying enamel to parts with a large smooth surface. It is more convenient to handle corners, panels and other decorative elements with a thin brush.
Aging
Wooden furniture can be painted with a dry brush, it leaves unpainted areas, and it looks like furniture from another century.
How to artificially age a cabinet:
- first you need to paint the surface in a color that is several tones darker than the original;
- With a regular candle you need to rub some (in random order) areas of the surface;
- Next, the cabinet should be painted in a light shade (beige, for example);
- Next, rub the surface with sandpaper until abrasions appear;
- For a long service life of the product, it is worth covering it with varnish.
Remaking the book table
To update the appearance of a book-table, you can use the following methods:
- Pasting with film. You can choose any color to match your new interior. Glue should be on a dry surface, cutting with a margin. After gluing, the corners are closed using a sponge pointed at the hair dryer.
- Painting. The surface, cleared of the old coating layer, is painted using acrylic paints. If there are cracks or other damage, they are eliminated in advance using putty.
- Decoration with lace. The design is applied using curtains or tulle. The material is fixed to the freshly painted surface, after which a second coat of paint of a different color is applied over it.
- Decoupage. Can be performed either on a just primed or on a freshly painted table. It is made using a paper napkin or special paper, and at the end the surface is covered with varnish.
- Replacing with laminate. Old countertops are replaced with laminated ones.
Before you remake old furniture with your own hands, you should decide on the desired style solution. Based on this, the optimal material is selected that will give the furniture a second life.
By restoring interior items, you can save a significant amount of money than by purchasing new furniture.
Painting
One of the most popular ways to make an old cabinet look new is to repaint it. You can choose a color that matches the color of the other furniture in the room, or you can choose something radically bright so that the new cabinet becomes an accent spot in the room.
Wardrobe before and after painting
Before painting, the surface of the cabinet must be sanded and leveled. You can even apply another layer of primer on top. Sanding will allow the paint to lay flat on the surface. You can paint with ordinary brushes, or you can also use a special spray gun - with its help the painting will be more accurate.
It is worth applying several layers of paint: this way it will last longer. After the paint has dried, you need to apply varnish to the surface. It will give the paint a deeper color and also protect it from rubbing off.
This method is suitable for any material, including a cabinet made of chipboard.
Before and after view of a painted chest of drawers
Four types of paint are suitable for painting a chipboard cabinet:
- alkyd;
- acrylic;
- aerosol;
- wood paint.
Acrylic is the safest for humans. It dries quickly in the room and does not need to be aired out for a long time. Acrylic in an aerosol lays smoothly and evenly on the surface.
For variety, you can paint the cabinet with a stencil. To do this, after the first layer of paint, you need to apply a stencil to the surface (you can cut it out yourself in advance) and carefully glue it. Then you need to spray a special spray paint over the stencil; once is enough. Next, the stencil can be removed: the drawing is ready.
Options for updating old cabinets
Furniture fashion is democratic. Therefore, any idea regarding the finishing of cabinets is accepted as a manifestation of the designer’s individuality.
Lovers of minimalism find furnishings in Ikea stores. Those who have original taste remake things. They are repainting a new blue cabinet pink with beige stripes. Or they decorate it with a mosaic or a dot pattern. You can see how a set with a wood finish is completely transformed when it is painted black or white.
Using enamel or varnish to update a wardrobe or wardrobe is not the only option. The furniture is covered with fabric, covered with arakal, and decoupaged. From the many ways to transform interior items, everyone can choose their own.
Pasting
Covering a cabinet with wallpaper or fabric is perhaps the most economical way to decorate an old cabinet. You can look for a couple of pieces of wallpaper on the mezzanine: maybe there are still some left over from the previous renovation. You can use any fabric for pasting, even if it’s an old sheet.
“Before” and “after”: a closet covered with wallpaper
If you take wallpaper for the kitchen, it will be more convenient, since such wallpaper is easy to wash. A fabric cabinet will be a little more difficult to clean.
It is desirable that the pattern and color on the material with which the cabinet will be covered fits into the design of the room. The gluing process itself is simple: you need to cut the wallpaper or fabric into strips, apply glue to the surface of the cabinet (you can use PVA), apply the material and run a roller over it to smooth it out.
You can take multi-colored strips of fabric or wallpaper: for example, stick material of one color and with one pattern on one door, and a different color or with a different pattern on the other. This way you will get an interesting almost designer wardrobe in the shabby chic style.
You can also cover the closet with photo wallpaper. They are made in a printing house or sold in a hardware store.
Wardrobe covered with photo wallpaper: “before” and “after” photos
Video description
The video shows how to apply large posters to wardrobe doors:
Method three - stained glass
It is easy to remove the doors and replace them with stained glass windows made in specialized workshops. Only wealthy people can do this. But even here, if you wish, it is not difficult to save money by choosing translucent stained glass film instead of stained glass finishing. It is also allowed to be used if the doors have a mirror surface.
Bright stained glass film for a closet in the living room Source maksdecor.ru
The film has a translucent base. It lets light through. It is reflected from the mirror and comes back. In this way, a glow effect is formed, similar to the reflection of colored glass. The film is applied in the same way as a vinyl sticker. The following photo allows you to evaluate the result.
Bright stained glass films Source i.ytimg.com
Covering with fabric
The fabric usually gives softness, so this method of upholstery is best used in a children's room or bedroom. For sheathing you will need:
- the fabric itself;
- padding polyester or foam lining;
- furniture stapler.
Using staples or liquid nails, you must first secure the lining, and then pull the material over it. The resulting closet will be soft and cozy. You can even pin photos or icons to it as decoration.
Additional details
A practical solution is to install mirrors on the façade. This will visually give the room more space, and also give you the opportunity to look at yourself in full growth. Mirrors also reflect light - they will make the room brighter.
You need to carefully measure the front of the cabinet and order mirrors along with fastenings in the workshop.
The mirror can also be attached to liquid nails. The only thing is that it is better to apply them to objects in a horizontal position: that is, the cabinet will need to be disassembled.
Tip: do not apply liquid nails very close to the edge of the mirror. Very often, under the pressure of the mirror sheet, they end up outside of it, which looks ugly. It is best to apply the mixture to the middle of the mirror.
If dismantling the cabinet seems too unattractive, then you can buy hanging mounts for the mirror.
Also now many people buy a slate surface and attach it to an old cabinet door. First, the door should be removed and the slate board attached with liquid nails. This cabinet will fit harmoniously in the kitchen or children's room.
Wardrobe with slate doors
You can decorate an old cabinet with new handles. If the wardrobe itself still looks good, but the handles are no longer so good, then you should buy new ones: this way the entire product will look better.
Decor elements
Mosaic
You can decorate your closet with different elements. For example, make a drawing from a multi-colored mosaic. This decor will add brightness and elegance to the interior.
Typically used:
- ceramic fragments;
- pieces of multi-colored glass;
- beads;
- shells;
- sea pebbles;
- artificial flowers.
First you need to prepare the surface with sandpaper and putty (level it and cover up cracks, if any). Next, you can attach multi-colored elements with rubber-based glue. The glue should be applied to the middle of the element, not along the edges. It is better to prepare a drawing in advance: draw a sketch and place the mosaic on a flat surface so that you can carefully transfer it to the cabinet.
Rivets
You can add metal parts to furniture pieces. Cabinet doors can be decorated with nails with decorative heads, rivets or staples.
Metal elements can be combined with fabric and painting: the product turns out even more interesting.
Cabinet doors can be decorated with metal rivets or staples
Additional volume
If you want to make the drawing on the cabinet three-dimensional, you can use special plaster. It is designed for decorating furniture.
To begin with, it is worth treating the surface of the cabinet and especially those areas on which the drawing will be applied. If there are cracks, they must be covered with putty and the surface leveled.
Next, a stencil is applied, just as you would with painting a cabinet. You can attach it with tape to be sure. Then a layer of decorative plaster is applied to the stencil. It is important to apply it evenly.
When the plaster has dried, the stencil can be removed and the resulting pattern can be smoothed out with a knife or spatula. Also, after drying, the decor can be cleaned again with sandpaper, again, for leveling.
Afterwards, you can optionally paint the volumetric elements, apply gilding or patina to them, which will give an aging effect.
The final stage is applying varnish. It will preserve the product for a long time and protect the surface from damage.
How to decorate an old closet with newspapers
Cabinet decoration with shells
How to repair cracks
You can often find chips, scratches, and cracks on old furniture. They must be removed before painting. To do this you need to use putty.
To prevent the restoration material from crumbling after drying, it is necessary to pre-treat the defect with a primer solution. Experts recommend using automotive primer. This high quality product is suitable for use on dense wood.
After applying the putty, the surface of the cabinet is sanded. And then remove dust and remaining putty material with a damp cloth.
Wardrobe restoration
| How to do | How to do |
| Door painting | This option does not require much time. It is necessary to level the surface with sandpaper and apply paint in at least two layers. |
| Wallpaper, self-adhesive paper, decoupage | This option is a little more complicated. It is necessary to clean the surface of the cabinet, seal the cracks with putty, and apply glue to a flat surface. You can use wallpaper glue or PVA. With its help, you need to glue wallpaper or cut-out paper drawings to the facade. In a children's room, geographical maps are often used as furniture decor. You can also buy self-adhesive paper and decorate your closet with it without using glue. |
| Covering with fabric | An even more complex option, but the result is impressive. It is necessary to prepare the front of the cabinet in the same way as in the previous two options, and then cover it with fabric. Typically, preference is given to chintz, as it is an inexpensive and bright fabric. You can glue a whole piece of fabric that will cover the entire door, or you can cut small squares of different colors, soak them in PVA glue and paste them over the front of the cabinet in any order. You can also add laces, ribbons and lace to the fabric. |
| Nail patterns | Another interesting option is to buy nails with heads of different shapes at a hardware store and drive them into the front of the cabinet. You can drive them in on the sides, or you can make interesting patterns out of them in the middle of the door. Nail heads come in completely different shapes (there are even soft ones): in the store it’s easy to choose any that you like best. |
Here are before and after photos of the cabinets update.
Using these tips, you can restore an old cabinet: it will become beautiful and stylish, and will please the eye for several more years. The only thing is that updating your closet is worth doing if you really want to spend time on it; If you don’t like handicrafts and painstaking work, then it’s better to just go ahead and buy a new cabinet.
Preparing the product for decoration
Asian style wardrobe
Before you start updating a closet that has already outlived its usefulness, you should carefully examine all the existing furnishings in the room.
Such a decorative element must necessarily match the overall style and theme of the room.
This means that you need to pay attention to which colors predominate in the interior and, in accordance with this, choose the desired palette of shades and tones.
In addition, the use of fittings for finishing the old cabinet will also be important.
The design deserves special words. If you have not yet had experience in such work, you should first practice on any old furniture. It is best to do this on a small part of it.
Before you start decorating the cabinet, you need to make sure that it does not need repairs. If it is necessary, you should produce it and only then begin the design.
In this case, the cabinet must be thoroughly inspected from all sides. If the hinges have become unusable or become loose, they should be replaced or strengthened.
It is best to remove rust from the surface. This is done using a special tool. If necessary, the joints of the parts are strengthened with self-tapping screws and glue.
The next step is to remove the old varnish using an electric sander. You can do this with fine-grit sandpaper. You need to clean the old varnish coating not only from the cabinet doors, but also from the shelves that are inside it.
This type of furniture may have defects that are clearly visible to the eye. These include various types of cracks, chips, abrasions, etc. If the scratches are completely microscopic, this can be easily eliminated using fine-grain sandpaper.
If the damage is large and deep enough, it is necessary to use special furniture wax.
To do this, it must be preheated well. After this, they are used to wipe away any damage to the cabinet.
Large chips and dents require a little more time to repair. Any damage to the furniture should be treated with a primer.
After it dries, you need to putty in thin layers. There is no need to repair the damaged area in one go. In this case, the surface of the cabinet will begin to crack and will not adhere well.
At the last stage of preparing furniture for decoration, you should clean the putty areas using sandpaper with fine particles.
It will be possible to carry out pre-painting preparation only when the entire surface of the cabinet parts is completely leveled. The next step is to apply primer to the shelves and doors from the outside or inside.