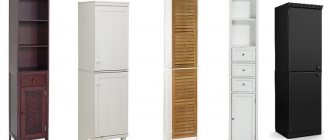
A handmade buffet has one significant advantage - it is unique. Since making a cupboard for dishes is quite difficult, it is advisable to use ready-made master classes with drawings and step-by-step photos. As a result, the sideboard will not lose its individuality, because the finished product will differ in size, color, and finish.
Below are 10 MKs that you can use as a basis when making your own buffet. Among them there will be no exclusive models with figured carvings and complex decoration.
A novice master will still not be able to repeat such work using only photos and videos. But a professional does not need additional instructions; he creates on his own.
Criterias of choice
Before you begin manufacturing, you need to select a model and suitable material for the future buffet. When choosing, you need to proceed from several factors:
- availability of tools. There is no point in buying expensive milling machines, etc. just for the sake of one cabinet. Otherwise, it will be cheaper to order a buffet according to your own design from professionals. In this case, it is better to choose simple models made of MDF and plywood without complex panels and finishing;
- own level. It is better for an inexperienced master to choose the simplest scheme. So the likelihood of making a mistake and spoiling the material is minimal;
- use of the finished product. A cupboard can be placed not only in the kitchen, but also in the living room, dining room, or even in an unheated country house. In the first case, it is advisable to make a buffet from wood. Natural solid wood better tolerates the warm and humid microclimate of the kitchen and will last longer than its MDF counterpart;
Schemes and drawings
Although most kitchens are made according to a standard design, the cabinet will still have to be made according to individual parameters. After all, in each apartment the location of large equipment and communication outlets may differ.
Also, when drawing up a drawing of a buffet with dimensions, you need to take into account a number of points:
- thickness and dimensions of the sheet. Perhaps by removing some of the trim or making some of the shelves open, you can significantly save on materials (spending one less sheet). You also need to take into account the clearance for allowances and grinding;
- filling of the finished product. It is better to select the height of the shelves for specific utensils and household appliances. With the same consideration, the dimensions of the drawers and the final dimensions of the buffet are calculated;
- cabinet location. Hinged doors must open completely. At the same time, it is desirable that they do not block the passage and do not hit walls or adjacent pieces of furniture. Do not install the buffet too close to the sink and stove. Splashes and fumes will significantly reduce the service life of the product.
The drawing is drawn up in three stages:
- A room plan is drawn indicating the location of the rest of the furniture, equipment and communications (sockets, switches, pipes, etc.).
- A diagram of the finished buffet with all dimensions is drawn up (view from the outside and inside). At this stage, it is necessary to think through all the joints, ends and fastenings.
- According to the drawing, a complete list of required blanks with dimensions is compiled. All parts must be numbered, the required number of specific elements, fasteners, and fittings must be indicated.
This approach will facilitate the manufacturing process and help avoid possible errors.
Manufacturing process: step-by-step instructions
Before you take up the tools, you need to clearly imagine what kind of buffet you will make, and reflect your thoughts and ideas on the drawing, indicating all the details of the product.
A sideboard is part of the kitchen furniture.
First, the largest elements of the product that form its basis are prepared according to the available drawings, taking into account the necessary parameters. In order not to disturb the assembly order and not to lose the necessary parts, experienced home craftsmen advise numbering all parts.
It has the shape of an ordinary cabinet with a closed and an open part.
After completing the preparatory work, the cabinet is assembled in the following order.
The designs of such cabinets vary.
However, in other designs you can also find kitchen furniture with engravings, plinths and cornices on the facades.
Made of wood
This master class will discuss the process of making a sideboard from individual bars and boards. But to create a furniture panel, you will definitely need a surface planer and a jointer.
Without these two machines, it will not be possible to make a high-quality workpiece. If they are not available, it is better to make a buffet from plywood or ready-made boards (MK below).
Tools
The list of necessary materials and tools includes:
- boards for making furniture panels;
- plywood, fiberboard or wooden slats for the back wall;
- dowels and glue for joining parts;
- router and set of cutters: molding, edge, radius, etc.;
- thicknesser;
- jointer;
- accessories;
- clamps;
- sander;
- jigsaw;
- a circular saw;
- ruler;
- pencil;
- level;
- priming;
- wood glue;
- putty;
- paints and varnishes.
Hypothetically, instead of power tools, you can use a regular saw or jigsaw, but in this case the cost of effort and time will be much higher. Yes, and the chance of spoiling the part increases significantly.
Step-by-step instruction
The model of a wooden cupboard with open shelves is quite simple and versatile. If desired, the upper part can be closed with the same doors as in the lower half.
First of all, you need to make furniture panels, from which parts will subsequently be cut. The steps for this work are quite simple.
| Sort out the available timber and boards. You need to divide materials based on quality and cut (transverse, radial, rustic, etc.). Blanks with minor defects can be placed along the edges of the future shield. In this case, they will subsequently fall under the cut and help save quality materials. The type of cut is also important. Otherwise, the lamellas will dry unevenly, and the finished shield will crack. | |
| Prepare each piece. Adjust the thickness and length to the dimensions of the required panel (they are selected to match the parts of the future cabinet, taking into account the margin for cutting and grinding). Dry the surfaces with a thicknesser and jointer. | |
| For a more reliable connection, it is advisable to make quarters or shaped grooves (with a router) in the long ends of the workpieces. If the lamellas are of sufficient thickness and width, they can be connected to dowels. | |
| Glue the ends (joiner's PVA is suitable) and connect the beams into a shield. Before complete drying, the workpiece must be secured with clamps. |
The finished panels are re-processed with a jointer and thicknesser. After which they can be used to make furniture.
The buffet will consist of two parts: upper and lower, which will be connected into a single whole.
The bottom half is assembled first.
| The bottom of the future cabinet is cut out of the shield. Dowels are inserted into the processed ends. | |
| The walls are cut out of two blanks. In order not to complicate your life, the legs are made separately - they are cut out with a jigsaw at the bottom of the sidewalls. | |
| Holes for dowels are drilled in the side walls to connect to the bottom. | |
| In addition to dowels, the side walls are fixed with glue and screws. The shelves are attached in the same way. | |
| At this stage you need to check the geometry of the cabinet . All angles must be strictly 90 degrees. | |
| From the back side, secure the free edge and diagonal of the sideboard with two slats. | |
| Cut the tabletop to the desired size. If the thickness of the shield is small, beams can be placed along the edges to the width of the protruding part. This will make the product stiffer and will not sag during use. And a buffet with a massive tabletop looks much more solid. | |
| The beams used for thickening are attached with furniture glue. | |
| In this position, they need to be fixed with clamps until completely dry. | |
| The back wall is cut from fiberboard or plywood. | |
| Dowels are glued into the upper end of the sidewalls. Holes are made symmetrically in the tabletop. | |
| The structure is assembled into a single whole. The joint is fixed with wood glue. | |
| Flutes are made on the decorative strips on a milling machine. These elements will cover the vertical ends of the side walls. In addition, doors will be attached to them. | |
| The longitudinal ends of the decorative strips are also processed with a milling cutter. This way they will look more aesthetically pleasing. | |
| The lower part is closed with a decorative strip. It is cut out with a jigsaw, and the edges are processed on a milling machine. | |
| The ends of the side walls are covered with previously made decorative strips. | |
| When assembling parts into a single whole, you need to pay attention to the joints. | |
| If the connection turns out to be sloppy, you need to make a quarter in the decorative strip, as shown in the photo. | |
| In this case, the decorative element will go deeper and will not protrude beyond the bottom bar. | |
| To hold the bar more securely, a beam must be glued to the back side. Additionally, it can be fixed with self-tapping screws from the side (this can also be done from the inside, the main thing is that they are not visible from the front part). | |
| It is advisable to refine the ends of the tabletop using a milling machine or cover them with decorative strips. | |
| To make panels on the doors you will need two cutters shown in the photo | |
| The finished panel will consist of three parts: a frame and an internal part made of solid wood, and a base made of plywood. | |
| Each frame will require 4 blanks. | |
| They need to be prepared by treating them with a jointer. In the upper part, you can make a shaped cut with a jigsaw. | |
| The parts are connected to each other in the same way. | |
| The main thing is not to damage the workpiece when drilling holes for dowels. | |
| It is more convenient to work when the part is clamped with clamps. | |
| To prevent the glue from the dowel holes from leaking onto the front part, the edge needs to be slightly widened with a crown or a thick drill. Then the excess adhesive will collect in the resulting recess. | |
| You need to assemble all parts of the frame at once. It is advisable to press the parts not only against each other, but also against a flat table surface. If this is not done, the frame will move when it dries and it will turn into a “propeller.” | |
| The inner perimeter is processed with a moulder. | |
| The outer perimeter is the same. | |
| On the back side it is necessary to make a groove along the inner perimeter of the frame (about 10 mm wide). A plywood base will subsequently be glued into it. | |
| The photo shows the finished groove for the base. In addition, it is necessary to make (with a crown) recesses for the canopies. | |
| Step back 10 mm from the edge of the plywood (the width of the groove) and draw a line parallel to the end. | |
| Place the frame so that the inner edge coincides with the line. Trace the inner perimeter with a pencil. | |
| Draw cut lines , retreating 8-10 mm from the resulting line. This gap will “fit” into the groove in the frame. As a result, only the visible part (which was outlined with a pencil) will remain inside the door. | |
| Use a jigsaw to cut out the internal trim for the façade (its size and shape depend on the design of the cabinet). | |
| Sand the ends with a sander. | |
| Use the same calving cutter to process the perimeter of the workpiece from the outside. | |
| All that remains is to assemble the three blanks into a single whole. | |
| To do this, the plywood base is glued into the groove. When making glazed doors, glass is glued in place of the base, without additional overlays. | |
| A decorative overlay is glued on top. At this stage, you need to keep an eye on two things: · the glue should not extend beyond the borders of the decorative overlay; · the distances to the frame must be the same on all sides. Then all that remains is to sand the surface. | |
| All imperfections can be removed with putty. The products are primed, painted, and after drying, fittings are attached to them. | |
| The top of the cabinet will be open. Therefore, it is better to make the back wall for this half from lamellas or plywood, and not from fiberboard. | |
| This way the appearance will be much more aesthetically pleasing. | |
| To assemble the upper part you will need 5 parts: · two side walls. Dowels are inserted into them at the upper and lower ends, and holes are drilled for fastening the shelves; · top cover; · two shelves (with dowels at the ends). | |
| All parts are assembled according to the same scheme. | |
| The top and side ends are covered with decorative strips. | |
| The lower edge is attached to the tabletop using dowels. | |
| The finished facades are screwed onto the canopies. | |
| The finished product is puttied, primed and painted in the desired colors. |
For convenience, this master class is divided into two videos.
Manufacturing of facades:
Panel. Easy to make. Do it yourself.
Cabinet assembly:
Beautiful buffet on the veranda! With my own hands.
Beginning craftsmen can refuse all decorative elements. The finished buffet will not look as attractive, but will not lose its functionality.
Add a plinth and cornice
1. Cut out the blank for the base M. Mill along the top edge a rounding with a radius of 10 mm with a ledge (the so-called “nail”) (Fig. 4a).
2. To make the texture pattern on the plinth parts surrounding the case look continuous, cut out a piece for the front board from the middle of the workpiece. Its length should be 50 mm greater than the width of the body. File a bevel on one end of the front board, as well as on the front ends of both side boards. Mark the exact length of the front board (photo K) and file the second bevel. Next, mark the length of the side plinth boards (Photo L ) and file the back ends to the final length.
Align the heel of the bevel of the front plinth board with the outer corner of the post I of the façade frame. Mark the heel of the bevel at the other end of the plinth board.
With the front plinth board in place, attach the side plinth piece to it and secure both pieces with masking tape. Mark the length of the side board along the rear side post A.
3. Mark an arcuate cutout on the front board of the plinth (Fig. 4), cut it out with a band saw or jigsaw and sand it to the contour line. Then finish sanding the front and side plinth boards and glue them to the body, securing them with clamps.
4. Cut out blanks for the frieze N , the cornice O and the molding R. Route a 6mm fillet on the frieze blank and a 10mm fillet on the cornice blank (Figure 4b). Make a 3 mm deep cut on the front side of the workpiece for molding and file a bevel along the bottom edge. Then make shallow cuts in the N and P to serve as traps for excess glue. Finish sand each workpiece, and then glue them together, securing them with clamps (Fig. 5, photos M and N ).
Working on a flat surface, glue and clamp Frieze Board N to Curtain Board O, lining up the backs and ends of both pieces.
When the blanks N, O glued together have dried, glue the decorative molded profile P in place.
5. From the middle of the gluing, cut out a piece for the front part of the cornice, the length of which should be equal to the width of the body with an allowance of 102 mm. Then, just as when making a plinth, file the bevels, try on, mark and file the parts to the final length. Glue the cornice to the body, pressing the parts with clamps (Fig. 4).
From plywood
To make a sideboard from plywood, you will need almost the same list of tools and materials that were used in MK No. 1. Only boards and beams are replaced with sheets of plywood (at least 18 mm thick for the frame and 9–12 mm for the panels). You can only refuse a surface planer and a jointer (depending on the quality of the shields).
You can assemble a cupboard using the same pattern and dimensions, but there are two nuances:
- It is better to install the buffet on ready-made furniture supports;
- It is easier to assemble the product for confirmations.
Plywood is not as durable as natural wood, so instead of hinged doors it is better to make drawers. You will also have to abandon figured panels and decorative elements. It is advisable to use a simple and concise design.
Having drawn up a drawing and decided on the dimensions of the finished buffet, you can begin manufacturing.
| Cut the plywood according to the diagram. | |
| Secure the sheet with clamps and cut along the cutting lines. | |
| It is more convenient to cut a large number of identical workpieces using a circular saw. During the process, you need to monitor the geometry of the parts. All angles must be strictly 90 degrees. | |
| Assembly begins from the bottom of the buffet. An even rectangular beam is pressed against it with clamps, as shown in the photo. | |
| On the other side, the side wall is located similarly. This is done to ensure that all corners of the future cupboard are strictly straight. | |
| The fixed parts are sealed with confirmations. The remaining sides of the frame are assembled in the same way. | |
| Then the shelves are screwed to the frame. The caps that remain on the sides will subsequently be hidden under a layer of putty and paint. | |
| After assembling all the pieces, the upper half will have compartments for drawers, and the lower part of the cabinet will consist of open shelves. | |
| The ends of the shelves are hidden under thin plywood strips. This is done for two reasons: · so that the fronts of the drawers do not protrude forward after assembly; · to hide possible cut defects. | |
| Decorative strips are attached with wood glue and additionally nailed. | |
| The frame of the drawers is assembled from the same plywood. The sizes of the buffet drawers are selected based on their intended contents. | |
| For façade panels, thinner sheets will be required. | |
| The boxes are assembled on confirmations, having previously secured the sides with clamps. | |
| Quarters are made in the blanks for the façade frame on a milling machine. | |
| The panel will subsequently be glued into these recesses. | |
| The façade frame is assembled using dowels. | |
| The panels are glued into ready-made frames. The products are pressed with clamps until completely dry. | |
| It is better to make the tabletop from natural solid wood. Or choose thicker plywood for it (at least 30 mm). | |
| The corners of the tabletop are given a rounded shape using a jigsaw. | |
| The ends are processed on a milling machine. | |
| The finished frame is sanded, puttied, primed and painted. Marks are applied to the completely dry surface for attaching the fittings. | |
| Furniture supports are screwed to the bottom. It is better to choose adjustable models, so it will be easier to level the finished buffet. | |
| At the top there are guides for drawers. In order to clearly maintain the distance both on the frame and on the box itself, it is advisable to make a “stencil”. | |
| The bottom cabinet of the buffet is ready. |
The details of the assembly are shown in more detail in the video: The upper part can be made based on MK No. 1, or you can be creative and make open shelves, for example, from old drawers. To do this, you need to disassemble them, remove the top darkened layer of wood (with a plane or jointer), and then put them back together and hang them in random order. If desired, open with varnish or paint.
The details of the assembly are shown in more detail in the video:
Making a chest of drawers from plywood. DIY furniture
It is worth noting that such a cupboard is better suited for a dining room or living room than for a warm and humid kitchen.
How to choose a kitchen cupboard for dishes
First, you need to choose the style of the product. Secondly, choose colors and decor. Thirdly, choose the functional content.
IMPORTANT! It is worth considering individual needs when choosing the size and type of boxes. Not all housewives need a variety of large drawers, and some cannot imagine a buffet without small, narrow, neat doors.
The style of the buffet is chosen based on personal preferences and the overall interior design.
From furniture panels
It is much easier to work with furniture panels than with individual boards and beams. They are sold in various sizes and thicknesses. But it is almost impossible to find similar blanks made of oak or ash. Most often, pine and other coniferous woods are used for the production of shields.
Furniture panels are pieces of wood glued together. Depending on the production technology, they are divided into solid-lamella and spliced.
It is better not to make carved panels in cabinets from this material. When creating a shaped sample, you can expose the junction of two adjacent beams.
Such a product will not look very attractive. It is better to give preference to straight lines and simple shapes.
A drawing with the dimensions of this buffet and a list of materials required for production is shown in the photo below.
Before starting assembly, it is advisable to paint all blanks in the desired tone and dry them thoroughly.
The workpieces are connected to each other using corners. The buffet is attached to the load-bearing wall of the room in the same way.
With this installation, only two furniture supports are required - for the outer part. Instead of the rear legs, the load will go to the concrete wall.
The upper part of the buffet is assembled and fastened in the same way.
Both hidden and open shelves are attached to the frame using dowels.
Naturally, you don’t have to save money and make both the back wall of the cabinet and the distant supports. Moreover, if the buffet is installed against a plasterboard wall, then it needs to have all four supports.
An option for making a more familiar (photo below) home-made cabinet from solid-lamella panels is shown in the video:
Sideboard to order. Solid lamella pine
DIY kitchen buffet
Making a kitchen buffet yourself is quite possible. For this you will need:
- Internet access (there you will find a lot of buffet options with different designs in a couple of minutes);
- tools;
- materials;
- desire and imagination to create an individual masterpiece.
You can make a simple buffet yourself.
From lining
Lining is a board that is used for cladding. It comes in different thicknesses, lengths and widths. But on sale, most often, only fairly thin varieties (12–15 mm) are found.
This material is not suitable for making a frame. Therefore, the frame for the buffet is made of thicker timber, and the walls and trim are made of lining.
Such cabinets have a unique design that not everyone likes. Clapboard trim is difficult to combine with other pieces of furniture.
For production you will need:
- lining;
- timber 50x50 mm;
- corners;
- self-tapping screws;
- screwdriver;
- saw;
- decorative strips;
- level and plumb;
- fittings (hinges, handles, etc.);
- construction square;
- pencil;
- roulette;
- sander;
- glue;
- varnish;
- paint or tinting;
- brushes and sponges.
In this master class, the corner buffet will be attached to the wall, so it will not have internal walls.
| Apply markings to the ceiling, floor and walls. Screw the timber for the frame along the boundaries of the future cupboard. | |
| Using a level and plumb line, install the external frame jumpers. Make sure that all angles are right. | |
| Connect the joints using corners and self-tapping screws. | |
| If the buffet borders a refrigerator or other kitchen appliances, be sure to leave gaps around the perimeter. Such ventilation will protect electrical appliances from overheating. | |
| In the places where the shelves will be located, add additional beams made of timber. They will bear the entire load. | |
| Place the shelves on a timber frame and fasten them with self-tapping screws. In this case, the shelves are made from leftover laminate, but they can be built from clapboard, MDF or boards. | |
| The outside of the frame is covered with clapboard. If desired, it can be pre-painted or tinted and varnished. | |
| The frame for the doors is assembled from the same timber. Marks are applied to the frame and frame, and the awnings are screwed onto them. | |
| For greater rigidity, the door joints are fixed with metal corners. | |
| For large doors it is necessary to install additional stiffening ribs (diagonal jumpers). | |
| “Sew up” the finished frame with clapboard. | |
| The cut line at the corners and screws do not look very attractive; it is better to cover them with a decorative strip. | |
| It is glued around the perimeter, and the joints in the corners are “cut” at 45 degrees. | |
| The inside of this buffet doesn't look very attractive. But this does not affect operation. Such models are made solely to relieve space (to hide utensils, canned goods and household appliances). |
If the doors do not fit tightly or open, secret magnets can be screwed to the frame from the inside.
Assemble the door
1. Take the door parts Q, R, S and T . Using a flexible template, mark a T arc on the top crossbar. Cut out the arc with a bandsaw or jigsaw and sand smooth.
2. Cut out the U and sand it. Dry assemble the door to check the fit of all parts (Fig. 6). Then glue the door, securing it with clamps, and make sure it is square.
Using a thin sliver or small brush, apply glue deep into the tongues of the Q post and the top rail T, then insert the triangular gusset V.
3. To strengthen the thin walls of the deep tongue at the bottom of the top crossbar T and strengthen the connections between it and the posts Q , cut triangular gusset inserts V , shown in Fig. 6, and glue them in place (photo O).
4. Using the router by hand, make 6mm offset fillets ("claws") along the outer front edges of the door (Figures 6 and 6b). Next, install the rebate bit into the collet and select 10mm rebates on the outer ribs on the back side (Figures 6 and 6c).
Sand the curves on the top ends of both side beads E according to the radius of the top corners of the folds.
5. To install the glass and beads E, remove by milling the inner wall of the tongue only on the posts Q and the middle crossbar S (Fig. 6), using the same techniques as when making the side frames. Start and end the cut with the cutter at the connections of the top crossbar T with the posts Q. Use a chisel to trim the corners only at the bottom of the fold. Cut out the glazing beads to the required length and sand their upper ends in accordance with the upper curves of the rebate (photo P). Using a finishing nail with a bitten head, drill holes in the glazing beads and then sand.
6. Clamp a 5mm drill bit into the drill chuck and drill a mounting hole for the knob handle. Then use a 19mm Forstner drill bit to make a hole for the post lock cylinder. (You can do without a lock if you are making a display cabinet to store items that are not too valuable or dangerous.) With the case facing up, place the hinges on post I of the façade frame (Fig. 4), drill pilot holes and secure the hinges with screws. Place the door on the body and secure it. Working from inside the cabinet, drill pilot holes in the door post Q . Remove the door and remove the hinges from the frame. Finish sand the door.
From kitchen shelves
Old shelves, boards and timber can also be used. The main thing is that they are whole and even. Otherwise, you will have to purchase new materials.
The list of what you need is in the photo below.
In addition, you will need fittings (guides and hinges), tools and paint materials.
This amount of materials is enough to make a fairly spacious buffet, measuring 230x95x48 cm (approximate data).
Depending on the chosen color and type of finish, you can get different variations of the buffet.
It can be outright retro or loft, as in the photo below.
Or various options for rustic style (country, etc.)
The work begins by cutting the materials to the dimensions indicated below.
If you need a cupboard of a different size, then the dimensions of all parts need to be adjusted to the required parameters.
The manufacturing algorithm is quite simple:
- assemble the upper and lower frames. This frame will bear the entire load;
Source: www.ana-white.com
- attach the side walls. If the buffet is assembled from kitchen shelves, then the width and height of the product can be adjusted to the specific dimensions of available blanks;
Source: www.ana-white.com
- when assembling the façade, you need to ensure that the joints are identical and neat;
Source: www.ana-white.com
- When installing the floor, you need to ensure that it does not protrude beyond the frame. Otherwise, the sliding doors will not be able to move freely along the guides;
Source: www.ana-white.com
- to prevent the shelf from sagging, it should be supplemented with transverse stiffeners;
Source: www.ana-white.com
- like the floor, the shelf should not protrude beyond the frame;
Source: www.ana-white.com
- For the back wall you can use the most unsightly shelves and boards. A sheet of fiberboard or old slats will also work. In the most budget option, you can do without the back wall altogether. But you need to keep in mind that this model has only two doors. This means that part of the shelves and back wall will be constantly visible;
Source: www.ana-white.com
- if the countertop will be used as a work surface (for cooking), then it is advisable to choose moisture-resistant materials for it;
Source: www.ana-white.com
- The last stage is attaching the fittings. Here you need to monitor the level very carefully. Otherwise, both doors will constantly slide to one side.
Source: www.ana-white.com
Sawing tongues and tenons
Note. Typically, in such connections, the depth of the tongues and the length of the tenons are 10 mm. Since the side frames and door of this display cabinet are subject to significant stress due to the large glass panes, we increased the length of the tongues and the depth of the tongues to 12mm to give them additional strength. To simplify and speed up production, the lid, shelf and bottom have the same design and are manufactured in the same way. And for greater accuracy and to avoid repeated adjustments, we processed all parts in which tongue and tongue joints were used one by one in one step.
1. According to the dimensions specified in the “List of Materials”, cut out the side posts A , crossbars B and middles C , longitudinal and transverse parts of the frames F, G for the bottom, lid and shelf, as well as posts Q , lower R , middle S and upper T crossbars doors. Use chalk to mark each detail. Before cutting out the tongues, mark the inner edges of parts A, B, F, G, Q, R and T , as well as both edges of parts C and S (Fig. 1; 1 b ; 2; 2a; 6 and 6a). Save some scraps of the same thickness for setting up your saw.
2. Cut out dowels in the parts in the center of the marked edges with a width corresponding to the thickness of the plywood panels. To do this, raise the groove disc to a height of 12 mm above the saw table and position the rip fence so that the disc runs in the middle of the cutting edge (this can be done by eye, without resorting to measurements). Make one pass, turn the ends 180° and make another pass. Then, gradually moving the longitudinal stop towards the disk with a minimum step, cut out dowels in the scraps, not forgetting to unfold and make a second pass, until 6 mm plywood fits tightly into them. Now you can cut out the tongues in all parts. Raise the disc to a height of 51 mm and make two additional passes to deepen the tongue in the top crossbar of the T . To ensure that all tongues are the same width, especially on long pieces, press the pieces firmly against the fence using a comb.
Having partially covered the groove disk with a wooden overlay of the longitudinal stop and using the longitudinal stop as a limiter, and the transverse stop with the overlay as a pusher, form tenons at the ends of the crossbars B, C, G, R, S, T.
3. To make short tenons on the crossbars B, C, G, R, S, T (Fig. 1; 1 b ; 2; 2a; 6 and 6b), install a 16 mm thick groove disk in the saw machine, partially covering it with wooden longitudinal stop plate. On a test cut, feeding it using a transverse (angular) stop, cut out a short tenon in the middle of the end, making one pass on each side, and adjust the reach of the disk so that the ridge fits snugly into the tongues of the posts. Then use a rip fence as a length stop to cut 12mm tenons at the ends of all the crossbars (Photo A).
From kitchen cabinets
You can find old Soviet cabinets at your own dacha, or buy them at a flea market for literally pennies.
High-quality materials were used for their manufacture (mainly natural wood), but the design of such buffets is hopelessly outdated. But this does not mean that they cannot be used as a basis for realizing your own ideas.
To work you will need:
- sander;
- brushes, rollers and sponges;
- masking tape;
- paints of the required shades;
- roulette;
- hammer;
- screwdriver or screwdriver;
- level;
- scissors or stationery knife.
If the old cabinet is in poor condition, individual doors, legs or other elements may need to be replaced. In this case, you will additionally need a saw and consumables.
| Soviet buffets, in most cases, were opened with varnish. A new coat of paint will not apply to such a coating. Therefore, the varnish must be removed with a sander. You can do without this tool, but it will take a long time to work with sandpaper. | |
| Before you start sanding, you need to remove the original glass and fittings from the sideboard. Older sideboards usually used glass shelves, a design that is still relevant today. If the glass has become cloudy over time, similar pieces can be cut out using a nearby glass cutter. Glass with a thickness of at least 4 mm is placed on the sideboard (depending on the dimensions of the shelf). In some cases, additional hardening is required. | |
| Some glass or mirrors can be left in their original form (if they fit the future design). Their edges need to be sealed with mounting tape so as not to get dirty during the painting process. | |
| It is most convenient to paint smooth surfaces with a roller. It does not leave streaks or smudges. | |
| Figured decorative elements are painted with a sponge or brush. | |
| If the original did not have shaped elements, but they are needed, they can be glued with wood glue or a hot-melt gun (ready-made plastic decor is sold in hardware stores). | |
| The painted buffet must dry thoroughly. | |
| For a buffet with a pattern, you should stock up on a stencil so that the ornament is the same. Using mounting tape you can create simple lines or a cage. The main thing is to accurately measure and apply the protective strips evenly. | |
| Free spaces are painted with a roller with contrasting paint. | |
| The adhesive tape is not removed until the paint and varnish materials are completely dry. | |
| After removing the adhesive tape, smooth stripes with clear edges remain. |
Then all that remains is to screw the appropriate handles onto the doors and drawers.
DIY baroque buffet
Buffet finishing
Probably, many will agree that the new furniture looks impeccable, but, alas, the price is not at all pleasing. If you suddenly inherited your grandmother's sideboard, consider yourself lucky! After all, as you know, furniture used to be made for work, with the expectation of long-term use. And you can bring it into the proper, and most importantly, desired, form yourself, without spending a lot of money on it.
Five ideas for decorating old furniture
We offer you several interesting options for remodeling kitchen furniture.
Even at home, a kitchen buffet with your own hands can be transformed from seemingly shabby furniture into a real interior decoration!
- Painting and replacement of kitchen facades. An old wooden or painted surface must be thoroughly cleaned of grease stains and dust, washed with warm water and detergent and dried. Next, a light sanding with fine-grit sandpaper will be required. If there are cracks in the furniture, we fill them with a special wood putty. The already dried surface must be re-treated with sandpaper (only with medium-grain sandpaper). This is followed by a primer with universal paint and light sanding.
Snow-white cabinets with replaced doors and fittings
Then you need to apply the selected paint in two layers. The cabinets in the photo above are painted white, and some of the doors have been replaced with new glass ones. New metal fittings were also selected. Beautiful dishes complement the overall composition.
Attention! Instead of replacing the doors, you can add a beautiful design to the old doors.
With application of ornament
- Decoupage technique. Here you will only need special napkins or a pre-printed design, scissors, brushes, glue and acrylic. With a little imagination and effort, you will get a truly original and spectacular thing!
Stunning buffet decoupage! And all this with your own hands
- In this version, the cabinets are painted in a delicate light green color, and a colored stencil is applied to the doors. You can experiment with any shades!
With stencil application
- Bright furniture! All with just paint, new fittings and charming curtains. You might like this option.
A kitchen that plays with bright colors is amazing!
- Black and white contrasting furniture. Quite an interesting solution for modern kitchen interiors in high-tech, art deco, minimalism or modern style. And all unnecessary decorations from cabinets in the form of carvings and balustrades can always be removed.
Black and white version
Angular
A corner buffet is a godsend for small kitchens. It will allow you to fully utilize every centimeter of free space.
The master class discussed the option of making a corner sideboard with dimensions of 183x90x48 cm (HxWxD). If necessary, the dimensions of the cupboard can be adjusted.
This buffet has a trapezoidal shape (when viewed from above), so it is more convenient to cut the shelves, as shown in the photo below. So from one board you get three shelves at once (a total of 6 of them are needed).
The resulting blanks are attached to the back wall of the sideboard using glue and self-tapping screws.
The outer edge of the shelves is attached in the same way to the timber frame. As a result, the back wall and two front slats will become the legs of the buffet.
When attaching the side walls (with glue and screws), you need to pay special attention to the joints - they must be smooth and neat.
Next, you should glue three transverse strips: above and below the hinged doors, as well as to the top shelf of the cabinet.
Decorative molding will be attached to the top bar, and the bottom ones will hide possible gaps in the area of the sashes.
The facades are assembled as shown in MK No. 1.
If the doors do not fit tightly and a gap forms between them, it is hidden using a secret jumper.
Instructions for making a corner sideboard
The corner of the room is often left empty. If there is a shortage of usable space in the kitchen or living room, a corner cabinet will provide greater freedom.
Prepare your tools. In principle, the list is the same as described in the previous case, only we don’t need clamps.
Select the following materials:
Specification
All parts are marked in the pictures with numbers in red circles:
Pass boards 1830 mm long through a surface planer. Mark and cut 2 boards with a circular saw into six trapezoidal shelves. The shelves will have a small base with a width of 1950 mm and a wide side of 775 mm.
Using a circular saw, cut one board into two 60 mm wide slats; from the other slats, make a web for the back wall with a transverse dimension of 195 mm (according to the width of the small shelf base).
Attach six horizontal segments (top cover + bottom base + 4 shelves) to the back wall with self-tapping screws.
On the front side of the case, attach two vertical strips - supports - with self-tapping screws. Embed the self-tapping screws into solid wood so that you can putty the fastener sockets later. Mount the lower base at a distance of 70 mm from the floor. Place the shelves at equal distances from each other. It is important that the third shelf from the bottom, which will be the tabletop, is fixed at a distance of 760 mm from the floor.
To make the side walls, cut 2 boards from plywood according to the height of the cabinet (1830 mm). Attach the walls with self-tapping screws and glue to the bases and shelves of the case.
Prepare three cornices. Make a curly cutout in the bottom bar, as in the picture. Process the middle and upper cornice with a router - make curly grooves and notches.
You can secure the cornices with wood glue; be sure to secure the lower support bar with self-tapping screws.
Making doors
Assemble two transoms from 45 mm wide planks (the length is indicated in the figure). Do this using tongue-and-groove corner joints and coat them with wood glue. On the back side of the transoms we screw the plywood sheets with screws.
You should have two doors with a height from the middle of the bottom bar to the middle of the middle cornice (635 mm). The width will be equal to the distance from the middle of the side vertical bar to the central axis of the body (335 mm).
Treat hard-to-reach areas of the body with a grinder or a block of sandpaper. Paint all surfaces with stain. Then coat with furniture or water-based varnish. If you are skilled in craquelure, you can give furniture a noble, aged look in the form of a patina.
Using a chisel or a router, cut out the seats for the hinges in the sides and doors. Hang the doors by screwing the hinges with screws. Drill two holes in the vertical slats of the transoms in the center and screw two handles.
Install a central vertical stop bar inside the cabinet. The doors will rest against it and will not fall inside the cabinet.
Put the corner sideboard in its place. You can glaze the upper compartments for dishes by installing horizontal guides for sliding glass panels.
Antique
Every antique sideboard is a masterpiece. The unique carving and finishing make this piece of furniture a true decoration of the home.
But not every professional is able to do such work. If you don’t have the appropriate skills, but you still have the desire to own an antique cupboard, you can use a trick.
Provence style
Provence is a very cute and cozy style. It is perfect not only for apartments, but also for cottages and private houses.
The list of necessary tools and materials includes:
- boards or finished furniture panels;
- jointer;
- thicknesser;
- milling machine;
- saw;
- screwdriver;
- corner;
- level;
- glue;
- accessories;
- clamps;
- brushes and rollers;
- paints (enamel, acrylic and patina);
- sandpaper;
- primer.
The step-by-step progress of work is shown in the table:
| Prepare materials according to the drawing. | |
| Sawing, sanding and sanding the workpieces. | |
| Or cut out finished parts from the shield. | |
| Assemble the frames onto the dowels, tightening them with clamps until the glue dries completely. | |
| Assemble the frame and glue the side walls to it. | |
| Cover the end of the tabletop with a decorative strip. | |
| Place the lower part on the legs. | |
| Assemble the upper part in the same way. | |
| Cover the workpiece with white primer. | |
| After drying, carefully sand the surface. | |
| After sanding, cream-colored enamel is applied. | |
| Use a light brown patina to create darker areas. | |
| Using acrylic paints, paint a design on the panels of the facades (can be done using the decoupage technique). | |
| After the paint has dried, assemble the doors and shade them with patina. Glass is glued into the upper doors instead of wooden panels. | |
| Hang the sashes and add fittings to them. |
The finished buffet is light and bright. It will perfectly complement a kitchen or dining room in Provence style.
Related articles:
Kitchen design in Provence style with AliExpress: dishes, textiles, decor
Applying patina to furniture and wood with your own hands: detailed technology