Preparatory and sawing work
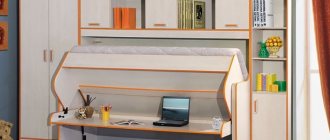
The transformable wooden chair stepladder consists of two parts: the chair itself and a retractable structure with two reliable steps. The retractable structure will be placed under the chair seat and pulled forward using guides.
To make a stepladder with your own hands, we take a planed pine board with a thickness of up to two centimeters and cut out the necessary blanks from it.
Drawings of all the main elements that will be needed, with dimensions, are presented in the photo. All the necessary dimensions are marked on them, and when sawing, strictly follow them so that the stepladder and chair look perfect.
Make blanks ten centimeters wide, sand all surfaces on all sides so that when you run your hand over them, you feel that they are extremely smooth. Next you should start cutting out the legs. Three sets will be needed.
Transformation in one photo
To make your chair stable, its legs should be attached at an angle of ten degrees.
To do this, you need to cut their ends strictly at an angle of eighty degrees and it is very important that they are made parallel (the drawings are visible in the photo)
Next in line are the leggings, and there are three types of them. Here we need a circular saw and a jigsaw. Control the sawing so that the corners of the legs move apart. The corners of the plywood overlays should also diverge, and their lower edge can be given a decorative profile.
Make grooves for the connecting dowels (to connect with dowels, drill holes for them). Cut the joints of the legs with other elements at an angle using a jigsaw. It is necessary to round the corners of the legs, which will protect them from chipping under increased load. Now the next step is the drawers (the strips on which the chair cover is attached). They are cut out and also beveled at the upper ends at an angle of eighty degrees.
We make the steps last. We cut it out and round it at the edges. On the step that will be the bottom, make two corner square cuts (with a side of thirty-eight millimeters). This is necessary for docking with small legs.
Assembling all parts
Do the initial assembly to ensure that the stepladder chair will be assembled correctly and all parts fit together perfectly. Assemble without glue, using screws, dowels, dowels. We connect the legs and legs, put them on the screws in the drilled holes.
If no modifications are needed, then do a complete assembly, as shown in the video.
Takes up little space
We close the screw heads with special wooden plugs to match the chair. Screw the lower and upper drawers onto the screws. Secure the step that should be on top, place the small legs on the screws and connect them with a drawstring, screw on the remaining steps.
Arrange the two parts of your chair in the desired order and screw the guide to the movable legs on the outside. Install the guide so that its rear ends are at the level of the rear strip of the rods. The front edge strips are aligned along one line. To eliminate the possibility of the steps being skewed when extending, you need to pull the guides into the grooves of the prongs. We check the smooth operation of the retractable mechanism.
Very useful in the kitchen
The stepladder chair can now be assembled clean using melted wood glue. For good gluing, we fix it with clamps. Sand all the plugs and screw heads, cover the stepladder with putty, let it dry and apply three layers of varnish alternately, letting it dry after each layer.
A do-it-yourself stepladder chair is shown in the photo.
By performing fairly simple operations, you yourself have made a multifunctional, comfortable chair. Now you can perform many high-altitude household jobs using your creation.
From the pipe
If there are fragments of a profile pipe left from welding any metal structure, you can put them to use - build a step-ladder chair with your own hands.
- Using a grinder, we cut the profile into parts so that the base can be welded. We will weld the frame at an angle of 45 - for comfort in climbing stairs.
- We make the frame of the bench at an angle of 90 degrees (see picture below).
- We cover the finished frame from the profile pipe with black paint (it is better to do this twice, drying each layer thoroughly).
- We construct steps with a seat from a plank pallet (from under blocks or bricks). We cut out the elements using a jigsaw in accordance with the dimensions of the welded structure.
- We fasten the parts from the board with self-tapping screws, covering the steps with the seat with furniture varnish (2 layers are desirable). Ready to use!
Stages of production from a profile pipe
Photo gallery
How to do it?
Simple
Making a simple step stool looks like this. It is necessary to cut and saw off all the necessary parts. Now we need to start making the seat.
- You need to take 2 wide boards and attach them tightly to each other. If desired, they can be glued. To make the product more durable, two bars need to be attached to the back side.
- The support posts should be connected. They can be attached using self-tapping screws: fasten 2 transverse bars to the guides, strengthen 1 of them diagonally.
- To make the sides (legs) of a chair, you need to cut off the inner contour of the side using a drill or jigsaw.
- Next, you should make a ladder: place it at an angle and secure the steps parallel to the ground.
- Like the sides, you need to make a back for the chair.
- Next, you need to take the middle step, which was located in the chamfer, and screw it with self-tapping screws.
Now all the necessary elements can be collected. It is necessary to attach the guides of the support post and the string of the ladder to the seat. Make and attach a step and seat. When the ladder and the support post are connected, you need to secure the slats with the first end under the seat and the other between the support posts.
Using a piano loop, you need to fasten the 2 parts of the step stool together. The structure must be primed and painted with varnish in 3 layers. If desired, the step stool can be painted or painted.
Transformable chair
Transformer chairs can consist of 3 steps, and if the product is folded, it will look like a regular chair. First you need to draw a drawing sample for the blanks. Then prepare the following elements:
- front sides (2 x 29 x 42 centimeters) – 2 pieces;
- rear sides (2 x 32.6 x 86 centimeters) – 2 pieces;
- backrest strips (2 x 7 x 42 centimeters) – 3 pieces;
- rear seat (2 x 16.7 x 41 centimeters);
- front seat (2 x 10 x 41 centimeters);
- steps (2 x 13 x 37 centimeters) - 3 pieces;
- planks (2 x 3 x 9.6 centimeters) - 6 pieces.
Manufacturing.
- It is necessary to thoroughly polish all the elements of the future product. Using a router, you should process the pointed ends.
- The back for the chair can be made from planks. And then, using self-tapping screws, attach it to the sides.
- Using grooves, you need to connect the steps and the seat to the sidewalls. When you need to assemble the structure, all joints need to be lubricated with glue and reinforced with screws. They need to be screwed into the prepared guide holes.
- You need to take a piano loop and connect the 2 parts of the product.
There is another model of a transformable chair - this is a ladder chair. For this design you need to prepare the following elements:
- seat (29 x 37 centimeters);
- walls that will be located on the sides (29 x 63 centimeters);
- bases (29 x 33 centimeters and 21 x 29 centimeters) - 2 pieces;
- cross bars (2.6 x 7 x 37 centimeters) - 4 pieces;
- support strips (2 x 2.6 x 7 centimeters) - 2 pieces;
- side walls (21 x 24 centimeters);
- wall located behind the module (24 x 26 centimeters).
Manufacturing.
- It is necessary to determine the drawing of the future product, prepare the drawing tool and all the elements that will be attached to the wooden blanks for sawing out parts of the upcoming structure.
- It is necessary to thoroughly sand each part, and also remove all sharp edges and corners.
- Now you can assemble the product. Fasten the side parts in pairs using self-tapping screws and attach the crossbars.
- You need to take a piano loop and use it to connect the stool and steps.
Transformable chair
First of all, you should draw patterns for the blanks. Prepare the following details for them:
- 2 front sides (2 x 27 x 40 cm) – A;
- 2 rear sides (2 x 32.5 x 85 cm) – B;
- 3 backrest slats (2 x 5 x 40 cm) – B;
- Rear seat (2 x 16.5 x 40 cm) – D;
- Front seat (2 x 9 x 40 cm) – D;
- 3 steps (2 x 12 x 36 cm) – E;
- 6 planks (2 x 2 x 9.5 cm) – F.
Stages of work:
- The parts of the future step-chair must be carefully polished. Process sharp ends using a router.
- The back of the chair can be made of planks or solid. It is attached to the sidewalls with self-tapping screws.
- The steps
and
seat
are connected to the sidewalls using grooves.
The grooves
are selected
chisel
, cutting halfway into the wood.
During assembly, the joints are lubricated with glue and reinforced
with screws, which are screwed into pre-
drilled
guide holes. - The two parts
of the structure are connected
by a piano loop
of the appropriate length.
Note! The chair will turn out to be more decorative if the back and seat are made of wood of a different, contrasting color
Building a classic version of a step stool
In order to make a transformable stepladder chair with your own hands exactly according to the drawings, you will need a minimum set of power tools:
- Jigsaw with a set of saws for wood;
- Manual electric router with 25 mm and 30 mm end mills;
- Drilling machine or drill with a device for precise vertical drilling;
- Polishing machine with wood attachment;
- Screwdriver;
- Set of carpentry clamps.
Since this design, in addition to the functions of a staircase, will also be used as a piece of furniture, it is best to choose a design with elements of carving and decor.
For the most part, a step stool will be used as a piece of furniture, so it makes sense to make it as beautiful and attractive as possible. In this case, decorative elements are practically not used; windows are made on the sidewalls in order to make the structure lighter and give it a more elegant look.
Structurally, each part of the step-chair consists of two sidewalls, between which four transverse steps are glued. One of the steps serves as a seat, the rest are used only for climbing stairs.
Initially, you will need to transfer the contours of the side posts of the stepladder chair to the boards. This can be done in two ways. In the first case, the contours are transferred by drawing lines using carbon paper. The second method allows you to do the work much faster - you can simply print out the outlines of the parts of the future step-chair and stick the paper on a wooden blank.
At the first stage, you need to make longitudinal grooves or cuts on each side of the large and small parts of the step stool, as in the photo. The grooves must be made for two reasons: firstly, they will be necessary for further processing of the workpieces. Secondly, the step boards will be inserted into the grooves. If you fasten the steps only with self-tapping screws, the rigidity of the step-chair will be very small, and the entire structure will quickly fall apart under the weight of a person.
Next, you need to make several through holes with a drill and cutter, preferably at the corner points of the internal contours. This must be done in order to be able to cut out selections along the openwork thread with a jigsaw.
Following the inner contours, we cut out the outer lines of the sidewalls in the same way. After all four sidewalls have been cut out, two for the larger part of the stepladder chair and two blanks for the smaller one, you will need to calibrate the dimensions, as in the video
https://youtube.com/watch?v=oQq1OMXHA1Q
To do this, two side blanks are folded in pairs and cut on a router. This allows you to make both elements of the step-chair absolutely identical in shape and size. At the same time, we remove chamfers and burrs, and treat the surface with a grinding and polishing attachment.
The steps for a stepladder chair are best made from oak boards, 15-20 mm thick. For the large swivel part of the chair, you will need to make three steps, all three of different sizes. For the smaller stationary part, you will need to cut two steps, also of different sizes. The step blanks, cut to size, are carefully glued to the sidewalls. To do this, you need to coat the gluing areas with wood glue or epoxy glue and insert the blanks into the grooves. To maintain the geometry of the step-chair, gluing is best done with fixation in carpentry clamps.
After the glue has dried, the steps of the step stool must be reinforced with carpentry screws. At this stage we have two small structures, one looks like a short chair, the second looks like a stool. To make a full-fledged folding stepladder out of them, you need to connect the two parts with a furniture or piano hinge.
Attention! To ensure that during use the vertical load on the step-chair does not deform or tear off the hinge fastening, special stop pins are used in the design.
The last element of the chair is the back. It must be made and a stepladder installed on the chair without fail. Otherwise, the front supports of the ladder will be unstable and will quickly fail.
The step-chair is almost ready for use; you need to finish the exterior with stain or varnish.
The result is a nice design that can not be hidden, but rather installed in the kitchen or hallway, where there is always work for such devices.
Original transforming chair
When starting to manufacture such a product, it is imperative to draw patterns for the blanks. It is with the help of drawings that you can make high-quality parts from plywood. The craftsman will need to make two front side panels, a back and front seat, three slats for a comfortable backrest, several rear side panels, six slats and three steps. For these purposes it is better to use specialized tools. Sharp ends can be processed with a milling cutter, and all other elements can be carefully sanded.
To make the back of a chair, it is better to use durable strips that are fixed to the sides using self-tapping screws. The seat itself and the steps are necessarily connected using grooves, which can be easily made with a regular chisel. After this, you can begin assembling the structure. All fixation points are treated with glue. You can use screws for reinforcement. The master must screw them into pre-prepared holes.
Since the product will be used frequently, it is better to use a high-quality primer for finishing, as well as a paint and varnish of a suitable color. It is necessary to ensure that the step stool matches the interior of the room as harmoniously as possible. If you follow all the recommendations correctly, the finished product will delight you with its functionality for many decades.
Read more here
Drawings and dimensions of parts
Before constructing a step-stool with your own hands, you need to study in detail the drawings and dimensions of the future craft. There are several types of this design:
- transformable chair;
- high step stool;
- ladder chair;
- step stool with a spiral module.
The first model is a transforming chair. When it is folded, it cannot be distinguished from a simple chair with a backrest. To make a stepladder, you just need to lay out the elements of the product. If this chair is well designed, it will look beautiful in different interior designs. If the stepladder has an unfolded or folding appearance, then it will consist of three steps.
The second model is a high step stool. In its design, it has a high chair and a retractable module, which, if possible, can be pushed under the seat of the stool. A variation of the step stool is the ladder chair. It comes with or without a back.
There is another type of step stool - a stool that has standard dimensions. From under the seat of this stool, steps can be pulled out in a spiral. This chair has many functions; it is unusual in its appearance both when unfolded and when folded. If you need to make a transforming chair, you must first develop a diagram. It is possible to use prepared drawings with dimensions or to make drawings yourself, having examples of constructing a suitable model.
If you rely on the standards, then the seat should be located no less than 41 centimeters from the floor. The base of the stepladder chair should be at least 41 centimeters deep. Now you need to decide on the height of the structure. You can use the standard characteristics or add 11-16 centimeters on top. To make the product more stable, you can use a wide base.
All drawings of a step-chair indicate the dimensions of the following parts:
- front and rear sides;
- strips for the back of a chair, seat, steps, etc.;
- supports that fold either sequentially or smoothly.
The future design must have at least 3 steps. The dimensions of the legs should guarantee the quality of the product in various positions. The shape of the supports is similar to the letter “A”, since the planks should be located in an inclined position and connected by a crossbar. In order for the structure to be stable, you need to know that the angle of inclination of the frame and legs is 80 degrees. The steps should have a distance between each other of no more than 21 centimeters so that the stepladder chair can be used comfortably. The design has a seat that should be divided into 2 parts, the division is based on the placement of the central supports.
Once the dimensions of the model and methods of fastening the parts have been determined, the diagram must be transferred to a piece of paper with millimeter markings. It is necessary to carefully draw all parts of the product and follow the order of installation of the parts. Having all the relevant sketches, you need to prepare a pattern for the blanks. Using carbon paper, you can transfer the image of the future structure onto a piece of plywood or wood.
Working with a drawing
You can make a folding stool yourself or purchase a finished product. The purchase is not always financially affordable, so craftsmen with experience in carpentry prefer to create practical designs with their own hands. The procedure is simplified thanks to a large number of ready-made diagrams with a detailed description of the manufacturing process.
The design of the chair will depend on the type of design and materials used. It is necessary to clarify the purpose of the product. Based on this, wooden, chipboard or metal blanks, as well as suitable tools, are prepared for the work.
To make furniture yourself, you will need drawings with dimensions including general views, assemblies, and sections. The diagrams use special symbols that must be read correctly. The lines in the drawing are deciphered as follows:
- Solid thick ones are contour lines depicting a piece of furniture.
- Solid thin - used to indicate parameters.
- External thin ones - specify part numbers.
- Dotted - used to demonstrate elements that are not visible from a certain angle.
- Dash-and-dotted lines are center lines showing the middle of the furniture.
- The intersections of 2–3 center lines reflect the centers of round parts.
The preparation process and stages of restoring chairs at home
In furniture drawings, all dimensions are indicated in millimeters and are given in actual size, regardless of the scale of the diagram. The parameters of each element are reflected taking into account the length of the spikes. Capital Russian letters indicate the arrows of the cuts, and Roman numerals indicate the nodes.
In the drawings of step-chairs, each element is drawn in detail. Detailing is carried out - drawing structural parts, determining their sizes. This is a creative process, not just copying images. Using ready-made diagrams, you can make all the panels and drawers to order.
Varieties of design
Before choosing or manufacturing a product, you need to decide on the type of design. A do-it-yourself transformable stepladder chair can be made from various materials:
- Most often, wood is chosen as the base. It is cheap, durable and, if properly treated, can last for many years. You can buy different breeds at a hardware store. The most budget option is pine and birch. More expensive - oak.
- Products made from plywood are lighter and cheaper, but are less durable. The maximum weight they can withstand is 80 kilograms.
- Plastic step stools are the most affordable. They can be found in most hardware stores, and the price is only a few hundred rubles. However, their quality leaves much to be desired, and their service life is limited.
- Metal stepladders are highly durable and can last for decades. If you decide to purchase such a product, then it is better to choose a chair made of aluminum or stainless steel, since these materials are least susceptible to corrosion.
There are several types of chairs based on the type of construction.
- An ordinary step stool is quite unsightly in appearance and takes up a lot of space. Most often, such a product has one wide seat and 2-3 steps that can be extended or folded. This model can be used both in the kitchen and in the living room as a stool or even a bedside table.
- Transformable chair - similar to a regular chair, several steps are hidden in the lower part. This piece of furniture can easily be turned into a stepladder.
- Folding ladder-stool - designed for climbing to medium heights. Sometimes equipped with a backrest. A ladder stool is a great mobile option for small spaces.
- A step stool is a slightly different design. The product is usually made without a back and is equipped with several sliding modules.
The design of the transforming chair can be folding or stationary. The first models take up less space, but the second ones are more reliable and stable. In addition, they can be used as a stand for objects or indoor flowers.
Step stool
Transformable chair
Folding ladder-stool
Step stool
What is
A transformable chair is a wooden product that looks like a regular chair, but can turn into a stepladder. The product has many advantages:
- takes up little space;
- does not require additional support, it is easy to move;
- able to withstand heavy weight while maintaining stability;
- you can make it yourself at home using available materials;
- Easily transforms into a staircase.
The design of such a chair consists of the following parts:
- front, rear sidewalls;
- backrest slats;
- sitting;
- steps.
Similar transforming chairs have been used in everyday life for a long time. Initially, they were used in libraries, as they made it easy to reach even the highest shelves. Soon after this, the idea spread to the people, step stools began to be found everywhere. At the same time, the appearance of the products can be completely different: the chair can be made of inexpensive wood or decorated with decorative and carved elements. Everything depends only on the carpenter’s imagination.
DIY metal ladders
You can buy such stairs. Aluminum products are especially attractive. However, many owners are not satisfied with this solution to the problem for several reasons. This:
- A price that in no way corresponds to the cost of such a simple design. Why spend good money on something you can do yourself?
- “Wonderful” quality of purchased products. Very often there are unflattering reviews regarding the fragility of the light metal “remake”.
They say that now purchased aluminum stairs do not stand up to criticism. They “learned” how to make them so that the products (all their elements) begin to deform after a year of operation, or even earlier.
Materials, tools
To create the most reliable structure, the master will need to purchase a profile pipe: for racks (20x40 mm) and for steps - round (30 mm). You will also need to prepare:
- grinder, powerful drill (900 W minimum);
- special crown for metal (30 mm);
- discs - grinding, wire;
- solvent: acetone, white spirit:
- primer: metal spray;
- car paint: acrylic, alkyd;
- marker, tape measure;
- hammer.
The last and main equipment is a welding machine. You will also need strong rope or plastic ties to temporarily secure the elements before welding.
Manufacturing of metal structures
The process of “creating” a metal ladder goes according to the following scenario:
- First, mark the racks. Two rectangular profiles are laid close together on a flat surface. The elements are aligned along the bottom edge, then both profiles are marked with a marker.
- They make preparations. They are cut with a grinder so that the cuts are perfectly straight, without the slightest distortion. The supports are again laid close together, then, again simultaneously, the places for mounting the steps are marked on them. Precisely control the step between them.
- The mark should be in the center of the round bars. Then it is transferred to the middle of the shelf, measuring 20 mm from the edge. However, make sure that both pipes are aligned along the edge. At the found points they “put a bold cross”, which should be clearly visible.
- The crown is fixed on the drill. The tool is positioned so that the drill is located exactly on the cross. After passing the metal, the tool is removed. Otherwise, it is easy to damage the opposite side of the profile. The remaining holes are made in the same way.
- Move on to marking the pipes for the crossbar blanks. Then the profiles are securely fixed and cut, avoiding any distortion of the ends. The finished elements are polished. Any burr may prevent the step from fitting into the hole in the post.
- They begin to install the steps. The first string is laid on the floor with the holes facing up, then pipe sections are inserted along the entire length. A second stand is placed on their installed ends. An assistant will most likely be required for this operation.
- To secure the ladder for welding, use a piece of rope or plastic ties. Then all the steps are welded to the bowstring profiles. They care not about beauty, but about the quality of the seam. The stronger it is, the more reliable the ladder will be.
Finishing touches
The scale is knocked off with a hammer, then the semi-finished product is carefully ground. The force must be controlled, as excessive force will only weaken the welded joint.
To rid the surfaces of any imperfections, sanding is completed with a wire disc. The last stages of work are degreasing with a solvent, treating the surfaces with a primer and painting with a spray can (2-3 layers).
DIY wooden ladders are operations that do not require welding equipment, which is why they are more popular. If the master is familiar with welding, then it is better to make a super-reliable metal structure that is not afraid of any “inhuman” conditions.
To get acquainted with all the stages of making a more popular and simplest wooden “helper”, it would be a good idea to take a look at this video tutorial:
Features of the stepladder
The stepladder itself is a type of folding ladder. It is extremely popular due to its combination of characteristics such as convenience, safety and compactness.
The advantage of such a product is its compactness.
The main distinguishing feature of a stepladder is the presence of additional support. Thus, we get a structure that contains steps on both sides and essentially represents two attached ladders connected to each other. They are connected at the top by a platform, which is very convenient when working with objects at height for a long time.
However, this design has a significant drawback - dimensions. If for personal plots, private houses and utility rooms this characteristic is not particularly important, in the case of an apartment the size of the stepladder does not allow its use in limited space. In addition, you need to allocate additional space for its storage.
In such conditions, most often you have to use a regular chair to get to the top drawers or screw in a light bulb. Its height is not always enough, and climbing onto it is not entirely convenient. The problem can be solved if you use an improved design that combines both of these products.
Preparatory and sawing work
The transformable wooden chair stepladder consists of two parts: the chair itself and a retractable structure with two reliable steps. The retractable structure will be placed under the chair seat and pulled forward using guides.
To make a stepladder with your own hands, we take a planed pine board with a thickness of up to two centimeters and cut out the necessary blanks from it.
Drawings of all the main elements that will be needed, with dimensions, are presented in the photo. All the necessary dimensions are marked on them, and when sawing, strictly follow them so that the stepladder and chair look perfect.
Make blanks ten centimeters wide, sand all surfaces on all sides so that when you run your hand over them, you feel that they are extremely smooth. Next you should start cutting out the legs. Three sets will be needed.
Transformation in one photo
To make your chair stable, its legs should be attached at an angle of ten degrees.
To do this, you need to cut their ends strictly at an angle of eighty degrees and it is very important that they are made parallel (the drawings are visible in the photo)
Next in line are the leggings, and there are three types of them. Here we need a circular saw and a jigsaw. Control the sawing so that the corners of the legs move apart. The corners of the plywood overlays should also diverge, and their lower edge can be given a decorative profile.
Make grooves for the connecting dowels (to connect with dowels, drill holes for them). Cut the joints of the legs with other elements at an angle using a jigsaw. It is necessary to round the corners of the legs, which will protect them from chipping under increased load. Now the next step is the drawers (the strips on which the chair cover is attached). They are cut out and also beveled at the upper ends at an angle of eighty degrees.
We make the steps last. We cut it out and round it at the edges. On the step that will be the bottom, make two corner square cuts (with a side of thirty-eight millimeters). This is necessary for docking with small legs.
Back assembly
If you decide to make a transformable garden bench, then at the next stage you can work on the back. It will also serve as a tabletop at the same time. This part of the product must be made from 5 boards that will form a common plane. The dimensions of the backrest are 57x126 cm. The blanks are connected to each other using a pair of planks. Self-tapping screws that hold the boards together will help with this.
On one side of the tabletop, stops should be fixed, which will have a thickness of 20 mm. The workpieces must be cut at an angle of 115°. It will determine the backrest angle. Using self-tapping screws, all stops are fixed in the next step. Subsequently, you will use screws and metal connections that will allow you to connect everything into a single structure.