When purchasing cabinet furniture, you probably pay attention to how the parts of the product are fastened together. In some cases, manufacturers use nails, in others - self-tapping screws. But perhaps the most reliable method of fastening is an eccentric furniture tie. We will talk about what it is and in what cases this type of fastening is used in this article.
Eccentric furniture coupler
About the eccentric coupler
An eccentric coupler, or, in other words, rastex or minifix, is one of the most practical, durable and convenient types of fastening furniture elements together. The use of such fasteners allows you to disassemble and reassemble furniture without damaging the material from which the furniture is made.
With the help of a minifix, you can easily assemble T-shaped and L-shaped elements when it is not possible to make grooves in them. Often this option for connecting parts is used when assembling tabletops on dining tables and computer tables, the top and bottom parts of cabinets, chests of drawers, and cabinets.
This type of fastener is hidden, and as a result, it can be used without fear that the appearance of the structure will be damaged.
An eccentric connection is a hidden type of fastener, and therefore it is invisible, but, nevertheless, it gives strength to the structure and is not afraid of reuse.
What is this type of fastening?
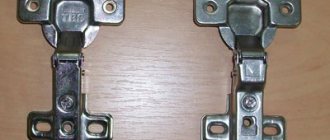
Minifix is a fastener consisting of several components:
- eccentric;
- stand or rod;
- futorka;
- dowel;
- sleeve made of plastic or metal;
- stub;
The parts are sold in different configurations and may differ from each other in length, diameter, type of fitting and method of fastening, which can be a screw or self-tapping screw.
Components of an eccentric coupler
Advantages and disadvantages
Like any type of fastener, an eccentric connection has its positive and negative sides. Let's look at them using a table as an example.
Table 1. Advantages and disadvantages of an eccentric coupler
| Advantages | Flaws |
| 1. Furniture can be assembled and disassembled quickly and effortlessly. 2. Possibility of repeated assembly and disassembly of products. 3. The most reliable and durable mounting option. 4. Does not spoil the appearance of the product. 5. Possibility of fastening products at different angles. | 1. High price of fasteners. This increases the cost of the product as a whole. 2. The installation technology is quite complex. 3. The need for perfectly accurate calculations for marking locations for fastenings. |
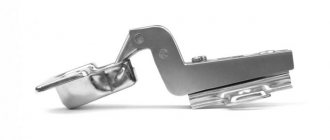
What does an eccentric coupler look like when it's in place?
Mounting features
Eccentric furniture ties consist of the following parts:
- stand (another name is a rod, it can be either a self-tapping screw or a screw);
- eccentric;
- futorka (performs the functions of a nut).
Sometimes the kit includes a sleeve, also known as a coupling, to screw the rod not into wood or plastic, but into it. If the diameter of the screed is large, a plastic decorative plug is added to the front side. The bushing increases wear resistance and strength - the metal part is not as loose as a hole made in the chipboard. So it is better to choose fittings with couplings to avoid breakdowns and extend the life of the furniture.
The basic principle of operation is quite simple: a coupling is inserted into a round hole on the furniture, a stand is screwed into it, and an eccentric connects them from the side. If some unsightly detail remains visible from above, then a plug is put on.
Eccentric furniture ties are also called minifix or rastex.
Benefits of use:
- If the minifix is already built into the right place, the bushing and eccentric are inserted, installation will not take much time. The only tool you may need is a flathead screwdriver.
- This type of fittings is very wear-resistant and can withstand repeated assembly and disassembly without becoming loose or losing its quality and strength.
- From the front side, the screed is invisible and does not spoil the design of the product; it can only be seen from the inside, and even here, if necessary, a plug is used.
- The ability to fasten parts at different angles (the most common options are 90, 135 and 180 degrees).
- The fastening adds rigidity to the entire structure.
- Reducing the number of spare parts, for example, if you attach the tabletop directly to the sides, drawers will not be needed.
- Long service life and ability to hold heavy weight.
Purpose and types of furniture hinges, installation nuances
Disadvantages include:
- Relatively high cost. An eccentric minifix is approximately twice as expensive as a regular confirmat. When using a large number of elements, such a difference can significantly affect the final cost of a piece of furniture.
- A single-piece confirmat requires only one drilled hole for installation, whereas a minifix requires three holes. Because of this, installing furniture screeds is somewhat more complicated.
- Working hours. Screwing in a Euroscrew is much faster.
The number of advantages of minifix outweighs its minor disadvantages, especially when it comes to assembling high-quality, durable furniture for your own use.
Types and sizes
The eccentric coupler comes in plastic and metal. Depending on the material of manufacture, it is used in one field or another. For example, small pieces of furniture can be secured with plastic fasteners, but for large items, such as cabinets or kitchen units, it is advisable to use metal fasteners.
The dimensions of the parts also vary, for example, the length of the stand can vary from 38 to 58 cm, the diameter of the minifix can be of three sizes:
- 12 mm;
- 15 mm;
- 25 mm;
The most commonly used fastener is 15 mm in diameter.
The dimensions of the eccentric coupler parts may also vary.
Types of eccentric couplers
1. Simple eccentric coupler
consists of elements:
1 - Cast ZnAl eccentric with a diameter of 15 mm and a height of 12 mm (the most common parameters among different manufacturers) 2 - Futorka 3 - Steel dowel
Eccentrics with diameters of 12 and 25 mm and a height of 10 / 12 / 14 / 16 mm are also used in simple couplers for slabs with a thickness of 12 / 16 / 18 / 22 mm, respectively.
Dowels in simple eccentric ties differ in the length and diameter of the rod, as well as the length, diameter and type of thread. The threaded part can be metric (for example, M6, as in model ST01/47) or Euro thread (ST01/48, ST01/51). Dowels with self-tapping threads (or Euro-threads) are usually available for drilling holes with dimensions of 5x11 mm (d*L) or 5x8 mm. Dowels with M6 metric threads are screwed into a fitting pressed into the face of the attached part.
In simple couplers, the center of the eccentric is located at a distance of 24 or 34 mm from the edge of the attached part. The common drilling diameter for dowels is 7 or 8 mm.
The BOYARD company presents the following simple eccentric couplers: ST01/47, ST01/48, ST01/50, ST01/51. These models differ in the height of the eccentric and the type of dowel.
ST01/47
ST01/48
ST01/50
ST01/51
The most popular model all over the world is a simple eccentric coupler with the following parameters:
- eccentric with a diameter of 15 mm and a height of 12 mm
- dowel with self-tapping thread (or Euro-thread)
- dowel with installation size for eccentric 34 mm
ST01/51 with a rotary lock
In the BOYARD company, a screed with these parameters is presented by the ST01/51 model. This versatile model provides the optimal balance between price, quality and functionality. An additional advantage of this option is the presence of a rotary lock, which makes it convenient to hold the dowel when screwing it into the face.
2. Quick installation screed
includes the following elements:
1 — Simple eccentric 2 — Steel dowel in a plastic case
Installation is easy and quick: when you turn the eccentric, two furniture parts are attracted. At the same time, the dowel rod moves inside the plastic housing installed in the face of the part being connected, pushing the plastic apart. In this way, the furniture parts are firmly fixed to each other. The plastic case has installation dimensions of 8x12 or 10x12 mm.
The advantages of this type of installation are its ease and speed. When using a quick-installation tie, there is no need for additional tools: the dowel is simply inserted into a pre-made hole in the panel to be attached. After connecting the furniture parts, turning the eccentric fixes the connection.
At BOYARD, the quick-installation coupler is model ST01/52. The advantages of this model are in the adjusted design - the length of the rod, the shape and material of the plastic case. ST01/52 fixes furniture parts securely and does not damage them.
ST01/52
3. Screed-shelf support
Another option for an eccentric tie is a shelf tie. It is convenient to use a tie as a shelf holder, since this type of fastener is installed directly into the edge of the shelf.
Elements of the shelf support tie:
1 - Cast ZnAl eccentric, built into a plastic or metal housing.
The color of the case can be matched to the color of the shelf 2 - Shortened steel dowel BOYARD shelf holders have a plastic case. Some manufacturers offer shelf supports with all-metal housings. Such a solution leads to a significant increase in the cost of fasteners with a slight improvement in quality parameters, for example, an increase in the rigidity of the screed.
The advantages of the shelf support tie in general and the advantages of the BOYARD models in particular.
- Aesthetic appearance of furniture
- Simplified installation: it is enough to prepare only 2 holes, not 3, as when installing simple eccentrics
- Possibility of installation in narrow openings with an overlay on top
- The shelf support tie from BOYARD has the advantage of fixing ribs on the surface of the plastic case. These ribs fix the eccentric inside the hole and prevent rotation and displacement of the tie, which, in the absence of fixing ribs, can happen when dismantling and reassembling furniture
- The presence of a second mounting hole for a screwdriver on the back side of the eccentric. Sometimes it is not possible to tighten the eccentric from the inside, from the side of the main hole, and the second mounting hole allows you to tighten the tie from the outside. In addition, the second mounting hole helps to strengthen the eccentric and improve the reliability of the connection.
When installing a shelf support tie, maximum precision is required when preparing the mounting holes: the tie is installed directly at the edge.
The standard drilling diameter for an eccentric is 20 mm. The eccentric height is usually 12.5 mm or 14 mm for slabs with a thickness of 16 or 18 mm, respectively. Reference to the thickness of the slabs is optional.
Dowels come in different types - with a threaded part of 6.3x11 mm and 6.3x8 mm. The longer the threaded part, the more reliable the dowel. Using a reduced length is useful if you need to install several shelves on either side of the partition between them. So, in a partition 16 mm thick, you can make a through hole and screw in dowels with a thread length of 8 mm on both sides. It should be borne in mind that shortened dowels, with a threaded part length of 7.5 - 8 mm, may not have a starting turn, which can lead to deformation of the surface of the slab material during screwing.
In the BOYARD company, the shelf support tie is represented by the ST01/49 model. This model is made in a plastic case with a “border” at the cutout, which allows you to install shelves overlapping from top to bottom, while shelves with ties-shelf holders with a continuous cutout can be installed from the side and from above. The design with a “edge” makes the shelves more stable even in an untightened position, since the dowel is fixed inside the ex, which prevents it from slipping out. ST01/49 is available in four colors.
ST01/49
Instructions for creating holes for an eccentric tie
Step No. 1 – mark the drilling locations. Before you begin installing the hitch, you must accurately mark the places where the necessary holes will be drilled. You can mark manually using a ruler or template, or you can use a special device - a jig. We'll talk about it below.
First of all, you need to mark the places for attaching the screed using a ruler or template.
Step No. 2 - drill a place for the rod. Next, in one of the two parts to be connected, we drill a groove for the rod. It is important that it does not go through, so use a stopper. We screw in the rod, leaving it to protrude 6 mm above the blade.
Next, you need to drill grooves in the material, into which the rod will be inserted later
Step No. 3 - make a groove for the eccentric. The next step is to drill a hole for the eccentric. This is done using a Forstner cutter. And here the depth is important, on average 15 mm will be enough. The groove should not be through, the eccentric should fit into it to its full height and be flush with the surface of the workpiece. On the product, using a template or ruler, measure a distance of 33.5-34 mm from the bottom edge and 5 cm from the side end. The intersection point will be the center of the hole.
The hole for the eccentric segment of the connection is drilled using a special cutter
Step No. 4 - drill a passage for the rod. And the final stage in preparing places for fastening will be drilling a passage for the rod in the same element in which we will place the eccentric, only from the end side of the part. It is done with an 8 mm drill and should be located exactly relative to the center of the niche for the eccentric and exactly in the middle of the end part of the part itself. When working, it is important to use a ruler, tape measure, or, if you have a special jig, a template. Otherwise, misalignment of the grooves may result in you not being able to assemble the furniture neatly and evenly.
Next you need to drill a passage for the rod
The holes are ready and all that remains is to connect the parts of the future structure. To do this, we apply one workpiece to another so that the rod enters the passage. We insert the eccentric into the groove and use a Phillips screwdriver to tighten the minifix, thereby firmly and securely fastening the furniture elements together.
Provided that you followed the instructions carefully, the furniture connection will be installed without problems
With correct and accurate calculations and following all instructions, your furniture pieces should fit perfectly into a single plane, without protrusions or distortions.
Instructions for installing furniture eccentrics
To do the job you will need a small set of tools, namely:
- drill 5 and 7 mm;
- screwdriver; pencil;
- ruler;
- cutter 1.5 cm.
Having prepared the tools, you can proceed to the main, most interesting part of the work.
IMPORTANT! To install the minifix, you need to make 3 holes of different diameters in the parts to be connected.
Let's start the installation. So, in order to perform a high-quality assembly, it is necessary that the eccentric grasps the rod head. To do this, you need to provide for its rise by about 6 mm.
Screwing the rod into the chipboard, use a drill to make a hole measuring 5 mm; if it is a side panel, then a confirmed one. The center of the hole from the edge of the part must have a distance of at least 8 mm, while its depth is in the range of 10-11 mm. The rod must be screwed in until the very end, tightly.
The second part is marked with two holes:
- First, the distance from the edge to the center is 3.4 cm. The depth must clearly coincide with the thickness of the eccentric. It is important here that it fits flush into the material.
- The second hole is made from the end part, using a 7 mm drill in the center. When everything is done, the eccentric rod is screwed into the hole. Afterwards, a second part is placed on it, the structure is clamped, and a minifix is used.
Advice and recommendations from experts
This is one of the most difficult stages of the assembly. It is important to prepare the holes correctly - the quality of the connection of the parts will depend on this. Of course, such work should be entrusted to experienced craftsmen, who guarantee that the furniture screed will be carried out with pinpoint precision.
The choice of drill size is carried out individually based on the size of the rod. In approximately 90% of cases today, a 5 mm drill is used. The holes through which the connection to the eccentric is made are made with an 8 mm drill. In rare cases, it may be necessary to reduce the size of the holes. Then a 6 mm drill is used, which guarantees a tight fit
There are several ways to make holes. The best option to ensure maximum quality is to use a ready-made conductor. In this case, even using a conventional drill, you can make holes with perfect accuracy. When drilling holes for installing eccentrics, it is important to pay attention and try to do everything carefully.
After the holes are made, you need to figure out how to tighten the eccentrics so as to ensure maximum secure fixation. To do this, you will need to carefully study the instructions, as well as the recommendations of specialists. If all the points are done correctly, the connection will be reliable and durable.
What is a furniture jig and how to use it
If you have a furniture jig, this will make it much easier for you to mark and drill holes for any type of fastener. A jig is essentially the same template, which is a special device or bar on which holes of different diameters and at different distances are applied. With their help, you can make perfectly accurate markings and drill passages of the size you need. Various materials are used to make this assistant:
- metal;
- plastic;
- tree;
- wood boards.
The product is a solid base with many holes at different distances required from each other. Additionally, it can be equipped with a mechanism for fixing and adjusting the distance between the holes.
Use a special drilling jig to help you hold the drill at the right angle.
Thanks to the device, you will install the drill exactly at a right angle to the blade, without deviations. This is a great help when working on narrow surfaces, such as the ends of chipboards. After all, if the groove is not located at an angle of 90 degrees, assembling the body elements into a single whole may become impossible.
Types of conductors
Depending on the functions performed and design features, templates can be of several types:
- Invoices. This type of device serves as an assistant for drilling holes on flat elements by placing it on the workpiece. The device is not attached, but only held by hand. Suitable for use on chipboard or fibreboard surfaces.
- Rotary. The rotating device allows you to move it vertically or horizontally and rotate it at different angles. This device is convenient to use provided that the part that needs to be drilled has a complex shape.
- Tiltable. Tiltable assistants are convenient for working with elements that are located in planes that are different from each other.
- Universal. The devices are convenient because they can be customized for the production of furniture of various configurations.
All types of templates can have a sliding or fixed type of fit to the surface. The sliding type allows you to move the product along the surface of the workpiece. Fixed option - firmly fixed in the desired position and does not move.
The conductor is the furniture maker’s best assistant, without him it would not have been possible to connect furniture so beautifully
What to look for when choosing a conductor
When choosing a furniture jig in a store, you should carefully examine the product and pay attention to the material from which it is made. For example, stainless steel products will be high-quality and reliable.
The manufacturer matters too. World-famous brands, as a rule, produce high-quality tools with a long service life and a warranty from the manufacturer.
The more famous the brand, the higher the quality - a rule that works flawlessly in the case of construction tools
When purchasing such an assistant, take an interest in the additional equipment that comes with the kit. The versatility of the device will make your work easier. The more tools included in the package, the more cases you will be able to use it. For example, a set may include
- various bushings;
- drills of various diameters with stops;
- Forstner cutter, for holes for minifixes;
- keys.
There are a significant number of advantages in using this device.
By using a template when manufacturing and assembling cases, you will save yourself from many inconveniences. For example, you don't need to mark places with a ruler and pencil. The jig allows you to fix the distance and drill several absolutely identical holes at the same distance from each other. There is no inaccuracy here.
But a factory-made conductor also has a drawback - its rather high price.
Therefore, craftsmen are quite capable of making such an assistant with their own hands. Our instructions will help you with this.
Instructions for making a furniture jig
Step No. 1 – prepare tools and materials:
- square metal block, section 1x1 cm;
- Bulgarian;
- file;
- calipers;
- awl or thick needle;
- drills with a diameter of 5 mm;
- metal plate for stop measuring 1x25 mm;
- a sheet of sandpaper.
First, let's collect all the tools and materials necessary for the work.
Step No. 2 – make the base and markings. Using a grinder, cut off a piece of the required length from the block. Sand any burrs with a file. Mark the locations for future holes. The generally accepted dimensions are the distance between the grooves is 32 mm, the distance from the centers of the slots to the side edge is 8 mm. To make the markings accurate, use a caliper. It is convenient if you mark the centers of future grooves using an awl or needle.
Make the markings, you can first do it on paper, then transfer it to the material itself that requires connection
Step No. 3 – install the tool. Next, we drill passages in the required quantity. Then we take a metal plate and grind it with sandpaper if necessary. Clamping it with a vice, we bend our plate at a right angle. Align the resulting parts and clamp them with a clamp. Fasten the parts with screws, having previously cut the thread to the desired size. Thus, you can create a very convenient tool for yourself.
Next we drill the holes
Installation nuances
You need to know how to install an eccentric coupler: if used incorrectly, it will be practically useless and will lose all its advantages. You should start with markings: put marks with a pencil or chalk where you plan to drill the grooves. The optimal distance from the edge is at least 10 mm; it should be the same on both parts being connected. The hole for the rod should not be located less than half the thickness of the eccentric from the edge. Most often, furniture purchased in a specialized store is accompanied by assembly instructions, which usually provide all the necessary recommendations. If the holes are not accurately marked, there is a high probability that the rod will dangle and the tie will be weak. Therefore, measurements must be with minimal errors.
Types of furniture fasteners, their characteristics and application features
The second step is the additive. It is very important to drill all the holes carefully, without making them through, because the quality of the result greatly depends on this. It would be wise to put a stopper on the drill you are using. Tools you will need: a drill and a milling cutter or a screwdriver. The dimensions of the drill are selected based on the declared dimensions of the rod. In most cases, a diameter of about half a centimeter is suitable to secure from the screw side. For the hole where the post is connected to the eccentric, you usually need a drill of about 8 mm in diameter, but it all depends on the specific mount.
Finding out what size the hole for the eccentric should be is quite easy: the height of the head is about 3 mm, and the same amount is needed to grip the head. That is, you need to subtract 6 mm from the total length of the rod.
Installing a standard size eccentric tie will require a drill of 15 mm in diameter, this will allow you to fasten the parts without a gap - it will be stronger and more aesthetically pleasing. The best tool is a milling cutter. For more accurate markings, stencils and even a special conductor are used; if desired, they can be purchased at the store. If you have to work with wood, it is better to take a special drill specifically for this material, otherwise during work there is a chance of severely damaging the appearance of the product.
The bushing is first hammered into the hole for the rod, and then the rod itself is screwed in. An eccentric is attached to the second part, its upper surface is flush with the wood. Now both parts are connected, the eccentric needs to be tightened. This mount will last a very long time.
Make a hole
Drill holes
Hammer the bushing, insert the rod
Attach the eccentric, tighten
Other options for furniture ties: a brief overview
As we have already found out from the above, the eccentric coupler is one of the most durable fasteners. But it is not always advisable to use this type of connection. Let's look at what other fastenings are used by cabinet furniture manufacturers.
Confirmat
Confirmat is one of the most popular and easy-to-install connection options. Fastening the body parts using confirmations is not difficult or difficult. This type of fastening can only connect elements at right angles.
Confirmat - another detail of furniture fasteners
To install furniture parts using a confirmat, you will need to drill a groove along the diameter of the fastener head in one of the workpieces, the second hole must be made in the end part of the other workpiece, but the diameter will be smaller - usually two drills of 5 and 6 mm are used. Although, you can also use a combination type drill - this is convenient, since you will work with only one tool, and there will be no need for constant replacement.
For greater reliability, confirmations are recommended to be used together with a small wooden rod - a dowel. Such a rod will prevent the workpieces from moving when secured with a confirmat.
This type of coupling, unlike the eccentric one, does not allow parts of the product to be fastened several times
But when using this type of hitch, you should know that chipboard products should be fastened once. Due to the high hollowness of chipboard, re-joining with confirmat does not guarantee a strong screed.
Confirmat is a connection that, unlike an eccentric coupler, is visible on the surface of the product. Therefore, to hide it, you can use decorative stickers or plugs that match the color of the body surface.
Intersectional screed
This fastening method is used when it is necessary to connect modules to each other, for example, cabinets or mezzanines. The coupler consists of two parts - a nut (bushing) and a screw. Since the chipboard used to make the cabinets has different thicknesses, the intersection screed can also be of different sizes.
Intersectional screed
To fasten two modules with this type of connection, it is necessary to align the elements being fastened and drill matching through holes in the two walls of the housing. Insert a bushing on one side, a screw on the other side and tighten with a screwdriver. Sections are fastened.
Furniture corners
This type of fastening has long been known to everyone. They are made of metal and plastic, and are mounted using self-tapping screws. It is not recommended to use corners in those parts of the furniture that are expected to be loaded.
Furniture corners
Table top screed
This type of hitch is used in the production of kitchen sets. It consists of a screw and a pair of stops. Holes for such a screed are made using a Forstner cutter of the required diameter, and a channel for the screw is cut out with a jigsaw.
Holes for such fastening are also made using a Forstner cutter
Varieties
There are several types of modern fastening, for example, shelf holders. They are available for chipboard and glass. When mounting wooden parts with fixation, an eccentric mechanism is used. It consists of a rod, which is screwed into the wall of the structure, and a supporting part, installed in the shelf using a self-tapping screw. During assembly, the rod must be placed in the eccentric groove and tightened. This connection method strengthens the structure. Shelf holders for glass are:
- with a suction cup that allows you to fix the part;
- overhead with a rubber and plastic cover;
- with a clamp in the form of a screw or fastener, with a gasket made of soft material.
Also, the elements of the furniture screed may differ in their design or installation method, for example, invisible and built-in elements differ. Some types of fastening require tools for milling and drilling, with an accuracy of up to 1-2 mm. Eccentric and tapered couplers are installed using precision machines, and the countertop requires a Forstner drill.
Scope of use of overhead furniture hinges, their features
With suction cup
Invoices
Confirmat
Confirmat is an easy-to-install type of fastening. It is needed to assemble 2 parts at right angles; it refers to invisible fastener models. The Euro tie consists of a pin with a cap, similar in shape to a self-tapping screw, and has a cut end and a large thread. On its lower part there are notches that allow you to make a notch in the finished hole at the moment of tightening. This gives additional strength and stability to the mount. To connect the parts you need to make 2 holes:
- the first - under the mounting head;
- the second - under the thread notch.
For this furniture screed you need a 6 and 5 mm drill or a combination drill, which is intended for such an assembly. This method is used when installing parts made of wood or chipboard in combination with a furniture dowel (with a wooden or plastic rod) as guides. It is also used to carry out a carriage tie.
The confirmat should be tightened manually, as a screwdriver can deform the hole, so the parts will fall apart during use.
Eccentric
The eccentric fastening method is used in industrial enterprises due to the fact that it is necessary to use a drill for furniture screed and expensive equipment. It makes it possible to hide connection elements. This type of fastening consists of 3 parts:
- A rod or stud that has a head with a hole for an installation tool and is inserted into one part of the structure.
- Decorative plug.
- Eccentric. This is a clamp installed in the second fastening element.
Drilling a groove for such a screed is done using a Forstner drill, and the depth of the hole should not exceed 12 mm (the thickness of a standard laminated chipboard sheet is 16 mm). There is specialized equipment that mills holes for parts. The eccentric connection allows the structure to be reassembled without harm to the fasteners. This installation method also makes it possible to mount parts at oblique angles.
Intersectional
An intersectional screed is needed to connect several parts of the interior into one solid fragment, for example, for cabinets or mezzanines. This fastening consists of a threaded pin and a bushing. For installation, you should align both sets for the screed exactly and make holes in their walls. After this, you need to insert the sleeve on one side and the mounting screw on the other. Despite the fact that there are notches for screwdrivers or hex keys on both parts of the part, it is the screw that needs to be tightened. The head on the bushing is needed to fix it during installation and prevent the tie from turning. To connect structures you need 2-4 intersectional fasteners. They should be placed closer to the corners, as this will increase the strength of the screed. There are parts of different lengths that need to be selected to match the overall wall thickness.
Characteristics of beech furniture panels, main advantages
Corner
Corner ties are plates with holes that are bent in the middle. This installation method is fragile, so it is used to assemble elements that will not bear much load. Most often, decorative parts or mezzanine shelves are connected with ties. Such fasteners are made of metal or plastic. The furniture corner is mounted using self-tapping screws that are screwed into the holes.
There is also a type of tie for attaching the legs of a table, chair or bed. This design connects the side parts of the furniture to each other, leaving a small space for a corner piece into which a threaded pin is inserted. There is a hole in the tie for inserting a rod and screwing a nut or screw onto it. This type of installation stands out greatly, so it is replaced with confirmat, another invisible fastener.
Screw
A screw tie consists of a steel cylinder with a hole made across it, as well as a pin with a head. This fastening method has a large tightening stroke due to the thread, which is machined along the entire length of the part. This gives furniture with such a connection high strength under lateral loads. This type of assembly is used to make chairs.
If the fastener becomes loose, it can be tightened to improve the stability of the structure. The screw fastener makes it possible to reassemble furniture without damaging the mechanism. The disadvantage of such fasteners is that to use them you need to have skill and special equipment. During installation, you should accurately match the holes for fastening, since it will be difficult to pull the barrel out of the groove. Visible parts of the mechanism can be covered with decorative plugs.
Conical
Conical couplers are used to connect thick panels made of wood or chipboard, as well as frame facades. The thickness of such parts is 25–38 mm. The mechanism is similar to a screw tie. The difference is that the rod is attached to the drilled flat part of the part. The screed has 2 holes:
- For a rod that is screwed into a panel.
- For a screw with a conical socket at one end and a thread at the other.
The disadvantage of this assembly method is the small stroke of the screed. Also, the tension screw is made of silumin, so it has a limited number of assemblies and disassemblies and a short operating time.
To re-install the structure, it is necessary to change this fastening element.
For table top
For furniture that consists of several collapsible elements, a “tabletop screed” is needed. To install it, you need to use a Forstner drill to make one recess in each part. Between them you need to make a groove for a clamp (threaded pin). A static part with a C-shaped washer is placed in one of the holes. After this, a nut with a curved plate is tightened on the opposite side of the groove, like at the other end of a clamp. Most often, this assembly method is used to tie together a furniture table. There is also an option using a part in the form of a washer (instead of a C-shaped one), which is attached on one side, and on the other - a bolt with a wide head.
Types of accessories for upholstered furniture, functionality and characteristics
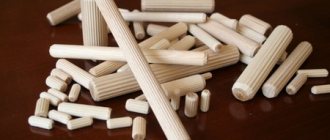
Furniture dowel
A dowel is used for furniture ties. It is used to center and stabilize parts. Also, such fasteners reduce the lateral load on other connecting elements. Furniture dowels are most often made of wood; iron and plastic are less commonly used. This fastening method is used in combination with confirmat or other types of connection.
The most common dowel model measures 30 mm in length and 8 mm in diameter. On the surface of this part there is a grooved notch, which increases the adhesion strength. The furniture dowel is mounted into drilled holes, which can be pre-filled with glue for greater stability. The disadvantage of this type of fastening is that over time the wood and the sealant will dry out, so the structure will begin to wobble.