All about solid wood facades.
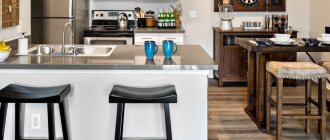
Despite the high cost, solid wood kitchen fronts are in constant demand. Indeed, in addition to the fact that facades made of natural wood look noble and respectable, they bring an atmosphere of comfort and warmth to the kitchen interior. Wooden kitchens, as classics of the genre, will always be relevant regardless of changing fashion trends.
solid wood kitchens
Facade design.
Many people want to purchase a kitchen with facades made of natural wood. But before choosing solid wood facades , it is worth determining that wooden facades can be made from solid wood, or can be lined with veneer.
Solid wood can be solid or stacked (joined) - these are fairly thick bars from 2 cm, which are connected to each other in certain ways to obtain a wooden product, for example, a facade or a tabletop.
Veneer is a thin plate of natural wood (0.3 - 10 mm), removed from solid wood by planing, sawing, peeling or chipping. As a result, the veneer completely preserves the unique texture of the wood. Veneer is usually used to cover inexpensive materials such as chipboard or MDF. On the finished façade it is almost impossible to distinguish whether it is wood or veneer due to the lack of raw ends where you can see the structure of the material. And in terms of price, facades lined with veneer are noticeably inferior to facades made entirely of solid wood.
solid wood and veneer
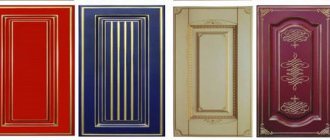
There are two design options for kitchen wooden facades: panel (solid) facades and frame-paneled, assembled from several individual elements.
The paneled facade made of solid wood consists of a wooden frame - frame and panel, internal filling of the frame. The thickness of the frame and the insert differ, the trim is usually 18mm thick, and the panel is no more than 10mm thick. The frame in such facades is always made of solid wood, and the panel is most often a veneered MDF or chipboard. Making panels from solid wood is very rare, as this increases the cost of the façade and makes it heavier.
A solid solid wood façade is also extremely rare. It is made from a solid wooden board, or by gluing wooden planks together. On such a façade it is possible to apply milling, the so-called “false panel”. In addition to the fact that such facades are very expensive, they are also very demanding to maintain and use.
paneled and solid facades
Wood for facades.
To produce kitchen facades from solid wood, more than 40 species of trees, both coniferous and deciduous, are used, among which a distinction is made between soft and hard wood.
Soft types of wood require more delicate handling, these include: spruce, pine, cedar, cherry, birch, chestnut, poplar. In the production of kitchen facades, hardwood species are still more often used, since they are more resistant to high humidity and temperature changes. Trees with hard wood for facades : beech, oak, ash, maple, birch, apple, walnut, acacia, as well as exotic species of wenge, zebrawood, merbau, mahogany, ebony.
wood for kitchen facades
Technology for manufacturing facades from solid wood.
Making facades from solid wood is a rather complex process and requires some time. At the first stage, blanks for future furniture panels from which facades will be made are dried in a special chamber. In this case, an optimal wood moisture content of 7 - 10% is achieved. Then, furniture panels are made from the prepared material using their own technology, removing defective areas such as knots or cracks. Furniture panels are impregnated with special antiseptic compounds. From the finished furniture board, blanks are cut for panels and strapping, in other words, frames. Then they are profiled, milled and the finished elements are assembled. A panel, lattice, glass or stained glass is inserted into the grooves of the inner perimeter of the frame and fastened together. To make it silky and absolutely smooth, the surface of the structure is sanded and then a paint coating is applied.
In kitchens in a classic style, solid wood facades decorated with milling, carving, gilding, and patina will look great.
solid wood kitchens in classic style
Wooden facades in Provence, country, loft or Scandinavian style are painted with opaque matte enamel. Also, the wood of facades can be brushed - artificially aged.
wooden facades covered with matte enamel
Wooden facades in kitchens in a modern style, as a rule, are devoid of various decorative elements; the decoration here is the uniqueness of the wood pattern, coated with transparent varnish.
wooden facades in kitchens in a modern style
Advantages of solid wood facades.
The main advantage of solid wood facades is, of course, their appearance, as well as the ability to decorate the kitchen, often in a classical style, with various decorative elements such as pilasters, balustrades, cornices. The material is environmentally friendly and safe. With proper care, wooden facades will last a very long time. In places of fastening, facades show high reliability and endurance.
Types of furniture paneled facades
Framing for panels can be made from various materials:
- chipboard;
- MDF;
- natural wood;
- aluminum
<
>
Chipboard frames are popular due to their low cost. Otherwise, they are not so ideal - they cannot boast of durability, they absorb moisture and odors.
MDF structures are the best combination of affordable cost and high quality. MDF frames are environmentally friendly, safe and resistant to negative external factors.
Frame furniture facades made of natural wood are more expensive, but are widely popular due to the ability to give furniture a noble look. As a rule, MDF covered with veneer - a thin layer of wood - is used as a panel in such products. In appearance and to the touch, such panels cannot be distinguished from solid facades made of solid wood.
Aluminum frames are characterized by increased wear resistance, hygiene and durability. In addition, they are perfect for modern interiors.
Production of paneled facades
We begin constructing the facades with vertical framing elements. We cut them to size according to the drawing.
For the panel we glue the shield from a piece of board without knots. In our case, we used a piece of well-dried board 50 mm thick. We run it through a thicknesser.
On the jointer we make one longitudinal edge perpendicular.
We cut lamellas (sections) for gluing the shield. Cutting width 20 mm.
A pencil mark helps in the future to orient the plots in pairs so that the fibers on the cross section go in opposite directions - such a shield will be more stable during changes in humidity.
Before gluing the lamellas, we fit them tightly to each other using a jointer with a planing thickness of no more than 0.1–0.2 mm.
We remove excess glue with a damp cloth, and level the shield on both sides by thicknessing. We bring the final thickness to 15–16 mm.
To assemble the façade, we use “framework” and “figurine” (paneled) cutters.
We set the stop on the bearing.
We mill the internal longitudinal edges of the future doors.
We place them on the cabinet, ensuring a future gap between the doors of 3–4 mm. We measure the length of the strapping crossbars along the inner edges of the grooves.
Cut the crossbars to size.
Without changing the position of the cutter and ruler, we mill.
We assemble the counter-profile in order - the flat part of the cutter, the bearing, the spacer washer, the figured part, the nut.
We again set the stop on the bearing.
We mill the ends of the strapping crossbars. We feed using a piece of wood.
We clean the workpieces with a sharp knife.
We assemble the facades without glue for fitting.
The presence of leaks in the connections indicates that the cutter is not fine-tuned enough. To avoid this, you need to more accurately select the thickness of the spacer washer individually for each cutter.
We measure the size of the future panel along the inner edges of the grooves of the trim.
Subtract 2 mm from each side. We cut the panel panels to the resulting size.
We install the figurine cutter.
We remove the material in stages, in 6–8 passes.
It is more convenient to sand curved areas before assembly.
A gap of 2 mm around the perimeter of the panel is needed to compensate for changes in its size due to changes in humidity. To prevent the panel from dangling, we put pieces of foamed polyethylene into the grooves.
We assemble the facades using glue, coating both the tenon and the groove.
We do not apply glue to the panel.
We tighten the facade with clamps, controlling the corners with a square.
After the glue has dried, we sand the ends.
Using a medium-sized moulding cutter, we remove the chamfer from the front part of the facade. To avoid scorching, we reduce the speed of the router.
Design of the style of paneled facades
Physical panel facades have been used since the Middle Ages and have not lost their former popularity.
Designers nowadays are guided by the experience of centuries-old foundations and offer panels suitable for a variety of style solutions:
- Gothic (peak popularity from the 11th - 12th to 15th - 16th centuries) - furniture in this extravagant design is characterized by pointed arches, multi-colored stained glass windows, wood carvings and unusual forged parts;
- Baroque is a luxurious style brought to Russia by Peter I. It is characterized by rich decoration of facades with stucco and carvings. The use of panels of original shapes is encouraged - with curls and spirals;
- classicism (XVIII-IXX centuries) - a balanced and correct style. The framed facades are made in two contrasting colors and are discreetly decorated with forged elements and marquetry.
Cabinet fronts made in modernist styles, for example, minimalism or hi-tech, are distinguished by clear lines and little decoration.
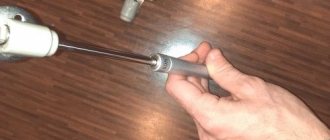
Making pens
We draw a pen randomly on thick paper. We cut out the template and apply it to the trimmed hardwood boards. We trace with a pencil.
Using a jigsaw or band saw, cut out the handle. Mark the center on one side of each handle and drill a hole with a 3 mm drill. Clean with P80 sandpaper.
We mill around the perimeter (except for the support heels) with a small molding cutter.
We sand with sandpaper P120, then P180.
Door panel: how to make and install
Structurally, doors are divided into two main types: panel and panel. With the first option, everything is clear - it is a frame with filler and cladding, forming a solid shield. But perhaps not everyone knows what a door panel is: this is the name given to the decorative elements that are inserted into the door frame.
They are able to turn a door into a real masterpiece of carpentry art. In addition, they can be placed not only on doors, but also used, as shown in the photo above, in the complex design of furniture and walls.
Using the video in this article, we will tell you how to make panels and assemble a door - this is a task for those who like to create useful and beautiful things with their own hands.
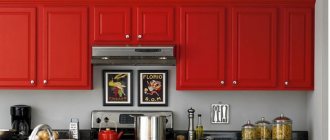
Wooden facades for kitchen furniture - an exclusive option
- this is the part of the set when choosing which compromises are inappropriate: the facades are always in sight. Properly chosen doors will help create a harmonious and comfortable kitchen space. If furniture restoration is planned, it usually concerns the facades. The photo below shows elements of wooden facades.
Solid natural wood is an expensive material. This affects the cost of the kitchen set. It should be noted that the price of facades made of this material constitutes the most significant part of furniture costs.
Wooden doors are used for luxury furniture. Manufacturers have learned to reduce their cost by using natural wood only for cladding. All wooden facades for the kitchen can be divided into several groups:
- paneled facades;
- veneered facades made of MDF and chipboard.
Combined wooden facades
If price matters to you, feel the warmth and comfort of natural wood with combined facades. Usually these are paneled furniture doors with a frame made of natural wood and a middle made of plywood (veneer can be used). They are inferior to the array in terms of their aesthetic and functional qualities, but their price is much lower.
The photo shows a design diagram of a veneered facade
Veneer is not so difficult to use. It is made from oak, birch, walnut and maple wood. Recently, manufacturers have begun making it from exotic materials. Veneer is made using fine-line technology from wenge, anegri, zebrawood. Restoring furniture using this material allows you to achieve new textures. This veneer does not look like ordinary wood.
In paneled facades, veneer is used for the middle and facing of the frame. However, it is not easy to wash it off. If you don't know what to do with your old kitchen, use fine-line veneer as finishing. It is suitable for solid and paneled facades.
Wooden facades with a base made of chipboard and MDF
If you choose veneer with an interesting texture for decoration, you can make inexpensive facades. They can be called wooden very conditionally; they have absorbed the characteristics of wood and fiber boards, but they look presentable. The photo shows a sample of a set with such facades.
Solid wood is the main material in the manufacture of kitchens in a classic style. It is also used in such design styles as country, Provence, art deco and ethno. The advantages of solid wood facades include:
- durability;
- aesthetics;
- originality;
- environmental safety.
Natural wood gives room for the imagination of home craftsmen to fly. Ideas can be seen in many photos. Wooden doors can be easily decorated with your own hands. This requires interesting ideas and various varnishes, stains and enamels. The price of the updated headset will depend on the selected materials.
There are a number of materials that allow you to create interesting coatings. These are special furniture effects, when applied, cobwebs are drawn on the wood or cracks appear, imitating aged surfaces. Moreover, such facades can be washed.
But solid wood cannot be called a universal material. Its disadvantages include:
- high price;
- special care requirements (abrasive substances cannot be used);
- tendency to mechanical damage;
- low resistance to ultraviolet radiation (furniture can fade in the sun).
But still, the main disadvantage can be considered the high cost of the material. Restoration will help solve the remaining problems. We will tell you later how to make it yourself. You will find current ideas for use in several photos in our article.
Features of a panel door
Before understanding how to make panels, you need to understand what such a door is. As you already understood, this is an insert with which you can give the door leaf an attractive appearance.
The structure of the canvas is not simple, and the panels, especially wooden ones, can have a rather complex architectural form: milling, carving.
The design of such a door can be considered framed, since it consists of a frame that forms a contour frame, mullions (transverse crossbars), and panel liners that fill the cells. The more mullions, and therefore liners, on the door, the more interesting it looks, the higher its strength, and, accordingly, the price.
Fabric structure
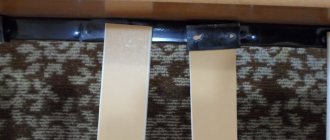
The web binding consists of bars: the lower part, that is, the empty part, can be thicker and consist of several composite parts. This is necessary in order to attach the protective baseboard to it.
The panels are inserted into specially cut grooves on the strapping and intermediate beams. Well, if there are grooves, then there must be tongues: along the perimeter of the inserted elements they are - only here they are called figares.
- Today on sale you can see doors whose lining only imitates panels . Manufacturers or retailers may call them paneled, but in reality they are simply molded with a honeycomb filling. The buyer, to put it mildly, is being misled - and we think that our instructions will help you figure out what's what.
- Real panels should only be plug-in . They can have a fairly simple flat shape, smooth, or, conversely, a voluminous surface, which, in fact, has long become a classic in door manufacturing. In a more complex version, these are stacked liners, which are a layout of lamellas joined in a tongue-and-groove manner.
- In wooden panels, panels most often have a figurine design . That is, they are thicker in the middle, and thinner at the edges so that they can be inserted into the groove. The connection point is closed with a glazing bead (kalevka) or a decorative baguette.
In metal doors and products made from valuable types of wood, the panels are usually floating, but for a beginner it will be difficult to make this option. We'll talk about doors with figurine panels.
What is required for work
When making paneled doors, often interior doors, glass is often used as filling. But on solid wooden doors, which are placed in bathrooms or at the entrance to an apartment, the panels can be made of either solid wood, plywood or chipboard.
In inexpensive versions, the door frame, as well as the door frame, is made from laminated pine timber, but if the cost of the source material does not really matter to you, you can use oak, alder, or, for example, ash. In any case, if you want to get a reliable structure, its frame must be made of high strength material.
Material and tool
The size of the bars and slats depends on the size and design of the door, therefore, in order to calculate the amount of material, you should first make your own sketch, or use a ready-made drawing. Mark on it the dimensions of the canvas along with the box, as well as the size of each part - this will make your work much easier.
- We will not talk in detail about the door frame now, since the topic of this article is paneled fabric. So, if you go by existing standards, then for tying the fabric you need a beam 55 mm thick, and for mullions 45 mm. Their width can vary depending on the door design, especially since the middles can generally be curved - therefore, it is impossible to give any recommendations here.
- You need to calculate the width of the bars without layouts, but taking into account the grooves - the shaped profile framing the panel. The bars are knitted together with a double spike, and if you haven’t encountered this before, watch a video from professionals. Connections are made using glue or additionally secured with dowels.
- With the thickness of the strapping beam being 55 mm, the thickness of the panels made from solid wood or laminated wood panels, which you see in the picture above, should be within 22-23 mm. If it is plywood or chipboard, you can use sheets 18 mm thick. Next, you should stock up on the necessary fittings for the door, small carpentry nails and transparent wood glue, for example: Moment Joiner.
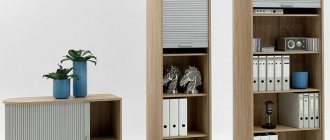
Types of internal filling of a frame facade
Depending on the shape, panel inserts can be:
- flat - they are completely smooth panels without any protrusions or overlays;
- volumetric - with the presence of figured protrusions or carved adjustments;
- typesetting - consist of individual lamellas that are connected to each other;
- figarean - with a convex central part, gradually turning into much thinner edges;
- floating - with inserts of the same thickness as the frame.
Floating panels are considered an excellent option for rooms where humidity almost always changes, for example, a kitchen or bathroom - they do not cause distortions and cracks in the facade when the size of the inserts changes under the influence of unsaturated air.
Depending on the material, the panels can be:
- from MDF covered with laminate or chipboard;
- real wood;
- veneered MDF;
- glass;
- plywood.
The insert usually has not only a square and quadrangular shape. In individual artistic projects for furniture sets, there are also round, oval, trapezoidal and even polygonal panels.
The frame front of the cabinet looks great on its own, but it is often further decorated with:
- carved and forged components - decorative overlays made of metal and wood;
- triplex - laminated glass with a wide variety of effects;
- stained glass - patterns on translucent surfaces.
The panels made from pieces of various materials look original.
The nuances of making a door
So, we will assume that you have developed a sketch, stored tools and materials, manufactured and installed the door frame. What's next?
Before you start producing panels, you need not only to make the parts of the door leaf, but also to assemble part of the frame. To do this, connect one vertical post with two horizontal frame parts: a sill profile and a frame (the upper element of the frame).
- Despite the fact that you have a drawing with dimensions, you need to measure the centerpieces and future panels after the fact, since it may well turn out that there are some deviations. This is especially true for models where the horizontal strapping bars have a curved shape. First, a centerpiece is installed on the frame: tenons are cut on the block on one side, it is tried on, and then the second end is processed according to the pencil mark.
- Depending on the structure of the door, the crossbars are inserted with tenons into the grooves of the strapping parts. If there are 6-8 panels on the door, then there will be several middle panels. The length of the horizontal elements usually corresponds to the width of the canvas. At the same time, the vertical mullions turn out to be short, and their height is equal to the distance between the horizontal elements.
The manufacture and installation of mullions is carried out in the following order: first the long parts, and then, after measuring and fitting, the short ones. Only after all the middles are in their places can the second vertical stand be mounted on the frame. Now the frame is completely assembled, and you can start making panels.
Panels
So, in front of you, leaning against the wall, is the frame of the door leaf - now you need to take the dimensions of the future panels. This is best done using pieces of slats, which, if there are several identical panels on the door, will later play the role of a template.
When measuring, it is necessary to take into account the temperature gap so that when the wood expands, the panels do not rest against the frame and the posts do not tear off the tenon.
Note! The template strip inserted into the cells of the panel should move freely left and right, but not fly out of the groove. The difference in its length and the distance between the bottoms of the opposite grooves should be approximately 6-8 mm.
- Now, using the slats, you need to make another template - this time for the panel itself. This especially facilitates the marking process when curved cuts have to be made on the tree. The template is cut out of thin plywood, hardboard, or hard fiberboard, tried on a cell, and only then they begin to make blanks for the panels.
- It helps you avoid numerous measurements, as well as avoid mistakes when cutting material - including tolerances for thermal expansion. Having cut the workpiece to size, you can start cutting the figarea field - for this you need special attachments for the router. They are different, so the processed ends of the panel may differ in configuration.
When milling them, the volumetric part of the workpiece is removed, and along the edges thin ridges (figareas) are obtained, which, when installed on the frame, are inserted into the grooves of the strapping beam. If there are uneven spots in some places, they are removed with a grinder.
Era of frame furniture
In the first case - historically also earlier - the board enclosing the body of the product (chest, cabinet, shelf, etc.) were hung in one way or another on the corner posts and the horizontal bars connecting them, covering them (Fig. a-c). It was mainly the enclosing elements - boards, wood slabs - that ensured the rigidity of the entire structure. In the second case (Fig. d), the fencing was inserted into the cells of the timber frame, like into frames, so the frame became an important expressive component of the appearance of the product, and at the same time it was primarily responsible for the rigidity of the entire structure. Something similar to products of the frame-mounted type was already in Ancient Rome (cabinets, chests). The load-bearing elements of the frame (posts and horizontal beams) served as a connecting link for the corner or frontal connection of the walls, assembled from boards onto a tenon, dowel, etc. The same role was assigned to the bars of the door frame and the lid of the chest. Often the frame parts were given a cross-section that was increased in comparison with the thickness of the enclosing ones. In this case, the result was something similar to a paneled structure. However, there were no real panels here: they have no other purpose than fencing (often a panel as a part performs a non-specific and not obligatory structural function, being used as an additional means to prevent axial distortion of the frame itself in which it is mounted). The boards inserted into the frame themselves served as elements of the supporting structure of the body, ensuring its rigidity greater than the frame parts. Real paneling appears only in medieval Europe, during the Gothic era (XII-XV centuries). It caused an economic revolution in furniture production, completely changing the “face” of products. The bulky, clumsy, “clumsy” furniture of the early Middle Ages is being replaced by works of high artistic and technological quality.
| Elements of a frame-hinged structure: a) - overhead version; b), c) - inset version d) - Element of frame-panel construction |
At first, craftsmen learned to saw fairly thin boards (up to 12-15 mm). Shields were assembled from them in quarters or end-to-end, held together on the back side by transverse bars or on the outside by strips of wrought iron. With the invention of a mechanical sawmill based on a water mill (1322, Augsburg, Germany), the thickness of the planks decreased to 8-10 mm, becoming, in fact, plywood. In the production of cabinet furniture, the frame-panel type design has finally taken hold. Now the panel was only inserted into the frame, held in it from the back side by wooden wedges, and later by small cross-section slats (headers). All this turned out to be feasible thanks to the large, two-fold or more, difference in thickness between the panel and the bars of the frame and frames. It became possible to perform more extensive profiling of the parts of the frame itself, as well as figure-carved processing of even their inner edges. In the Gothic era, with its still very flat decorative relief, in particular applied (often a slotted ornament or pattern from a board no more than 8-12 mm thick was applied not only to the face of the panel, but also to the surface of the frame parts and door frames), frame-paneled Usually all structural elements, including the side and rear facades, received a solution. Subsequently, with the advent of imported valuable wood at the disposal of carpenters and cabinetmakers, the parts of the supporting structure and panels are given complex sculptural and architectural forms, in particular in the form of a fig-rei, that is, an overlaid relief-carved slab of smaller dimensions than the “Prosvet” door frame. The height of the relief carving increases: for bas-relief - up to 10 mm from the “background” plane, for high relief - up to 60 mm or more. The difference in thickness between the frame beams and the panels sometimes decreases or almost disappears. Often the overall thickness of the panels together with the high relief (and it sometimes approaches a round sculpture) exceeds the thickness of the parts of the supporting structure. This is typical for the Renaissance (XV-XVI centuries) and especially for the Baroque (XVII - first half of the XVIII centuries). The “frame” design loses its expressiveness and visual clarity. The products become similar to frame-mounted or even box-panel, only densely covered with carvings. In addition, the facade and sides of cabinet products, including doors and front walls of drawers, are often given a curved shape in vertical and/or horizontal projection. The designer and consumer are no longer interested in the architectural work of the structure, but in the spectacular silhouette of the object. At the same time, thanks to the improvement of methods for joining joiner boards and increasing their fracture strength, the design of the body (for a cabinet, sideboard, chest of drawers, etc.) of a box type, with a frameless solution - the assembly of boards on a tenon, was widely spread across the surface. However, on the front facade of the products, the end parts of the side walls are still interpreted as vertical load-bearing posts, for which architectural (half-columns, pilasters, etc.) or sculptural overlay decor is used. In the era of classicism (the second half of the 18th-19th centuries), they abandoned the total “fluidity” and structural vagueness of rococo forms. The construction of products returns to the Renaissance clarity of the interaction of load-bearing and supported elements. The frame structure regains its vivid expression, at least on the front façade of the product. We especially note that the design, which does not require adjustment of the planes of the mating parts to form a single “Continuous” surface (as was typical for cabinets, chests of drawers and other furniture during the Baroque period), makes it easier for the craftsman to take care of the high quality of workmanship and the cleanliness of the item. . We can say that the style of classicism turned out to be appropriate during the period that began in the second half of the 18th century. mechanization of furniture production. The appearance of plywood after the invention of the peeling machine in 1819 (Russia) also contributed to strengthening the position of the frame-panel structure. But at the end of the 19th century. and the first decade of the 20th century. further changes were brought by a new style, called “modern” in Russia, “Secession style” in Austria-Hungary, “Jugendstil” in Germany, “Art Nouveau” in France, and “floreal style” in England. The frame structure again loses its expressiveness and is used for cabinets only occasionally. In addition, overlay doors are often used, hiding the structural features of the product, while until now, with the exception of the Rococo period (very short, like the Art Nouveau period), they were most often inset. True, one should remember the duality of the Art Nouveau style, in which two antagonistic directions developed: unrestrainedly decorative and ascetically rational. It was within the framework of the second that constructivism and functionalism grew in architecture and design of the 20-50s of the 20th century. Their ideological principles formed the basis of the so-called technical aesthetics in the 50s.